A Couple of Finishes and a WIP

scarves.jpg

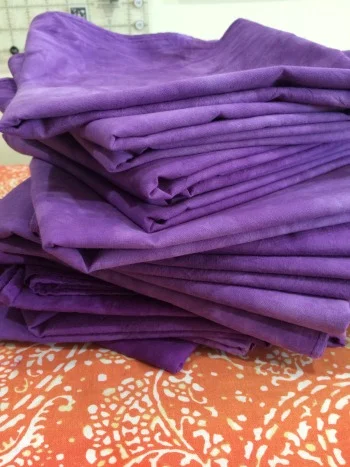
Yep, got those purple scarves done. The ones on the bottom are those I had leftover from the summer events. And yes, they are darker. I must have used a slightly different concentration for this newest batch. Which tends to happen when you don't write things down. Which is the beauty of handmade--the individual uniqueness. Which I'm going to say is my reason rather than just "I didn't bother to take the time to write the darn proportions down."

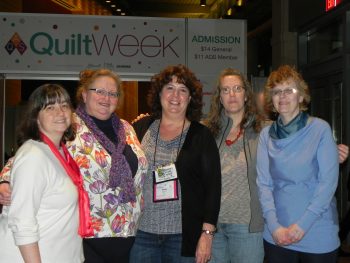
These will be gifts to women I meet on my trip. I have 25 altogether--no idea how many women I'll actually be meeting.

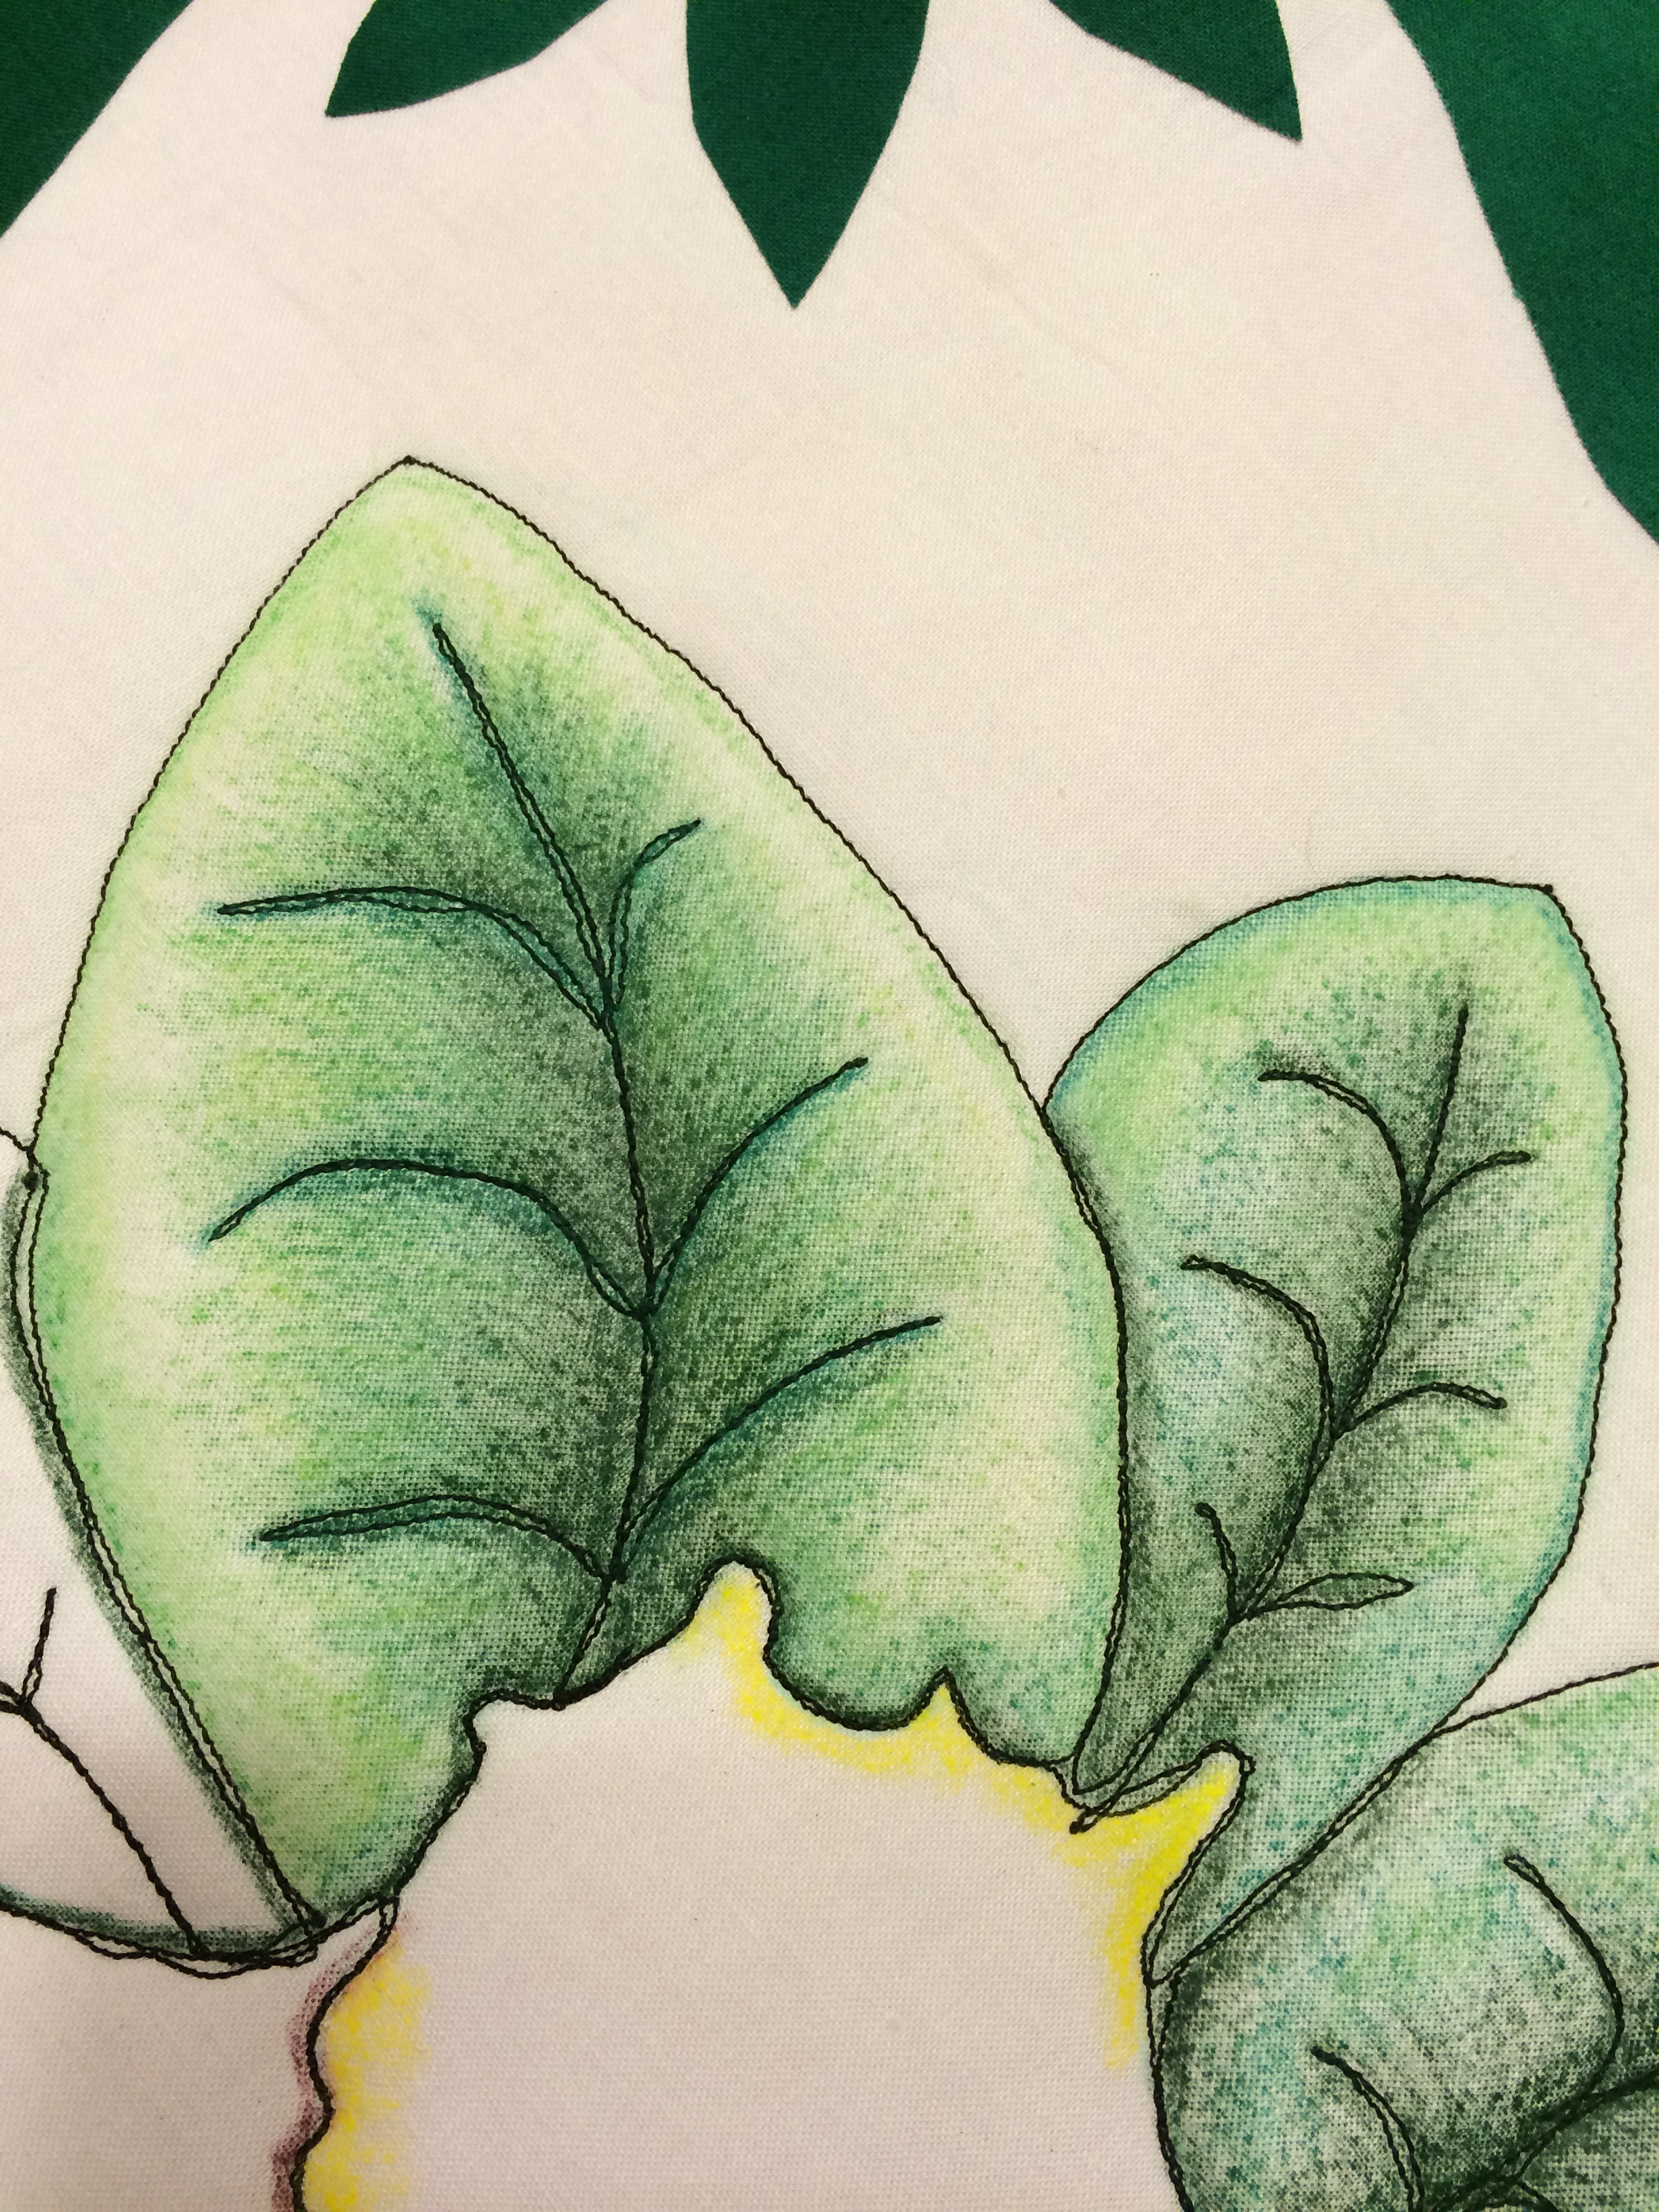
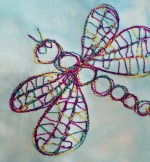
I'd also mentioned on somewhere along the way that I made a last-minute decision to make something for a special visit I'm hoping to make. This will be for the man who in the 1990s invited my father to work with him on peace-making. I thought a peace dove would be a suitable recognition of their shared work and token of my great appreciation for him and all he's done. 

It's roughly 9" square. Commercial fabric for the dove, my hand-dye for background, backing, and binding--all the same piece. The dove is fused to the background, and I did a hand blanket-stitch around the outside with a variegated perle cotton (I don't recall where I got it--I think from a vendor at Lancaster). Even though I've done blanket-stitches a whole lot, I had difficulty keeping my stitch even because I'm too used to doing it on felted wool, not fabric, and I was struggling to hold the piece comfortably in my hand. For some reason it was all kinds of awkward. But overall it looks okay.

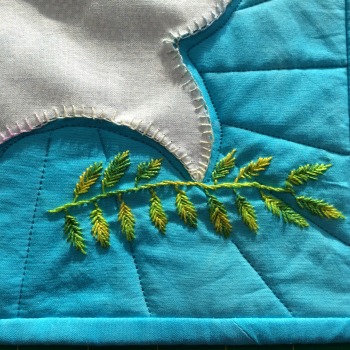
I then hand-embroidered the olive branch with a variegated hand-dyed perle cotton from Artfabrik. Love those perle cottons--very tasty.

As opposed to the blanket stitch, I'm really pleased with the way the olive branch turned out. First time ever doing a stem stitch, first time ever doing a herringbone stitch for the leaves. It looks a little more pine-y than olive-y but hey, you know what it's supposed to be so it's all good. 

It's possible I should've done the quilting first and then done the olive branch. Oh well.

I really enjoyed doing hand embroidery. I may do more free-form embroidery of my own designs in 2015. And yep, I've already got Craftsy classes on my wish list to help me out with that! BTW, I also talked about this on my last podcast episode and mentioned the book I used as reference. Oh, and yes, I did remember to put a label on the back of this too. Cookin' with gas.

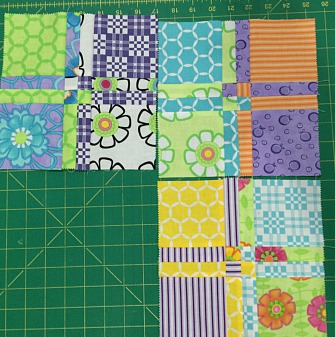
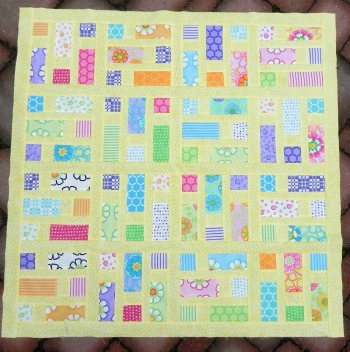
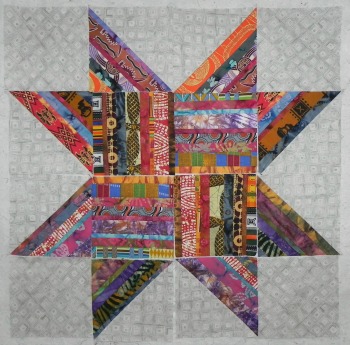
And then, also on a whim but with far less purpose than the dove... Remember that Jenny Doan trunk show I went to? Ever since, I've been jonesing to dig into my pre-cut stash and whip something up. Last weekend, when I'd gotten all my scarves pressed and done as much work on the dove as I felt up to doing that day, I pulled out a charm pack, consulted a Missouri Star Quilt Company tutorial, and started cutting.

Introducing: My Disappearing 4-Patch Work in Progress As-Yet-To-Be-Named

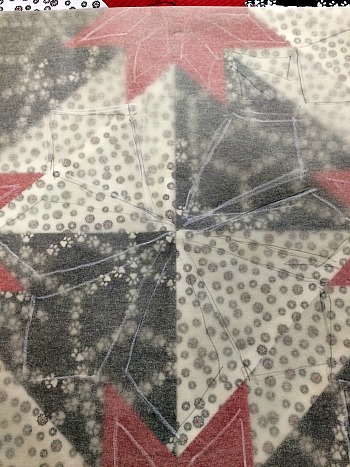
I'm hoping to get the blocks done before I leave; I'll not worry about getting it put together into a top until I'm back. I only had one charm pack of this fabric (Good Morning by Moda, an older collection) so it'll be a baby-sized quilt. At the moment, this quilt has no purpose--no one in mind. I don't think I'll donate it, though. I'm starting to realize it may be helpful for me to have a certain number of finished quilts on hand for those last-minute gifts (illness, shower gifts, etc.). And, if truth be told, every other time I've started a quilt without a designated recipient, it seems the designated recipient appears before the quilt is done anyway. So who knows?

Here's the tutorial!


Craftsy Class Review: Dot-to-Dot Quilting with Angela Walters

Online Quilting Class

So this one had been in my wish list for a few days, and I had no intention of purchasing it until I'd knocked a few other quilting classes out of my queue. And then I realized I had a UFO I really needed to finish before the end of November. And then I realized it was quite possible that this class would have the perfect solution to my "How to quilt this thing" dilemma. And then it went on sale. So I bit.

Here is my review of Dot-to-Dot Quilting with Angela Walters.

 I'll start by saying Angela Walters is an excellent teacher and very easy to watch. Her classes are much like her books (which I have reviewed before)--step-by-step, clear instructions, with good diagrams as well as her demonstrations. 

Using Golden Threads quilting paper to test out my design plan.

Using Golden Threads quilting paper to test out my design plan.

Here's one caveat: If you've never machine quilted before, you should consult other resources or classes first. This is a class about quilt designs: She doesn't talk about making your quilt sandwich, basting, or stabilizing the quilt. She assumes you are already at least that far in your experience. Indeed, I was wondering for several lessons whether she did any stabilizing (stitch-in-the-ditch) at all and finally found reference to it in the discussion threads on the side. As I watched the next lesson, I could finally see some evidence of stabilizing stitching.

Closer view of my quilt design sketch, marking what points I'd be using as my "dots". I then free-handed the actual quilting.

Closer view of my quilt design sketch, marking what points I'd be using as my "dots". I then free-handed the actual quilting.

That being said, once you know how to prep your quilt for quilting and are ready to start doing some designs, this would be a good starting point. These designs are very simple, but have lots of possibilities for making them more complex. They're good no-mark designs, but if you're more comfortable marking, there are some very fast and easy ways to do that. On the other hand, most of the designs she shows in this class involve straight lines, which can be remarkably difficult to do with a free motion foot. (Although you can use a walking foot if you want, that requires a lot of twisting and turning of the quilt so it's far simpler to become competent at doing straight lines free-motion.) 

I was able to immediately put the class techniques to use on a wallhanging/baby quilt I'm trying to finish for my great-niece's first birthday at the end of the month. I made it a long time ago and it's languished from inattention but then, I always work better to a deadline. I'd been waffling on how to quilt it but found the dot-to-dot technique the perfect solution. 

Quilted--you can see the chalk lines and stitching on the black but the thread blends on the white and red.

Quilted--you can see the chalk lines and stitching on the black but the thread blends on the white and red.

The pictures embedded in this post show my testing process as I tried to figure out what design would work well on this top--I sketched it out on Golden Threads quilting paper first (the most sheer paper I had in my cabinet), but I didn't use the paper when I did my quilting. I just wanted to see how my design thoughts would help those black and white background squares feel like a single block. For the first few blocks, I did sketch out in chalk on the black fabric where my lines should be and based on that, was able to then keep track through the whole block of where I was headed. By the end of it, I no longer had to sketch anything out; I'd gotten into a rhythm of knowing where to aim next. (The last picture is quilted--you can see the chalk lines on that block, but you can't really see the thread in the white or red.)

My need to continue practicing free-motioning straight lines aside, this was a great way to figure out a nice quilting design quickly, and execute it almost as quickly. I'm glad I bought this class!

The Basics

  • 9 lessons, ranging from 3 minutes (the intro lesson) to 10 1/2 minutes. Although the lessons are quite short, she gives good information in a very concise manner. I still felt like I'd gotten my money's worth from this class.
  • The lessons include quilting starbursts, starburst variations, diamonds, diamond variations, lattices, lattice variations, and borders. The final lesson is a gallery that shows all of the designs used in a variety of ways. 
  • The class materials include the pattern for a quilt if you'd like to use that to do the class project; it then includes diagrams of all the designs she shows in class, and three examples of how the designs could be used in the class project quilt.

Again, I do recommend Dot-to-Dot Quilting with Angela Walters. It really helped me in figuring out possible quilt designs more easily. And now I've got a UFO nearly complete!

(Using Craftsy links in this post help support this podcast and blog. Thank you!)


Some promised pictures of pretty fibers

How was that for alliteration?

I'd talked in a recent podcast episode about the fibers I'd bought at the Fibre Garden in Jordan Village, Ontario (Canada). I'd said then that I'd post pictures...and then I got distracted by, oh, you know, work and life and such. 

So, belatedly but nonetheless still pretty...

Two bags of pulled sari silk*--one group is called "Paint Box" and the other is "Warm Tones." I can't wait to play with these. I'm not good enough at spinning yet to be able to spin slippery and shorter fibers, so I will be using these as embellishments somehow. (Oops--just realized one of the bags was upside down when I took the picture. Sorry if I'm messing with your perspective, there!)

The long tube of dyed roving is named "Sorbet." I'm not normally a pastelly-kind of girl but this one grabbed me for some reason. I imagine it'll spin beautifully.


I have already started spinning the other tube of dyed roving that I bought. I was anxious to test out the new, slightly heavier top-whorl spindle I bought at the shop. The new spindle does work better with the thickness of yarn I'm able to spin at this stage. The more I practice, the thinner yarn I can manage. For now, though, my yarn is still thick enough that it needs a spindle that'll stand up to it. 

This spindle also has a notch carved into the side of the whorl which has been tremendously helpful in holding the yarn in place as I'm spinning. (I tried to carve a notch into one of my other spindles but couldn't make a dent in the darn thing.) This spindle is also able to be used either as top or bottom whorl, which may come in handy, although I've not tried to use it as a bottom whorl yet so I don't know how well it works that way.

And that's it! Not a big quantity of stuff, but the roving allows for plenty of spinning play time so I'm definitely getting a lot of bang for my buck!

*If you've not heard of it before: "sari silk" is recycled silk fibers from old saris. They're all the rage now in the fiber arts world because they're just so darn yummy! I think this link will take you to some Google images of saris, and this link should take you to images of recycled sari silk fibers.

Weekend Progress

Sorry about completely blowing off my Fight the Funk Friday post. I was fighting the funk in many other ways! Thursday through Saturday were a mite busy in these parts and I just wasn't on my computer much. 

I actually touched my sewing machine for awhile on Sunday afternoon. I could've spent more time sewing this weekend but my BBW project is one of those that just needs time. As I'm working on one step, my mind is brewing possibilities for the next step. I'm pleased with where it's at but I needed another brief pause before I make final decisions about the last part I need to do. No pics until final reveal, though--the individual parts don't make much sense without the whole. And the backstory. So wait until next Sunday!

Meanwhile, I made pasta.​

I've been anxious to work on whole wheat pasta. I've tried eating whole wheat pasta a few times (dried, boxed, from a grocery store) and just couldn't get into it. Not so much a flavor thing as a texture thing. Too chewy or something. It just didn't jazz me enough to bother. 

But when I decided I wanted to learn how to make pasta myself, my primary goal was to make whole wheat pasta to see if I liked it any better than the boxed stuff.

And oh, I do.

This was definitely a success. I'll be making a lot more.


And, subsequently...dinner.

Whole wheat pasta with a quick sauce made of diced onions, garlic, diced tomatoes, diced roasted red pepper, Italian seasoning, leftover rosemary garlic chicken (Saturday night's dinner that's going to be a Craftsy class review as soon as I have a few minutes to really pull it together), and fresh shredded Parmesan. 

Very, very tasty. And pretty dang healthy, all in. Absent the Parmesan. (There's not as much pasta on that plate as it looks--I'd spread it out bowl fashion and put the sauce in the middle.)

So, of course, we have to figure out dessert.  

Yes, Virginia, there IS chocolate pasta. 

I know it may sound odd. When I bought the book Artisan Pasta and flipped it open to have my very first peek at the inside, it fell open to the chocolate pasta recipe. "How very weird," I thought, intrigued and a bit horrified at the same time. But it had to be tried. 

Mind you, this chocolate pasta isn't sweetened at all; you just add some unsweetened Dutch Process cocoa and a dash of cinnamon to your pasta flour. It's just about the prettiest pasta I've ever seen.

Look at that, all creamy brown ribbons. Gorgeous.


My first experiment for dessert tonight: I boiled the pasta (then drained and cooled it) and melted some Nutella with a dash of Canola oil to make it a little more of a syrup. Then I sliced up some strawberries into the pasta, drizzled the Nutella over the top, added a spoonful of Cool Whip Lite (had to save calories somewhere!) and sprinkled just a few chopped hazelnuts over the top.

I was shooting for a good balance of bitter, tart, sweet, and crunchy--and I did achieve that, at least--it wasn't too bad, but I don't think it let the chocolate pasta really shine. I'm intrigued by some ideas I saw online for using it Mexican-inspired preparations. After all, cocoa is an ingredient in molé so why not? This begs more experimentation. I've appointed fellow-twilter-foodie @HQSuz as my research assistant on this one.


On a day filled with pasta, it was a darn good thing I still managed to get in my canal walk despite threatening skies. No rain, though. I took my good camera along to play with some new filters I'd bought for it. No really exciting pictures, although you can see things are still pretty lush and green around here. While I walked I was pondering some hand-dyes to capture all those lovely variations on green. I'm starting to see some reds and yellows develop, though--just a couple more weeks and these pictures will look very different!

And, for those of you in his fan club, I'll leave you with a picture of a very happy mid-walk dog.


July Craftsy Class Update

I'm writing this early and scheduling it to post since I'll be out of town for the last week of July, when I'd normally be posting this. So it's possible I'm under-reporting my completions, but I doubt it. My last couple of weeks in town before my travel are jam-packed so progress on Craftsy stuff will be limited.

Just as a note: This month I found myself consulting the Peter Reinhart classes (Artisan Breadmaking and Perfect Pizza at Home) several times for reference. The focaccia I've made for a couple of events, based on the recipe and techniques he covers in both of those classes has become an oft-requested item in my husband's family! But it just proved to me how much I love the fact that there's no time limit on these classes. Once you've got 'em, you've got 'em!

New Completions

(+3)

Classes in Progress

(2)

My thread art class project in progress

My thread art class project in progress

  • Thread Art with Lola Jenkins. Very close to done--and having an absolute ball with it! Can't wait to get home and have the time to finish this project.
  • Building Flavorful Soups with Peter Berley (see "Classes added..." below).

Classes added this month

(+4--with only a little twinge of guilt because most of them were on big sale, and I've already finished one and am working on the other.)

It's been in my wish list for a long time, and came on sale at the same time as I was feeling pretty good about having finished so many classes...and so, now I own

  • Building Flavorful Soups with Peter Berley. I've started watching this one but may not get around to trying any of the techniques or recipes until later in August when I'm looking forward to the crisper evenings of fall and pots of soup simmering on the stove. I do, however, have some Parmesan rinds set aside for a very tasty-sounding broth he covers early on in the class.

Another that's been on my wish list for awhile and came on sale mid-month at 50% off (so how could I resist?):

Okay, so this one was brand new to me, but I've been talking with my husband that I feel like we should be including more fish in our diets and that I'd like to take a class in cooking fish just to see if I couldn't expand my repertoire a bit. When this class came on sale--and I was feeling particularly over-tired and self-indulgent--I bit. (Pun intended, ar ar ar.)

  • Fire up the Fish with David Bonom. We'll see if he can convince me I like more types of fish than I think I do. This is definitely a summer class for me, though, since it's about grilling. Our grill season is pretty limited here in Western NY. I'm sure I'll be able to adapt some of the concepts to my its-too-dang-snowy-to-fire-up-the-grill rest of the year indoor cooking.

And another photography class and another 50% off sale. This class doesn't depend on having a DSLR--it's all about composition and telling stories. Since I was two days away from leaving for a work event at which I knew I'd be primarily responsible for taking photos we'd use in future publicity, I went ahead and bought it, started watching the lessons the same day, and finished it before I left. Again, here's the link for my full review.

Classes To Be Completed

Current count:  17 (+1. This month was tough to keep track of because I had a couple that were sort of "in and out" classes.)

Completed Classes (all topics)

Current count: 29 (+3) (And I've alphabetized them!)

(Usual transparency statement: This post contains affiliate links and I will be compensated if you make a purchase after clicking on my links. Thanks for supporting this podcast and blog!

WIP Wednesday--String Star

I think I've only managed to connect to Freshly Pieced's WIP Wednesday once, but I've finally managed to time it right this time!

Last weekend I finally got the borders on my string star quilt, started in a class with Ami Simms at the AQS quilt show in Lancaster, PA, back in April. I took the class mostly because I've always wanted to take a class with Ami Simms--she's a hoot. (I have an interview with her on my podcast too--great fun!)  I used a collection of African fabric fat quarters I'd been gathering over the years--I'd never figured out the best way to use them and decided this class was as good an experiment as any. I was very unsure how everything would turn out, but I'm quite pleased!

The background fabric is from my LQS--I like the cross-hatch design on it (sort of "thatch-y"), and the light gray sets off the fabrics really well without being the more jarring contrast of a plain white.

The biggest challenge on this was the African fabrics themselves. There was a lot of variation in thread count and weave. Some were very stiff, others were really stretchy. That border caused me some grief. Besides, mitering string pieced borders isn't fun--seams ending up in all sorts of wrong places. But it worked out better than I worried it would, so it's all good.

As of this writing I'm still pondering quilt designs. I think I'll have awhile to do that--I'm unlikely to get back to this until August when my work travel is over for a few weeks.

This has already been designated for a recipient, but I've really fallen in love with it. I do have enough of the fabrics and even enough cut borders left to do a second quilt for myself. I haven't decided if I'm up for that yet--I'm not a huge fan of doing the same thing twice. We'll see.

Here's my traditional "Dog with Quilt" shot. He was apparently quite pleased to be included. Smiley guy. But he kept his tennis ball nearby just in case I put the camera down.

And yes, I dragged my portable quilt hanger out of the pool for the photo op. Because I'm just that kind of Mom.

Be sure to check out all the other WIP Wednesday bloggers at Freshly Pieced!

Flimsy Finish Finished Further

You may recall an earlier version of this sans borders from a post last week or thereabouts.

I decided to give it borders as I wanted it somewhat bigger. A search at an LQS turned up one of the fabrics that was in the original charm pack. I'd wanted a funky happy floral border but couldn't find one that worked. I wasn't thrilled with the border fabric until I got home and was able to find a good inner border fabric in my stash that set everything off nicely. I'd still have preferred a floral, but this works. At the moment, I'm just calling it "Good Morning," which is terribly uncreative as that's the name of the fabric line of the charm pack. But, like the border, it works.

I had to piece my backing--never my fave task--because I didn't have quite enough of any one fabric. I'll do a picture of that when it's finished.

It's all basted and ready for me to quilt. I may not get to that before I skip town for work in a couple of days...we'll see...

BTW, I'd be remiss if I didn't mention Craftsy is having a big summer sale from Thursday 6/5 through Monday, 6/9--all online classes are up to 50% off. I may have to move one from my wish list to my "to be completed" list! Gotta love half off!

**This post contains affiliate links and I will be compensated if you make a purchase after clicking on my links.

May Craftsy Class Update

Ahem.

Ain't he cute? A little whonky, but cute!

Ain't he cute? A little whonky, but cute!

I'm still working on Ann Petersen's Beyond Basic Machine Quilting. At least I've made a lot of progress on it, finally! I debated going ahead and posting my review even though I'm not actually done with it yet, but I've decided to stay honest and wait until I'm really completely done--or, at least, whatever I've determined will define "done" on this project. I probably won't get it finished this week due to some travel but next week looks good.

A quick reminder here: I'm doing these posts to meet one of my 2014 Quilty Resolutions. Are you still working on yours? I'll be doing a quarterly check-in and giveaway at the end of June, so check your list and get ready to 'fess up...I mean...report in on your own progress!

New Completions

Online Quilting Classes

Nada. But progress!

Classes in Progress

Current count: 2

  • Beyond Basic Machine Quilting with Ann Petersen.
  • Thread Art with Lola Jenkins. Well, in my head, anyway.
  • I might return to one of my cooking classes in the next couple of weeks: I have a couple I started but never finished. I just haven't had the time to do much cooking lately so those have languished a bit.

Classes added this month

None. The ones I'm working on are keeping me too busy to check out new ones!

Classes To Be Completed

Current count: 18 (no change)

Completed Classes (all topics)

Current count: 22 (no change)

(Usual transparency statement: This post contains affiliate links and I will be compensated if you make a purchase after clicking on my links. Thanks for supporting this podcast and blog!

A Finish and a Flimsy (or: A Flimsy Finish)

One of my last minute impulse retreat projects was "Building Blocks," a pattern by #twilter and listener Jackie of Sew Excited Quilts (@sewexcitedquilt). Her pattern is available on Craftsy.

I had bought it and printed it off a couple of months ago because when I saw her posting about it on her blog, I immediately thought it would make a great donation quilt. When I was packing for retreat last week, I stumbled across the print-out of the pattern and checked the fabric requirements: one charm pack and/or 36 5" squares, 1 1/4 yard fabric for background, plus backing and binding. I thought, "Why not? I've got me some charm packs!" (I talk more about the whole 5" square thing and why I didn't use my scrap squares in this week's podcast episode.)

Laying fabrics out to avoid having three of the same pattern appear in a single block, like they do above. (This got changed before sewing!)

Laying fabrics out to avoid having three of the same pattern appear in a single block, like they do above. (This got changed before sewing!)

It was a great impulse project! It only took me maybe three hours, all-in, to have the top cut and pieced, including what I finished up at home. At that, it probably only took me that long because I took my time piecing the blocks together on the top to try to make sure fabrics weren't crowding up together and such. If I'd been in get-er-done mode, it would've gone a lot faster.

The charm pack is "Good Morning," by Moda. Can't tell you what the background fabric was--it was from my stash. But I loved that sunny yellow with the charm pack. Good morning, indeed!

So here's the top complete.

It was a very foggy morning when I took this picture on my back patio so the colors are off. It's a little more saturated than this. Hopefully when I get it quilted and am ready for the full reveal I'll have a better picture.

Still n' all, won't this be a cute donation quilt for a baby? (It finishes up somewhere in the neighborhood of 42"x42".)

I may have to do another of these. Did I already say I got me some charm packs?

So the other finish this week was something that was also quite spur of the moment. In moving some fabrics around on my shelves I came across a Stonehenge panel and four coordinating fat quarters I'd bought maybe...ummm...four or five years ago? Every now and again I pick them up, look at them, think, "I should use these or give them away," realize I'm not quite ready to do either, and put them back on the shelf.

I'd done that again this week. Only this time, my daughter happened to wander into the sewing room, and she fell in love. As I was explaining the problem (four fat quarters not being quite enough fabric to actually do anything simple in terms of borders and such, and me not wanting to spend the time at the moment to get all creative on its little fabric butt), she said, "But the panel would be great to hang in a window like stained glass!"

Since she's game to do that in her dorm room next fall (senior year!), I pulled out my fusible 1/4" Steam a Seam and went to town.

So here's her new window dressing. This is simply the panel with the selvedges cut off either end, and the edges pressed to the back and fused down.

I love fusible.

The only little bit of sewing I did was on the ends of the hanging sleeve, although I could've fused that too, certainly. I just went into auto-mode and was sitting at my sewing machine before I even thought about it.

Here's a picture of the back--the fused edges (pressed 1/4" inch, then folded over another 1/4" to fused so it'd have a clean edge) and the hanging sleeve. The sleeve is made the way you often make sleeves, but I fused it to the back instead of sewing it because I didn't want any sewing showing up on the front. Depending on what kind of window she has, she should be able to slide a tension rod in there to hang it up. We'll see what happens.

The four fat quarters? Well, they'll either go into my stash or end up being a giveaway at some point. But at least now this is one less bunch of fabric sitting unused on my shelf mocking me!

Retreat Report with Pics!

To listen to my report on last weekend's guild retreat, check out the latest episode of my podcast. Meanwhile, here are a few pics! This isn't the complete photo-report as some projects will be photographed later.

So, for now, here are the blocks I finished on my jelly roll sampler, a project that's been in the works for a few years.

Jelly Roll Sampler block 10

Jelly Roll Sampler block 10

Jelly Roll Sampler block 11

Jelly Roll Sampler block 11

Jelly Roll Sampler block 12

Jelly Roll Sampler block 12

And, ta da, all 12 blocks together. Approximately three years of piecing. (Well, okay, three years of a couple of hours at a time on retreats.) As you can see, it's mostly a low-volume quilt although that dark burgundy fabric really jumps out in these pictures. It's not quite that stark in real life. I'm going to let these blocks brew on my shelf for a bit until I have time to get them to a quilt shop to find the perfect sashing/border fabric. 

Sorry, I really don't remember the name of the jelly roll. By 2011 when I started this it had already been on my shelf for awhile, and I may have inherited from my Mom. So who knows hold old the line is now?

Here's the (in)famous scrap bag/pin cushion retreat project. And yes, true to what I said in my podcast that my friend would be able to finish the second one off right-quick, she's already emailed me that it's done.


Here's the electric seam ripper I talked about on my blog--this was my friend's (I took the picture at retreat). I immediately came home and ordered one for myself. I've got it in hand now, although haven't had to rip a seam out with it yet!

And you know what else I figured out? I've been thinking about getting one of those seam rippers that has the big eraser-like knob on the end that helps you get the broken thread pieces out of the seam after you're done ripping it. Well, I discovered on retreat that the end of my Fons & Porter stiletto works the same way!

I just held it like an eraser, rubbed it across the threads in the seam lines, and they brushed right off. O, joy! I just saved myself $7 or whatever that other seam ripper costs. Let's not do the math with what I just spent on the electric seam ripper, though.

And here's a general photo gallery of shots from around the grounds. A couple are panoramic if they work well in this gallery setting. Also, I discovered I could mess with the panoramic feature on the phone, so there are a couple of photos that I've entitled "When Worlds Collide" and "The Edge of the Earth." See if you can figure out which they are.

Birthdays all around!

birthdaytreat.jpg

Happy birthday to Bubba Jr, @ltdermdvm's Golden who's turning 14 today! Sammy sends birthday greetings and had a piece of birthday Milkbone in his honor. (It's blurry because although he posed for me he was a bit impatient to get at that treat! Princess Doggie's hindquarters in the background show her wagging tail as she quickly downed her birthday Milkbone. She's highly suspicious of cameras as a rule--no posing for her.)

Meanwhile, it's Craftsy's birthday too! They're having a big sale this weekend, through Sunday, May 11th, ad midnight Mountain Time. The banner on the right sidebar will take you to the sale, or you can just click here. Selected classes are up to 50% off. Yeah, I'll probably be checking it out myself, sigh. (Usual transparency statement: using Craftsy links on this page helps support this blog and podcast. Thanks!)

And, what am I doing for Mother's Day? Also a birthday of sorts--after all, it's a couple of births that got me the name "mother," right? Well, the day itself is still a bit under construction. I'm waiting for the first-born to let us know what hours he's working so we can plan around him. Meanwhile, yesterday the second-born came home from college for the summer, and she brought her bad cold with her. She ignored my pleas to pack those cold germs in a box and leave them there. I'm just hoping that cold doesn't turn out to be her Mother's Day gift to me.

I'm still recovering from a couple of back-to-back busy weeks with work, but I'm awake enough today to be decently productive. I got groceries this morning. Woo. Better than I did last weekend!

icedye51014.jpg

I also got this in the works.

Indeed, it's about 70-something degrees outside and our lilacs are a few days away from blooming, and yet I'm still ice-dyeing. I can't help myself. This batch is using some color combos I've not done before, and the one in the center is my new Antique Gold dye, so I'm anxious to see how that plays with the ice--as well as how it works with the Old Rose dye I combined it with. The one in front is Fushchia, Grape, and Boysenberry, and the one in back is Teal, Intense Blue, and a little Black (629, I think, but might be 628, not sure which one I grabbed off the shelf). I've got some fat quarters in each as well as some clothing items. Should be a fun rinse-out in the morning!

Groceries. Check. Ice-dye prepped. Check. Chicken breasts in marinade for grilling tonight. Check. Shower. Check. Lunch. Check.

Hmmm. I think it's time for some Scrapitude binding!

April Craftsy Class Update (Delayed)

Since I was out of town sitting in meetings this past week while the calendar changed from April to May, I'm a few days late posting my monthly update on progress made in Craftsy classes. That actually fits. I haven't made much progress in Craftsy classes anyway, so not like I was rushing with huge reports or anything.

Online Quilting Class

To whit: I'm still working on Ann Petersen's Beyond Basic Machine Quilting. I've been trying for a few weeks now to piece together the background I'm going to use for the class project. I mean, really--one big center piece of fabric, slap on a couple of borders, one with cornerstones. I could have it whipped out in a couple of hours on a Saturday. I've just had problems finding a couple of hours when I was (1) not awash in other more urgent projects, (2) not busy doing other stuff, or (3) not sick or recovering from trips! Yiminies. April was a tough month. (May doesn't promise to be much better so my May Craftsy Class update might be equally slim.)

New Completions

  • I completed Carol Ann Waugh's Stupendous Stitching class in early April. See the blog post with my review and completed project here.
  • This was a quick turnaround one: One of the Craftsy emails this month advertised several new freebie classes available, and I bit. I picked up Creative Ways with Whole Grains with Anna Bullett, executive chef at Cooking Light, and finished watching it within two or three days, even cooked a whole grain for dinner one of those nights (though not using her recipe). I'll do a review in later blog post.

Classes in Progress

Current count: 2

  • Thread Art with Lola Jenkins--still in the "thinking about" stage, although I did buy some Prisma colored pencils with a 50% off coupon at Joanns last weekend to use on this project.
  • Beyond Basic Machine Quilting with Ann Petersen. 'Nuff said.

Classes added this month

1 freebie. But completed immediately (see Newly Finished section above).

Classes To Be Completed

Current count: 18

Completed Classes (all topics)

Current count: 22 (+2 from last month)

(Usual transparency statement: This post contains affiliate links and I will be compensated if you make a purchase after clicking on my links. Thanks for supporting this podcast and blog!)

Mad Quilt Scientist Finally Back in Action

I woke up feeling like I was in recovery mode, for some reason, and decided I wanted a pajama day today (Saturday). Since I don't worry too much whether I get dye on my pajamas, I headed to the basement as soon as I felt caffeinated enough. As it turns out, I had about a half hour of sorting and organizing to do since things had gotten a bit stacked up, and I had all sorts of new dye-playthings to pet and then put away. While I was sorting, I was pondering what I most wanted to do. Turns out, I really wanted to re-do Frieda Anderson's gradations again at home so that the color mixes would really sink into my brain and I could take better notes. I also chose not to work nearly so fast as we'd sped through them in class (and a whole lot cleaner!), so I only got one set of gradations done in just slightly less than the time it had taken us to do two in class.

gradation1WIP.jpg

You're seeing 12 fat quarters soaking in everything from Sun Yellow to Fuschia to Intense Blue (different names, but same colors that Frieda had us using for the first set of gradations.) After some internal debate, I decided to go Straight Frieda on this one and use her method of mixing colors and soaking in soda ash first, as opposed to Ann Johnston's method (different dye mix, soda ash comes later) which I've been using most often in the last year. This way I can do a more direct comparison with what I came home with from the class last week.

Okay, ummm... so it might just be possible that I used some of the remaining dye concentrate to, just maybe, do some more bamboo baby clothes for my great-niece. Babies do grow, you know. And that bamboo stuff is mighty cool. I wish I could have me some adult-sized hand-dyed bamboo onesies, donchaknow.

On the other hand, yep, I am also dyeing some stuff for myself--mostly experimenting for future dye projects for other people down the road.

So I cleaned out the icemaker in our freezer.

One of these bins contains more baby clothes, but one is something for me.

The one on the left is a dye combination I've used in the past that turned out kind of cool; I'm hoping for similar cool this time. The one on the right is three new-to-me dyes and one that I've had for awhile. Two of the new ones shouldn't be too much of a surprise, but I have no idea what the other one will do. And that's the fun of it! (The white patches you see are a few run-away ice cubes I dumped on the top after I'd already put the dye on.)

But wait, the fun isn't over yet! I've got tomorrow's dye playdate already soaking...

(With apologies for the bad pictures--taking them on my cell phone wearing rubber gloves...not good photography praxis!)

Oh, and one more thing...I've secured two big giveaway items and am working on a third for my fourth podcastaversary coming up--woot! Next week, First Quarter 2014 Quilty Resolutions Check-In Giveaway; The week after, Fourth Podcastaversary Giveaway! Does the fun never end?


Lancaster Report--Part 1

I had so much fun at the AQS Quiltweek in Lancaster that to try to report in on everything in a single blog would be ridiculous. So I'm going to piecemeal it and do several blog posts. For the most part, they'll go through the week chronologically but I may throw some thematic stuff in there as well. So, let's get started with...

Setting the Scene

First off, here's a pic of my BFF/BQFs Lori and Katie standing with me in front of the AQS Quiltweek admission booth. This pic was actually taken later in the week, but it'll help you picture who I'm talking about in all these posts.

We stayed at the Best Western Eden Resort, which is about 10 minutes away from the Lancaster County Convention Center where the show is held. It was a great place. The beds were extremely comfortable and it's been recently renovated so everything was brand-spanking new. The indoor pool was just gorgeous, although strangely it was a mix of salt water and chlorinated water, which I haven't encountered in an indoor pool in the northeast before. The only downside was that with three in the room, I'd requested a rollaway bed. Their definition of rollaway bed is "air mattress." We rotated who got to sleep on it each night.

Day 1 (Wednesday)

I spent the first day in a full-day class with Ami Simms making a String Star quilt. I mostly took it because I really enjoy Ami's sense of humor and thought it would be fun to take a class with her. The project was incidental. Still n' all, I had fun making the project and I surprised myself by being one of maybe two or three people who actually got all the blocks made for the center. I was en fuego! None of us got it completely put together. She didn't really expect us to, it seems; the purpose of the class was to show us the technique and let us get a running head start.

String Star with African fabrics

String Star with African fabrics

I talked about the African fabrics I used in a previous blog post. I wasn't sure I was going to love my background fabric--I was a little worried it would end up looking too busy. I'm glad to say that I'm thrilled. It works beautifully. I couldn't be happier!

I still need to piece all the blocks together. Then I'll be adding a narrow border of more background fabric to float the star a little bit.

Detail of background

Detail of background

For the outside border, at the moment anyway, I plan to do what Ami Simms did on hers: more strip sets of the African fabrics all around the outside, with mitered corners. She'd warned that it takes more strips than you think it will so even though I have a lot left of each fat quarter I've already used for the blocks, I ended up picking up four more African fat quarters--likely from the same vendor I bought all the rest from years before--to give me some wiggle room. I'm going to strip them all up and sew them together to see how much border I might be able to get out of them. If I'm short, I'll add some batiks or hand-dyes. If I'm long, I'll throw the leftover into the backing or something. I just really want to use up all my African fat quarters.

I also made two new buddies during class--woo for new buddies! Ellen and Deb were a hoot to share tables with. Ellen was sitting alone at the table behind me but happened to be placed underneath one of the only actual lights in the room. (It was obnoxiously dark in there!) She kept inviting me to "Come to the light! Come to the light!" So I turned around and put my cutting mat on the empty end of her table behind my sewing space. We were sewing on Bernina machines--don't recall the model number. It took me a few minutes to get used to it but we were doing very basic sewing so it wasn't too bad. The Bernina woman (Mary Alice) was very nice and even figured out how to override some settings on my machine so it would behave more like I'm used to my Janome behaving. After that, I was flying!

And yes, Ami Simms was a great teacher. I picked up some tips for ironing fabric before cutting that will be useful. She had brought examples of string stars she's made to show us what works well and what maybe could be done differently--I really appreciated her showing us something she wasn't as happy with so we could discuss possibilities for backgrounds and such. She also did the lion's share of our pressing for us--at first, so she could check to make sure people weren't getting off track anywhere. Later, I think, just to allow us to be able to keep moving as quickly as possible. She was entertaining but educational at the same time. I'd take a class with her again anytime!

Meet-Up Number 1

Left to right: Julie, Judy, me, Jill, Sarah

Left to right: Julie, Judy, me, Jill, Sarah

After class was out, I had the joy of meeting up with four listeners. Woot for meet-ups and woot for listeners! Judy and I had actually met earlier in a vendor booth when she recognized my voice. (Not surprisingly, it was the ProChem Dye booth. Go figure.) Wednesday afternoon, I met up with Julie, Judy, Jill, and Sarah. Say that three times fast...

I coveted Judy's cardigan and will be checking out the Land's End website soon.

Sarah swears she's going to be using the fabric she just won in my recent giveaway almost immediately!

Julie gave me a lovely gift. It's a little pouch with that snappy-open kind of top that just makes you want to squeeze it and say " 'Salright" like the Parkay containers in those old commercials from my childhood. (And I might just have done that several times. Maybe.) I've had it in my purse ever since, waiting for me to figure out the perfect use for it. Thanks so much, Julie!

Evening Event: Author's Roundtable

Wednesday evening, Lori and I went to the Author's Roundtable which featured eight AQS authors demonstrating a technique or talking about the topic of their latest book. I'm definitely going to be trying out the fun, fast block technique that Billie Lauder demonstrated--it's perfect for a quick baby or wheelchair quilt, especially. I bought some Sulky foundation papers based on the Sulky person's demonstration (more about purchases later). And I enjoyed Edyta Sitar's presentation though I didn't end up purchasing any of her stuff. But I could see myself taking a class from her someday. She's charming. I really enjoyed all the authors' presentations, actually. Not a slow moment.

If you get a chance to do something like that at a show, take it. It's a great way to be introduced to what's new and happening, as well as get short snippets of a variety of potential teachers. I have Mom to thank for keying me into that. The first time I went to Houston was with Mom and she recommended I do whatever roundtables or round robins that I could to be exposed to as many techniques/methods/teachers as possible in a short period of time. I could then see what sparked my interest for following up later. And she was right! I've done it at most shows I've been to and have never been sorry.

After the author's roundtable, we all got back to our hotel room, did the requisite Show n' Tell of what we'd done during the day, and giggled until we couldn't stay awake any more. A true girls' night.

Stay tuned for Day 2...

Boo Yah! Weekend Goals Met! Plus DPW, Scrapitude, and Daisy's Quilt Reveal

This time around, I did great on my weekend plans!

SDHDPWTop3914sm.jpg

Remember that Disappearing Pinwheel extravaganza from way back at the MLK Jr Day Sew-In? I finally got my top completed! I also did a backing for this one, a nice turqouise or aqua blue marbled cotton. It's now in the hands of the longarmer at my LQS. I'm having it pantographed, quilter's choice. Still haven't entirely decided what I'm going to do with this one but I'm thinking it may be a gift for a friend.


And now, the big reveal....

SDHScrapitude3914sm.jpg

My Scrapitude top!

I haven't come up with a spiffy name for this yet.

SDHScrapitudeborderdetail3914.jpg

The narrow inner border was from my stash, so the only purchased fabric for this was the outer border and backing.

I fell in love with this border fabric. Not at all what I'd originally had in mind when I ventured to my LQS to find something. I'd been thinking a large print multicolored floral to balance out all the sharp pointy things going on in the center. I'd seen the bolt of this fabric on the shelf and liked that it had all the colors I was looking for, but since it had the vibe of an Australian aboriginal print design I didn't think it would really fit the feel of the traditional scrappy top. Later in my search, the staffperson pulled it off the shelf and we laid it out next to the quilt. There was a moment of silence, and we both said, "...Oh." And then, "Oh..." again. I loved the way the border motif mimicked the shape of the block, and it spoke to the colors in the quilt. I fell in love with it. Unique and unexpected--even better.

I only debated it for several moments longer because it's a directional print with a distinct motif and I thought I'd hate myself for trying to work with that. Yeah, I probably would, but it was too perfect to pass up.

My original intention was to do all sorts of math to get those motifs to work out as perfectly as possible, by taking little tucks in the border  to pull the motifs together in a shorter repeat as needed. When it came right down to it, though...I was really trying to get the borders done in time to get the quilt to the LQS before it closed on Saturday. Plus, I'd already lost so many points and had so many things not meet up as they should've (you'll need to listen to my rant about a particular ruler for the backstory on that one) that this is nowhere near an heirloom or show-quality quilt anyway. It's going to be on a bed in my house...which bed is yet to be determined. So, in any case, me and my family are the only ones that will see it. My husband really likes it as-is, so I decided not to sweat the border and just get it on there.

Magically, and thankfully, this is the first fabric I've worked with in this way in years that was actually mostly printed on grain! As I cut the fabric lengthwise (so I wouldn't have to piece the border), it was mostly in line with the motif. Amazing. So my priority of at least having the motifs appear relatively straight along the borders worked out pretty dang well. I didn't worry about where the motifs ended or mitering borders to make them match or anything. We were in Get-'Er-Done mode and I was absolutely thrilled to Get-'Er-Done!

This is also now in the hands of my LQS longarmer and it's also going to get a pantograph. As I said to the woman taking my quilt, "If I'm ponying up for custom, it's going to be on a quilt where I can see all my points!"

StringStarPrep3914.jpg

Other projects done this weekend...

Got all my cutting done for my String Star class with Ami Simms at Lancaster AQS quilt week. I'm using various ethnic design fabrics. We're supposed to bring the uncut fabric to class "pressed and ready to cut." The best way I could think to do that was to press it, then lay it out flat one on top of another and carefully roll it all together. Here's hoping it's not a mess if we do get to the point of cutting that.

dyeclassprep.jpg

And I collected all my supplies for the dye class with Frieda Anderson. I already had most of it, but I did take this as an opportunity to pick up more small containers with lids from the Dollar Store--they're a good size for fat quarters and you can even scrunch a half yard down in there if you're going for the scrunchy look, which I normally am. Pack of five for a buck. Can't beat it.

I don't have to bring a ton of supplies because I did buy her kit, so she'll be giving us the dyes, gloves, a face mask, and some fabric. I'm also bringing extra fabric that I cut and folded later after I'd already taken this picture; she invited us to bring whatever else we might want to dye since we may have time to do more in the afternoon. I couldn't bring my dog (What? You can't imagine a Turquoise Retriever?) so I'm sticking with doing more PFD fabrics I can add to my collection.

I got more done on my Spring postcard swap--can't show that yet, though!

DaisysGrace3914.jpg

And, finally, in a last-Hurrah of the weekend, I got the binding on the quilt I won from Daisy in her giveaway a couple of months ago! Woot! If I recall, the name of the design is "State of Grace," so I've named this quilt "Daisy's Grace." My daughter wanted it for her dorm room, so I did a machine binding. She's very happy with it!

DD is holding it up for the photo, and she's standing on the second step up on our staircase. She refers to herself as "fun-sized," so this is the perfect size quilt for her. She'll easily be able to wrap herself up in it while...ahem...studying.

DaisysGracedetail.jpg

Detail of the pantograph design. I almost inevitably leave it up to "Quilter's Choice" on design and thread color--the most I'll usually say is "I want it to blend," or "I don't mind something that stands out on this one" or whatever. They used a nice beige thread that stands out a little, but not so much as to detract from the design. They always do a great job...which is why I usually say "Quilter's Choice!"

I am so thrilled to be able to report that I'm not longer feeling overwhelmed by the number of projects I've got going on! Getting all this done this weekend has  cleared off the top of my cutting table and my sewing table, plus a shelf or two. Things feel organized and in control again.

Breathe.


What I'm Working On...and 2014 Quilty Resolution Spreadsheet

As I announced on this past weekend's podcast episode, I'll be doing a 2014 Quilty Resolutions First Quarter Check-in at the end of March. A few weeks from now I'll ask you to let everyone know how you're doing so far at keeping your 2014 resolutions and I'll choose a giveaway winner from those who play along. Even if you didn't participate in my resolution challenge, you can report in on your own quilty-related resolutions and how you're doing, and you'll still be eligible for the giveaway drawing.

A few of you, ahem, you know who you are, have admitted to me that you can't remember what you resolved. Perhaps next year's resolution should be, "Improve my memory." So here's a link to a public version of the 2014 Quilty Resolutions spreadsheet. I've removed everyone's email addresses and last names for Internet safety.

I'm looking forward to hearing how you're doing at our first check-in!

How am I doing with my resolutions?

SSinprogress.jpg

Well, as we all know, one of them had to do with Craftsy classes. I've been keeping you updated on that. I'm currently in the finishing stages of Stupendous Stitching with Carol Ann Waugh, and then I really want to get cracking on Thread Art with Lola Jenkins. I already know what artwork I'm going to use and am seriously jazzed!

I'm also going to start working on another machine quilting class (which double-dips in my resolutions) but I'm waffling a bit on which one. I own several, and they've all got benefits. I'm watching all the lessons in two of them now to see which one calls to me more at the moment. Eventually I'll do all of them in my queue, so I could really flip a coin. I honestly don't know why I'm waffling.

I'll do another update when I post the giveaway blog in another few weeks.

What else do I have in progress?

  • I have to do the cutting for my Ami Simms class at Lancaster, and gather all the supplies for my Frieda Anderson class. The first will take a whole lot longer than the second! For the dye class, I already own all the supplies--I just have to pull it together and figure out the simplest way to pack them so they're easy to carry into class.
  • Scrapitude still needs borders (already have the fabric), then I'm taking it to my LQS for longarming--I'll buy backing there. They have a nice selection of wide backing fabrics.
  • My Disappearing Pinwheel quilt still needs borders, and I'm piecing backing for that one (have fabric for both), then I'm also taking it to the same LQS for longarming.
  • My postcard for Sandi's Spring Postcard swap is in progress but I really need to get working on it as technically it's supposed to be in the mail before March 20 and I'm in Lancaster for a chunk of that time!
  • I've got the binding pieces cut for Daisy's Twitter Giveaway quilt top that I won; I just need to get that top bound.

I have no idea how this happened. I rarely, if ever, have so many things going at once. I usually shoot for no more than three projects--one in planning or cutting, one at the sewing machine, and one at handwork (binding) stage. I'm feeling a bit overwhelmed with all of this so I'm just staying organized and focused and reminding myself to just enjoy the process. If it doesn't feel like fun to work on something on a given day, I choose one of the other projects to work on. It's all about having fun, not stressing out!

What's on for the weekend...

I'm writing this blog post on Saturday morning and thinking through what my long weekend will bring. I'm caffeinating and "charging" (as my husband calls it when he sees me sitting in front of my light box), and watching another lesson in one of my current Craftsy classes, "Complete Knife Skills" with Brendan McDermott--a freebie that has quickly become one of my favorite classes I've taken from Craftsy so far. But you'll just have to wait for my full review when I'm done with the class entirely.

Speaking of Craftsy--they're having another sale this weekend, the "Perfect Match Flash Sale" in which you can get two classes paired together, both on sale. I've already glanced at some of the offerings but haven't spent a lot of time on the site yet. I have other things I need to get done today!

In any case, as I'm sitting here getting ready for my day (which begins with a run to the grocery store), I thought it might keep me on track if I listed here my quilty-related goals for the weekend, and then I'll check in again sometime Monday evening and let you know what I actually accomplished. As we know, I'm a list-maker!

1. Post a podcast episode. (Sorry about missing last week; as it turned out, it was a very busy weekend followed by a busy week!)

2. Get my Scrapitude blocks and triangles made. If I can manage it, I'd really like to get the whole Scrapitude top pieced.*

3. Put my dye studio back together. It's still dismantled from when I had to repurpose one of the tables for Thanksgiving dinner. I also still need to haul my old cutting table from my second-floor sewing room to my basement dye studio. This requires my husband's involvement.

4. Put the finishing touches on new cutting table--using my 3M adhesive strips as I mentioned in a previous podcast episode, and heat-setting the edging strip around the top.

Now, here's the thing--some of my weekend schedule is still a bit up on the air. I may be making a nice dinner tonight, which means some of today will be spent in the kitchen, or we might be going out for a nice dinner, which means I'd not have to spend time in the kitchen. I can actually go either way on this one--after being gone for a week of vacation I'm very okay with spending a night in my kitchen. I enjoy cooking when I've actually got time to do it. But I'd also be very okay with having a whole afternoon to spend in my sewing room. So I'm viewing this as a win-win whichever way we end up going. Tomorrow I've got a commitment in the morning which means we may not be home until about 3p, and although I've got Monday off, I've got an appointment in the morning so may not have much sewing time until the afternoon. I still think I'll be able to accomplish all of the above.

So here's to a long weekend, and being home, and getting homey kinds of things done. What are your plans for the weekend? For U.S. readers, do you have Monday off? I believe we've got a #PDSI going on, though it won't be as active as usual since this is a much-less common day off for most people. Indeed, this is the first year that I can remember actually having it off! Yay!

*Whether I get the whole Scrapitude top pieced is less dependent on the amount of time I have this weekend, and more so on how long I can sit at my sewing machine doing the same thing over and over again. This is why I rarely make bed-sized quilts. Even with movies or audiobooks, I just get stir-crazy after awhile, so I may switch up what project I'm working on rather than plowing through one project for the whole weekend.

Vacation Accomplishments and Ready for 2014

(Caution: Long post ahead!) I talked about this on my podcast, but here are the pictures.

Recall my blog post on spending Friday at my church sewing "Little Dresses"?

I didn't get any made that day, but I'd gotten some pieces cut out and brought them home to finish. And had to re-do it three times because I couldn't figure out how they were supposed to go together. I'd gotten a less-than-five-minute tutorial in the midst of chaos that Friday; now a few days later I was trying to recall what had seemed like a simple process at the time, but I just couldn't get it to make sense in my head. After ripping seams out for the second time (yay for my Havel's seam ripper!), I walked away in frustration and did something else for awhile. Then it came to me: Was it possible I was missing a piece?

littledresses1.jpg

After thinking it through, I decided to make a fourth piece from scrap in my stash. Sure enough, once I made that piece and sewed everything together in a way that seemed to make sense, I had a completed dress that, while not elegantly sewed by any means, is at least wearable and from a distance on a galloping horse, kind of cute.


littledresses2.jpg

I stuffed some scrap fabric in the pocket so you could see that feature better. Basic pockets I've done before, so no seam-ripping required there. The fabric is a Hawaiian "bark cloth" that I got in Hawaii a few years back. It makes a nice sun dress as it's a little lighter weight than traditional quilting cotton, but it frays like nobody's business. Ripping out those seams got harder and harder every time!

I was thrilled to hand that off following our Christmas Eve service at church to the woman in charge of the project. Done and done!

I then moved on to things I feel much more confident in, LOL.

 
Scrapitude 1-3.jpg

I completed Scrapitude Step 1, Step 2, and Step 3. Caught up! Well, okay, still need to trim some dog-ears and square up some units, but I'm considering it done. I'll trim here and there as I'm working on other things.

To set myself up for making serious progress on my 2014 Quilty Resolutions, I bought muslin for and made a boatload of quilt sandwiches for practicing my machine quilting. I think I now have 16 or so, all somewhere around 12-16" square. That should supply me for some time to come, anyway. (No pics since they're just boring white squares!)

Also towards my resolutions, I prepped several new pages so I can finish my Stitch Bible for the Carol Ann Waugh Craftsy class "Stupendous Stitching." I got about halfway through my Stitch Bible last January/February and ran out of pages; that became a stopper. I think I've now got enough pages to finish up the Stitch Bible so that's a priority for the rest of my vacation. (Also no pics yet--I'll wait 'till there's stitching on there.)

huntersstarcenter122013.jpg

I finished the center of the Hunter's Star quilt I'm making using the Deb Tucker Rapid Fire Hunter's Star (petite) ruler I won from AJ at the Quilting Pot podcast.

Ain't it pretty? Points all met perfectly! The fabric is leftover from my grand-niece's baby quilt. I decided on my border fabric yesterday so now that I'm caught up on Scrapitude, this project is back on deck!

For the last couple of days I've been spending most of my time on this: After my husband surprised me by deciding to move his computer to another room (thereby also removing his computer desk), I moved the furniture around in my sewing studio/home office. And then moved some of it again. And a third time. And vacuumed a whole bunch. I think I'm now at an arrangement I really like; I'm going to live with it for a few weeks and then probably build myself that solid-surface cutting table like Tanesha's--boy, have I wanted something like that for a l-o-n-g time!

And then there were all those other extraneous cleaning and organizing things: the spice cupboard, the pantry (yikes!), my Dropbox folders, my photo files on my external hard drive (still in progress), and learning a new calendarizing/organizing mobile app that I believe is the app of my dreams, but with a big learning curve.

Apparently my sunlight lamp is really working--it's unusual for me to have this much energy at this time of year!

One more day off tomorrow, and then it's back to work. I hope everything I've put in place will make it easier to continue to make progress on my goals.

My word for the year in 2013 was "play." I really do feel like I achieved that. In 2014, I'm going to do my best to live out the word "balance." Everything I tackled this week was with both of those words in mind--what I could do that would be fun, and what I could get done that would help me maintain better balance in the coming year.

Have you done yourself any favors towards the future? If not, what's one thing you could do in the next couple of days that might make life a little easier for yourself in the months to come?

Craftsy Class Completion Update

One of my 2014 Quilty Resolutions was to get more organized and intentional about going through the Craftsy classes I own. To that end, I'm going to post a quick monthly update as to which class I'm working on or have completed that month.

First, here's how I define "completed":

1. I have finished watching all the lessons in the course, AND

2. I have...

  • completed the class project, OR
  • completed one project in the class (if there are multiple projects--I may not be interested in all of them), OR
  • practiced or made note of one or more techniques in the class for use in my own projects later. (I may learn things simply by watching, but am not interested in doing class projects; and, some classes don't necessarily have projects per se but only teach techniques in the first place.)

Other terms I use:

  • "In progress" means I've actually taken some actions based on the class and intend to go back and practice more intentionally or do project.
  • "Viewed, not done" means I've watched most or all the lessons but haven't taken action steps yet; still plan to.

So, this first blog entry related to my Craftsy classes will list all of the classes I have purchased or registered for (freebies) since my very first day on Craftsy. (I can hear your gasp from here. Just stop, LOL. ) I'll then have notes about where they stand.

Completed Quilt Classes

  • Art Quilting 101 with Wendy Butler Berns (no class project; still go back for reference on occasion)
  • Chain of Stars Mystery Quilt with Kimberly Einmo (finished class project)
  • Color Play for Quilters with Joen Wolfrom (watched all, but did not do class projects)
  • Craftsy Block of the Month 2013 with Laura Nownes (watched much of it; decided I wasn't interested in doing the blocks now)
  • Creative Quilt Backs with Elizabeth Hartman (for reference only, no class projects)
  • Hand-Stitched Collage Quilts with Laura Wasilowski (finished 1 of 3 class projects, posted on blog; watched all lessons--that was enough for me to learn techniques to use on my own projects in the future. Great class!)
  • Magical Jelly Roll Quilts with Kimberly Einmo (I'm considering this one completed even though I've not yet made one of the quilts in the class, but did use her class as inspiration for other quilts I made in the interim. Will likely go back and make one or two in the future--I like the designs.)
  • Pattern Free Quilt-making with Joe Cunningham (Didn't do any class projects, not sure I will--not entirely to my taste, but good to have for future reference if I decide to play around with it later.)
  • Piece, Patch, Quilt: Basic Quiltmaking Skills with Gail Kessler (Always game for new tips even though this is for beginners; watched all the lessons, won't be doing projects.)
  • QuiltCon Lecture Series 2013 (watched all those of interest)
  • Scrap Quilting with Pepper Cory (watched all of the lessons; didn't do any class projects but will use for reference later as there were a couple I have in the back of my mind as possible donation quilts in the future.)
  • Stitch & Slash with Carol Ann Waugh (completed class project and backing!)
  • The Art of Cloth Dyeing with Jane Dunnewold (this is the class that sent me down that whole hand-dyeing bunny trail.)

Completed Spinning Classes

  • Know Your Wool with Deborah Robson (Used for reference before going to fiber festival last spring)

In Progress or Not-Yet-Started Quilt Classes

  • Art Quilt Backgrounds: Beyond Log Cabin with Judith Trager *Not started
  • Beyond Basic Machine Quilting with Ann Petersen *Not started
  • Designing Modern Quilts with Weeks Ringle *Viewed, not done
  • Fabric Patterning with Wax Resist with Malka Dubrawsky *Not started (Took awhile to collect materials, but have most of them now)
  • Finishing School: Edges and Bindings with Mimi Dietrich *Viewed, not done
  • Free Motion Fillers Vol 1 with Leah Day *Not started
  • Free Motion Fillers Vol 2 with Leah Day *Not started (I just bought these two about a week ago when they were 50% off knowing I wouldn't be getting to them immediately)
  • Free Motion Quilting a Sampler with Leah Day *Viewed, not done (not making the sampler; watched a few lessons to pick up tips for basting, etc., need to go through quilting designs one by one.)
  • Machine Quilting with Wendy Butler Berns *In Progress--see below.
  • Machine Quilting Negative Space with Angela Walters *Not started
  • Machine Quilting the Home Sweet Home Quilt with Frieda Anderson *Not started (just bought this one on sale a few days ago to have for when I'm ready)
  • Painted Pictorial Quilts with Annette Kennedy *Not started
  • Pictorial Quilting Techniques with Wendy Butler Berns *Viewed, not done
  • Pictures to Pixel Quilts with Carol Sheridan *Not started
  • Shoot It! A Product Photography Primer with Carol Sheridan *Not started
  • Strip Your Stash with Nancy Smith *Viewed, not done
  • Stupendous Stitching with Carol Ann Waugh *In Progress (see below)
  • Thread Art with Lola Jenkins *In Progress (see below)

In Progress or Not-Yet-Started Spinning Classes

  • Spindling from Fluff to Stuff with Drucilla Pettibone *In Progress (have worked through quite a bit of this but haven't finished a full spindle yet, so not considering this class completed.)

In Progress or Not-yet-started Cooking Classes

  • A Modern Take on the Mother Sauces with James Peterson *Not started
  • Artisan Bread Making with Peter Reinhard *Viewed, not done
  • Homestyle Pan Sauces with Martha Holmberg *In Progress (have made a couple of the sauces, am debating others based on our usual eating habits)
  • Perfect Pizza at Home with Peter Reinhart *Not started
  • Secrets of Slow Cooking: Mastering the Braise with Molly Stevens *Not started, but will soon--it's winter, after all!

Plan for January, 2014:

  • Finish Machine Quilting with Wendy Butler Berns. The main stopper here was that I ran out of prepared quilt sandwiches for practicing and never took the time to make more. During this vacation week I'm working on getting more ready--right now I've got a bunch of muslin pairs cut, but I need to piece some batting scraps together and then baste the sandwiches. I've also added to my task list "15 minutes practice machine quilting a day" and am doing my best to stick to that. I watch a lesson from her class, sketch her suggested designs out in a sketchbook, and then practice that design on a quilt sandwich. I may actually get this class done by the time I go back to work on January 2.
  • Finish Stupendous Stitching with Carol Ann Waugh. The stopper here was similar to above--I used up all the Stitch Bible pages I'd had prepared and needed to prepare more before I could make more progress. Creating more pages was one of my #BDSI tasks, so now I'm ready to finally make progress on this class. I should be able to have this class done by the end of January.
  • Make progress on, if not complete, Artisan Bread Making with Peter Reinhart. I'm not sure I'll make all the breads in the class but I want to get familiar with his technique and try at least a couple of his recipes.

I'll post at the end of January what progress I've made on my classes. Doing this should help me stay accountable and organized! I'll also be giving reviews of the classes in my podcast episodes so stay posted.

#Scrapitude Step 1--Finally!

With my "found time" yesterday and a couple of hours this afternoon, I finally have Scrapitude Step 1 done--woot!

(If you're not seeing the image below in the emailed-blog version, use this link to see it in Flickr. Not that it's really all that exciting at this stage...)

I'll probably do another Scrapitude linky sometime next week to let everyone check in on their progress. So you may want to put that on your to-do list for #BDSI!