
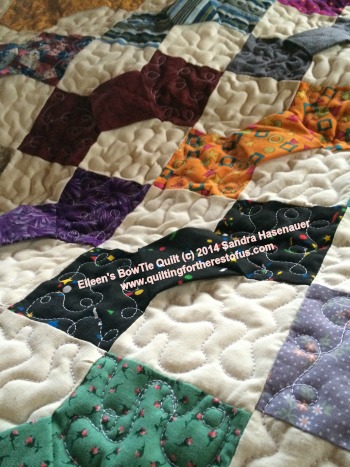
Last weekend I was in Nebraska with women of my denomination. Despite it being a work event, I found plenty of ways to Talk Quilt while there! One woman named Eileen had organized a large number of donation lap quilts and afghans to be donated to a home for the elderly. She'd made all the quilts that were present at this event herself, so we spent some time during a break going through her quilts: She was telling stories behind the patterns, quilting designs, and fabrics, while I was admiring all the same.
One quilt in particular caught my eye as the block was a dimensional bow-tie block. I've seen those here and there online, but had never had the chance to see one in person. Eileen explained to me how she did the block. She'd actually figured it all out by herself (she's definitely not an Internet person) but she is aware that others also do them. So there may be other methods, but I'm giving her due credit for figuring it out on her own! Hence, I'm presenting this as Eileen's Tutorial.
Eileen gave me a nice little set of demo squares and I took some pictures while she walked me through the process. After I got home and got some sleep (!), I pulled some 5" squares out of my scrap stash to see if I could remember how she did it. My first one turned out perfectly! My second one, not so much--I somehow reversed the squares. Twice. But the third (and fourth) time's the charm!
So let's walk through the process....
Eileen's Dimensional Bow-Tie Block Tutorial
With pictures I took of my own blocks back home. Again, yes, you can find this elsewhere--I'm just giving credit where credit's due to the person who taught me!

For each block, you need five squares of the same size. You can use any size square you want, you just have to make sure they're all the same measurement.
You also get to make some choices about color arrangement. I did my blocks with three squares of the same color for the bow tie, and two light background squares. I did that mostly because I have lots of multiples in my scrap square stash and this is a great way to use them up. But there are lots of possibilities, here: I could see having the bow tie ends being scrappy but all of the tie knots in the middle of the blocks being the same color to bring the whole design together; or using all solids; or prints in the background with solid bow ties....
For the purposes of this tutorial, your bow tie fabrics will be referred to as "dark", and the background as "light." This is key to keeping everything straight later!
1. Fold one of the dark squares you're using for the "knot" in half, right side out. It's not necessary to press and, in fact, you may not want that kind of a hard crease in your finished product.

2. Sew the folded "knot" piece, fold towards the top, between one light and one dark square: light square on the bottom, dark square on the top. Make sure the raw edges (unfolded side) are aligned with the bottom edge of the squares, and sew along the right-hand edge. Be sure the light piece is on the bottom, the folded piece in the middle, and the dark piece is on top. (If you do it in the reverse you'll need to flip things around later!) The light and dark squares should be right sides together.
Press towards the dark.
3. Now comes the first tricky part. Flip the unit over so the folded square lays to the right of the seam you just sewed. The folded edge will now be on the lower edge and raw edge side towards the top. Fold the already-sewn dark square to the left and out of your way.

4. Lay the remaining dark bow tie square, right-side up, underneath the folded square and line up their right and top edges.
Then lay the remaining light background square, right-side down, on top of both, lining up the top and right edges. It's critical here to make sure you've got the two colors in the right place. The first time, you have the light on bottom and dark on top; this time the dark is on the bottom and the light is on the top. If you reversed it in the first step, you'll need to reverse it again here.
Sew the seam on the right hand-side and press towards the dark again.

5. And now for the second tricky part. You need to open that folded square and line it up between all four blocks for the final seam. The only way to describe this is in pictures...
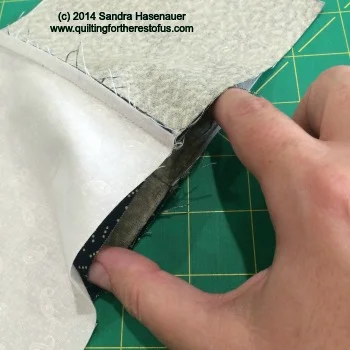
I found it helpful to pull the knot sides fully open with my thumb and forefinger of one hand, then flip the top squares out of the way with my other hand to make sure I had the sides of the knot fully extended. (Don't let the quick-swap of fabrics fool you--this picture was taken while working on a later block.)
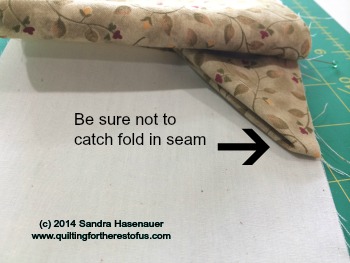
They won't come to points--it's sort of a blunt end. And here you need to be pretty careful that you don't get the fabric that's in that fold caught in the seam you're about to sew. Keep moving things around until you're sure you're not sewing extra layers. This is virtually impossible to describe and although I tried, I couldn't get a good picture of what I mean. But you'll know if you've done it wrong when you flip open the finished block--more about that later.

For this part, I did what you usually do with matching seams--I scooched it around until the seams felt like they were really butted up together. Then I pinned that center down so it would stay in place. Next, I reached under each side to make sure the knot was really fully extended, evenly pleated in the center, with raw edges flush. I pinned each end of the knot once I had it in place. I also pinned both ends of the unit because that center knot seemed to want to knock everything a little out of whack.
6. And finally, you sew that last seam. And the magic happens!

Press the last seam whichever way you choose, depending on how you're setting these finished squares. Then open it up and thar she blows! A bow tie with a fun dimensional knot in the middle!
As mentioned earlier, you'll know you've caught a fold in a seam if you open it up and see a sewn crease down one of the lines of your knot. It should look nice and flat and open, like this. (And yes, ask me how I know. That same block in which I sewed the squares in the wrong placement twice in a row also ended up with a sewn line down the middle of the knot at the end. Go figure. It was doomed, but me and my seam ripper beat it into submission.)

The first one took me all of about 10 minutes. The second one...well, you've already heard about all of that. My trusty new electric seam ripper was put to good use.
But the third and fourth blocks were back to about 10 minutes each again. What a fun way for me to burn through some of these 5" squares and eventually have some donation quilts! Woo!
Again, I know there's likely other methods out there, but I need to give props to Eileen from Nebraska for figuring all this out herself, and then teaching me so easily. And not least for making several dozens (perhaps even hundreds!) of donation quilts herself. Go, Eileen!