Food Friday--CSA Week 4 Report and Week 5 Pick-Up

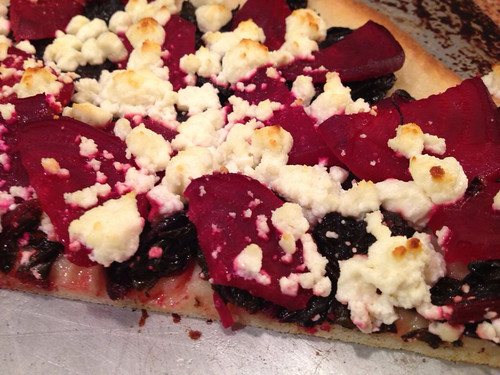
Beet & Goat Cheese Pizza
I used up most of week 3 and 4's CSA beets and beet greens on a Roasted Beet and Goat Cheese Pizza. Although I used the recipe at the link for a little guidance, it's very straightforward. You roast the beets with a little salt and pepper, then peel and slice them. Meanwhile, sauté the beet greens with some onion until they wilt down. Then you simply brush the dough with olive oil, and spread the wilted greens and beets on it. Finally, put the goat cheese on top. Bake it at about 400 or a little higher for about 10-15 minutes, depending on how thick your crust is, and you're good to go.

I used goat cheese crumbles available at my grocery store because I have those on hand for salads. But a really nice goat cheese would work better--the crumbles got a little dry. I made homemade pizza dough (did the breadmaker recipe without a breadmaker) and rolled it out really thin so I'd get a nice, crispy crust. The texture on the dough was a perfect complement to the soft beet topping.

I already love beets and goat cheese. Putting it on a pizza crust is a plus! I did decide, however, that I'm not overly keen on beet greens. If I get beets again next week, I may try the greens again with a different preparation, but I'd have preferred this pizza without the greens. Maybe some orange slices or an orange sauce or something.


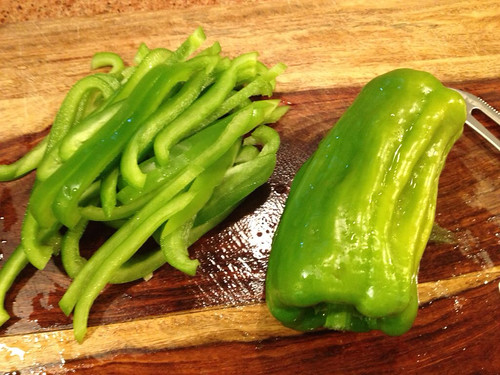
Remember the one CSA green pepper? (It's the one on the right--uniquely shaped but still tasty!)


We had some leftover Italian sausages from the 4th of July so I supplemented that one green pepper with a second from the store, a clove of garlic, an onion, a can of diced tomatoes, a couple of tablespoons of tomato paste, and some Italian seasoning. Very tasty sausage and peppers for dinner on Saturday night. Add in some of the dinner rolls I'd made last week and it was a pretty simple, mostly fast dinner. That was the last night for the rolls, though--they were somewhat dried out.

Other than that, this was a pretty light CSA week for me. I've been eating the CSA green beans raw (my fave preparation), and I have to confess the dogs got a couple of the CSA carrots because they looked ever-so-appealingly at me when I opened the vegetable crisper drawer. Plus, either my husband and I were out for dinner or I was home alone and didn't cook. So, admittedly, some produce ended up getting tossed because it turned before I could get to it, for which I feel forever guilty.

I did make some blueberry muffins, however, with fresh blueberries from a U-Pick farm I visited last weekend. Not CSA, but still supporting local agriculture! I used a recipe from my Betty Crocker cookbook. Not my favorite--a little on the bland side despite the crumble topping--so if I get out picking again, I'll be checking out different recipes.

Week 5 Pick-Up

My daughter did me the huge favor of doing our CSA pick-up this week since I was (ahem) otherwise occupied at the Ricky Tims Super Seminar during our pick-up time. (I'll be talking about that experience at a different time!)
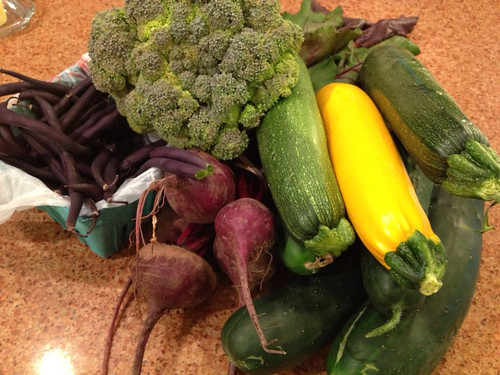
Week 5:

1 head broccoli (I think maybe it was supposed to be purple broccoli but ours wasn't very purple)

4 cucumbers

2 zucchini

1 yellow squash

4 beets (yay)

purple beans

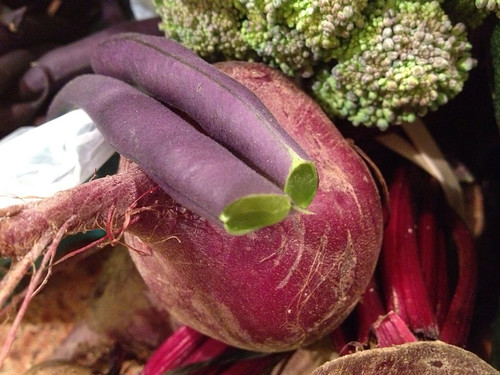
I've seen these in magazines but haven't ever had them--they're just green beans of a different color, of course. But how pretty! Check out that closeup!

I may not have time to post much about this week's CSA produce since I'll be leaving town in a few days. I'll be making zucchini bread, that much I can guarantee you. (Still have zucchini left from last week.) And those beets? Roasting 'em. Maybe pizza again. The cucumbers are mostly getting eaten raw--DD and I are both big cucumber fans, although the farm provided a recipe for cucumber soup that's intriguing my daughter so we may end up making that over the weekend. And several of those beans didn't even make it into the fridge since I was gnawing them raw while I was prepping everything else.

The next two weeks I won't be around much, so my daughter has instructions to pick up the CSA deliveries and head them straight over to my mother-in-law's house. Unfortunately, I won't be able to get pictures of what my MIL does with them, so no CSA reports for a few weeks until I'm home again!


Food Friday--CSA Week 3

Sorry folks...last week was busy and I neglected to take pictures of my CSA adventures. Admittedly, I wasn't particularly adventuresome. I got big hunks of lettuce so I was mostly eating salads all week, although I did do roasted beets with goat cheese one night. Nummy. And I still have some green lettuce, and kale left from week 1 (boy, that stuff stores forever!).

CSA Week 3

Beets! More glorious beets! And all for me, since no one else in my family likes them. I'll try to do something marginally more creative with them this week, although I do love them roasted, and with goat cheese.


Also: 

  • 1 yellow squash
  • 2 zucchini
  • 1 head bok choy (will the bok choy never end?)
  • 1 head red lettuce
  • 1 bunch carrots
  • 1 head green lettuce (smaller than last week's, thankfully, since I'm still working off that one)
  • 1 head Chinese cabbage

My daughter is in the process of making dinner while I'm prepping this blog post--I'm writing this on Thursday night so it can go live Friday morning. She's making penne, and will just be eating it plain with a little olive oil, garlic, and parmesan, her favorite preparation. I do believe I'll be adding some zucchini to mine. Maybe a tomato. Saut<&eacute>e it up with a little olive oil, garlic, and toss some shredded parmesan on the top, and you've got something there.

On Friday night's menu is something we do frequently around here, and I've got pictures from the last time I did it, but never ended up posting. I've talked about grilled pizza before. It bears repeating. I'm figuring this will be a good way for me to use up some of this week's CSA.

First of all, for recipes for the dough and sauce, check out my blog post on homemade pizza (with thanks, again, to Susan of The History Quilter podcast for one of the sauce recipes). Here I'm just talking about the process of doing a pizza on the grill. 

Pizza on the Grill

When you've made the dough using your favorite recipe and method, you start out rolling it just like you would to make a regular pizza. However, when I'm grilling, I like to make a thinner crust. It's easier to work with, grills more evenly, and the center will bake before the outside chars. (The dark spots in the dough are herbs. I like a flavorful crust.)

We also usually do personal-sized pizzas when grilling. Not only does that accommodate varying tastes and creativity, but it's easier to handle smaller pieces on the grill than one big pizza crust.

You oil both sides of the dough when you grill pizza, so I like to make an oil concoction with more herbs and a little garlic powder. And yes, I oil both sides before it gets on the grill. You could oil one side and then quickly oil the second while it's on the grill, but often my husband or nephew are doing the grilling part, so I'd just as soon have everything done in advance.

It's crucial to put waxed paper between the pizzas. And make sure the paper completely covers the crust. The dough will stick to itself and you'll have a nasty mess on your hands otherwise.


Hey, whatever it takes to grill. 


You'll put a couple on the grill at a time, directly on the grill. Make sure you've cleaned your grill and oiled the rack with a rag or paper towel and vegetable oil.

It's much like making pancakes. You'll see them start to look dry around the edges and then that dryness moves in towards the center, and bubbles start forming. (I like to poke the bubbles. It's fun.) When you think the bottom is ready, flip it over and do the other side. You want them to get done enough to put toppings on, but not fully done. You'll be cooking them again with the toppings, so don't do the initial grilling past a very light golden brown.


When it's done on both sides, take it off the grill and add whatever toppings flip your switch. You don't want to go too heavy on toppings--again, it won't grill evenly if it's too slushy or piled too high. But you can still be pretty generous.

When you put them back on the grill with the toppings on, do it over indirect heat to give the toppings the best chance of cooking through/melting before the bottom of the pizza burns. (If we're doing these for a crowd, I usually finish them off in the oven so some can be going on the grill while others in the oven. However, this is a tricky menu for more than about eight people.)


And then it's time to eat!

One of my favorite combinations: parmesan sauce (see that previous blog post), spinach, carmelized onions, and goat cheese. 

Tomorrow night I'm going to have to come up with a combination using something from my CSA pile instead. I'm imagining something Asian-inspired, with sauteed bok choy, chicken, onion, maybe a little pineapple, soy sauce...

I texted my nephew earlier this afternoon.

Me: "Grilled pizza tomorrow night. Coming?"
Him: "I'm so there." 

Food Friday--Homemade Pizza

I own a breadmaker. Do I ever use it to make bread? Uh, no. Let's name it a pizza-dough-maker and call it a day. Once every couple of weeks I make us homemade pizza. When it's just my husband and I home alone, I will make two personal sized pizzas and we each make whatever we want. Note: I'm much more creative than he is. He's happy with tomato sauce (and plenty of it), mozzarella cheese, and pepperoni. I lean towards a white sauce, spinach, caramelized onions, and goat cheese. But we'll keep it simple for this blog post.

I've adapted a bread machine pizza dough recipe I found on the Internet a little bit. Then I'm going to share with you three sauce recipes--I've tried them all, and they're all tasty!

Although the pizza dough recipe is made for a breadmaker, check out this link for some tips for how to make a bread machine recipe by hand instead: http://www.stretcher.com/stories/00/000117n.cfm.

Here we go:
Pizza Dough in Bread Machine
(Adapted from Allrecipes.com)

Ingredients

  • 3/4 cup water
  • 1 tablespoon vegetable oil
  • 1 teaspoon lemon juice
  • 1/2 teaspoon salt
  • 1 tablespoon white sugar
  • 1 tablespoon dry milk powder
  • 2 1/4 cups bread flour
  • 1 teaspoon active dry yeast
  • Optional: approximately 1 tablespoon Italian Seasoning or mix of dried oregano, basil, thyme, etc., if desired, to taste
  • Optional: grated parmesan or romano cheese for crust

If desired, make an olive oil mixture to brush on the crust before baking: olive oil, garlic powder, dried oregano or Italian seasoning, grated parmesan, or whatever seasonings you like.

Directions

1. Place ingredients in the pan of the bread machine in the order recommended by the manufacturer. Select dough cycle. Press start.

2. Remove dough from pan after rise cycle. Roll to 14-16". Allow to rest several times in the process of rolling--this will help it get to the desired size more easily.

3. Place in lightly sprayed pizza pan and allow to rise a few minutes.

4. Brush with plain olive oil. Poke holes in dough with a fork to prevent bubbles from forming. (Remember to also poke the edge of the crust.)

5. Bake in preheated oven at approximately 400 to 425 degrees for about 8-10 minutes, until slightly browned.

6. Optional: Sprinkle parmesan or romano cheese on crust after first baking, then bake again for a couple of minutes to melt the cheese, then add toppings.

7. Top with sauce and desired toppings, brush crust with olive oil or olive oil mixture, then bake again until toppings are at desired doneness. Brush crust with olive oil as soon as it's out of the oven if desired.

And now, onto the sauces!

Parmesan Sauce (not low fat!)
(Learned at cooking class at the New York Wine and Culinary Center)

Ingredients:
  • 1 clove garlic, minced
  • 2 tablespoons olive oil
  • 1/2 pint heavy cream
  • 1/2 cup grated parmesan cheese, or to taste
  • salt and pepper, to taste

Directions:

1. In a large skillet, heat oil over medium-high heat and saute garlic until softened but not brown.

2. Add cream and heat until foaming. Add parmesan, salt, and pepper to taste. Turn down heat and heat until thickened to desired consistency. Use over fettucini or pizza.


Simple Margherita Sauce
  • 1 can San Marzano Tomatoes
  • Salt and pepper to taste
Directions:
1. Open can and remove several tomatoes to lessen volume and set aside. Using immersion blender, puree remaining tomatoes in can (or pour tomatoes into blender). Give removed tomatoes a rough chop and return to can. Salt and pepper to taste; use cold over pizza. (Freeze into 2 cup portions for other pizzas, or use as a base for spaghetti sauce.)


Susan's Pizza Sauce
(From History Quilter Susan--who gave me permission to post this!)

Ingredients:

  • 1 28oz can diced tomatoes
  • 1 tsp sugar
  • 1 tsp garlic powder
  • 2 tbl olive oil
  • 1 tsp Kosher salt
  • 1 tsp pepper
  • 1 tsp oregano (add at end)
Directions:
Add all ingredients above (except oregano) to saucepan and let simmer about 20 minutes at the minimum. Puree to your desired consistency or keep it chunky. Add 1 tsp oregano just before you are ready to make your pizza. Makes about 1 1/2 cups - easily doubled/tripled.

(I made Susan's sauce for the first time tonight--thanks so much for sending it to me, Susan! We loved it!)