Craftsy Class Review: Small Changes, Big Variety with Angela Walters

Craftsy

I'm celebrating Valentine's Day weekend by writing up another Craftsy class review!

Yep, another free motion quilting class. At this point I'm just looking for inspiration for designs. And this class was chock-full of that! So, here's my review for Machine Quilting: Small Changes, Big Variety, with Angela Walters.

Do I have to say again that Angela Walters is an enjoyable teacher to watch? I've lost track of how many of her classes I've reviewed on this blog now. And although I've done several of her classes and own several of her books, I have to give her props for not noticeably repeating herself. This class really felt like all new material. Sure, I'd already done spirals before, for example, but getting a few ideas for how to change it up to look like an entirely different design was very helpful.

As always happens with every FMQ class I take, just watching the teacher do the design helps me grasp more easily how to travel from one section to another, how to work my way back out of the corners I almost inevitably end up in, and how to ignore the couple of bobbles here and there and simply drive on. After all, as Angela Walters continually points out, for the most part I'd be using a thread that blends and those little bobbles would be completely unnoticeable. 

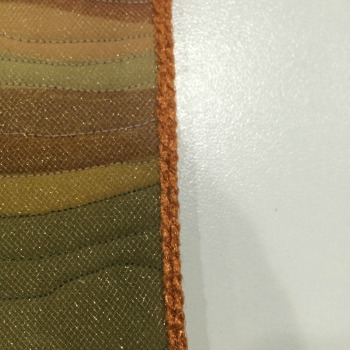
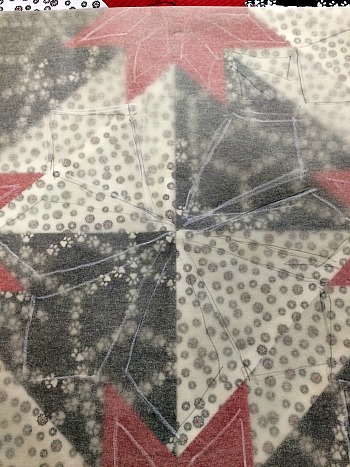
I decided to practice some of the designs on a practice quilt sandwich, but to make it interesting for myself I used one of my [less favored] hand-dyes to make the sandwich and then played with a lot of my funkier threads while I was quilting. I intentionally used contrasting thread so I could see what I was doing, so it's clear where my brain and hands periodically refused to play nicely together. But still n' all, I can definitely see the improvement in my FMQ skills after a full year of so many classes and practice. And that's nice. 

In any case, this class is just jam-packed with designs. Packed. I think I counted up something like 32 total designs, and that's just to get you started. Once you see her suggestions for variations it gets your mind running with "What ifs". 
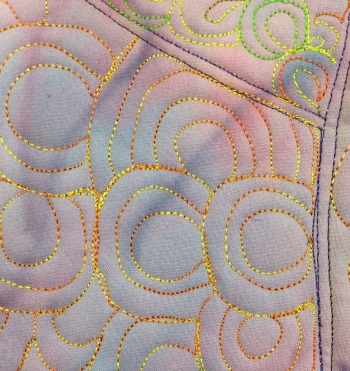
Detail of practice 

Detail of practice 

If you've never free-motion quilted before, you'll need to start somewhere else because she really doesn't spend any time teaching about how to set up your machine, basting, tensions, threads, or any of that. But if you at least know the basics, you'll have no problem doing this class. Each lesson goes from a fairly simple version of the design to increasingly more complex variations. 

The Basics

  • 7 lessons. The 1st is a short introduction; the rest range from 19-27 minutes long.
  • The main designs include pebbles, swirls, ribbon candy, feathers, squares, and clamshells. For each design, she gives between four and six variations, plus ideas for additional variations you can try. 
  • The downloadable class materials are set up like her Free-Motion Quilting Workbook, with a drawing of all of the designs, each with a blank box next to it for you to do your own practice drawing before trying to stitch it on the machine. Although part of me struggled a bit with printing off so much blank space, I have to admit it was useful having the reference drawing directly next to the space I was drawing in rather than on a computer screen or something where I'm bouncing my eyes back and forth.

So, all in all, two thumbs way up for Machine Quilting: Small Changes, Big Variety, with Angela Walters.. I got a lot out of it, I'm still practicing some of the designs, and I'm brewing ideas for some of them on current projects.

By the way, it's on sale this weekend, too! Just click any of the Craftsy links on this blog and it'll take you to the sale.

(Using Craftsy and Amazon links on this post helps support this podcast and blog. Thanks so much!)


January 2015 Craftsy Class Update

I had this done before January 31 but was out of the house yesterday and forgot to post it. Oops. 

As I'd said at the end of 2014, although my Craftsy classes are no longer part of my quilty resolutions for 2015, I do want to keep making progress. I've learned so much from them! Therefore, I'm going to keep posting my monthly updates here. I've found, however, that a couple of the classes I'm now working on are definitely long-term classes so you'll be seeing them listed in the "in progress" section for some time to come.

By the way, one of my podcast listeners wrote in with her own Craftsy count, and she's got me seriously beat in terms of quantity! (You know who you are!) So I'm not the only one out there...

New Completions

(+1)

 (Does finishing the January block of the Craftsy BOM count? I could count that as a new completion every month!)

Classes in Progress

(5--ahem. Maybe some more "in progress" than others. But still.)

Classes added this month

(3)

  • 2015 Craftsy Block of the Month with Jinny Beyer (see blog about this here)
  • Cooking the Perfect Steak with Bruce Aidells--I finished all the cooking classes on my list and was really hankering for a new one. I've got a few on my wish list but I figured my husband would prefer me to get this one over Thai or Mediterranean cooking. This one will go fast--I'm sure I'll be using a technique or two quite soon!
  • Crazy Quilts with Allie Aller--this was on my wish list for several months and I knew I'd buy it after finishing an embroidery class or two. When Craftsy had it's big sale over a weekend I was out of town and feeling a bit self-indulgent, I bit. I've watched the first lesson or two and I'm really looking forward to digging in. She's a good teacher and I'm a huge fan of crazy quilts. But a few other projects need to move along further first.

Classes To Be Completed

Current count:  14 (+2--oops, lost some ground there!)

Completed Classes (all topics)

Current count: 46 (+1)

2015 Quilty Resolution--January Journal Quilt Done

So the one thing I've always wanted to do that I hadn't done yet--my 2015 Quilty Resolution challenge--is to make one journal quilt per month in 2015. 

Several years ago, there was a national quilt challenge named "Journal Quilts."  I was first introduced to the Journal Quilt project when I went to the International Quilt Festival in Houston with my mother in 2005 (if I can believe the festival pin that's sitting in my sewing cabinet). I fell in love. I spent more time in that exhibit than in any other part of the show. I even bought the book. I highly recommend it--I've spent a lot of time with that book over the years.

I'm using my journal quilts as experimental fun. My personal rules are:

  • Each one will be 8 1/2" x 11" (based on the original Journal Quilt challenge size).
  • Each one will be an opportunity to experiment with something I've not done before or want more experience with.
  • I won't take too much time with them--they'll be spontaneous and fun, even if they ever end up dealing with more serious themes.
  • I won't worry about the product, just the process. If it turns out looking like cr*p but I had fun and learned something, it's all good.

For January's journal quilt, I really wanted to try my hand at using sheers. I've seen it done, I've read about it a lot, I've just never done it myself. Just as I was starting to think about it, I saw an article on sheer collages in Art Quilting Studio magazine Winter 2015 (the same issue that our very own #twilter Carol McDowell is in!) and I was off and running.

For my image inspiration, all I had to do was remember the glorious sunsets I'd seen in Burma, especially in Bagan. It's probably the most famous tourist spot in Burma and I can see why although my personal favorite was somewhere else, but that'll wait for another blog post. We spent one evening on top of Shewsandaw Pagoda--famous for its sunset-viewing opportunities.

Shwesandaw Pagoda--all of the sunset photos are mine; the photo of the steps up the pagoda was taken by one of my friends.

Shwesandaw Pagoda--all of the sunset photos are mine; the photo of the steps up the pagoda was taken by one of my friends.

Rather than lock myself into trying to represent a single image, I didn't even look at the photos before I started working on my journal quilt. I wanted something that would capture the shadowing of the landscape, and also give some sense of the immensity of that pagoda and the insanely steep/high stairs you had to climb to the top. So I mentally compiled all the images in my memory and abstracted a bit from there.

And thus: January's Journal Quilt "Sunset in Bagan" is complete.

In the name of "getting over myself," I didn't sketch anything out ahead of time. First, I fused backing to a piece of batting, and then I put fusible on the front of the batting as well. I free-hand cut most of the fabric pieces although I did loosely sketch the pagoda shape on the cloth, but in cutting it I didn't really follow my own lines so it was still spontaneous. Then I just laid things out as they looked good to me, and did a quick fuse-tack to get it all in place. The fabrics for the background and pagoda are all my own hand-dyes.

I used a piece of nubby silk for the sun and highlights on the sky fabrics. Finally: the sheers. I only ended up using two as I didn't want to entirely lose the fabrics behind. There's a darker burgundy sheer that I layered in a way that reminded me of the mists drifting through the valley--you can see a couple of strips of it in the photo on the left. IT's got a beautiful gold sheen to it that just very barely comes out in the finished product. 

Then I layered a very light gold sheer with a bit of sparkle to it over the whole top, again because it reminded me of the mist on the valley. I used a fusible spray on the burgundy sheer because I was afraid my Misty Fuse would show through. I was a little concerned when I first put the spray on but it did dry entirely invisibly. I didn't fuse the overlay sheer--just pinned it to hold it in place until I quilted it. 

For quilting, once again, I made myself just haul off and start quilting lines. Oh, but I wanted to draw it out first! Still, the name of the game was "experimental fun" so I just did something that represented the stairs and the different levels on the pagoda that you could stand on to view the sunset (we were on the top one). The background just got swirlies and lines to show rolling ground and a slight breeze.

Finally, I did a zig-zag to stabilize the outside edge and then couched yarn as a binding*. One pass of yarn looked kind of skimpy, so I went through a second time with another round of yarn. Bingo! I really like how that turned out.

So when I compared my finished product to the photos, did I get the shape of the pagoda exactly right? Nope. Do the stairs really stand out in my quilting as much as they do in the photo? Nope. 

But do I care? Nope. 

I had a ball. And I got to play with my hand-dyes and with sheers. And I learned a few things in the process. 

So the January Journal Quilt experiment is a success!

*Thanks to Carol Ann Waugh's Stupendous Stitching class on Craftsy--I first learned this technique when I did her class last year. (The link to her class is an affiliate link--thanks for supporting this podcast and blog! The second link is to my review of the class.)

2015 Quilty Resolution Challenge and Giveaway

It's that time of year!

You'll need to listen to Episode 171 In Which We Talk 2015 Quilty Resolutions (posted 12-31-14) to hear the set-up for this year's quilty resolution challenge. 

Once you've done that, use this form to submit your 2015 Quilty Resolution and optional word-to-live-by.

If the form doesn't appear above, or doesn't work for you, here's a direct link: https://docs.google.com/forms/d/1pGxo2nkilwznjJfMfoIuvYyQaSt1KU_Bx9zMXJw1ITI/viewform

What am I giving away? 

Anyone who enters their resolution in the form above will be entered in my giveaway! I'll be choosing three (count 'em--three!) winners. Each winner will win one set of fat quarters--I'll be choosing.

Maybe this set of soft, mostly taupe-y, somewhat William Morris-y, fat quarters will come home to live with you!

Maybe this set of soft, mostly taupe-y, somewhat William Morris-y, fat quarters will come home to live with you!

Or maybe you'll get this set of Stonehenge fat quarters, looking a bit like stained-glass windows.

Or maybe you'll get this set of Stonehenge fat quarters, looking a bit like stained-glass windows.

Or, perhaps, this fun set of brights will be yours to play with!

Or, perhaps, this fun set of brights will be yours to play with!

How do you enter for the giveaway?

First, use the form above to enter your 2015 Quilty Resolution (and optional word-to-live-by). 

Second, use the Rafflecopter widget below to register your entry in the giveaway. (I'll be using the Rafflecopter list to choose winners for the giveaway.)

Hey, if you want to leave a comment below too, that doesn't hurt--but I'm not including comments in the giveaway. That's just for people who take up my challenge for 2015!

How long do you have to enter?

This giveaway closes at midnight Eastern Time (where I live) on January 31st. So you've got a little time to think...but don't forget to enter!

I'm looking forward to reading your resolution!

December Craftsy Class Update (Final for 2014)

Craftsy Logo

Well, dang. I had a November Craftsy Class Update all written and intended to schedule it to post while I was gone. Apparently I never did, because I just found it still sitting in my drafts folder. So this month I'm catching both my November completions and December completions--not that I've gotten a lot done in December because...well, you know. Something about travel, about only being home one week of the month. Still n' all, I managed to complete two classes this month to add to the four last month, so that's not bad!

Check out the very end of this post for my grand summary of my progress on my 2014 Quilty Resolution regarding the completion of Craftsy classes.

New Completions

(+6)

Classes in Progress

(3)

Proof I've already started working on the Sue Spargo class...

Proof I've already started working on the Sue Spargo class...

Classes added this month

(+2)

I succumbed to the Craftsy end-of-year sale and got two more classes at $19.99 each. I can't be very sorry about that, especially since I immediately finished one and got started on the other.

Classes To Be Completed

Current count:  12 (-4 from last month as I added 1)

Completed Classes (all topics)

Current count: 45 (+5)

2014 Quilty Resolution Summary

A few of my Craftsy class pics from 2014

A few of my Craftsy class pics from 2014

So, how did I do, in total, on my 2014 quilty resolution regarding completing Craftsy classes? I never set a specific number to be completed, nor did I have the real intention of wiping the slate clean by the end of the year. I was far too realistic for that. Plus, as you know, I bought new classes through the year in addition to working on ones I'd already owned. For the most part, the new classes got finished pretty quickly. New is always more interesting, to be honest. So I'd say about half of the classes I didn't get finished have been in my queue for a long time; the other half were purchased in 2014. I suppose that's not a bad balance.

When I started in January 2014, I had:

  • 14 completed Craftsy classes.
  • 21 to-be-completed classes (those I already owned but hadn't finished or, in many cases, even started yet).

At the end of December 2014, I now have:

  • 45 completed Craftsy classes (+31 from 2013)
  • 12 to-be-completed, 3 of which are currently in progress (-9 from 2013, but the math doesn't show the true picture because...)

...this means I purchased 22 classes during 2014, most of which I then completed.

It certainly would be understandable if you were thinking, "Yeah, but did you really learn anything? Is it possible to take that many classes and absorb the material?" The answer is, yes. Sure, there are some classes I went through and decided, "Nope, not for me, not right now, anyway." But they're in my memory banks (and on my computer) for future reference. Some are classes with techniques that I continue to work on--such as spindling, dyeing, and free motion quilting. I can indeed say that I picked up hints or tips from just about every class, even if most of the class turned out to be not my bag or stuff I already knew. That being said, there are several things I do now that I didn't do before--making homemade pasta being a major stand-out, and spinning, and being far more brave and confident in my machine quilting. So yes, those 45 completed classes (or 31 completed in 2014, anyway) were all worth the time, and have helped me improve. 

I can also say, however, that though I'll continue to do my monthly updates in 2015 (it keeps me plugging along and I really do want to finish the 12 remaining on my list) and will most likely continue to buy new Craftsy classes on occasion, in general I'll be doing a lot fewer this coming year as I have other things on my horizon that'll be taking up some time. So no, Craftsy classes aren't continuing as part of my 2015 Quilty Resolutions. I have another plan for that. Stay tuned.

(Usual transparency statement: This post contains affiliate links and I will be compensated if you make a purchase after clicking on my links. Thanks for supporting this podcast and blog!)

#BFSI Craftsy Class Review: A Modern Take on the Mother Sauces with James Peterson

Craftsy

Yes, it's Black Friday, and once again I'm refusing to shop. However, I'm also not really hosting my usual #BFSI (Black Friday Sew-in) because I dropped my machines off for cleaning/tune-ups already--since I'll be gone three weeks, I figured this was the best time to do without. Unfortunately, I ended up with more time on my hands today than I thought I would and I'm really missing those machines!

However, it did give me time to finish up a Craftsy class, and I figured I'd quick post the review today since Craftsy is having a big Black Friday sale with all classes $19.99 or less. So grab the ones you've been looking at now!

This morning, sans machine, I took the time to finish A Modern Take on the Mother Sauces with James Peterson. To a certain degree I've been working on this class for awhile, watching lessons here and there, waiting until I had the time to try out one of the techniques. This one was a little trickier to decide what to try than the other sauce class I took awhile back, Homestyle Pan Sauces with Martha Holmberg (see my review here). Homestyle Pan Sauces is geared more at simple and relatively quick sauces you can make even on a weeknight when time is short. Mother Sauces take more investment of time, and willingness to wash a few more pots and pans afterwards. To tell the truth, some of what I learned from this class is, "Unlikely to make that one at home!" But that's part of the learning process--discovering what your limits are. None of the sauces are difficult, really; it's just a matter of time and, again, being willing to wash a bunch of pans. 

Holding steady...

Holding steady...

However--one of his lessons that I was willing to take on: I made myself a cranberry rosemary mayonnaise this morning to use on my leftover turkey sandwich for lunch, it being the day after Thanksgiving and all. I've made homemade mayo before, but I wanted to try his technique. I've used my food processor for this before; this time, I did it by hand. I picked up a nifty technique from him for keeping the bowl in one place on the counter while you're whisking--wrap a damp cloth around the base. My bowl was so lightweight it still bounced around a little unless I held onto it but it did make it wander a lot less than usual. He made some great suggestions for mayonnaise variations and how he serves them at barbecues that I may need to call on sometime over the summer when we've got a crowd over--they sound tasty!

I may do his aioli technique at some point--it's in the same lesson, and takes the same time and number of bowls (one) that the mayo takes. I could see myself doing a Hollandaise sometime, on a weekend or for a brunch. I thought all of the other sauces looked quite wonderful, really, but they're mostly going to have to wait until I have a stay-cation or retire.

I enjoyed James Peterson's teaching style quite a bit. He's very laid-back and can come out with some very funny expressions here and there--he referenced stealing the soul of a particular ingredient, for example, which tickled me. I did find that some of the lessons I was able to watch on 1.5x speed because he speaks relatively slowly, so if I was just wanting an overview of the technique to determine if it was something I'd do again, speeding it up a little was great. Besides, it's fun to watch someone whisk that quickly. Once I decided I wanted to use a technique, I went back and watched it again at regular speed to make sure I hadn't missed anything. Plus, of course, I took lots of notes--one of my favorite parts of the Craftsy platform.

Cranberry Rosemary mayo--tasted far better than it looks.

Cranberry Rosemary mayo--tasted far better than it looks.

The lessons are very comprehensive--in addition to teaching how to make the basic sauce, he gives several variations (sometimes demonstrating them, sometimes simply talking about them), and in most of them he also gives one quick recipe or demonstration of how you'd use the sauce--a cauliflower gratin, for example, or poached fish, and so forth. 

If you're a foodie and are willing to invest some time in getting great results, this would be an excellent class for you. Even if you're not into cooking, I actually found it very interesting to learn what goes into sauces I like to order at restaurants--now I finally know what they're made from and what makes them special, even if I don't ever tackle making them at home. 

The Basics

  • 8 lessons; the intro is 3 minutes, but the remaining 7 lessons range from 20-30 minutes long.
  • Lesson 1, the introduction, does the usual teacher introduction, but then explains what a "Mother Sauce" is and why they're good to learn how to make.
  • Lesson 2 is Béchamel Sauce; Lesson 3 is Beurre Blanc (another one I'm likely to try at some point); Lesson 4 is tomato sauces, although not necessarily "your grandma's Italian pasta sauce cooking on the stove all day," but other types of sauces using tomatoes; Lesson 5 is Brown Sauce, Demi-Glace, Glace de Viande, and Bordelaise; Lesson 6 is Velouté (this was a new one on me!); Lesson 7 is Mayonnaise and Aioli--inclduing a brief discussion of why much of what you see called aioli in restaurants isn't actually aioli; and Lesson 8 is Hollandaise and Béarnaise sauces.
  • The class materials are also very comprehensive. Not only do they include the recipes he demonstrates in class but a ton of variants on a lot of the sauces, and a glossary of terms at the end. 

Even though, the day after Thanksgiving, I'm watching this class and saying, "Nope, not gonna wash that many pots again," the likelihood is that once I'm a few weeks removed from kitchen chaos I'll decide on some relaxed weekend that spending a few hours making a really wonderful, fancy French sauce for dinner sounds like a lot of fun. I would definitely take other classes from James Peterson. Two thumbs up.

Again, that's A Modern Take on the Mother Sauces with James Peterson. And yes, it's on sale today!


Craftsy Class Review: Strip Your Stash with Nancy Smith

I've owned this class for awhile. A l-o-n-g while. I waffled frequently about whether or not I was going to use it to actually make a quilt. I've ultimately decided that this kind of quilt is a fantastic retreat project, and since I'm not likely going on retreat anytime soon due to scheduling issues, I may as well go ahead and review it in concept, because I know it's a concept that works. (I've done similar in the past.) So, unfortunately, no photos of my own work based on the class!

Strip Your Stash with Nancy Smith shows how to cut your stash fabrics into strips of varying sizes, sew them back together to make a new "fabric," then cut different types of shapes out of that fabric to create some really fun quilts. It's more or less string quilting, although with bigger and, in her examples, more color-coordinated "strings."

Why would it make a great retreat project? Because part of the process is extremely repetitive--cut, cut, cut, cut...sew, sew, sew, sew. Once you've got your new fabric made, of course, then it gets really interesting again. So I need the kind of setting in which I can have all sorts of other things going on to entertain me while I'm cutting, cutting, cutting, and sewing, sewing, sewing. 

In the class, Nancy walks you through how to choose effective color combinations, and then walks you through the cutting, sewing, and pressing of the strips. This is the lesson you'll really want to pay attention to as she gives good advice for how to keep those strips from going all whacked when you're sewing them together. (Never sewn a bunch of long strips together side-to-side? It's not as easy as it feels like it should be!)

After the fabric is created, the remainder of the lessons go through several possible block variations cut from this stripped yardage, including very helpful tips relevant to each one. And let me tell you, the quilts are all just so much fun. I do really like the designs and could easily see myself designating one of them as a retreat project in the future.

The last lesson, entitled "Good to the Last Scrap,' gives several examples of how to use up the progressively-smaller pieces of scrap stripped-fabric you'll have left from doing any of the previous quilts. There are some cute ideas here!

Want to see some pictures of projects based on the class? Check out the class project page here. (You may have to be a member of Craftsy for that link to work--apologies if that's true!)

The Basics

  • 8 lessons, ranging from 8 to 35 minutes, though most are in the 20 minute range.
  • Lesson 1 is Nancy's introduction, as well as a really good discussion of color choices.
  • Lesson 2 is making the stripped yardage. She really takes her time with this and offers a lot of tips along the way, so it's worth paying attention to even if you already know the concept.
  • Lesson 3 starts the block designs with Carnival Squares in two variations--I love this block; Lesson 4 is Candy Strips; lesson 4 is Paint Box--another of my favorites; lesson 5 is Kaleidoscope with some great information about putting the rows together; and lesson 7 is Curved Play, which introduces curved piecing. '
  • Finally, as mentioned above, Lesson 8 gives several great ideas for using up the scraps. 

I did enjoy watching Nancy Martin and I really do like several of the block designs. As I said above, I could see myself doing this sometime in the future--just not right now. So, with apologies for a photo-free-post, I'm giving Strip Your Stash with Nancy Smith two thumbs up.

Craftsy Class Review: Travel Photography: The Essential Guide with Jad Davenport

Gee, have you heard? I'm about to take a trip. A *Big* Trip. Therefore, I've been brushing up on my photography skills, and Jad Davenport's Travel Photography: The Essential Guide seemed just the ticket. 

His main theme of the class is to take your time. Get to know the area. Get to know the lighting. Think through themes you want to convey in your photos of the trip. He states at the outset: You're not just taking photos, you're making pictures. 

As I was watching these lessons, I realized that, for the most part, I have been working on everything in this class for many years. Not only do I enjoy photography myself, but as I do most of the marketing and all of the resources for my organization, I'm also consistently trying to improve my photography so we can use my photos rather than having to pay for stock--as well as the fact that when I take photos at an event to use in publicity for future events, I know exactly what photos I want to have. I did pick up a couple of tips and the conversation with the teacher available on the Craftsy platform is quite helpful. 

Boy behind wire fence at refugee camp in Thailand

Boy behind wire fence at refugee camp in Thailand

I've always known that I want to take pictures that "tell a story." Jad's discussions of making pictures with intention (lesson 2) are exactly that. Think through what story you want to tell--what theme you want to explore with your photos. He discusses the theme "edges" that he often uses--where are the edges between things? As I was listening to him talk about that I immediately recalled one of my favorite photos I took during my 2008 trip to Thailand, of a man carrying a basket on his back walking down the side of a road with a motorcycle going by (included in this post). I took it because it represented to me the strange blend of ancient and modern I saw all around me in Thailand. I also have several photos of people standing behind the fences on the edge of the refugee camp, representing their lack of freedom. Apparently I also explore the theme "edges" without realizing it!

Juxtaposition of ancient and modern in Thailand

Juxtaposition of ancient and modern in Thailand

That being said, with apologies to Jad and his emphasis on taking your time to find the best photos, usually when I'm traveling I'm not able to just wander about at will, going back to places at different times of day, waiting in one location for half an hour to get the perfect shot, asking people to pose for a series of 25 shots to make sure I get one good one. Few of us have the luxury of time; rather, we generally have to grab photos on the fly. This means training our eyes to know immediately what will likely make a good photo; being willing to get into a different position to capture just a particular angle; knowing ahead of time what story we want to tell. And, of course, taking thousands of pictures so we'll get a handful of good ones. Thank you, digital technology.

This class will help you train your eye. Jad discusses issues of composition, getting unique perspectives, using available light, and the importance of "moments." For someone new to photography or someone who is trying to improve upon the shots she normally takes, I would recommend this class. For me, while I enjoyed Jad as a teacher and loved seeing his photos as examples (beautiful stuff!), I didn't learn as much from this class as I'd have liked; but then, I've been working on these concepts already. Sometimes I just don't give myself enough credit for what I already know. However, it did put some ideas back in the forefront of my mind for when I'm traveling. And I picked up a great tip for a portable tripod-hack that he learned from the Navy Seals. I have to get myself to Home Depot this week to pick up the parts to make it for myself! 

"Joy"--of girls playing on the beach in Oregon when we finally let them out of meetings.

"Joy"--of girls playing on the beach in Oregon when we finally let them out of meetings.

The Basics

  • 7 lessons, ranging from 17 to 32 minutes in length.
  • Lesson 1 includes the usual teacher introduction (and he's got some serious street cred), but also addresses planning ahead, travel gear, and basic camera techniques to set yourself up for success.
  • Lesson 2 lays the foundation, including how to assess the location for possibilities, four elements of a good photo, and "building" a photograph.
  • Lessons 3-6 then each explicate one of those four elements of a good photo in more detail. There are some great tips here in things to be paying attention to as you line up for a shot. Even if you don't have a lot of time or if you have a point-and-shoot with no manual controls, you can still usually take just a minute or two to think through where to stand, where to aim, how close to be, how to compose the best possible photograph.
  • Lesson 7 talks about putting together an "artful presentation," rather than just showing people pictures willy-nilly. How do you put your photos together to tell a story or create a mood?

For me, I gave Jad Davenport's Travel Photography: The Essential Guide one thumb up. (Although that might go to two thumbs if this tripod hack thing works for me!) For anyone who is newer or less confident in their photography, it's two-thumbs up. Great guidance, helpful tips, and it's almost worth it just to see his photos!

Craftsy Class Review: Continuous Line Quilting with Ann Petersen

Online Quilting Class

This class has been in my queue for some time now, but I moved it up to the top of the pack this month because I have several UFOs all in the same stage: They need to be quilted. I've been working my way through all my free-motion quilting (FMQ) classes most, to be honest, to get inspiration for designs. I feel like at this stage I know how to do FMQ--it's just a matter of a lot more practice and better thoughts about design patterns. 

And this class immediately paid off.

And so, my review of Continuous Line Quilting with Ann Petersen

I'd already taken another of her Craftsy classes--check out my review of Beyond Basic Machine Quilting. I liked her then, and I still like her now. I won't take time here to talk about her teaching style and such as I've already covered that in my previous review.

Just for a quick definition, if this is an unfamiliar term for you: "Continuous line quilting" is doing a quilt design in a single pass, without cutting thread and restarting somewhere else. It's the best way to make FMQ fast and simpler, rather than having to keep stopping at the end of one line, locking the stitch in some way, breaking thread, moving to another section, and starting all over again. 

practicing

practicing

This class is very helpful (1) if you're looking for more quilt design ideas (most in this class were not ones I've already found in other classes, or she brings a new twist to the design); or (2) if you've been trying to figure out how to use some of the standard (traditional) quilt designs in a continuous-line way. For me, with all the studying-up I've been doing on FMQ for the last couple of years, I found that aspect of the class (especially lesson 8) the most useful for what I needed; that's where she walks you through the process of how to take a standard traditional quilt design--often those developed with hand-quilting in mind--and make it work better for FMQ by figuring out where the continuous lines could be. Now-a-days, more and more designs made with FMQ in mind are being published and produced as stencils. However, there are still a lot of great quilt designs out there that need some slight adjustments to make them easier to do FMQ-style, and this class is really helpful in teaching you how to look at designs differently, break them into component parts, and think through your quilting plan.

Signature as seen from the front

Signature as seen from the front

I chose not to do the class project and, rather, look at how I might use any of the designs on current projects I need to finish. As it turned out, it was the very last few moments of the very last lesson in the class that inspired me. I'd just finished the baby quilt for my great-niece earlier this week but was realizing, over my morning coffee today, that I hadn't put a label on it. Since it is for her first birthday, a very momentous occasion in any person's life, I felt badly that I hadn't put something on there marking that.

And then I watched the last class while I was eating breakfast. And there, at the very end, Ann FMQ'd her name onto the corner of the quilt as her label. Well, of course! I've done words on quilts once or twice before but it rarely comes to mind as a first option. I was pleased to be reminded. 

Signature from the back

Signature from the back

From the pictures on this blog you can see the results. I practiced with a sharpie on paper first because, face it, it's been awhile since I've written in cursive--or, at least, a cursive that would work in FMQ. Then I practiced on a quilt sandwich to make sure I had the tension right--it took a few passes. But then I was ready to do it on the quilt.

It's a secret message, to be sure--I intentionally chose thread that would blend on both sides. It says, "To [name] for her first birthday" in one border, then "Love Great Aunt Sandy"; no comma because it wouldn't have been visible anyway, but it has the nice grammatical effect of commanding her to love her great-aunt so I'm okay with that. Then the other two borders include words that come from the meaning of her name, almost as sort of a blessing. I was very pleased with the way it turned out. So, thanks for the idea, Ann!

The Basics

  • 8 Lessons, ranging from 36 1/2 minutes to 8 minutes, although the 8 minute one is an outlier--they're mostly 20-30 minutes long, so you really get your bang for your buck in this class.
  • The introduction talks about fabrics and tools, tracing the stitch path, transferring the design, and some basics about FMQ and troubleshooting.
  • Lessons 2 and 3 present several motifs and variations on them
  • Lessons 4 and 5 address ways to travel from one part of the design to another, some of which help make simple designs appear even more complex
  • Lesson 7 walks through the process of breaking a design down into component parts to make it easier to quilt in a continuous line
  • Lesson 8, as mentioned above, addressed converting a non-continuous line design into continuous line. As always, she gives several options here for you to consider.

When I'm back in the saddle after the holidays, I plan on practicing some of the designs from her class a little bit to get myself back in the habit of FMQ after a bit of an absence from my sewing machine. But mostly I'm looking over my UFOs to see if any of the motifs or suggestions from her class will inspire me to finish one or two of them!

Once again, that's Continuous Line Quilting with Ann PetersenTwo thumbs up!

(Usual transparency statement: Using Craftsy links or banners on this post help supports this podcast and blog. Thanks!)

October Craftsy Class Update

Online Quilting Class

Time for my October update!

I recently realized that I've got one less month to hit my 2014 quilty resolution goal of getting my to-be-completed-classes down to a single digit count, as I'll be out of the country for most of December. Unlike other recent trips, I won't have access to WiFi to watch classes while I'm gone, either. So my overall goal has been adjusted some. I'd like to get at least two more classes done in November--which means I'll miss the single-digit goal by a couple of classes. But I'll still have made fantastic progress! (The upside to this is that once I get back from said overseas trip, I'm unlikely to feel up to much else besides sitting and watching Craftsy lesson videos for several days, so I may make great progress on classes then!)

New Completions

(+3)

Dot-to-Dot Quilting results

Dot-to-Dot Quilting results

Classes in Progress

(3)

Classes added this month

(+3)

  • Machine Quilting: Small Changes, Big Variety with Angela Walters: This was on sale mid-month and I thought it would make yet another good addition to my collection of machine quilting classes and, perhaps, even my collection of Angela Walters classes. I may not get to focusing on these until the new year (I'm running out of 2014!) but I'm looking forward to some really intentional work time on my machine quilting skills. 
  • Dot-to-Dot Quilting with Angela Walters: Okay, may as well make the collection complete. I bought this one because one of my UFOs seems like it will lend itself perfectly to this technique. I've been stumped as to quilting designs for it, so I finally went ahead and bought this class that I've been looking at for awhile. But I also finished it right off the bat! (See the full story in my review.)
  • Travel Photography with Jad Davenport: I got to the end of the month with no plans to purchase any more Craftsy classes this year when I got an email from Craftsy that told me I'd bought so many classes at this point I'm now considered a "top student" and they were gifting me a free class. That's one of those "good news/bad news" moments: Bad news that I've earned top ranking with Craftsy on the number of classes I've bought (sigh) but good news that yay! I've now got a free class! I perused for awhile and decided that this photography class would be the best purchase as I'm about to, you know, travel...and take pictures...and such. I watched the first couple of lessons right off, so I'm already on the way to finishing this one quickly. I picked up an excellent tip about travel tripods in the very first lesson so it's already been a worthwhile investment!

Classes To Be Completed

Current count:  16 (-1 from last month)

Completed Classes (all topics)

Current count: 39  (+3)

(Usual transparency statement: This post contains affiliate links and I will be compensated if you make a purchase after clicking on my links. Thanks for supporting this podcast and blog!)

Craftsy Class Review: Roasting Techniques Every Cook Should Know with Molly Stevens

It's the time of year when we go from grilling on the back patio to roasting in our kitchen oven. Cool nights are just made for a nice, comforting roast-of-whatever, so it was time for me to finish up a Craftsy class I'd started awhile back, Roasting Techniques Every Cook Should Know with Molly Stevens.

I really like Molly Stevens as a teacher. I took one of her other Craftsy classes, Secrets of Slow Cooking: Mastering the Braise last winter (see my review here)--I'm thinking I may watch a couple of the episodes for refreshers now that we're back into slow-cooker weather as well. In any case, I knew I liked her style from the braise class so I figured the roasting class was a safe bet.

And sure enough, I still like her style. She's very no-nonsense but very friendly. She explains things clearly, and gives a couple of science lessons in the middle of certain parts so you can better understand what's actually happening when your meat or your produce is in the oven at different temperatures. The class materials are extensive and, in addition to 13 recipes (by my count), include very helpful temperature charts, information about dry brine and wet brine techniques (plus ingredient lists), and at-a-glance instructions for which cuts of meat work best in each technique.

I haven't yet worked my way through all the various roasting techniques. Indeed, at this point I've only been home one night in which I had enough time to roast anything, so I did a high-heat roast on a roast beef. The roast was done perfectly using her techniques, although next time I'll probably use a different technique for that particular cut of beef, or a different cut of beef for that particular technique. It was just a titch (a very little titch, really) on the dry side, but it was incredibly tender and exactly the right amount of pink that my husband and I prefer. 

Tomorrow night (Friday), I'll have a little more time I think, so I'm planning to use her technique for roasting a whole chicken. I really like the usual way I do chicken so we'll see if her technique beats it. 

That being said, there are several other techniques and recipes she demonstrates in the class that sound mighty tasty to me, so I'll be heading back to these class materials a few more times in the weeks to come, I'm sure. Those sear-roasted steaks and the Maple-Glazed Rack of Pork are just calling to me. Really, just about every lesson had my mouth watering as I watched it. Yum.

And for the non-carnivores out there, she does have a segment on roasting vegetables--potatoes, a vegetable medley, and green vegetables. I've done some vegetables in the past but haven't had consistent results so I'm looking forward to trying out her techniques for that as well. (That being said, the bulk of the class is about meat so vegetarians may want to check out other Craftsy classes, such as Love Your Vegetables with Anna Bullet or Big Bowls: Hearty Vegetarian Meals with Martha Rose Shulman. I'll probably pick those up next spring when my vegetarian daughter moves back home from college.)

I really enjoyed this class and I think I'll keep learning from it as time goes on. I'm really looking forward to some wonderful weekend meals!

The Basics

  • 7 lessons, ranging from nearly 10 minutes to almost 30 minutes.
  • Lesson 1 goes into the science of roasting, which actually really does help to know.
  • Lessons 2-5 cover different types of roasting: high-heat, combination-heat, sear roasting, slow-and-steady roasting. In these lessons she also offers bonus information such as a pan sauce, pre-salting, carving, a compound butter recipe, flavor boosters and glaze. 
  • Lesson 6 is roasting vegetables, already mentioned above. She has good tips here that will make your vegetable roasting efforts successful.
  • Lesson 7 is about stuffed roasts--pork loin and beef tenderloin. 

Again, that's Roasting Techniques Every Cook Should Know with Molly Stevens. Two big thumbs up--especially if it's a cold, rainy or wintery day!

(Usual transparency statement: Using Craftsy links provided in this post helps support this podcast and blog. Thank you!)

Craftsy Class Review: Dot-to-Dot Quilting with Angela Walters

Online Quilting Class

So this one had been in my wish list for a few days, and I had no intention of purchasing it until I'd knocked a few other quilting classes out of my queue. And then I realized I had a UFO I really needed to finish before the end of November. And then I realized it was quite possible that this class would have the perfect solution to my "How to quilt this thing" dilemma. And then it went on sale. So I bit.

Here is my review of Dot-to-Dot Quilting with Angela Walters.

 I'll start by saying Angela Walters is an excellent teacher and very easy to watch. Her classes are much like her books (which I have reviewed before)--step-by-step, clear instructions, with good diagrams as well as her demonstrations. 

Using Golden Threads quilting paper to test out my design plan.

Using Golden Threads quilting paper to test out my design plan.

Here's one caveat: If you've never machine quilted before, you should consult other resources or classes first. This is a class about quilt designs: She doesn't talk about making your quilt sandwich, basting, or stabilizing the quilt. She assumes you are already at least that far in your experience. Indeed, I was wondering for several lessons whether she did any stabilizing (stitch-in-the-ditch) at all and finally found reference to it in the discussion threads on the side. As I watched the next lesson, I could finally see some evidence of stabilizing stitching.

Closer view of my quilt design sketch, marking what points I'd be using as my "dots". I then free-handed the actual quilting.

Closer view of my quilt design sketch, marking what points I'd be using as my "dots". I then free-handed the actual quilting.

That being said, once you know how to prep your quilt for quilting and are ready to start doing some designs, this would be a good starting point. These designs are very simple, but have lots of possibilities for making them more complex. They're good no-mark designs, but if you're more comfortable marking, there are some very fast and easy ways to do that. On the other hand, most of the designs she shows in this class involve straight lines, which can be remarkably difficult to do with a free motion foot. (Although you can use a walking foot if you want, that requires a lot of twisting and turning of the quilt so it's far simpler to become competent at doing straight lines free-motion.) 

I was able to immediately put the class techniques to use on a wallhanging/baby quilt I'm trying to finish for my great-niece's first birthday at the end of the month. I made it a long time ago and it's languished from inattention but then, I always work better to a deadline. I'd been waffling on how to quilt it but found the dot-to-dot technique the perfect solution. 

Quilted--you can see the chalk lines and stitching on the black but the thread blends on the white and red.

Quilted--you can see the chalk lines and stitching on the black but the thread blends on the white and red.

The pictures embedded in this post show my testing process as I tried to figure out what design would work well on this top--I sketched it out on Golden Threads quilting paper first (the most sheer paper I had in my cabinet), but I didn't use the paper when I did my quilting. I just wanted to see how my design thoughts would help those black and white background squares feel like a single block. For the first few blocks, I did sketch out in chalk on the black fabric where my lines should be and based on that, was able to then keep track through the whole block of where I was headed. By the end of it, I no longer had to sketch anything out; I'd gotten into a rhythm of knowing where to aim next. (The last picture is quilted--you can see the chalk lines on that block, but you can't really see the thread in the white or red.)

My need to continue practicing free-motioning straight lines aside, this was a great way to figure out a nice quilting design quickly, and execute it almost as quickly. I'm glad I bought this class!

The Basics

  • 9 lessons, ranging from 3 minutes (the intro lesson) to 10 1/2 minutes. Although the lessons are quite short, she gives good information in a very concise manner. I still felt like I'd gotten my money's worth from this class.
  • The lessons include quilting starbursts, starburst variations, diamonds, diamond variations, lattices, lattice variations, and borders. The final lesson is a gallery that shows all of the designs used in a variety of ways. 
  • The class materials include the pattern for a quilt if you'd like to use that to do the class project; it then includes diagrams of all the designs she shows in class, and three examples of how the designs could be used in the class project quilt.

Again, I do recommend Dot-to-Dot Quilting with Angela Walters. It really helped me in figuring out possible quilt designs more easily. And now I've got a UFO nearly complete!

(Using Craftsy links in this post help support this podcast and blog. Thank you!)


Craftsy Class Review: Pictures to Pixel Quilts with Caro Sheridan

Online Fabric Patterning with Wax Resist Class

And yes, that's not a typo--her name is Caro, not Carol.

Pictures to Pixel Quilts with Caro Sheridan is a free class that I picked up a long time ago. At the time, I was fascinated by pixel quilts and really thought I would do one. Since then, I've come to the conclusion that I'm unlikely to do one any time soon. I still enjoy them when I see them done by other people, but at the moment it's not my vibe. At any moment, however, that could change, so I decided my best move at this stage would be to watch all the lessons in this class so I'd know what was involved and have it available as a concept in my mental filing cabinet. Or my mental pot-o-bubbling-ideas-brewing-on-the-back-burner. Whichever is a more apt description. 

Watching Craftsy on my iPad while out of town

Watching Craftsy on my iPad while out of town

And then I was out of town for a week with a room to myself, which almost NEVER happens when I'm out of town for work (not for a whole week, anyway). So I took advantage of the alone time and watched the lessons when I got back to my room at night. I even had decent hotel WiFi--which also almost never happens.  

A "pixel quilt" is definitely a child of the digital age. If you're unfamiliar with the lingo, a pixel is a single unit of information in a digital photo; pixels are the dots which, when combined, make up the image on your screen. Photos are often referred to by their pixel size. The more pixels, the more image information. When a photo goes too low resolution (low pixel count) to be recognizable as it's original image, it's said to be "pixellated." That's when you see all those squares show up instead of the picture. This background information is important when you get to choosing what image you want to do in this style of class.

But first, let's start by saying that Caro Sheridan is a very personable teacher, although pretty low-key, low-energy. She's definitely got more of a dry wit presentation than bubbly bestie or kindergarten teacher or maternal figure like other teacher personalities can be. I'd taken another class from her on Craftsy, Shoot It: A Product Photography Primer, and you can find my review of that class here. Interestingly, as I recall, I also watched that one mostly while on vacation. Caro seems to travel quite a bit with me. In any case, I still enjoyed her this time around.

For a free class, this one is certainly meaty! Carol describes her whole process for making pixel quilts in great detail. She gives good examples of what kinds of photos work best for pixellating--which is where that information about what pixels are and how they work becomes useful. You need to choose an image that, when pixellated to whatever degree you want to pixellate it, will still be at least recognizeable as what it's an image of--unless you want to go abstract, which is always an option. But Carol sticks to using images that you can still tell what the image is, even when pixellated. 

Caro also talked about how to go about pixellating an image, walking you through the process step-by-step using one photo-editing software but giving enough general information that you should be able to figure out how to do it in whatever software you choose to use.  

And then she gets into spreadsheets. Oh, this woman is a spreadsheet maven! She teaches how to set up the spreadsheet, how to use formulas to help you color the spreadsheet as per your pixellated image, how to use that spreadsheet to then figure out the number of squares you need of each color, and so forth. I found myself taking notes on the spreadsheet part to apply to spreadsheets I use in my job--no pixellated images involved!  (She demonstrates the spreadsheet portions using Google Docs spreadsheets, which is free for anyone to use. So you don't have to own any particular spreadsheet software to use this process.)

But for you old-schoolers, she does also show how to do it using a graph paper and pencil. In fact, even her spreadsheet method still involves a certain amount of pencil work, so Luddites will be happy.  

Finally, she walks through calculations needed, organizational tips, and sewing units together. She doesn't get into quilting designs or finishing--you're on your own there. But for a free class, one can forgive this especially due to the amount of information provided for creating the quilt itself.

If you're into the idea of making a pixel quilt, I highly recommend watching this class all the way through before you start. I think knowing what's coming next will really help you make better decisions at the outset. It's a straightforward process, but not an altogether simple one. But you do get very cool results.

The Basics

  • It's free!
  • 6 lessons. Lesson 1 is just Craftsy's little sales pitch of less than one minute. Lessons 2-6 are the class itself.
  • Lesson 2 is 4 minutes long and introduces Caro and the concept of pixellated quilts.
  • Lessons 3-6 describe the process in detail: lessons range from 19 1/2 minutes to nearly 40 minutes long.
  • Lesson 3 gives fantastic help for what kind of photo will work well, and how to create your pattern from the photo. Lessons 4 and 5 are all about the spreadsheet and calculations. Lesson 6 is about fabric selection, organization, and assembly.
  • She talks at the beginning (maybe in lesson 2, but I can't remember for sure now) about her recommended number of colors to use and so forth, as well as in lesson 6, so fabric selection is touched on a couple of times. She's a big fan of Kona solids, but you can use whatever fabrics you choose. This type of quilt, though, is most effective when using solids. Even "read as solids" may be a hair too distracting to allow the pixellated image to read true.

I enjoyed watching Pictures to Pixel Quilts with Caro Sheridan, even if watching it mostly convinced me this isn't something I'm going to choose to do at the moment.


My 3rd Quarter Resolution Check-in & September Craftsy Class Update

Craftsy Logo

I suppose it's only fitting that, since I did the August update in the beginning of September, I should do the September update in the beginning of October. At some point I'll get myself back on track!

We just completed the third quarter check-in on the 2014 Quilty Resolutions. My three "monkeys" were (1) Craftsy classes, (2) using my stash whenever possible, and (3) machine quilting. I've done great on #2, using my stash--I've bought very little fabric this year except borders, backing, and binding, and half the time I was even able to get that out of my stash as well. (No, I don't count buying PFD fabric since that's a supply for my hand-dyeing--it's in a different mental category for me.) Monkey #3 is related to monkey #1 since many of my Craftsy classes are on machine quilting. So my progress on #1 has a positive impact on achieving #3--and I've been going great guns on #1! I've had a bit of a slow-down in completions this summer but progress is still steady.

New Completions

(+ 3)

Classes in Progress

(2)

Classes added this month

(0--woo!)

Classes To Be Completed

Current count:  16 (-3 from last month)

Completed Classes (all topics)

Current count: 36 (+3)

(Usual transparency statement: This post contains affiliate links and I will be compensated if you make a purchase after clicking on my links. Thanks for supporting this podcast and blog!)

Craftsy Class Review: Designing Modern Quilts with Weeks Ringle

Online Quilting Class

I feel like I'm a little behind in my Craftsy class reporting--I know I missed doing my update at the end of September. I'll catch up with that this week. 

Meanwhile, in the midst of all the cooking classes I've been having a ball with, I have done another quilt class. This one was a theory class rather than a project class, so I mostly watched the lessons and took notes. But more about that below.

Here's my review of Designing Modern Quilts with Weeks Ringle

The main thing to understand with this class is that although the phrase "modern quilts" is in the title, the information in the lessons applies across the board, regardless of the type of quilting you're doing. Weeks does give some definitions of modern quilts and modern design in lesson 2, and there are some design ideas towards the end that are related to modern quilt sensibilities more than traditional. Of course, all the quilts she uses as examples are modern quilts as well. Still n' all, even if you have no interest whatsoever in modern quilting, you'd learn quite a bit from this class and be able to apply it to your traditional or art quilts easily. (Lesson 9 is probably the most "modern-quilt specific" as it deals with deconstructed traditional blocks and moving beyond blocks altogether, which are definitely modern quilt material.)

Exploration on color inspiration from "Old Masters" paintings

Exploration on color inspiration from "Old Masters" paintings

There's no class project but she does include "explorations" in the material--exercises meant to help you practice the ideas from the lesson. Although I chose not to do most of the explorations myself because they were things I was already quite comfortable with or was already practicing in other ways, I enjoyed the fact that she incorporated a review of the explorations in the classes themselves, using other student samples from past classes. It's a helpful way for you to do your own practice and then compare it with what she describes from others' work, to get a feel for what you did well and where you may still need expanding.

I enjoyed Weeks Ringle's presence. I've been familiar with her and her husband Bill's work for years, and I have a slight recollection of having seen a lecture by the two of them some time ago at one of the Houston festivals I attended, but I definitely enjoyed the opportunity to experience her as a teacher. I'd love to be in an in-person class with her--I suspect she'd challenge you gently, if you will. In other words, she'd make you want to reach further than you're comfortable, but you'd feel like she was doing it with kid gloves. 

I can't say I had any earth-shattering insights from this class but I've been studying design pretty intensely for the last couple of years so Weeks was going over familiar ground for me. It does always help to see different types of examples of the same principles, though, just to broaden my vision of how things can play out. It's always worth getting the same information in a variety of ways to  help you understand it more deeply, so although all of this was known territory for me, I still think it was worth my time to go through her lessons to get a different perspective.

As stated above, this isn't a project class and there's really not much in the way of specific class projects even in the explorations. The explorations are meant to be done as tests, not completed quilts. The class materials include one pattern for a quilt if you're looking for something like that.

I'd definitely recommend this class if you're new to studying design principles. It's one of the few true design classes on Craftsy, so take advantage of it! I'd also recommend it even if you've done some studying of design and want to look at it from a different angle. 

And, if nothing else, there's tons of eye candy with her quilts!

The Basics

  • 10 lessons, ranging from 11 to nearly 40 minutes in length.
  • The introduction is a serious introduction. Weeks spends a little time telling you about herself, of course, but most of it is about the importance of studying design and how to lay your groundwork for the rest of the class. It's a 33 minute lesson, so you jump into the learning fast!
  • Lesson 2 is where she talks about what makes modern modern, and what is available to us today that wasn't available in generations past.
  • Lessons 3 and 4 address color theory, and although she covers the basics here (color wheel, color schemes and so forth), she does also talk about the messages that color sends, which is a nice touch.
  • Lesson 5 addresses using prints, which gives good information about benefits and challenges; lesson 6, on the flip side, is all about using solids.
  • Lessons 7 and 8 talk about composition and execution. I enjoyed the lesson on composition (over 40 minutes!) because, again, she talks about some basic information you've likely seen in other places but takes it in slightly different directions; lesson 8 also has a very helpful section on avoiding design pitfalls.
  • Lesson 9, as stated above, is one of the few that's probably more closely related to modern quilting than other lesson topics, because it's all about messing with tradition or going in completely new directions. 
  • Lesson 10 talks about quilting and finishing, but to be clear, you'll get a lot more information about quilting from classes devoted to that part of the process. That being said, in many of her examples throughout the whole class she also talks about the quilting motifs and why certain ones were chosen, so you get a lot of inspiration here.

And so, my final review of Designing Modern Quilts with Weeks RingleI'd give this class two thumbs up!

(Usual transparency statement: Using the Craftsy links in this post helps support this podcast and blog. Thanks!)


Craftsy Class Review: Cooking Essentials: All About Chicken, with Marge Perry

Two reviews in one week! Bonus! Actually, I completed both of these classes some time ago and just haven't had the time to post reviews of them until now.

Here's another basic technique class, but this time it's all focused on one particular meat that I use a lot in my house: chicken. I actually like chicken quite a bit and don't get bored with it the way a lot of folks do, but even so, it's always worth picking up a few new recipes and tricks to keep things interesting.

Earlier this summer I picked up Marge Perry's Cooking Essentials: All About Chicken when it was on sale. I watched all the lessons during a period of time when I actually didn't have much time to cook (or quilt, or anything else for that matter). The lessons were a good length to watch on my iPad while I was eating breakfast or lunch, making mental note of things I wanted to try out later once my schedule eased up a bit. 

Roast chicken using Perry's methods--and a variation on her recipe with a mix of lemons, garlic, and fresh rosemary under the skin with salt and pepper on top. Some of the lemons snuck out from under the skin and charred just a bit on the top, but e…

Roast chicken using Perry's methods--and a variation on her recipe with a mix of lemons, garlic, and fresh rosemary under the skin with salt and pepper on top. Some of the lemons snuck out from under the skin and charred just a bit on the top, but everything else was perfect--the skin was crispy and the chicken moist. Yum.

Finally, I had a Saturday free--and it was a cooler day so I was ready to turn my oven on. Roast chicken seemed just the ticket, so I took advantage of the opportunity to put one of Perry's lessons from the class to work.

I've been roasting chicken for pretty much my entire cooking career, since both my husband and I really like it. (He's also an old hand at roasting chicken and will often make one for himself if I'm out of town.) If I recall, one of the very first dinners we made after we got back from our honeymoon was a roast chicken. In more recent years I've been playing around with different seasoning rubs, stuffing various things under the skin, and so forth. I didn't think Marge Perry would have much to teach me about a roast chicken. But oh, I was wrong. One simple change made a world of difference. Thanks, Marge! I'll be doing it like that from now on!

Each lesson focuses on a particular part of the chicken or taking the chicken as a whole. Each lesson also has a recipe it uses for that part and she walks you through many of the steps for that recipe. If you're looking for techniques and recipes, this is a great class. For myself, I would've liked a little more information on what other types of preparations work well for that particular part of the chicken; for example, qualities of that part that make it work better with certain types of preparations than others, or certain flavor profiles than others, that kind of thing. I am at a stage of cooking in which I far prefer to build my own recipes and want more information that will help me do that, rather than how to follow someone else's recipes.

Still, I did pick up a few good tricks on cooking with chicken in general from this class and, now that we've officially entered fall and cooler weather and more kitchen-based-cooking, I'm looking forward to testing out more of her techniques in the weeks to come.

After all, I just can't resist doing something named "spatchcocking." Don't know what that is? There's a whole lesson on it in the class!

Because this is a technique class, they've created it so you can dive in for one lesson and get everything you need to know for that technique without having had to watch any of the others. That means that there's some foundational information that gets repeated every time. After watching two or three of the lessons, I was quoting along with her how to measure the temperature of the chicken for doneness. But, still, that's not a bad thing to have drilled into my head.

On a scale of 1-10, I think I'd rate this class around a 7, maybe a 7 1/2 for me. But that's just because I want more cooking freedom, as it were. From the perspective of someone who's just starting out, or hasn't done much with chicken, or enjoys learning new recipes, this would probably be more like an 8 1/2 or a 9. She is a very good teacher, very polished but accessible, and the recipes do all sound quite tasty to me, even if I'm unlikely to use them as-is myself.

The Basics

  • 9 lessons. The first lesson is about a minute and a half of introduction. Lessons 2 through 9 range from 4 minutes to about 12 1/2 minutes.
  • The lessons cover boneless breasts, bone-in breasts, wings, thighs, drumsticks, spatchcocking, the whole bird, and how to cut up a bird--and that last lesson ends with best practices for hand-washing.
  • Each lesson is built around a particular recipe for that part, so there's a lemon butter sauce, a stuffing recipe, a sauce for wings, and so forth. 
  • The class materials include 7 recipes--all of which are covered in the class, if I recall, though there may be a throw-in that's not in a lesson. 

Cooking Essentials: All about Chicken with Marge Perry: again, somewhere between a 7-8 for me, but likely an 8-9 for others who are looking for more specific direction. In either case, definitely worth checking out!

(Using Craftsy links in this post helps support this blog and podcast--thank you!)

Craftsy Class Review: 20 Essential Cooking Techniques with Brendan McDermott

As I'd mentioned in a blog post awhile back, I had submitted a request to Craftsy some time ago to do some basic cooking technique classes aimed at new cooks--thinking especially of my kids and nieces and nephews who all are a lot more interested in food and cooking than I was at their age. Some of them have done in-person cooking classes with me but because of random work schedules, college, and little bitty babies in their respective lives, they don't always have time to haul themselves to a cooking school. Video lessons are the perfect answer. I was thrilled to get an email from Craftsy saying that my request had now been answered. Enter Brendan McDermott--one of my fave Craftsy teachers to date--and 20 Essential Cooking Techniques with Brendan McDermott. Since I'd helped make it happen, I figured I had to buy it myself.

And I'm glad I did!

Hardboiled eggs done perfectly--not over or under done. These turned into egg salad.

Hardboiled eggs done perfectly--not over or under done. These turned into egg salad.

Even a woman who's been scrambling eggs for [ahem] years can learn a few new tricks.

My recent dental issues meant I was having to restrict myself for days on end to soft, mushy foods. I had plenty of opportunities to use skills I'd learned from the class on homemade pasta I'd taken a few weeks ago, but I needed to keep protein in my diet so I started eating a lot more eggs than usual. This class has two entire lessons on eggs and walks through hard-boiled, poached, fried, scrambled, and omelettes. 've done most of those things...a lot...for a lot of years. The only two I hadn't done successfully were poached and omelettes--my poached ended up stringy and my omelettes ended up scrambled. But I always liked my scrambled eggs.


Poached eggs--yums.

Poached eggs--yums.

Still, boredom with soft foods made me willing to try new techniques just to do something different. And this old dog learned a few new tricks! Following his methods, my hard-boiled egg was perfectly done, my poached egg was beautiful, my scrambled eggs were extra fluffy, and my omelette stayed omelette-y!  

Brendan McDermott is fun to listen to, although his humor isn't quite as evident in this class as it was in his free knife skills class. (See my review of that one here.) His teaching style is relaxed, and he explains the whys behind the hows. I feel like I understand why certain techniques work better now than I did before, even where they were techniques I was already using.

​The lessons are each meant to be stand-alone--in other words, their working assumption in the class is that someone should be able to dip in, watch one lesson, and get all the information they need for that one technique without having missed anything from a previous lesson. This means that if, instead, you watch all or many of the lessons in a row, you will hear certain foundational information over and over. I can pretty much quote Brendan's instructions about heating oil verbatim now. But it's good information, so it's not bad to have it drilled into my head. 

Steak and shredded cheddar omelette, with the steak diced very, very small as I was testing whether I could handle chewables yet.

Steak and shredded cheddar omelette, with the steak diced very, very small as I was testing whether I could handle chewables yet.

I've watched most of the lessons at this point and plan on using his techniques for making clarified butter (something I've never done), and I'll be making fish for dinner tonight based on his lesson on working with fish and shellfish. 

Can you tell that I really enjoy Craftsy's cooking classes--perhaps even more than the quilting ones? I know, that's nearly blasphemy to admit on a quilting blog. But there you go. 

This is not a recipe-oriented class like other technique classes are. He does give some very simple, quick instructions for pan sauces and the like as he's talking through the techniques. The class materials, however, do include 6 recipes, only a few of which I remember him mentioning in the class itself. This truly is a technique class. I didn't miss the recipes at all, though I will be using one of the quick pan sauces he does with my fish tonight--it's a way to make something just a little more special and flavorful without taking any more time or dirtying any other dishes. FTW.

I recommend this class particularly for newbie or less confident cooks, of course. But I also recommend it for anyone who is interested in tweaking their techniques after a lot of years of cooking. There's a lot of good information packed into each lesson. And, again, Brendan McDermott is a really good teacher--easy to listen to, explains everything well, and with a deadpan humor that I enjoy.

The Basics

  • 9 lessons; the first lesson is just an introductory piece about a minute long. The other 8 lessons range from 9 1/2 minutes to nearly 40 minutes.
  • Lesson 2 lays the foundation with "Enhancing Flavors," explaining how to toast various spices and nuts, clarifying butter, and making infused butters. Lessons 3 and 4 are about eggs--hard-boiling, poaching, frying (sunny-side up and over-easy), scrambling, and omelette, plus tips on how to tell if an egg is fresh and so forth. Lesson 5 covers blanching and shocking vegetables, lesson 6 is working with chicken, lesson 7 is making stock, lesson 8 is fish and shellfish, and lesson 9 is pork tenderloin.

So, my final verdict on 20 Essential Cooking Techniques with Brendan McDermott: Two thumbs up!

(Note: Using the Craftsy and Amazon links on this post help support this podcast and blog. Thanks so much!)

2014 Quilty Resolutions Third Quarter Check-In

It's that time again! Check in here with your progress on your 2014 Quilty Resolutions to date!

If you've participated in my quilty resolutions challenge, click here to remind yourself what your resolutions were.

If you didn't participate in my original quilty resolutions challenge, that's fine! Just check in on what your progress has been on your own quilt-related goals for 2014.

I'll be drawing a name at random from the Rafflecopter widget below on Sunday, October 5. The winner will get these four lovely fat quarters!

(Grrrr. We're in an animal mood these days.)


For some of you, this will be a two-step process. For others, only one!

First step for everyone: Leave a comment on this blog post with your progress, and then make sure you enter the giveaway via the Rafflecopter widget immediately below. (I'll only see your name through Rafflecopter for the drawing, I won't be trying to count up names in the comments.)

Use this Rafflecopter widget through Saturday, October 4. I'll draw the winner on Sunday, October 5.

Second step for bloggers: If you've got a blog, write about your progress on your quilty resolutions and link up here! To enter the linky party, click on the froggie-fella below and follow the directions. (Remember, you still have to enter the Rafflecopter giveaway above. This linky party is just so others know about your blog and can come for a visit!) No fears--participating in the linky party does NOT earn bloggers an additional leg-up than non-bloggers in the giveaway. It's just for kicks n' giggles!

For everyone--click on the link to the linky party below to see who-all has linked up, and go read their blogs! It'll be good times!


The giveaway and linky party both close on Saturday night, October 4th, at midnight my time. I'll be doing my drawing on Sunday, October 5th. Again, I'll only draw from names entered in the Rafflecopter widget so be sure, after you've left a comment on this blog, that you go back into that Rafflecopter widget to say that you've left a comment!

I'll be posting my own progress in a separate blog post. Looking forward to seeing yours!

Craftsy Class Review: Homemade Italian Pasta with Giuliano Hazan

So you may recall my recent birthday celebration held at the New York Wine and Culinary Institute in the Finger Lakes of New York State. 

And how I learned how to make pasta.

And how I fell in love with making pasta.

And how my husband bought me a pasta machine, and I've been off and running. (Amazingly, even with all this homemade pasta in the house, I've still managed to lose weight the last couple of weeks. Must be all the calories I'm burning cranking the rollers on the machine.)

Well, finally--as promised awhile back--here's my review of the very tasty and very helpful Craftsy class: Homemade Italian Pasta with Giuliano Hazan. 

My first pasta made at home.

My first pasta made at home.

I. Loved. This. Class.

Giuliano Hazan is the son of the woman who has been credited for bringing Italian food into American (and British) home kitchens, Marcella Hazan. I'm not familiar with Marcella's work as I don't own any of her cookbooks. But I can say that Giuliano is a wonderful teacher in his own right. I found his lessons very easy to follow. In fact, the first couple of times I went through the process of making pasta with my new pasta machine, I did it side by side with him, having the videos running while I was doing the steps. Remarkably easy to follow, in fact, as I didn't have to keep jabbing at my iPad screen with pasta-covered fingertips to go forward or back. Smooth sailing.

The very first time you use a new pasta machine you have to make a batch of "waste dough," so to speak, because sending the dough through the rollers cleans any manufacturing or shipping dirt off the rollers and prepares it for service. This gave me the perfect opportunity to make my first batch of dough using his techniques because I had nothing to lose.

First taste--noodles with butter and poppyseeds--the way Mom made then when I was little.

First taste--noodles with butter and poppyseeds--the way Mom made then when I was little.

Admittedly, though, I didn't see much stuff coming off on the pasta as I rolled it through, so I tossed the earlier bits more likely to have invisible gook and still cooked up the later bits so I could see how everything was going. Since I'm still with us to write this blog post, I must not have ingested anything too suspect. 

I've been playing with different flours, which I will say comes more from the Artisan Pasta cookbook I bought than it does from Giuliano's class. He does talk about flours at the beginning and helped me understand why there were so many different ways to approach making pasta (in short: it's a regional thing) as well as a little more about the different types of flours you might use, but Artisan Pasta goes a bit more in-depth on the subject. I've been going back and forth between using an unbleached white flour and a pasta flour (which has semolina and durum in it). I also bought a whole wheat flour but haven't had a chance to test that one yet--that's next week's batch, I think. Giuliano also talks about making "green pasta" (with spinach mixed into the dough) and explains how to adapt it to "red pasta," (with tomato mixed in), but I haven't tried either of those yet either. Artisan Pasta also has a ton of recipes for flavored pasta doughs that I haven't gotten to yet.

So much pasta, so little time.

Ah, but back to the class. 

My most recent batch of pasta.

My most recent batch of pasta.

Giuliano is very easy to listen to, tells little stories here and there through the class so you get a real sense of how pasta and Italian food is such a part of who he is, and does a great job at filling in "dead air time" (while he's kneading or rolling or whatever) with extra information, substitutions, and great tips and tricks. He took all the concern out of trying to use a pasta machine myself, without a partner, by explaining some extremely easy fixes. Doh. Of course. 

He also explains how pasta is rolled out without machines, and gives information for using electric machines such as the type that attaches to a KitchenAid mixer. Because the electric ones are noisier, though, he mostly uses a hand-crank machine in the videos so as not to interfere with the sound.

Again, I really, thoroughly enjoyed taking this class. I'm looking forward to mixing his techniques with recipes from Artisan Pasta, as well as learning how to adapt the techniques to different ingredients. It's a matter of getting a feel for the proportions needed of liquid to flour depending on the density of the flour you're using, as well as how thick a pasta you need for the shape you're making. So far, I've been keeping it simple, but oh, I can see the possibilities.

Noodles in soup

Noodles in soup

Since I'm also one-tooth-short-of-a-full-mouth these days (and no, that's not a euphemism), I've been finding that pasta is a very easy-to-gum meal. So last night I combined a Parmesan broth recipe from Peter Berley's Building Flavorful Soup class (see my review of that one here), with homemade noodles from this class, threw in some diced tomatoes, crumbled chicken sausage (Wegmans Fire Roasted Tomato & Basil--my all time fave), and some fresh basil from my garden, and yum yum. I almost didn't mind having a sore tooth for a few minutes, there.

I highly, highly recommend this class. Everyone should be making their own pasta, in my opinion.

The Basics

  • 7 lessons ranging from 10 to 25 minutes
  • The class begins with a brief introduction to Giuliano but dives almost immediately into making the dough. The first lesson includes the instructions for making spinach pasta with a mention of how to adapt those instructions for making tomato pasta, and concludes with information about how to use and store the dough.
  • The next lesson covers how to roll out and make basic cut pastas. The rolling technique in this class is where he varied most from what I learned from the chef in the culinary center on my birthday--I've been using Giuliano's technique and it works great, so I'm sticking with it. 
  • Lessons 3 through 6 are how to make a variety of shaped and filled pastas, and each includes a recipe for that particular pasta. I liked that he talks about what kinds of dishes each pasta works best in, and sometimes how they're used traditionally in Italy as well as more modern uses. 
  • The final lesson talks about how to cook and sauce pasta. It may seem straightforward, but I found that lesson gave me, if you'll pardon the pun, food for thought. 

Even if you don't plan on learning to make your own pasta (but why wouldn't you?) I think you could still get something out of this class, just in knowing what the shapes of pasta are and how to use them most effectively, plus a lot of great recipes.

I do have to also mention that Hazan has two other Craftsy classes. I don't own either of these yet but I imagine I can see them ending up in my shopping basket in the not-too-distant future:

Classic Italian Pasta Sauces: Meat & Tomato with Giuliano Hazan

Classic Italian Pasta Sauces: Seafood and Vegetable with Giuliano Hazan

Review complete. Two thumbs up!

(Transparency statement: Using the Craftsy and Amazon links in this post help support this blog and podcast. Thank you!)

August Craftsy Class Update (oops--just realized it's September!)

Craftsy Logo

Summer's nearly over, and my fall's pretty busy so I'm hoping I can continue to make at least some progress on Craftsy classes. My goal is to whittle my "still to be completed" list to a single digit by Dec 31. Since I'm at the 3/4 mark for the year, I went back to my original post on this last year in December to see where I stood. At that point, I had 24 uncompleted classes. I now have 20. That wouldn't seem like I'd made a lot of progress, except...last December, I had completed 14 classes. This month, I have 33 completed classes. So I've definitely been completing far more than I've been adding. Yippee!

New Completions

(+ 4)

Classes in Progress

(2)

  • Cooking Essentials: All About Chicken with Marge Perry (see "Classes added this month"--and, actually, this one's just about done too. Will probably have it done this coming week.)
  • Designing Modern Quilts with Weeks Ringle. Confessional: I'd actually watched all the lessons in this one a long time ago, when I first bought this class. However, I was sewing at the same time and don't feel I paid close enough attention. So now I'm re-watching the lessons again. Not sure if I'll do any projects based on it, but Il will stay focused and take video notes and such to be sure I've actually learned from the class and haven't just had it on as background entertainment. 

Classes added this month

(+5) (Ahem.)

This one has been in my wishlist for a long time. I picked it up on sale earlier this month:

During a weekend away with my husband, we were once again talking about our mutual desire to be healthier and how we could help one another towards those goals. The fact of the matter is, most of the cooking now falls to me only because of our schedules. My husband enjoys cooking and cooks quite well, but as I work from home that means that during the average week it's just easier for me to do it. The other reality is, we eat a whole lot of chicken. We both like chicken and we like all our usual ways of doing it, but there's always room for improvement and new ideas. Therefore, during a huge Craftsy sale mid-month, I picked up these two additional classes:

And you've hopefully already read my blog post about this one:

And, finally, for my birthday (see my blog post about this too):

Classes To Be Completed

Current count:  20 (+3 from last month...oops; lost a little ground, there.)

Completed Classes (all topics)

Current count: 33 (+4)

(Usual transparency statement: This post contains affiliate links and I will be compensated if you make a purchase after clicking on my links. Thanks for supporting this podcast and blog!)