
Okay, that alliteration was a little more work. Ahem.
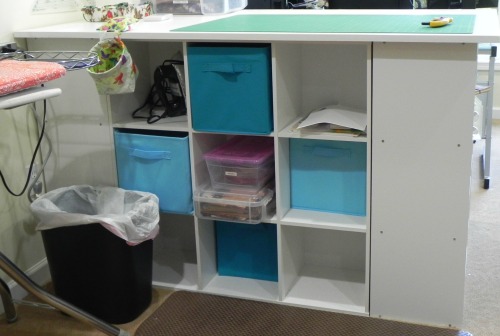
Cutting table from "front" (the side I stand on to cut)
I finally got my cutting table done! Talking about it on this weekend's podcast episode renewed my motivation to tie up loose ends.
This is the table I decided to make based on Tanesha's (of CraftyGardenMom Podcast) description of doing one herself. It's all over Pinterest--just look for "book shelf cutting table" or "cutting table with Target bookshelves" or something like that.
In any case, I'd done most of the work over MLK Jr weekend (listen to the whole tale here, and a little more about it here). However, I'd lost steam before getting to the finishing touches and every time I pulled the stuff out to do it, I just got all-over-tired again. And, frankly, the table was working just fine for me and no one else sees the room so it's unfinished state wasn't all that bothersome.
Finally, Sunday...after putting 18 more scarves into dye baths (found a few more containers!), and also (finally!) getting my seasonal wardrobes sorted out into "keep, toss, donate, put away for winter" piles, I decided to keep the "Get 'Er Done" mode going and tackled the cutting table. It would be nice, after all, not to have the unfinished pressboard edges of the melanine top keep snagging my clothes when I leaned in to cut.
All I had to do was sand the edges and iron on the edging around the top...yes, you heard me right... iron on edging for a piece of furniture--and then use 3M strips to stabilize the cutting surface. It all took me maybe an hour, tops, and none of it was hard although I suspect my shoulders will be whining tomorrow from bending over at an awkward angle to hold what I now know to be a remarkably heavy iron against the edge of the table.
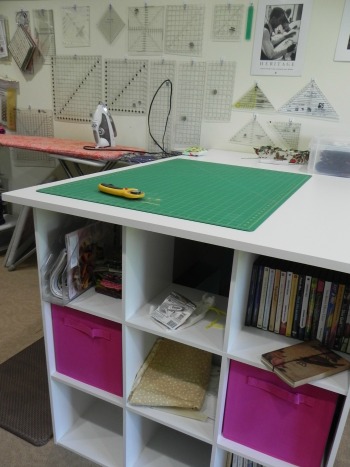
Cutting table from open end--looking towards where I stand to cut. You can also see what a fan I am of 3M strips and hooks here--that's how all my rulers and pictures are hung on the wall. Very handy!
I'd also thought I might attach the bookshelves to one another with 3M strips but they didn't want to hold, so I bagged that. I don't exactly live in an earthquake zone and they seem to be standing just fine. The usual method is to bolt these puppies together with metal brackets but I wasn't sure I wouldn't just drill a screw through into an open shelf--felt way too risky for me to do something I don't really think is necessary in my setting. In any case, if I ever want to move them, I'd prefer to move individual bookshelves--once these are bolted together no one would be moving them anywhere.
I did, however, use 3M strips between the tops of the bookshelves and the melanine top to keep the top from slipping. It's actually heavy enough that it hasn't slid on me much over the last several months anyway, but once in awhile if I leaned way in to square up a corner of a quilt or something, it would start to slip a little. Four of the long 3M strips, one near each corner, seems to be holding it just dandy, and I left the tabs hanging out a little so they'll be easy to remove if I ever have to move this thing. You can't see the tabs in the front which is the only part anyone else ever sees.
A tip here, if you make one yourself--I lined up the top so it's flush with the back edge and has a couple of inches overhang on the front edge, where I stand to cut. I figured that gave me a little bit of toe-kick room. It's very comfortable.
Because of the space in my room I wasn't able to leave all four sides open, but having three sides open gives me plenty of ways I can maneuver around if I'm basting or squaring up a quilt or anything that needs more elbow room. And it's so much more storage than I had before that I don't cry about losing the bookshelves that are facing the wall. The shelving on the back side has proven to be a great place to stash some office-related stuff I never had storage room for before, such as off-season storage for the little space heater I use at my feet in the winter, some extra power strips, hand weights that never get used but always live in hope...

Look at all that lovely surface space! That's a 36x24" cutting mat.
Mostly, I just love how much room I now have on top. If I recall all the measurements, it's only a few inches larger than my old Joann's cutting table, but what a difference that few inches makes! You may be able to tell from the pictures that it faces my office desk: When I'm going to be in a long cutting session, I take my computer monitor from my desk and put it on the far side of my cutting table so I can watch Netflix, Craftsy classes, or The Quilt Show. It's big enough, of course, that I have to be careful not to let it get too stacked up with stuff. Every now and then I have to go through and sort out piles around the edges and get things put away. But still, I love that stuff can get stacked up and I *still* have plenty of room to work!
So, it may not be a quilt, but it's a finish. And it's a finish that feels like a gift that just keeps on giving...