

Yep, another Angela Walters class! This one is Machine Quilting Negative Space.
I have to start by saying: This was the first time I felt like I'd seen a lot of this before. If you've read my other reviews of Angela Walters' classes, I've always been impressed that I didn't feel like there was a lot of repetition. I suppose at some point, given how many of her classes I've taken before this one, I would start feeling like I'd seen a lot of it already. The designs are, by and large, the same ones she addresses in her other Craftsy classes, as well as conversations about how to vary those designs. That being said, if you haven't taken as many of her classes as I have, you won't have that same impression.
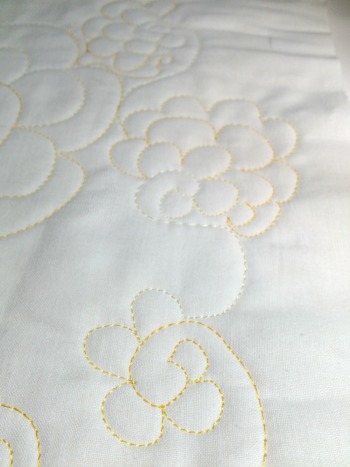
Practicing some FMQ flowers
What this class brings to the table is looking at expansive space as opposed to thinking in blocks. In other words, if we're accustomed to quilting block-based quilts, we have defined smallish areas that we're working with--places where we know we can put X design in one area and Y design in another area. Negative space, in the definition for this class, is one big wide-open space to fill in (think Modern Quilting). Angela offers a lot of good suggestions for how to break things up and create a lot more visual interest, as well as how to use that negative space to really highlight the overall design of the quilt
It is true that although I was already familiar with the designs and variations demonstrated in this class, I did still manage to pick up a couple of interesting new ideas (such as transitions) that she hadn't presented in other classes. Despite how familiar much of it was for me, there were still enough great tips and suggestions that I very much still feel that this was time and money well-spent.
Also, as a very important note here: In this class, she only uses her longarm to demonstrate the designs. But that does not make this only a longarm class. All of the designs are equally usable on either a longarm or domestic machine. She addresses briefly how you might need to vary your approach depending on which machine you're using. I only have a domestic machine and didn't feel like I was missing out on anything at all taking this class; I was playing with some of the designs on practice sandwiches here and there as I was watching--all very easily done on a DSM.
FMQ flowers for real
As always,don't forget to read the discussion questions posted from other students in the class. Sometimes you pick up great tips and additional information there!
Strangely, I also decided that there is something very meditative about watching someone quilt on a longarm with that close-up view of the needle and thread--especially when I sped it up a bit. Almost hypnotic, watching that design just appear as if by magic. Ohmmmmm....
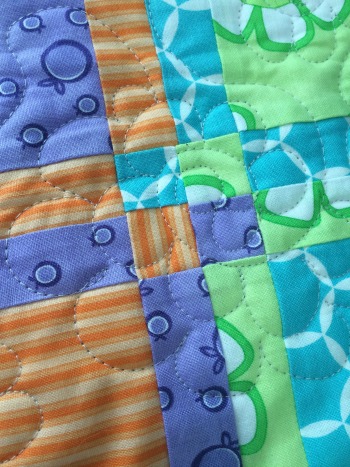
The photos I've included in this post are not really directly related to this class because it's not technically negative space. That being said, watching Machine Quilting Negative Space got me in the mental zone I needed in order to sit down at my sewing machine and finally knock out the quilting on the Disappearing 4-Patch baby quilt I started months ago. Plus, I was using a flower design that's a simplified version of one she demonstrates in this class--which has been in other classes as well. In any case...
The first picture is of my one-and-only practice session to see if I could pull it off and what scale I wanted to use. It went so well, I immediately put the quilt under the needle and took off. The second photo is the design on the quilt, for realsies. It went swimmingly! I used tips from this class and others about changing scale, thinking about filling space more than about symmetry of design, and so forth. In other words, who cares if part of a flower has two echoes of petals and another part has three because I had to move off in another direction before rounding out the whole flower? You don't see that at all when you look at the quilt; it's the overall impact that matters. Plus I had fun throwing in little flowers here and there as connectors or to fill in awkward spots and such. This was probably the first time in awhile I can actually say that FMQ felt fun.
Next step, ribbon candy in the inner border, and feathers in the outer. I'm feeling brave now!
The Basics
- 10 lessons, ranging from 5 to 27 minutes--most are in the 15-20 minute range.
- The first lesson is an overview and introduction.
- In lessons 2-4, Angela doesn't turn on a sewing machine--it's all sketching and showing examples in her own work of the designs she discussing.
- In lessons 5-9, she demonstrates quilting all of the designs she sketched out in the first few lessons, as well as showing how to most effectively work with the space available to you. She also demonstrates getting out of corners (which did help me at one point on the baby quilt!) and a lot of other helpful little tips that would be applicable regardless of what design you're using.
- Lesson 10 is a design gallery to, again, show you the techniques in action.
So, although there wasn't quite as much new for me Machine Quilting Negative Space with Angela Walters as in previous classes, there was enough to keep me watching and still make me feel like I had benefited from the class. So you should definitely check it out!
(Using Craftsy links in this post helps support this podcast and blog. Thank you!)