Weekend Goals and Craftsy Sale

Once again, I have the pleasure of a largely unscheduled weekend in front of me. I'm treasuring these because they are about to end. Next weekend I'm home, but I leave the following Monday for my summer board meetings and national conferences (work). I get home the 27th, have a week at home, then head to Boston for my August classes. And we all know what happens after that--back to assignments, papers, reading, work travel, and no more free weekends for awhile. 

So my goal is to get the Annie Unrein Ultimate Travel Bag done this weekend--or at least enough done that I can do the finishing touches in the evenings next week. I'd really like to be able to take this with me on my work trip.

I've got the class for this one so fingers crossed.

Join me? Craftsy is having a 50% off sale on some of their top classes this weekend! 


And yes, I'm still plugging away at that binding. Still feel like I have miles to go. We're running out of episodes of Stargate: Atlantis...


(Using Craftsy links in this post helps support my podcast and blog. Thank you!)

Post-4SI Weekend Accomplishments

On the spur of the moment, we U.S. #Twilters declared this past weekend #4SI--in other words, the 4th of July Sew In. Most people were out and about with friends and family for the weekend so there wasn't a ton of activity online, but it was still, as always, fun to keep up with one another. 

So here's what I got done with some mammoth (for me) sewing sessions on Saturday and Sunday:

Catch-All Caddy--done! I'll post a separate blog entry about this one. It was a thing. Although it wasn't as much a thing as the Everything in Its Place Bag or the Cosmetics Bag. But still. A thing.


Designs stabilized and traced for Postcard Cuties Halloween embroidery BOM for months one and two--done! Just in time, too, as we got the email today that month three is on its way. (Yeah, I know, you can't see much in the pictures, but really--they're all done!)


Design traced for Nouveau Witch--partly done. I've got the linen background cut, pressed (which took some doing--it is linen, after all), and stabilized. I haven't gotten the tracing done yet. See above. By the time I got all that done my neck needed a break from looking down so I put off tracing the witch for another day. No pics yet since it's just, well, a piece of linen. 

And gravy: I did get the second snowman embroidered. Just need to get him fitted with his hat, sewn together, and stuffed. I'll post a pic of him when he's totally done. Not that he looks much different from the other guy.

Binding on Jacob's Ladder--not done yet. By the time I got done working on that caddy every day my shoulders, neck, and hands were whining at me so I didn't push it. I'm working on it this week, though. Although I got the BOM embroidery designs traced I'm not letting myself start embroidering them until I get that binding finished, dang it.

Basically--woo for me--I got everything done I wanted to get done! 

I don't have much going on this coming weekend, either, so I am already starting to think through what I might focus on accomplishing. I think I'm hearing Annie Unrein call my name again...

(Craftsy links help support my podcast and blog--thank you!)

Pre-Long-Weekend Progress and Plans

Ooh. I love alliteration.

I do find it helpful to state boldly--sometimes rashly and foolishly--all those things I seriously think I could actually get done over a weekend. And then at the end of the weekend, I generaly look back and say with some sheepishness, "Well, at least I got this one little thing done. That's something."

Here in the U.S. it's the 4th of July weekend. For many of us, that means we have Monday off. I also had slightly-early-dismissal today (Friday). Even though it was only about 90 minutes early, it still feels like a nice way to get a head-start on the weekend.

We'd originally planned to have people over Monday but as it turns out, we're going to be meeting my son for breakfast and then maybe going to Genesee Country Museum for their festivities (including a swearing in ceremony of new citizens--always a highlight). Since we're not actually having people over and I don't have to prep for a party, that means woo! Sewing time the rest of the weekend!

2016-06-26 19.27.47.jpg

First: I plan on finishing the Catch-All Caddy.

It's been in this state since last weekend. That does actually represent good progress made last weekend, but obviously it wouldn't catch or caddy much in its current state.


Also: I plan on getting the binding done on the Jacob's Ladder. 

Miles. I have miles to go. But our family is in the midst of a Stargate Atlantis binge so I've been to working on this all week while watching the Atlantis crew fight off the Wraith. Here's to hoping we watch enough TV the rest of the weekend that I've got it done by Monday!


Finally: I'd really like to get started on putting together the first blocks of my embroidery BOM. 

I want to finish the little Christmas snowman guy I'm working on before starting the embroidery on this one, and I will get back to him once I get the binding done. (He's a "handwork in front of the TV" project.) But I need sewing room time to get the blocks for the BOM together and prepped for embroidery so I'd like to do that this weekend when I have more hours in the day available to me. 

By the way, I've also started thinking through my other new Halloween embroidery project. So that's a possible other endeavor this weekend, depending on time. 

Thanks to Trisha who turned me onto Urban Threads (see the Quilting for the Rest of Us Facebook page for that conversation), I bought a really wonderful Art Nouveau Witch design. Love Art Nouveau. This Halloween design is seriously classy and SO right up my alley. I've pulled out my tracing paper and colored pencils and am starting to think through thread choices. I printed a picture of an Alfonse Mucha painting to use for color inspiration. (Mucha's a fave.) I might toss into the weekend schedule a trip to an LQS that I recall having some great Art Nouveau/Art Deco/William Morris fabrics to see if I can find some borders I could use on her and blend that with color inspiration from the Mucha painting. I did find some pretty nifty possible border fabric from Fat Quarter Shop but really don't need/want an entire half a yard of it, so I want to see what I can get at an LQS first. Unfortunately, said LQS is about 45 minutes away so it would take a big chunk of sewing time out of Saturday, so we'll see what I feel like when I get up tomorrow morning.

So, let's see what happens this weekend, shall we?

Post-weekend progress and errata

I got a lot done this weekend, but I also realized I had two designers confused when I wrote a blog post and spoke on my podcast episode (posted yesterday).

The Christmas ornament embroidery I'm working on is Lynette Anderson Designs. She's from Australia.

The Postcard Cuties for Halloween Block of the Month I'm doing is Bunny Hill Designs. She's not from Australia. She's from the U.S. 

I've fixed the BOM blog post to note the error. I can't fix the podcast episode in which I think I said both projects were Lynette Anderson. Apparently I had too relaxing a weekend and my brain just stopped working altogether. Sorry about that!

Meanwhile, I did make progress!

1. I got the label affixed and the binding put on the front of the Jacob's Ladder quilt. I then got about 36" of the binding hand-stitched to the back while watching Stargate Atlantis (our current summer viewing fun). I haven't done the math to figure out how many inches I have left to go on that hand-stitching. Too depressing. I'm just enjoying the zen.

By the way, tried a new method for keeping the binding organized while sewing it on--I've seen this as a tip in a few places, and it really works! 

If you've got two thread spindles on your machine, roll up the binding and put it on one of them. I was concerned it would get tangled with the thread but it never did--I just kept a bit of an eye on it to make sure. 


2. I made progress on the Catch-all Caddy.

Trust me--that's a lot of progress. 


3. I got the first of the two Christmas ornaments completely done. The second is now on hold until I get that binding done.

He's kinda cute. His button hat is a little off in this picture (you shouldn't see the end of the stitching on the one side) but I just twitch it with my finger and it goes back into place. 

A point of slight interest on the stuffing: I bought myself a meditation cushion a few weeks ago as none of the cushions in my house were the right height/firmness. That puppy was rock hard when I got it, so I kept pulling out more and more stuffing until it got to a comfortable firmness I could handle for meditation sessions. The stuffing is 100% cotton fiber--beautifully smooth and soft, actually. I kept all the stuffing I was pulling out in a bag and stashed it in my sewing room. Came in handy for this! I've still got plenty left--can stuff more little fun things like this, of course, but some may also eventually make it down to my dye studio. I think it would be fun to play with. Way to re-purpose!

So--all of this progress, plus time poolside, a Saturday afternoon nap, and lunch with a friend, adds up to a really wonderful weekend. Ready for the week ahead!

Another finish! A New Travel Accessory

Probably not a surprise, given how much I travel, I've been hankering after some updated travel accessories of late. I've been using a jewelry roll that I bought from Etsy a few years back and I really liked it at first. But over the years my necklaces have shifted to bigger, clunkier, heavier things that refused to stay neatly corralled when it was rolled and were always trying to make a break for it out the ends. I began a search for a jewelry roll pattern with pockets that would keep everything more together and was so pleased to find such a thing in a jewelry roll pattern by ModKid/Patty Young Designs on Craftsy. Perfect!

The inside has one lined zipper pocket, four pockets on one panel (two tall, two shorter), and two tall pockets on the third panel. The button straps at the top are mostly for rings but I don't wear any other than my wedding/engagement rings and those puppies never come off. (Not even sure they could at this point; been wearing them nigh on 30 years). However, it's nice to be able to just slip the necklaces on without having to unhook them, and then button everything back down again.

(Photo gallery below will automatically forward, or use forward/back buttons on the sides. If viewing this in a feed reader or by email, the gallery may not appear; you may need to view it on my blog.)

 True confessions: I broke two needles doing the last topstitching as I hit some really thick seams (should've had a denim needle on hand, I guess), but other than that, and the fact that I had re-learn how to use my buttonhole feature on my machine, and I also had to learn how to do a different type of zipper pocket on this one...it all went pretty dang well!

Plus, I got to use up some cute fabric that hadn't found a purpose yet. Looking forward to this jewelry roll becoming a travel companion for the next several years

Finally! A finish that's been a long time a-comin'...

Remember oh-so-long ago when I started Annie Unrein's Travel Organizers class on Craftsy? Remember that I did actually finish the Everything in It's Place bag and post my class review back in the yesteryear? Remember how I mentioned in that review that it would probably "take me six months" to get the second bag done?

Ahem.

At least it's not a full year. Not quite. I'm about three weeks shy of a full calendar--which is, in this case, very similar to being a few cards short of a full deck.

Ah well, it's done. There was a bit of cussing, a couple of broken needles, some major surgery and a mulligan on a whole section of it, then finally just bagging any idea of something I'd be happy with other people seeing when I then messed up exactly the same part the second time and just moving on so I could get 'er done.

This puppy ain't making it to show n' tell at guild. It's definitely a note in the category of "I learned a lot, and mostly I learned I'm never making this stinkin' cosmetics bag pattern again." This is not an Annie-Unrein-Pattern problem. This is all in my execution. And this was a particularly challenging project for someone with my fairly newbie status when it comes to sewing accessories like this.

It actually mostly went swimmingly until the very end. I was extremely optimistic, indeed. And then the whole project went pear-shaped, to make the whole experience sound far too gentle and sweet, in the last couple of steps. The binding is my Waterloo, as it turns out. And Annie sure is fond of her binding--inside and out. I had similar problems with the EIIP bag binding, but this one took those problems and magnified them to the nth degree.

The first little snafu was with the webbing that goes in the handle. I'd had an early piece completely shred on me so I'd had to cut a second piece, which then meant the remainder was a bit too short for the piece it was to be used in. So I had to "franken-webbing" the unshredded part of the discarded webbing back to the longer piece. I tried zig-zagging it together. 

It felt strong enough, but as I was pulling it through the fabric casing the ends shredded again and the whole thing fell apart--which subsequently required about 10 minutes of fishing to get the short end back out of the middle of the fabric tube.

Fortunately, I happened to be on a Google Hangout sew-in hosted by the Stitch crew and got some good advice for options. The one that worked (I believe maybe originally from Nancy Zeiman?) was to wrap a piece of scrap fabric around it and then stitch the fabric to the webbing. Beautiful. Although, by the way, I learned that webbing--made from nylon which wasn't really on my radar--hardens into a tough plastic mess when you accidentally hit it with an iron. (Fortunately, I was able to clean up the iron.)

And then everything was fine for a few more steps (representing a few more hours). And then I got to the binding. Oh well. It's done.

Here's the outside, all hooked up. 

The fabric is a batik that had been given to me as a thank-you gift when I did a speaking engagement in ...where? Can you guess? Yep, Kansas, the Sunflower State. I've held onto it for a few years to try to find the right project for it. I thought it would be fitting to have a travel bag for work made from a gift received through work. And it still is--even if no one ever actually sees this thing. I won't be sending them pictures. 


And here's the inside in all its four-pocket glory.

Strangely, that pouch pocket on the bottom didn't really give me any problem at all. Nor did the vinyl pockets, since I've now got my handy-dandy Teflon foot (or, in the Janome world, the Ultra-Glide). Yep, if you're going to work with vinyl, that is well worth the purchase. My Ultra-Glide foot just skated right over that vinyl with no problem whatsoever. If only I'd just bitten the bullet and bought it when I was working on the EIIP bag. Life would've been much easier!

However, getting the binding on around that same darn pouch pocket was a real... ahem. This is a family blog. There will be none of that language here, young lady.

Now, the real question is--will I really use this when I travel? The jury is out on that. I'm going away with my husband on vacation next week and we're driving so, in that instance, yes, I'll take it for a spin. Luggage space isn't really an issue. 

However, for air travel? Probably not so much. Pam of Hip to Be a Square made this bag awhile back and told me she had problems traveling with it because the hook on the top is too small to hang on the clothing hooks on the back of hotel bathroom doors, which is what you're supposed to do with a toiletries/cosmetics bag like this. So that's kind of a pain.

Of bigger concern is the overall size. Here's a comparison photo with my usual L.L. Bean (well-worn) toiletries bag.

Compared to a bag that I already sometimes have difficulty finding room for in my suitcase, the Annie Unrein bag is a bit of a behemoth. I like to travel really light. In fact, when I'm only gone a couple of days I don't even bother with the L.L. Bean bag--I just use a zippered pouch or two and use as many hotel-provided toiletries as possible.

So the jury's out on how useful this new cosmetics bag will be. I strongly suspect I'll find some other use for it--like as another embroidery project bag or something like that. As long as it's something that doesn't have to appear in public, I'm good.

But it's done. And sometimes, done is even better than not-particularly-good, let alone perfect.

A Finish! Zippered Tote

I have very little time to spend in my sewing room these days so fast finishes are of appeal. Plus, as I've said before, I have a sickness: I keep buying bag and tote patterns even though I really don't enjoy making the things. I am in a constant search for the perfect travel bag and I really want to use up some fabrics from my stash that I love and want to keep around, but don't want to commit to turning into a quilt. So bags are sort of the perfect solution, if I can get around my dislike of the process. Since I knew I'd have a few hours as fabric therapy at my disposal this weekend, I decided to make myself something useful given the travel I'll be doing over the next couple of months. To whit: A travel carry-on for flights that would also be fine for normal running about and trips to libraries and coffee shops for school work.

I've posted the pic of a couple of the bag patterns I bought from a vendor at AQS Quiltweek in Syracuse. As soon as I got home, I started digging through my stash to see if I had fabrics that would work well with either of the patterns. I found a winner: I'd bought three fabrics from a collection a few years back, then found another fabric that worked beautifully with them. Then they sat on my shelves. And sat. And sat. They were enough for this bag pattern plus enough leftover to make a coordinating wallet or some such should I decide to do that later on.

Final results! This is the "Laura's Zippered Tote" pattern from The Creative Thimble. It really is pretty straightforward. I took my time with it and still had it done in something like 4 or 5 hours all-in. As a still-not-confident bag maker, I didn't run across anything that gave me the heebie jeebies.


Here's the inside. The pattern calls for pockets on only one side of the interior; I added another set of pockets on the other side as well. The more pockets, the better. 

I measured the divisions to fit my Kindle, phone, and some pens, etc., on the one side. 

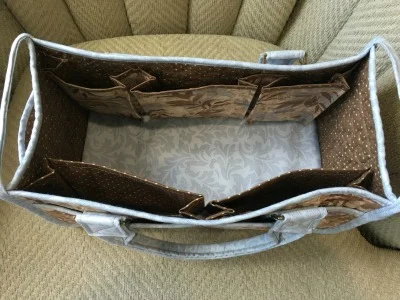
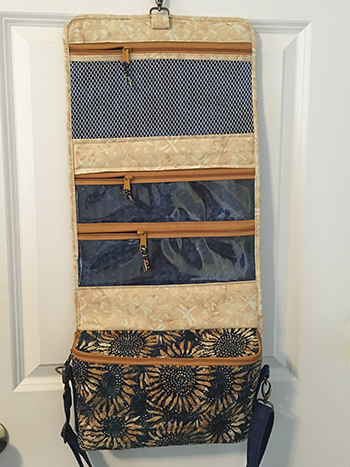
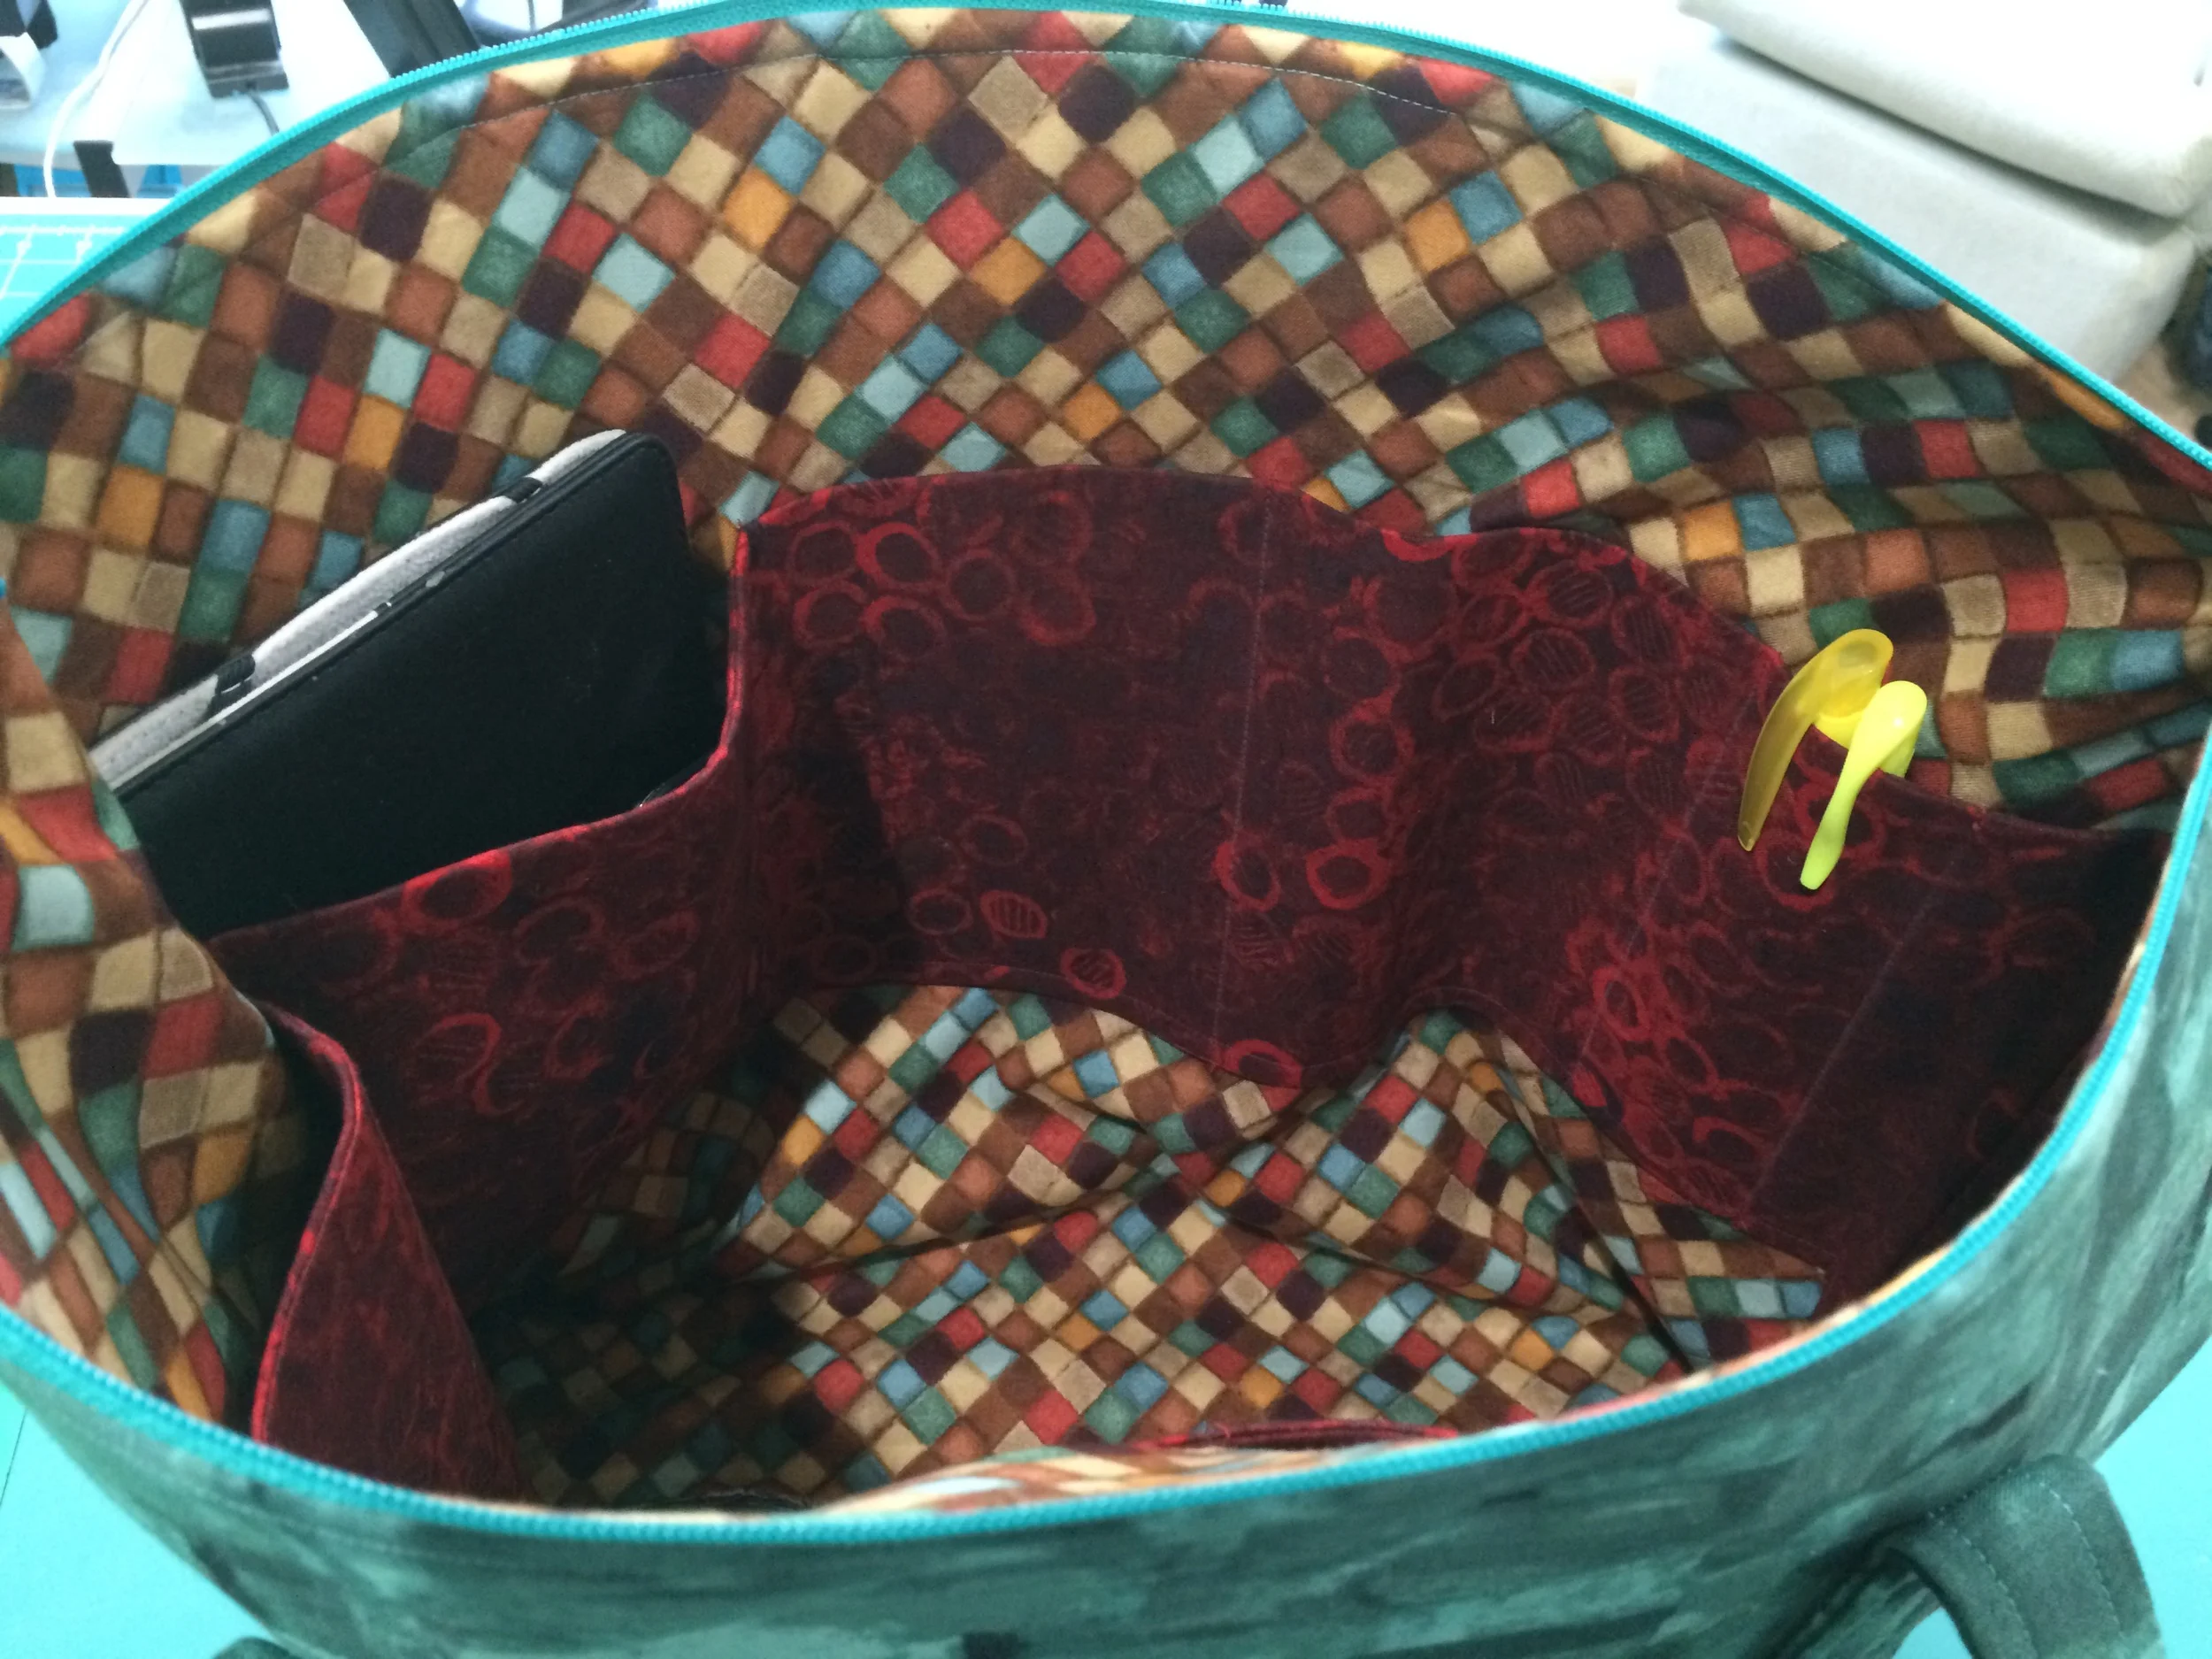
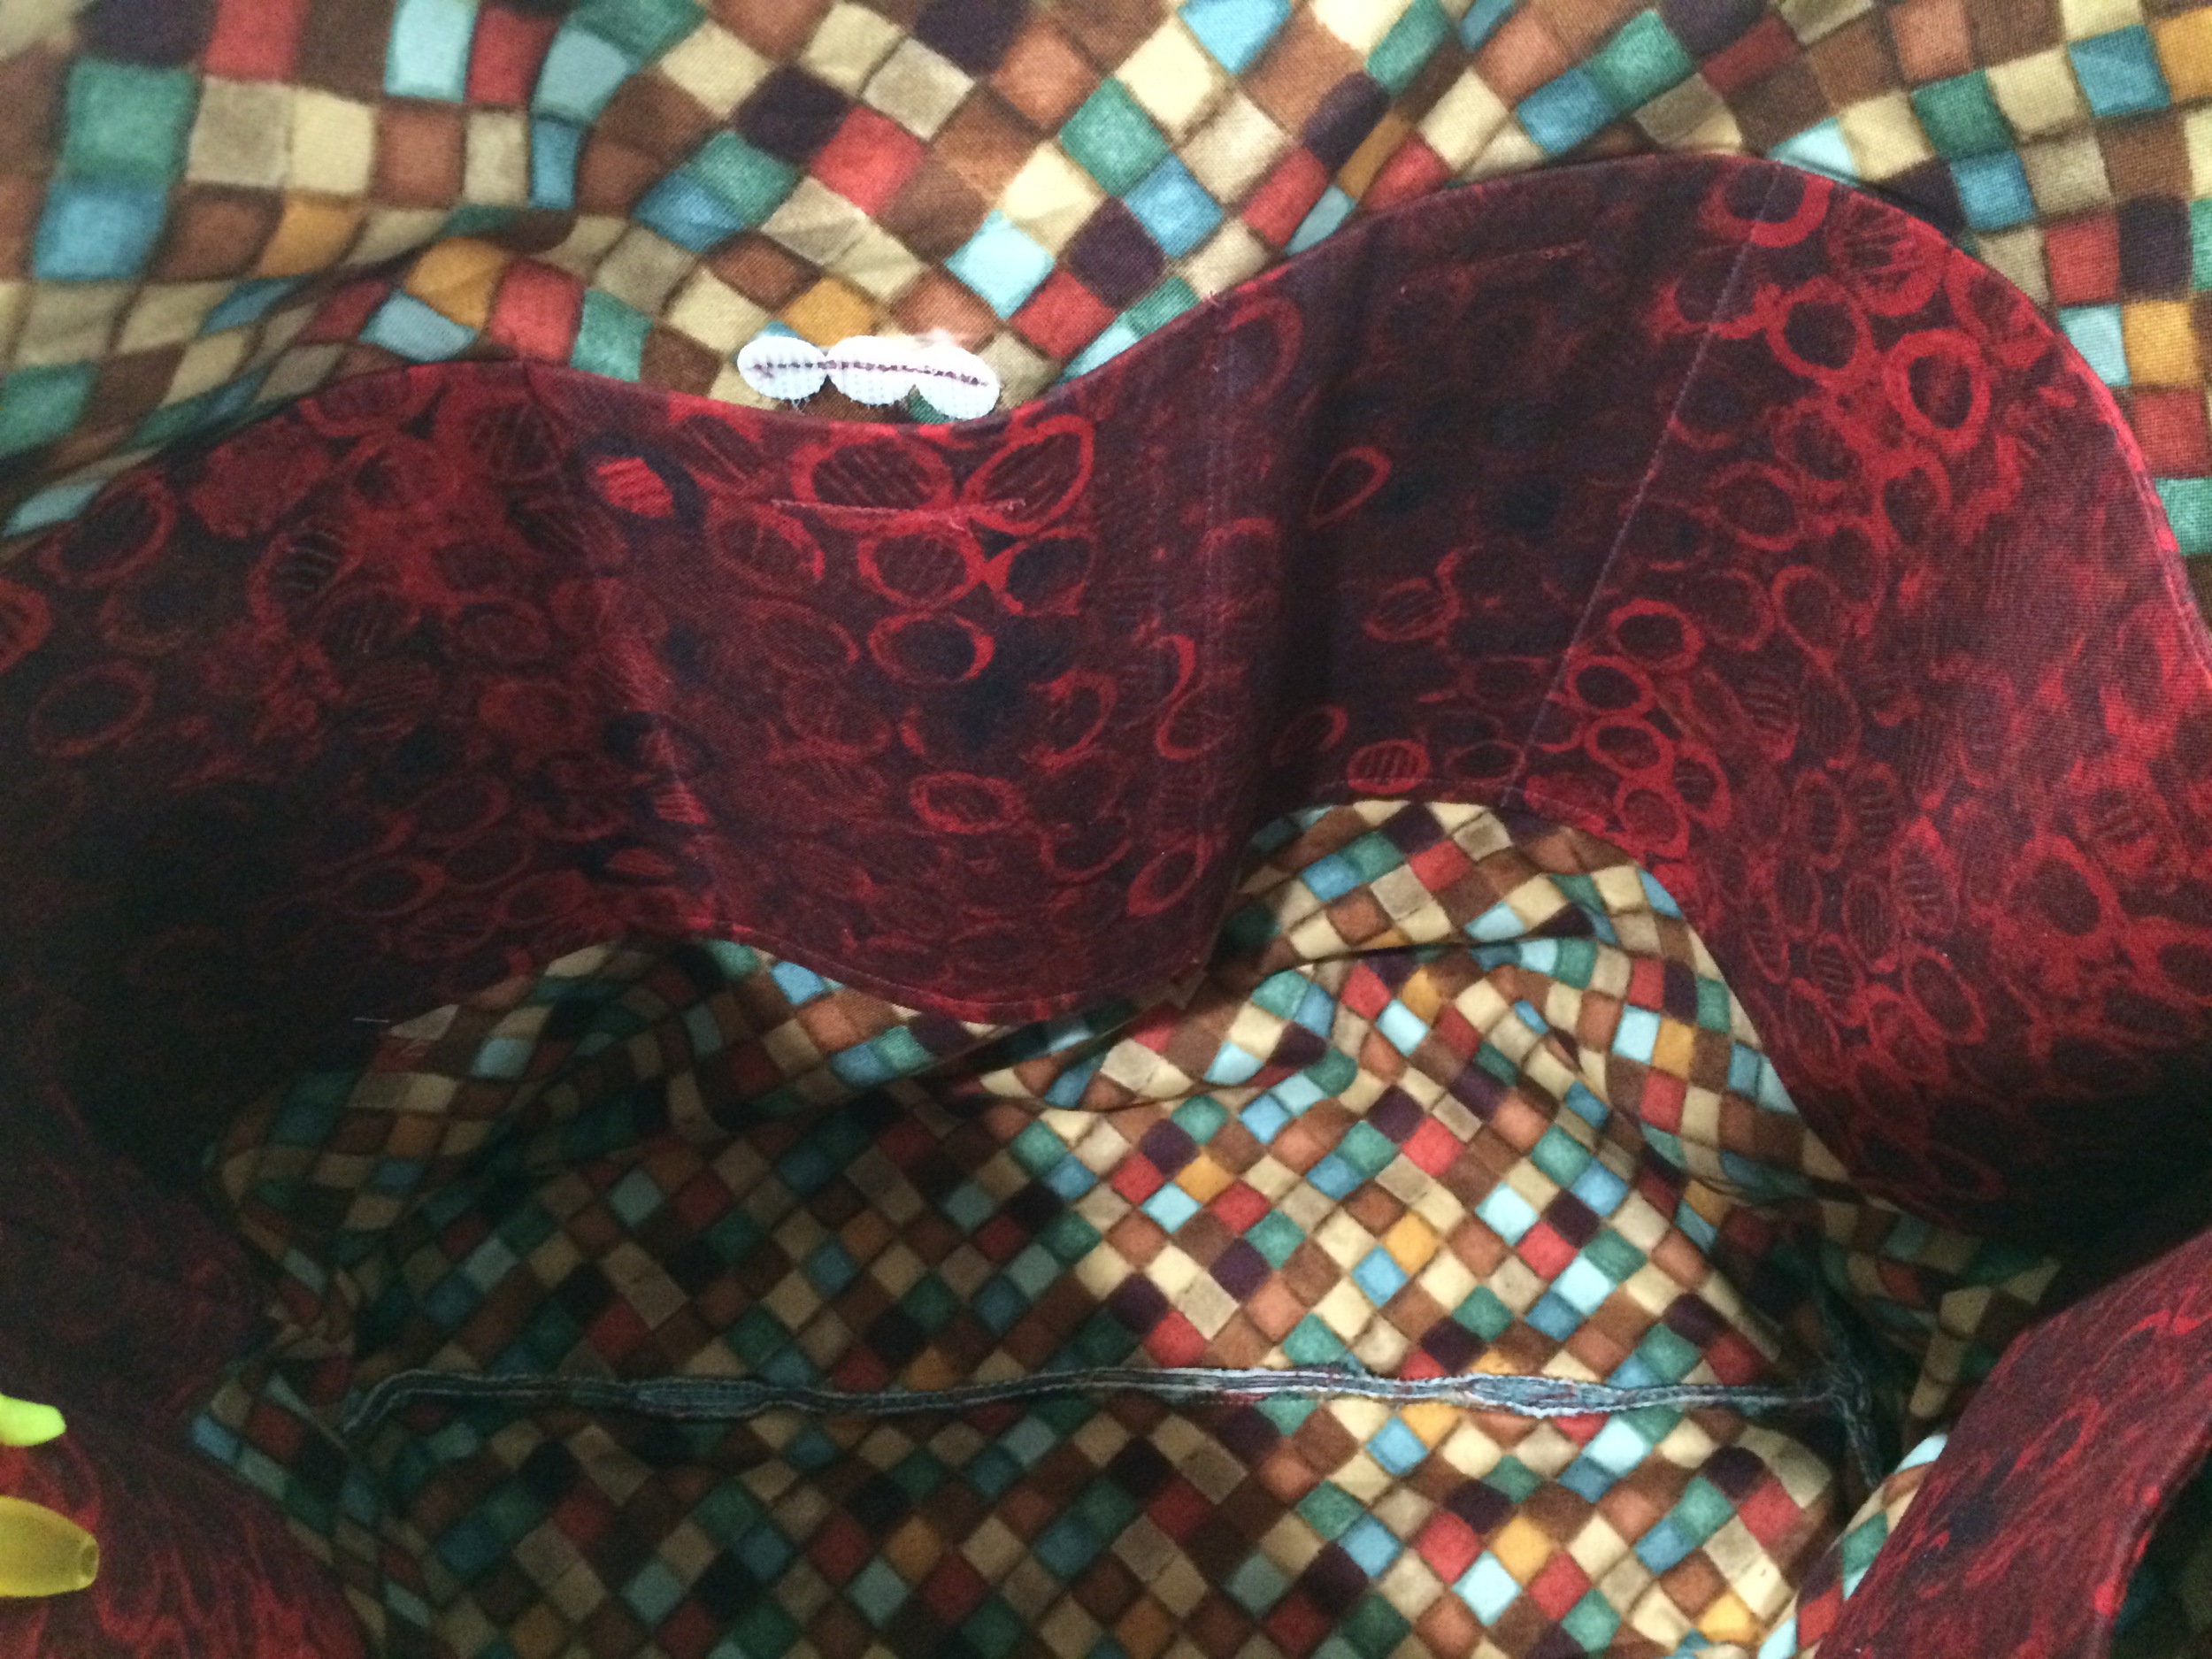
The other side of pockets were less specifically measured but divided slightly differently to give myself more options. I also  added some little velcro dots to two of the pockets. Why dots? That's all I happened to have on hand. So I used three dots attached to each other to make it about as long as a regular rectangle of velcro would be. I didn't bother changing thread to white to attach the velcro because at that point I was tired of changing thread colors and I figured that, other than this blog post, I'd be the only one ever seeing it. So yes, the velcro is attached with burgundy thread. I can deal with that. 

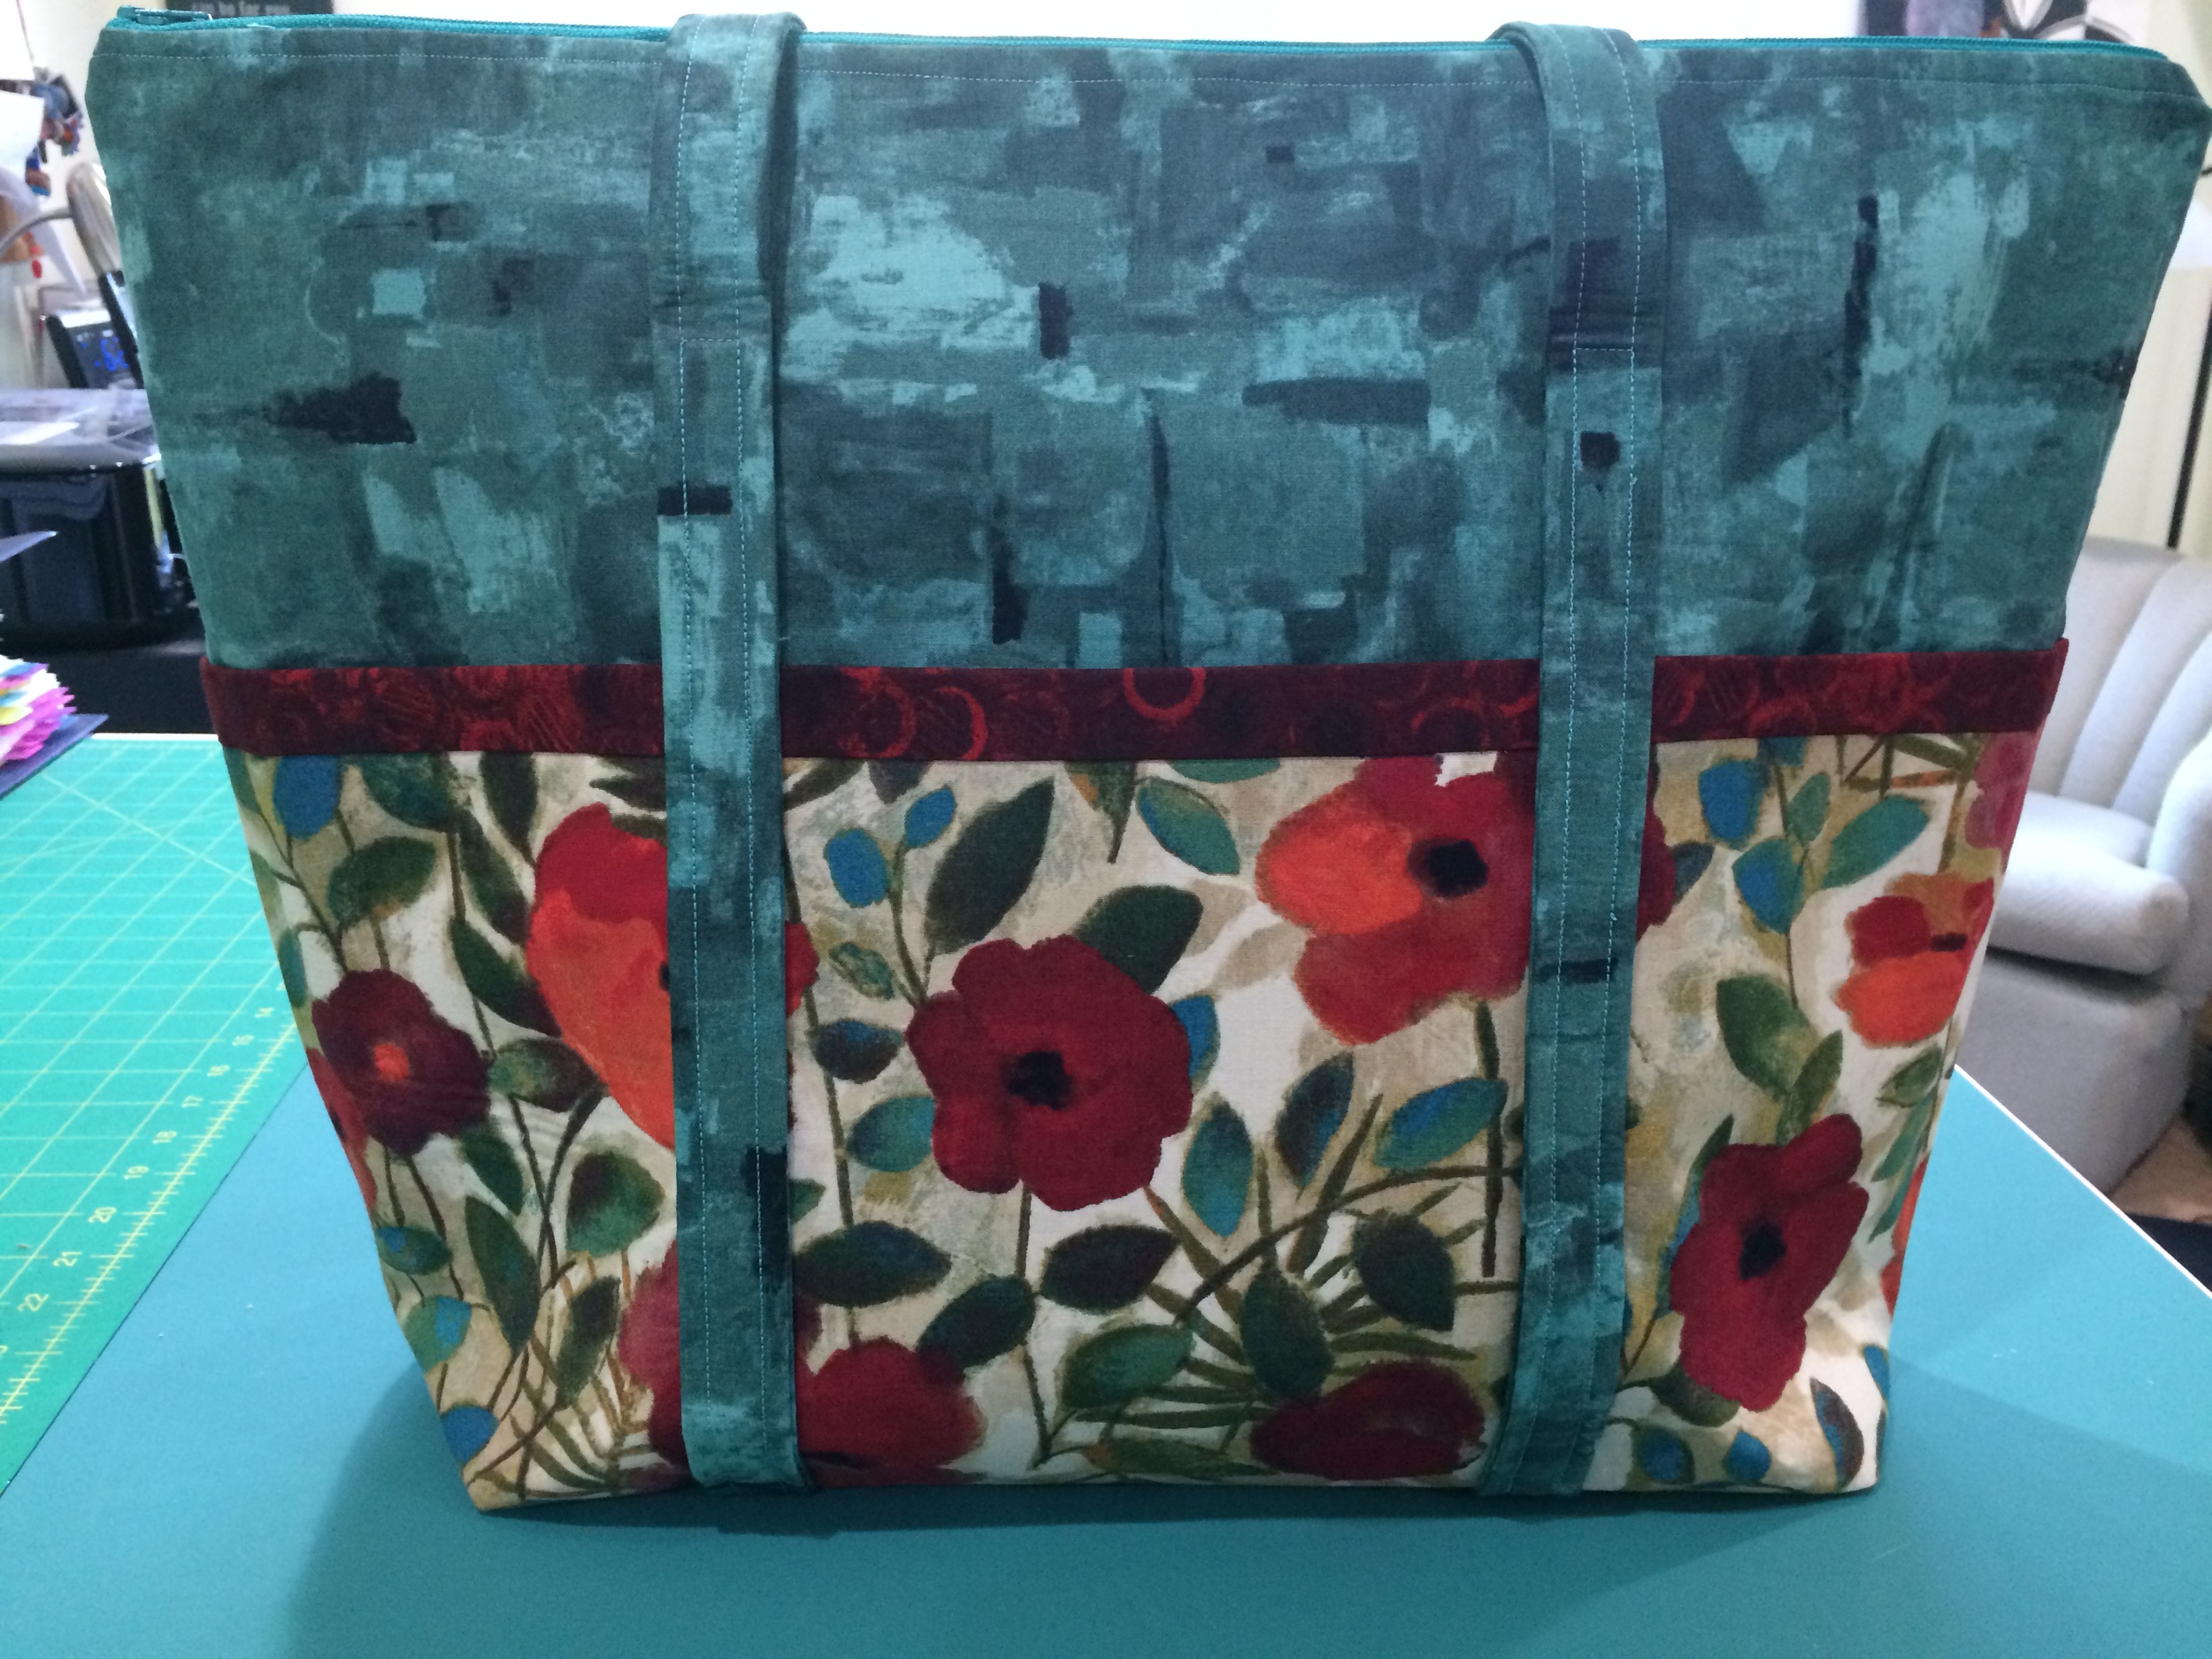
There are two things I'm not thrilled with about this design. The first, and main thing, is that there's a raw edge seam at the bottom of the interior. You can see it in the above photo. The instructions have you zig-zag the edge and I used Fray Check as well, but still n' all, I'd prefer a hidden seam. I'd have had to completely re-do the pattern to get rid of that seam and that's just not my thing. So I'm living with it. 

The second thing is that it uses Pellon Decor Bond (809) as the stabilizer. It does give it good structure, but I didn't really like working with it. Plus, the fabric puckered a little when I was fusing it to the Decor Bond. Were I to make this pattern again, I think I'd probably use Annie Unrein's Soft and Stable. I really like the way that one felt when I was using it for the EIIP bag; I don't think using it on this design would make a noticeable different to the process of making the bag.

I did skip one part of the pattern--when you box the corners, the instructions have you folding those corners back into the inside of the bag and gluing them down to give the bottom more structure and stability. I don't have any glue on hand that would work and, again, I wasn't keen on a bunch of stuff hanging out in the bottom of the bag that loose coins and such could get stuck under, so I just cut those off as you normally would. 

And one other note: The numbering of steps is incorrect in one part of the pattern. I had to read it a few times to figure out why I couldn't quite figure out how she'd gotten from point A to point B, but it didn't take too long to see where the mistake was and just move on from there. She doesn't have that error posted in the corrections on her website so I need to remember to email it to her. Other than that, the pattern was pretty easy to follow, even for a noob like me. 

By the way, those are outside pockets as well--six in all. And the straps are the perfect length to carry it comfortably over my shoulder. Finally--a good carry-on bag for airline travel that zips on top so I don't have to worry about stuff dumping all over under the seats!

And I just love that I could finally use these fabrics--they've been on my shelves for a couple of years and now I get to keep looking at them in a far more useful form.

Overall, I'm pleased with the results and am giving myself grace on those parts that are less than perfect. 


A finish--woo!

Okay, so this completion isn't such a big deal as it only took me about 90 minutes start to finish; and it only took that long because I wanted to fussy cut a motif and had to keep checking back on the instructions to make sure I had it facing the right direction. 

Also--normally I wait to do a reveal on a class project until I do a review of the class. But since it may be awhile since I have another finish, I couldn't wait to crow just a little bit. 

I finished something! Woo woo woo woo! 


image.jpg

This is the Runaround Bag by Joan Hawley of Lazy Girl Designs, as appears in her Craftsy class Zip It Up: Easy Techniques for Zippered Bags.  (The pattern is available elsewhere as well; you don't have to take the class to make this bag.) She calls her zipper technique "ziptastic" and I have to say--it was stinking easy, at least in this design. 

It gave me a nice way to use a couple of fat quarters from my stash--which was my main purpose for forcing myself to get more comfortable with purse-making in the first place.  

I misjudged the front fussy cutting just by a couple of inches; the print on the fabric was a little tricky in terms of isolating the motif easily. I had a sense I should adjust it a little bit but I wasn't totally convinced I knew where it was going to end up. Having done it once now, of course, I'd know better next time.

image.jpg

I did a lot better fussy cutting the back pocket.  

If I do this design again, I would probably put a little bit of velcro or something on that back pocket. It's a good place for a cell phone but I'd want it a little more secure if I used this regularly.  

image.jpg

By the way, the lining is the same fabric as the top accent (see last photo). I used an invisible zipper because that's what happened to be sitting in my drawer that was the right color and size for this project. I've decided I don't like working with invisible zippers. It was okay to sew, though I had to do a lot more by feel than sight, but mostly it was very difficult to unzip after the sewing was done in order to pull everything through right-side out. For some reason, that zipper was very stubborn--I finally resorted to pulling everything through a half-open pocket. Once it was right-side out, the zipper worked fine again. 

You can't really tell from these photos but it has fusible fleece on the back to give it just a little bit of structure.  

I do like this bag; I used it immediately last night going out for dinner with my husband. It's nice to do a simple design that's actually functional. It's a good little bag for times when you don't want to carry a lot around. 

Of course, the first thing I thought as I was putting my stuff in my bag to go out to dinner was, "I think I need to find a wallet design now." My usual wallet is too big and heavy to work in this bag well. So if you've got any favorite simple wallet designs that make a smaller, lightweight, but functional finished product, lay it on me! (Tip: I don't want to have to fold my money in half to put it in the wallet, so I've already nixed several possible patterns.) 

There are two more bags in the class, so stay tuned... 

(BTW, there's a Craftsy link in this post that will help support this podcast and blog if you use it--so thanks in advance if you do!) 

Craftsy Class Review: Sew Sturdy Travel Organizers with Annie Unrein

Craftsy

Once again, I'm doing the class review before I've finished all the projects from the class. I'm doing that in this case because it took me nearly 6 months to get the first of the two projects done for this class. Given my current schedule, it's likely to be another 6 months before I get the second project done. So, here's my review of Annie Unrein's Sew Sturdy Travel Organizers class. 

If you're a blog follower, you've already seen my reveal of the first project, an organizing bag she calls the "Everything In It's Place Bag," or as I abbreviated it, the EIIP bag. If you follow me on Twitter or listen to my podcast, you've heard me whine. A lot. With great passion and commitment to my whining.

This isn't a particularly easy project, especially for those of us quilters who didn't come at quilting out of garment sewing. I've only had limited experience doing bags or any type of accessories, and much of that experience hasn't been particularly positive. I'm not a fan, as I have pointed out on many an occasion, of fiddly bits. 

And boy, did this bag have more than it's fair share of fiddly bits. Namely, vinyl. More about that later.

It also had zippers which were a bit tricky at first. I've done a small handful of zippers in the past, but this was the first time I'd used zippers-by-the-yard, which raises the quotient of fiddly-bit in the zipper equation. I'll say, though, that by the end of doing this bag which had a grand total of 12 zippers and 16 zipper pulls, zippers no longer give me pause. I can also see the beauty of using the zippers-by-the-yard that Annie sells on her website; I'll advise, however, that you wait to watch where she talks about using those zippers before making your first zipper, which actually comes in the lesson before.

That's on my one knock on this class. It's not Annie's fault that I don't enjoy making bags. And it's not Annie's fault that I still don't enjoy making bags after taking her class. She helped me become more comfortable with certain things, but becoming more comfortable with something doesn't necessarily mean I'll start loving to do it. In any case, the one thing I will knock the class on is that once in awhile things are a hair out of order. You make the first zipper in one lesson, and then in the next lesson she explains how to work with the zippers. I was watching and working my way through the lessons so when I got to the one making the first zipper and didn't know how to put a zipper pull on a zipper, I spent 20 minutes on YouTube trying to figure it out. Then I get to the next lesson, and there she is, talking about how to put on a zipper pull. There are a couple of places like that, so just do what I didn't do:

Watch all the lessons all the way through, before starting the first step in the first lesson. 

The only thing that I really struggled with was the vinyl. That was brutal. I spent a lot of time reading through the class discussions to see if others were having some of the same problems I was having and what the suggested remedies were; I found some helpful things there, so be sure to read the class discussions as well. (I talk about that in the previous blog post about this project.) Mostly, I was being stubborn and refusing to buy a Teflon foot when I wasn't committed to the idea of ever using vinyl again. That Teflon foot probably would've been helpful. I used Scotch Tape instead. It was okay.

Annie is clearly very experienced at teaching. I had no complaints about her style. Her instructions are very thorough as well. I kept the class material print-outs in front of me while watching the related steps on video--the two pair well. Her website is great--she has great bag designs and very helpful kits for making many of them, plus she sells all the bag-making supplies separately. More helpful, though, are her YouTube tutorials (also on her website). So if you're into making bags, she's the one to get to know: www.byannie.com. I do really like her supplies--I like how the finished bag feels, using her stabilizer and such. So if I am inclined to make bags in the future, I'll definitely be going back to her site. 

So, to try to objectify this and review the class as a class, my personal feelings about bag-making aside, I'd say two thumbs up. She really takes you through a complicated process by breaking it down into very small, pretty manageable tasks. She explains and demonstrates pretty much everything; there are a couple of steps that she talked about but didn't demonstrate, and it would've been helpful to have those on video as well, but they weren't deal-breakers. I do feel pretty confident that I'd be successful at the cosmetics bag as well, whenever my schedule allows me to work on that again. And that's more than I'd have said when I started the first step of the first bag, so that's a mark in the plus column. 

The Basics

  • 7 lessons, ranging from about 18 to 52 minutes, mostly in the 30-minute range
  • The first lesson offers a short introduction, but then gets right into making the Everything In Its Place Bag.
  • Lessons 1-4 are for the EIIP bag, lessons 5-7 are the cosmetics bag.
  • Class materials are extensive--very clear, step-by-step instructions for each bag. In fact, at the start I found her instructions a little confusing because they are so complete; I'm not used to that. Once I figured out her approach, I did find them really well done. 

Annie's bag designs in Annie Unrein's Sew Sturdy Travel Organizers class are great. Can't beat the functionality. So here's to my perseverance sticking with me to get the second of the two bags done sometime before I retire. 

(Using Craftsy links in this post helps support my podcast and blog. Thanks!)


Craftsy Class Review: Learn to Sew: Simple Bags with Nicole Vasbinder

Craftsy

So, if you've been listening to my podcast or following my blog for awhile, you'll know my intense dislike for fiddly bits and anything that even vaguely smacks of garment sewing. 

I love seeing other people's completed fabric purses, totebags, and duffle bags. But let's just say that my own brief forays into the field haven't been stellar. I made one totebag years ago that I still use frequently but I can still see the places where seams didn't match up and I didn't quite box the bottom correctly. Still, it's pretty functional and nice fabric so I live with it. I had another attempt at a purse that ended up in the trash. My biggest issue? I'm not a garment-sewer, and a lot of purse/tote/duffle patterns are written with the assumption you are.

Foldover tote completed

Foldover tote completed

While toodling through Craftsy classes a week or so ago to see what was new, I saw Learn to Sew: Simple Bags with Nicole Vasbinder. I thought, maybe that's the ticket. Maybe if I take a step back and put myself in garment-sewing school (just the basics, ma'am), I'd grow more comfortable and wouldn't find these kinds of projects as frustrating. 

I completed the class in one weekend. It wasn't too painful, and I completed both projects in a reasonable length of time and with only a few curse words here and there (all while working on the dang boxed bottom of that pouch when my machine decided to throw a hissy). Enough background. Here's the review:

Demonstrating the pockets on the front (1 pocked subdivided into 3 parts)

Demonstrating the pockets on the front (1 pocked subdivided into 3 parts)

This class would be great for someone who's never touched a machine before. It really does start out with how to sew, as per the name of the class, "Learn to Sew." The first lesson walks through parts of a sewing machine (in brief), how to thread machine and bobbin, and so forth. There are some neat graphics in the first lesson about how the sewing machine works. The second lesson is sewing seams--of course, this class is doing it "garment-style" so seams are generally wider than this quilter is used to. I was proud of myself that I only went to default-mode of 1/4" seams twice--for the most part, I remembered to do those gargantuan 1/2" seams she uses. 

The third lesson had a little information about fabric in general, as well as some suggestions for picking fabric for the totebag. From there, it goes directly into the projects with some "teachable moments" interspersed. 

Showing the interior pocket and lining

Showing the interior pocket and lining

True confessions: I watched most of the lessons on 2x speed, until I got to parts I felt I needed to watch more carefully. I did get frustrated a few times because the video doesn't always completely match the written instructions in the downloadable materials, and the instructions sometimes leave out key information about placement and so forth. I had to keep referencing the video over again to make sure I was doing things correctly. It's not a huge issue in this case, but I would have wished for more accuracy in having the written and verbal instructions match. I made notes on the written instructions just in case I ever go back to use them again and don't want to have to watch the whole lesson over.

Zipper pouch completed

Zipper pouch completed

My suggestion is, if you're new to sewing or new to this kind of sewing, watch each whole lesson first, and then back up and start doing the steps with her. In some things it's confusing until she gets to later steps and finally explains how she's got things laid out or why she's doing something the way she's doing it. 

I can't say this class has made me all gung-ho to run out and start churning out purses and bags. But I think it did increase my comfort level with the differences between garment-sewing and quilting to a degree. The totebag and zippered pouch are cute, but if I were to make either of them again there are several adjustments I'd make to them to have them work better for me. I'm just not committed enough to either design to poke at them like that. I already own a lot of patterns for totes and purses; I guess this is something I can just keep plugging away at when I get in the mood...once in a blue moon.

Interior

Interior

The Basics

  • 7 lessons, ranging from 11 minutes to nearly 30 minutes
  • The first two lessons are introductions to the basics of your sewing machine and sewing in general. Lesson 3 includes some more of that introductory information, but then goes into the cutting of pieces for the tote.
  • Lessons 4 and 5 are the foldover tote, and lessons 6 and 7 are the zippered clutch. 
  • The class materials give some troubleshooting information about sewing on your machine, and then supply lists, instructions, and templates for the two projects. As noted above, I was disappointed that there were some discrepancies between the materials and the video lessons. Just have the materials in front of you while you're watching the lessons so you can make notes to yourself as you go.

This is a tough one for me to rank because it's a topic that I come to having a bit of an attitude already. In the grand scheme of learning how to do garment/accessory sewing rather than quilting, I guess I can give Learn to Sew: Simple Bags with Nicole Vasbinder my usual thumbs up. But I'm still not an enthusiastic garment/accessory sewist. 

Don't forget, Craftsy is having a Valentine's weekend sale--lots of great classes to check out. I'm working on another one I just picked up this weekend that's just chock-full of great information and much more in my wheelhouse...but more on that one in a later post!

(Using Craftsy links in this post helps support my podcast and blog. Thanks so much!)