
I'm working to access my QFTRU podcast stuff again. 24 hrs & I should be up and running; will get an episode out asap! http://bit.ly/i8lwJp

Another project completed--yippee!
It wasn't a hard pattern to put together, although I discovered this time how very stretchy jelly roll strips can be. You don't expect it because they're not on the bias, but they're on the width-wise grain which can be a bit bouncy. I had a little more problem keeping my blocks square with this pattern than I expected, but at the same time it was a very forgiving pattern because it had all that nice white space to give me room for squaring things up every step along the way.
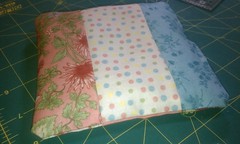
Here's a close-up of one of the blocks. I tried to stay as random as possible without repeating a fabric in a block. I then mostly stayed random with placing the blocks in rows but I did switch out one or two that had too much repetition right next to each other.
Here's my label. (Yes, although I said in my podcast episode today I was considering not doing one, that was mostly due to time. But I ended up with time I didn't expect to have. It looks out of line because I blurred out part of it in the photo.) This is the first time I've made a label using the embroidery stitches on my sewing machine. It's not an embroidery machine so I don't have a ton of options, but it does have lettering. I had to practice on several scraps because I couldn't quite figure out how the embroidery would line itself up but finally got it. I drew some guide lines to keep each line relatively straight and each line evenly spaced from the other. The label doesn't have as much information on it as I usually do but it's never going in a show and I'm documenting all the additional information in my own records.
I left the lighting unbalanced in this one so you could see the quilting better (I hope). It was done by Andrea of Olde Glory Quilting. She doesn't have a website or I'd link it--sorry! She's a local long-arm quilter that only does pantograph--all over--quilting, but does a really nice job and was amazingly fast! I had it in a week. All I had told her was that I wanted something that would pick up on the floral but would stay "open and airy." She showed me this pattern and I knew she was right. It was perfect.
So that's it! My MIL will love it, I know. I also know I probably should have ripped the binding out and redone it because it really didn't work the way I wanted it to, but in the "real world," it's fine. And it's done, and now I can move on to the next project!
A wonderfully quick gift--sachets
I whipped up this sachet tonight adapting a tutorial from Quilting in the Rain blog at quiltingintherain.blogspot.com. Her tutorial has a different design which I really, really like and will do at some point--it just didn't fit the particular scraps I wanted to use tonight. These are scraps from my MIL's quilt so guess who's getting the sachet?
My LQS had bags of dried lavender there when I stopped by last week. Couldn't resist picking up a baggie. Now I want to go buy more and use up a lot more scraps. I just started growing lavender myself last summer. We'll see if I get enough expansion this summer to be able to dry some myself.
The corners aren't pointy because I decided to reinforce the corners a bit by sewing a short seam diagonally across the corner seam. I had a sachet years ago (it was either a gift or I'd picked it up at a gift shop at one point--don't recall how it came to me now) that popped a seam in a corner and I ended up with little whatever-they-weres all over my drawer. So now I'm a bit nervy about those things. I decided I'd give up a bit of corner perfection for a bit of reassurance.
Anyway, cute project. Fun project. Fast project. Check out her blog!
A completed project I forgot to mention...
...because it was laying on the side of my cutting table for awhile waiting for me to do that one last step before I could call it done!
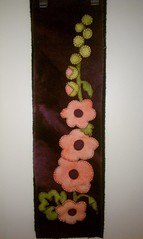
When I was at the quilt festival in Houston last November, I discovered the vendor booth of "Wooly Lady," who had all sorts of wonderful colors in felted wool, and fantastic kits and designs, different from the usual country colors and primitive-art-inspired felted wool kits I know and love. I succumbed to the lure of this kit, mostly because I knew this one would actually fit in my suitcase. Others that made me drool would've required a little extra ingenuity in packing to get home.
This photo really, really doesn't do the colors justice. If you want to see the original, use this link and scroll down until you see "Hollyhock Wool Applique Bell Pull." I'm noticing as I look at the one on her site that she did more embroidery on hers than I did on mine. Oh well--mine is reveling in its basic-ness.
I had a near tragedy with this, though. I had the top piece (the purple with all the applique pieces) downstairs where I could work on the applique while I was watching TV. Meanwhile, the black backing piece was folded up on the edge of my cutting table. I noted its presence there as I began one evening to cut fabric for another project. "Hmm...I should probably move that," I thought, "before I accidentally clip it with the rotary cutter." Did I move it? No. Did I clip it with the rotary cutter? Ahem. There's a nice little wedge-shaped piece now that I had to sort of glue into place. Good thing the black was on the back.
This is a fun little narrow wallhanging that will be able to move around my house as whim and decorating schemes require--just right to fill in an odd little blank spot. Love it.
And My Next Project Is... (Drumroll please)
OK, I think I know what my next quilty project will be. We finally finished putting away the Christmas decorations today--they'd been down for some time, but stacked on our dining room table. For awhile. It's amazing what you can learn to ignore. My husband decided to tackle the job this afternoon and got everything packed away, then turned to me and asked, "Do we have something more springy to hang up in here?"
The wallhanging I have in our dining room is actually non-seasonal, but I will admit it leans towards fall and winter months better than spring and summer. It's a 9-Patch Pizazz in coppers and golds. It's supposed to go with how we'd planned on decorating our dining room when we first moved in, but we never quite got the dining room actually, well, decorated. It's still a bit plain. So the 9-Patch Pizazz pretty much determines the mood of the room completely on its own.
 As soon as my husband asked me the question, my mind immediately started running through my stash. "I don't have anything yet...but I could make something!" I scurried right up to my sewing room for a fun hour of choosing some fabrics, scanning them into EQ7, and creating a design. I'm keeping it simple--just pinwheel blocks, each of one of four different colors, a couple of borders, and multi-colored pinwheel corner blocks (pictured). I played with several variations then showed my husband the top 4--he liked one better than the others so I let him make the call. I was pretty evenly divided between a couple of them.
The only thing stopping me from diving right into this tonight is the fact that my design calls for white-on-white background and I ran myself completely out of that on my MIL's quilt. I'll have to make a run to my LQS sometime this week.
The design only requires about a third of what I have of each of my chosen stash fabrics. I'm thinking if I really get going on this, I may make a tablerunner for the dining room table or for the top of the buffet out of the remaining fabric. Might be fun to have something that coordinates. One of my 2011 quilty goals is to have more seasonal quilts to use year-round and I have almost nothing for spring and very little for summer, so it'll be nice to meet one of my goals while still doing something purely on impulse--what fun!
I'll let you know how it goes...
The wallhanging I have in our dining room is actually non-seasonal, but I will admit it leans towards fall and winter months better than spring and summer. It's a 9-Patch Pizazz in coppers and golds. It's supposed to go with how we'd planned on decorating our dining room when we first moved in, but we never quite got the dining room actually, well, decorated. It's still a bit plain. So the 9-Patch Pizazz pretty much determines the mood of the room completely on its own.
The only thing stopping me from diving right into this tonight is the fact that my design calls for white-on-white background and I ran myself completely out of that on my MIL's quilt. I'll have to make a run to my LQS sometime this week.
The design only requires about a third of what I have of each of my chosen stash fabrics. I'm thinking if I really get going on this, I may make a tablerunner for the dining room table or for the top of the buffet out of the remaining fabric. Might be fun to have something that coordinates. One of my 2011 quilty goals is to have more seasonal quilts to use year-round and I have almost nothing for spring and very little for summer, so it'll be nice to meet one of my goals while still doing something purely on impulse--what fun!
I'll let you know how it goes...
More fabric somehow found its way onto my shelves...
My son had an appointment today conveniently near my LQS. So while I was waiting for him I scooted over because I knew they were having a sale. These four beauties were just calling my name. Nice stash builders. (And yes, they're already folded and labeled to be stacked in their appropriate new homes.)
Meanwhile, I'm now sort of waffling about what I want to tackle next. Do I want to finish a UFO? If so, which one? What about that last Momufo still on my UFO shelf? What about those charity quilt projects in the plastic bag next to my cutting table? Or do I want to start something new? Would it be a pattern using some of the pre-cuts that I have so many of in my stash, or playing with some of my new fabrics?
Choices...choices...
Apparently I've been so driven the last couple of years that, now that I've done all the projects I absolutely wanted/needed to get done, my mind is flailing a bit trying to figure out where to go next!
Never fear. I'll figure it out. Meanwhile, I'm having fun going through my stash and my books in an effort to see what grabs me...
Check out the video of entrants into the "Quilting...for the Rest of Us" March Stash Mystery Challenge! http://bit.ly/eRZYdw

Of Cabbages...and Fabric...
Tonight, DH and I took my IL's to a beer and food pairing event at the NYS Wine and Culinary Center. In honor of St. Patrick's Day but in keeping with the NYSWCC's emphasis on eating locally, it was various NYS beers paired with traditional St. Patrick's Day foods made from local ingredients.
It was amazingly good, and it was an amazing amount of food. I always think of "tastings" as being little nibbles of something and little sips of something. I had actually had the passing thought of eating a small dinner before I left home. Glad I didn't! This was an actual meal. Appetizer of cold salmon on Irish Soda Bread with an herbed mayo--amazing, and I'm not a fan of cold fish. Corned beef and cabbage--very good, and I'm not a fan of corned beef. My fave was the lamb stew with potato three ways, although I only ate my potato one way, so to speak, because at that point I was ready to burst. Dessert was a chocolate bread pudding kind of thing, with ice cream made from Irish Red Ale. Sounds weird? Yes, it was a bit mind-bending to be able to taste beer in my ice cream but it was also surprisingly tasty! The pudding was also good but by then I had to admit defeat and left quite a bit of it on my plate. Each course had a different type of beer paired with it; they were more circumspect with their servings in that regard--probably all four tastings added up to one actual glass, and maybe even a short one at that. But that's all you needed. Again, any more and....kablam. Plus there was that hour drive home to think about.
In any case, we had a really nice time. That was our first time doing one of those events and we're definitely going back for other ones. They do a wide range of food-related programs and cooking classes focused on using local ingredients. I think I've found something to add to my Empty Nest List--cooking classes!
On the fabric front, pictured is my recent medicinal fabric purchase. When I was down with food poisoning, I fell victim to a Hancock's of Paducah sale email. It hit me at a weak point. On the other hand, I also figured that form of doctoring was still cheaper than a hospital stay. In any case, I had enough presence of mind to only purchase fabric that would fill in some blanks in my stash. I ignored all the pretty, pretty prints that threatened to turn my sleep- and food-deprived head. All of these were somewhere in the neighborhood of 50% off, and I got a yard of each. Not terribly exciting, but definitely useful!
I had a little bit of time to work on the Floral Bouquet quilt today--got the center part trimmed and squared up and the border segments sewn together. Tomorrow I just put the border on, get the backing ready, and hopefully drop it off at the long-armers. I'll post a photo once the border is on. I'm pleased with the way it's come together, although I've got an amazing amount of scrap I'll now feel the need to do something creative with...
But I'm Working on White Fabric!!!
Last spring, my son worked for awhile as a Cutco knife salesman. He actually did quite well, and ended up with almost a complete set between the samples he had to purchase to start and what he earned as rewards for high sales. Since he's still in a dorm, I get the benefit of the cutlery. They're good knives. However, I manage to cut myself just about every time I user them--they're dangerously sharp.
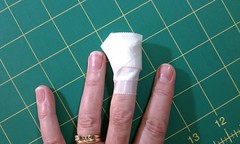
So I'm getting dinner ready tonight and slicing potatoes (I should learn not to use Cutco while chopping potatoes--I inevitably cut myself that way). Sure enough, this time I lopped off half a finger nail. As I'm holding my hand under the tap and my daughter and husband are running about trying to find the first aid supplies, all I kept saying was, "*!&!&*%$. This is going to bleed like the dickens and I'm sewing on white fabric tonight!!"
We have our priorities, after all.
Pictured is my daughter's attempt at bandaging. Not very skilled or pretty. I said I was tempted to draw a face on it and put on a puppet show. But at least it kept the fabric blood-free.
Doesn't do much for typing, though. I'll have to work something else out in the morning.
Finally...The End in Sight
The end of illness as well as the end of piecing!
If you're in the podcast BigTent group or connected on Facebook you already know that I've been down for the count for the last several days. I flew to NYC (delayed on the way there) on business Monday morning and by Monday night was laid out with food poisoning. Camped out in the hotel room all day Tuesday--up and around Wednesday but still not a whole lot better. Flew home Wednesday night (delayed, got home at midnight), took a step backwards Thursday. Finally today, I can say that I'm starting to feel somewhat human again.
As I'd posted in BigTent yesterday, I decided to release myself from the thought I'd pull off a podcast episode this week. My first goals were to eat, and then to sew. Anything after that is frosting. Not that I can face frosting at the moment. In any case...
Eating. Check. (Well, as long as I keep it small and very, very bland!)
Sewing. Check. Woohoo!
At about 5:30 tonight I decided I thought I could tackle the sewing machine. Funny, I worked all day with relative success, but the idea of being around sharp pointy things was a little more daunting. I'm pleased to say, though, that I have now finished piecing all the blocks for the Floral Bouquet quilt. I decided not to push my luck and try to start putting the blocks together--plenty of time for that tomorrow and Sunday. Like my meals, I think I'm better off for the moment keeping my quilting small and very, very bland. A few straight seams, no corners to match, we're golden.
And by the way, I've mentioned to friends that NYC is not my fave place in the world. And this trip didn't do much to endear it to me. Flight delays coming and going and it bit me, to boot. Maybe it's just getting me back for talking bad about it behind its back.
How does my garden grow?
 |
| "Floral Bouquet" in progress |
Spent a couple of hours at my sewing machine today and am now up to 21 blocks done, 18 to go. A little better than halfway. I'd originally thought I might get all the flower blocks done today but I was a little overtired, had a few other things I also had to get done, and ultimately lost energy and decided to stop before I got stupid. I was noticing that I was having to square up some of the later blocks a little more than I had been so clearly I was starting to lose my accuracy. Time to stop. Fortunately, the way the blocks make up, there's a little wiggle room for squaring them up. I love a forgiving block.
Tomorrow's another day. Not much on the schedule, so I should be able to knock out a lot more of those remaining 18 blocks. My plan is to pace myself and schedule a few shorter sewing periods through the day rather than trying to sit down in one long session. Should stay fresh that way!
Want to check out what we were doing on our vacation earlier this week? Here's a peek!
One Block Down...38 to Go...
Isn't this just the cutest dang thing? I've been in love with this pattern ever since I first saw it and it's not even my normal idiom (to nerdily quote Monty Python). I told my BFF/BQF Kate that this was probably the most "romantic" quilt I'll have ever made. It's very sweet.
However, that being said, I also immediately mentally tagged it for my MIL the second I laid eyes on the pattern as well. So it's sweet, but not something I'd probably normally have in my own house. I can so easily see it in hers.
That's the fun thing about quiltmaking. We can play with all sorts of colors and styles and not have to live with them any longer than it takes to make them!
In any case, this would normally be a chain piecing project for me but I think I might take it a block at a time. Mostly so I don't screw up the "planned randomness" I finally achieved tonight. But it may also be more accurate because I'll be going slower. We'll see. I could just as easily get five blocks into it and say, "Bag it. We're going for speed."
Oh, as for that planned randomness thing? I resorted the pieces tonight. Came up with one extra piece. Go figure. I counted twice. No idea how I made an extra piece. But it does explain some things...
When Random Isn't So Random
My MIL's quilt in progress. All the units just waiting patiently to be sewn into blocks. One would think it should be easy. Scrap quilt, you say? Just pick up the pieces at random and sew them together. Just go with the flow, use the force, whatever. And yet...
So I decided the best way to go random would be to "slightly sort" them as I stacked them, so I could get a feel for how each finished block would look. Really, the only thing I was trying to control was not having two fabrics end up in the same block. Although I'm not keen on a bunch of directional prints all ending up in one block either. Or too much green, or too much pink...
So. Planned Randomness.
It was all going swimmingly until the phone rang with a call I had to catch...and I lost track of where I was. I counted the stacks and thought I had caught up with myself, but when I got to the end, I had a couple left over. Which meant the blocks I thought I was forming were all a couple of strips off.
Natch, the second one I checked had two of the same fabrics in it. As did the next....
Bag it. I was just doing this while dinner was cooking anyway--no intent to start sewing tonight. Tomorrow I'll start fresh with new planned randomness.
Show n' Tell--The Peace Quilt is Done!
Here's the front, thanks to my handy-dandy-quilt-hanger, dear daughter. Cutest quilt hanger in the world. Probably also the one that complains the most. I tell her it comes with the territory and to suck up and deal. I believe in reality therapy.
BTDubs, I did actually quilt in the border, you just can't see it. I went along the black line between each set of blocks horizontally on the sides, vertically on the top and bottom. A little ray pattern in the corners just to hold them square. Nothing fancy. Wanted the focus to stay on the center.
The back. All that leftover yardage from my ill-fated plan to have the peace signs in the border all face the same direction went to good use anyway. And the fabric in the middle is the one coordinate I bought from the peace sign line. Originally thought it might make a cute binding, then I decided it was way too busy for everything else going on. Used it all on the back instead.
My nephew loves the back. He wants a quilt made just like this.
I said no.
Peace Quilt Continued
Got the borders on today. Ended up making all sorts of last minute judgment calls that changed my original plans. Even with the extra fabric order, I ultimately didn't have enough fabric to do the directional borders the way I wanted to (with all the peace signs heading in the same direction and no seams interrupting the flow). That meant I no longer really had to do mitered corners--in fact, I decided they probably would look better without since I'd never have gotten the peace sign blocks to line up well anyway. So I just did a much simpler border.
Still had to reverse-sew--aka seam rip--my inner (black) border due to some bad advice. I had read somewhere--don't recall where now--that using a walking foot/acu-feed for piecing would also help keep fabrics lined up well as you were sewing. Not so much. They were fine along the line of the seam but got smudged out of whack horizontally--in other words, one piece of fabric got pushed further away from the sewing line than the other. I'd even pinned! So I ripped it back out and changed back to my regular 1/4" presser foot and had a grand old time.
I just finished sewing about a 1/4" (slightly wider) echo quilt line around the entire peace sign. My original plan was to do that once, and then do a diamond grid for the rest of the background. But as I'm looking at it, I think I'll just keep doing the echo. The grid would never line up straight with the two diagonal bars on the peace sign so I'm better off not messing with it.
I'll finish the quilting tomorrow, get the bindings on Monday, good to go for show n' tell at my guild on Tuesday--and in the mail by Wednesday or Thursday (whenver I finish hand-sewing the binding). Yippee!
Oh--and no worries. The extra fabric went to good use. It now has a pieced backing with the one coordinating fabric I'd bought that I'd originally thought would make an interesting binding (nope--too busy), surrounded by the leftover peace sign fabric divided into two strips. Bingo--none left over!
Success...of a Sort
I mentioned that I had a sizeable stash of 2 1/2" strips...
The strips stacked on the sides are the collection from a couple of years of strip exchanges with my guild and some I picked up as door prizes at the shop hop last summer. I owned about three or four jelly rolls myself, and then the rest came to live with me after my Mom passed away. She'd just hit a sale or something--I found a couple of shipping boxes with bunches of jelly rolls and bundles in her quilt studio. I gave some away to share the wealth. But I kept all the Moda.
So here was the first set I picked out.
The original jelly roll fabrics are in the middle. I chose five strips from my stash that coordinated. I waffled about the deep rose one right next to the strips (on the right) for the longest time, then finally decided it really gave it a nice pop.
And then I measured the strips.
And the deep rose one was several inches too short. Curses. Foiled again.
Back to the drawing board, and this time, my fat quarter collection. I tend to buy my fat quarters as sets of coordinates--more or less. Not always from the same fabric line, but if I pick up a couple that I like, I'll try to make sure I buy two or three others I know will work with them so I've got at least a solid foundation for a project. I always hate to break up a set.
Darn. Ended up choosing the green plaid (on the left) since it was pretty close in tone to the greens in the jelly roll. Not exact, but the white in the plaid makes it less noticeable. It works. Broke up a nice set, though.
And now I miss the deep rose. Sigh.
Off to press and cut...again. But I probably won't get the background cut tonight. I got my shipment today of the rest of the fabric for the border on the peace quilt so that's back up at the top of the "Must-Do" list. Once I get these floral strips cut, I'll be setting this puppy aside for at least a week, I think.
Anyway, problem solved. (Thanks, Jaye, for the offer of fabric, though! Appreciated!)

The strips stacked on the sides are the collection from a couple of years of strip exchanges with my guild and some I picked up as door prizes at the shop hop last summer. I owned about three or four jelly rolls myself, and then the rest came to live with me after my Mom passed away. She'd just hit a sale or something--I found a couple of shipping boxes with bunches of jelly rolls and bundles in her quilt studio. I gave some away to share the wealth. But I kept all the Moda.
So here was the first set I picked out.
The original jelly roll fabrics are in the middle. I chose five strips from my stash that coordinated. I waffled about the deep rose one right next to the strips (on the right) for the longest time, then finally decided it really gave it a nice pop.
And then I measured the strips.
And the deep rose one was several inches too short. Curses. Foiled again.
Back to the drawing board, and this time, my fat quarter collection.
Darn. Ended up choosing the green plaid (on the left) since it was pretty close in tone to the greens in the jelly roll. Not exact, but the white in the plaid makes it less noticeable. It works. Broke up a nice set, though.
And now I miss the deep rose. Sigh.
Off to press and cut...again. But I probably won't get the background cut tonight. I got my shipment today of the rest of the fabric for the border on the peace quilt so that's back up at the top of the "Must-Do" list. Once I get these floral strips cut, I'll be setting this puppy aside for at least a week, I think.
Anyway, problem solved. (Thanks, Jaye, for the offer of fabric, though! Appreciated!)
Dang. And It Was Going So Well...
Another evening in, another opportunity to spend a few hours in my sewing room. Companionably, even, since my daughter is sitting on the floor in my sewing room with her computer (a long story having to do with hitchy wireless and ethernet cables), the two dogs are here, and my son's voice is coming to me out of my computer speakers since tonight's his DJ night on campus radio and I was streaming his show.
I was merrily cutting along to my son's music, not always my taste but I generally find it mostly entertaining. Everything was going swimmingly. His show ended just about as I finished up my last cut. I shut off my computer and went back to my cutting table to neatly stack all the pieces inside labeled plastic bags, when I decided to review the pattern instructions to see what I needed to cut next.
Wait....what? TWO 6-1/2" strips?? I had only seen that I was supposed to cut one of each successively longer size rectangle off of each set of 2 1/2" strips. But apparently I was supposed to cut two of one size, and I hadn't caught it.
I had leftovers of all of strips, of course, so at first I didn't think it would be that big a deal. Pull out what I thought had been scraps, trim it to 6 1/2", call it a day. But darn if five of those scraps weren't too short. Several more have some selvage showing at one end but it's not the white part--it's the part that would pretty much blend in, especially considering seam allowances. I could probably get away with it. But those five, there's no help for it. Even steaming the hey out of them wouldn't get them close enough for horseshoes.
So now I have to decide how to problem-solve. I've got some ideas but, frankly, ran out of steam. My daughter's school woke me up way early this morning with a robo-call to tell us school was closed so I'm about ready to head to bed as it is.
As my Dad always used to say, "Get a good night's sleep...it'll feel better in the morning."
Ok, Dad. Good night.
Stash Mystery Challenge project started
I'm still waiting for my order of the border fabric I need for the peace sign quilt, so I took advantage of a night "off" from that to start on my stash mystery challenge project. (The Stash Mystery Challenge is one I'm facilitating for my guild and I'm also running a slightly adapted version on my podcast. Check out the guidelines at www.quiltingfortherestofus.com, on the "Stash Mystery Challenge" tab.) This quarter's theme is "floral."
My take on the theme isn't actually using floral fabrics, although clearly I am. But the pattern I'll be doing makes pieced blocks that look like flowers. Very, very cute. The minute I saw the pattern in the book when I bought it a few years back I knew I wanted to make it for my MIL, but was still trying to clear the decks of so many other projects. I didn't even think about it in terms of this challenge until after I'd already published the challenge theme for the quarter and was trying to decide what I'd do. Doh. Of course!
If I can keep working pretty steadily on it, I should get the top pieced by the deadline of the challenge in early March. If that happens, I can send it off to be long-armed and quite possibly have it back in time to give to my MIL for her birthday in early April.
This quarter's stash mystery challenge involves using at least 2 yards of fabric from your stash. I'm using 3 yards of the whites, plus a jelly roll. I did the math on the jelly roll--it comes out to a little over two yards of fabric. Woop woop! So, not counting backing and binding yet, I'm using over 5 yards of fabric. I did end up being half a yard sort of white to complete what I needed for the background--and, being a good quilter, actually bought a yard so I could have some slush room and put some back in my stash when I'm done. I pretty much depleted my tone-on-tone whites on this one. (You can't tell from this picture, but I think there's three different whites in there, plus a collection of tone-on-tone white strips from a strip exchange we did in our guild several years back.)
I actually made the jaunt out to my LQS for that half yard tonight as soon as I realized I was short--I only live a few minutes from it and since we're due for the same snowstorm covering half our continent tomorrow, I'm thinking I'd rather be snowed in with fabric than without it. Most people run to a grocery store--quilters run to the fabric shop. We have our priorities, after all.
Applique done!
I finished the MQ blanket stitching on the peace sign today. And yes, it probably does look as wonky as all that. But it seems to work so I'm good. I still think it looks better in person, though. I'll just name it "Wonky Peace Sign" and claim it as an artistic decision. You can't see it easily in this photo (and enlarged is almost worse--cell phone pic and using Picnik's auto-fix which grained everything up but good), but the blanket stitch is black, which will work well with the borders.
I'm now at the point of debating said borders. I have the main border fabric--a peace sign print. What I'm auditioning on my design wall, though, is whether or not it needs a thin inner border first. I'm thinking yes. And I'm thinking a tone-on-tone black. The border fabric has lots going on (and thankfully, wonky, so yes, it's definitely an artistic decision). Although I could probably get away with just doing the one border, I think it'll be more effective if I just do a narrow, say 1", inner border in black and then the print border. Then bind it in black again. Should keep it from spinning off into psychedelic mayhem.
I also had a last minute panic about the amount of border fabric I have. I've got half a yard, which would have been plenty were it not a directional fabric. I would end up having to blend in lots of seams and frankly, I'm just not in the mood. So I just ordered another yard. Which means I'll have lots left over. And I did second-day-air. Which means I'm paying more for shipping than the fabric. But I'm still good.
I can always make her a matching pillowcase.
Peace Sign Progress
I know, I know. It's been awhile. Sorry about that. I was away over the weekend and have a cold that's not serious in most symptoms, but just making me all sorts of draggy. So I took a few nights off of doing much of anything. But tonight I finally got the next big step done in the peace sign--it's all fused and ready to go.
I figured out how I could have done this a little more easily...of course, the minute I finished doing it the hard way. I suppose that's the way it often goes--you have to do it once to see how it works. Or maybe that's just me.
Anyway, debating fusing methods and ended up going to my trusty MistyFuse. Love that stuff. Now I've got to find just the right thread for the blanket stitch. I decided against doing a funky color since I have so many funky colors a-happenin' already. I'm just going with a basic black, but I want something of just the right thickness and feel. Off to my fave LQS tomorrow after work, and perhaps a second, since my LQS primarily stocks embroidery threads and not such a wide selection for other stuff. There's another QS way across town that has a bigger thread selection so I might end up having to check both.
Thanks, crowefan, for telling me a grid pattern would look great. You convinced me!