Sick Days...and Dyeing

I was going to title this post "Sick and Dyeing," but thought that might send a bit too much panic. Adding some elipses may at least give people pause before they assume the worst.

Although, a few days ago, it was arguable just how lively I really was. Doing ever-so-much-slightly-better now, thank you for asking. Still not quite up to a podcast. Hopefully sometime later this week.

Yes, almost two weeks ago I came down with the same cold/flu thing that's been making the circuit. For some significant percentage of the afflicted, it has gone into pneumonia. When I finally gave in and called my doctor to ask if she could prescribe me anything that would help the cough go away long enough for me to get a decent night's sleep, she required me to actually come in to see her. I wasn't aware of the pneumonia thing. Fortunately, not pneumonia in my case; she prescribed an inhaler which helped remarkably during the day and antibiotics. Nights are still rough. I'm allergic to codeine so the usual 'Tussin with Codeine thing didn't go well (the headaches it gives me are worse than the slight relief from the coughing). I'm back to Nyquil Cough and I'm glad to say, last night was the first uninterrupted night's sleep I've gotten since this nonsense began 12 days ago. I was supposed to be driving for 6+ hours today for work but gave in and called my supervisor last night. When I couldn't even make it through the conversation without coughing fits, she very kindly moved our staff meetings so now I don't have to go down for another couple of weeks. I feel like two or three more days of quiet should kick this thing for good.

Meanwhile, what to do on sick days? I hate being completely non-productive, but I had to take things v-e-r-y slow with lots of long breaks. I did manage to get some things accomplished, though.

Our Guild does Blocks of the Month most years, in which one of our guild members (Kate) chooses a block from a book and we all make it in whatever size/colors we want. No swapping--just making it for ourselves. (This year we're doing it with paper-pieced blocks that

I've posted about before

.) I'd started doing the BOM in 2008 and never finished, so I pulled out that bin this weekend. I was pleased to see I was only three blocks short. 

After I got this block done, I realized I'd used almost exactly that same combination of fabrics in a previous block I'd made five years ago. Oops. Oh well--shows that the combination has staying power, I guess.

I kept this one simple to balance out a few of the other busier blocks.

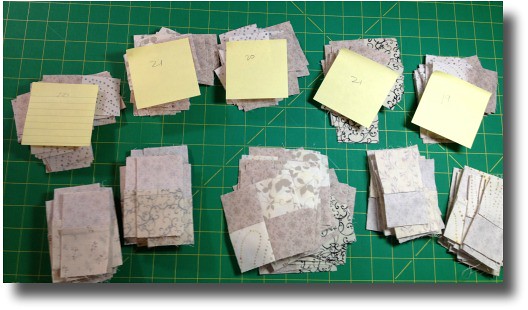
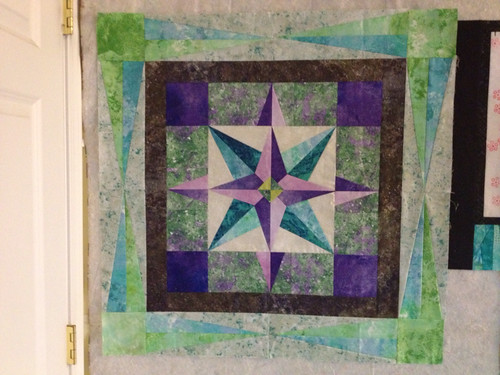
This was the last block, so I put all previous 11 out on the table to see what fabrics I needed to use to pull them all together. I had a rather troublesome almost-entirely-green block, and another troublesome strangely-pinkish block that I wanted to make seem more like they fit in with the rest of the collection. So I used one fabric from each of those blocks, and the third is a fabric I used often (note it in the block above).

With this one "tie it all together" block, I made the two troublesome blocks no longer troublesome. Now everything feels like it fits.

Dang, sometimes I actually know what I'm doing.

So here are the 12 blocks together for the first time ever. You can see the originally-troublesome green block near the front of the picture; the strangely pink one is sitting right above it, although it doesn't come across as much pink in this picture.

That's the problem with taupes. When you're buying them individually, they all read "taupe." When you put them next to each other, you realize you've got a pretty wide range of colors.

Those blocks are now hanging on my design wall while I decide what I'm doing next. I'm pretty sure I've decided sashing, and I'm pretty sure I know which fabric I'm using for it. I have a border fabric already that I know will work. It won't take me that long to get the top pieced--just have to get myself to the energy level where I trust myself to do math.

I also got a couple more steps done in the Kimberly Einmo "Chain of Stars" mystery quilt on Craftsy, but I'm not allowed to post pictures of that publicly yet. She doesn't want us ruining the surprise for anyone else. I hope she lifts that stricture soon, though--I hope to have it done in another few weeks and don't want to wait too long to post it as a finish.

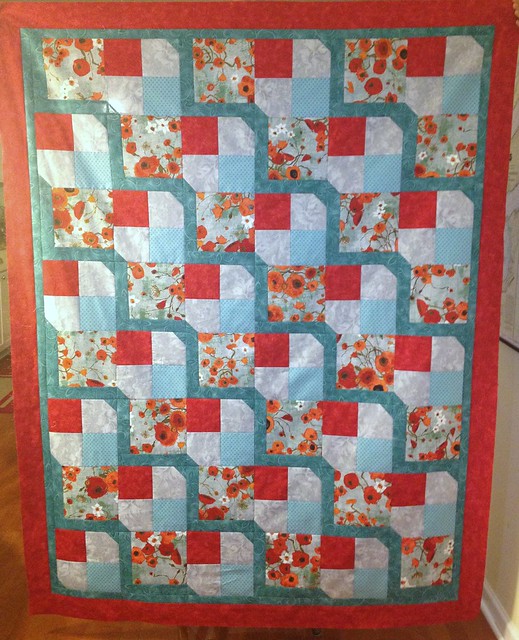
Thirdly, I got my Poppies quilt back from the longarmer and finished putting the binding on this morning. (Another great sick-day activity since it requires hours in front of the TV hand-sewing.) It's in the wash at the moment. I'll post pics later.

Then, because on Sunday I woke up to several inches of new snow, I got the bug to do some snow dyeing. Dyeing is a fantastic sick day project. About 20 minutes of activity and then several hours of waiting; a few more minutes of activity and then waiting...It was great. I felt like crud but I could still be creative. For the win.

I have dyes and such because I'd bought the kit available for the

Jane Dunnewold Fabric Dyeing class on Craftsy

months ago and hadn't gotten the time to use it yet. I tweeted

Sandi Colwell of Quilt Cabana Corner

, who had recently been posting about her snow dyeing experiments, and asked if she could send me quick-like-a-bunny how she had gone about it. She immediately replied with an email of instructions. I love social networking.

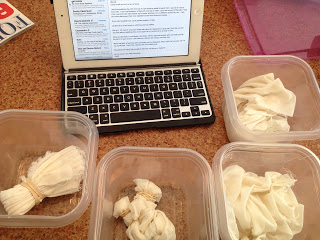
I had a little bit left of some PFD Kona White I'd bought at Joanns months ago for something else, so I tore it into pieces that are something less than fat quarter sized. I scrunched two of them, then accordion-folded one and bunched and rubber-banded a second one. (That's Sandi's email open on my iPad so I could follow step-by-step what she suggested.)

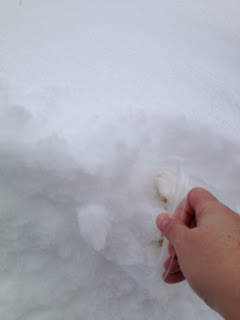
I reached out my patio door to scoop snow into the container with the fabric. Just out of sight to the left of my hand is Sam's snout. He was extremely curious as to what I was doing and I had to keep shoving him out of the way. Doofus.

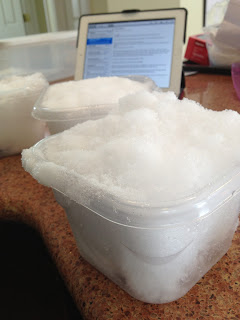
Here are all my containers ready to go.

Must have the face mask before opening the powdered dyes. Probably should've been wearing one of these on the plane back from Phoenix--maybe I wouldn't have gotten the plague. Go figure.

As soon as I poured the dye solution onto the snow, it melted. Oops.

In my usual "How fast can I fix this?" mode I just scooped a bunch more snow into the container, figuring it really had more to do with the water and cold temperatures or something.

I wasn't exactly thinking straight. I think all I did was dilute the dye.

I've since read information about people sprinkling the dye powder directly onto the snow rather than making it a solution first. That would likely work much better.

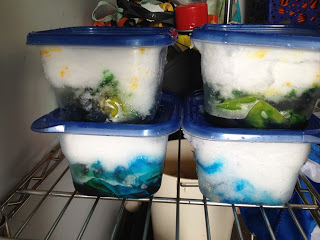
Still, not bad results!

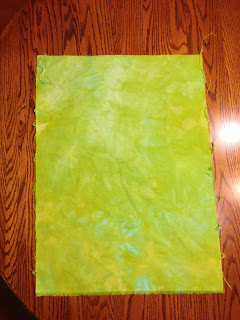
This first one was mostly yellow with some turquoise thrown in (scrunched).

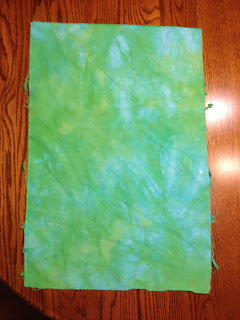
This was mostly turquoise with some yellow thrown in (scrunched).

This is the one that I bunched up with rubber bands; it was in turquoise, and then I had a little yellow dye solution left over so I dumped it on one end of the banded fabric.

This is the accordion fold one that was in what I thought was a fairly even mixture of turquoise and yellow, but it was clearly more yellow.

Hence ends my first experiment with snow-dyeing. I might try it again at some point, but today I've returned to the Dunnewold class in Craftsy and am working on doing standard dyeing using her methods. I'm in the waiting period at the moment--it's all in the dye bath and I won't know how it turns out for another couple of hours, so that'll be tomorrow's post...

Catching Up...WIPs, BOMs, and Finishes, O My

Boy, howdy, has it been awhile since I've written a blog post! My apologies. It's not for want of quilting to show, it's for want of time to write the posts about the quilting I've been doing. It's time to play catch-up, and the fastest way to do that is with a little photo-essay...

The Progress Down Easy Street (not in strict complete weekly order)


I have everything pieced--just have to put the top together. I'll be talking about this in an upcoming episode.

My Guild Paper Pieced Block of the Month
We're using Carol Doak's 300 Paper Pieced Blocks book. The BOM leader is choosing the block each month. I'm using only scraps from my scrap bin as much as possible--so far, with only two months under my belt, so good. We'll see what happens when I get into months 10-12! I'm trying to keep all the colors at the same intensity and saturation level, with scrappy white backgrounds, so no matter what the blocks are I'm hoping they'll all hold together at the end. But I'm also being flexible--if I can't get them all into one project I won't sweat it.

January's block


  February's block already done (woot! I'm ahead!)


My little growing village. 
@verylazydaisy said they looked like gnome houses; 
so now I think of this as Gnome Village. 
We'll see what the next block brings!


An Impulse Project: Christmas Tablerunner

I bought some Christmas fabric on sale that I really had no right to be buying given that (1) it was a couple of days before Christmas and (2) I already had a respectable stash of Christmas fabric at home that hasn't been used. So, to waylay the guilt factor, I immediately made a table runner out of it that weekend and successfully used up all the Christmas fabric I'd bought plus some white from my stash. So while I still have the aforementioned respectable stash of Christmas fabric, at least I didn't add to it! (My apologies--I stuck a black border on the picture and belatedly realized it makes it look like there's a black border on the tablerunner itself. There's no black border on the tablerunner.)

I also poked away at a quilt for a family member but it got set aside until I can finish Easy Street. That one really isn't picture-worthy yet--mostly a bunch of cut fabric at this point.

We have family in from out of town for the rest of this week/weekend so no more sewing for a little while. Things should settle down next week so I can get back into a blogging routine again!

Easy Street Weeks 3 & 4

I didn't finish Week 3 until the night before Week 4 was posted so I didn't do the linky last week. And I still haven't finished trimming the blocks, so technically I'm not sure I consider that I've completely finished week 3. But there it is, move on. I can finish trimming later.

I really like the way these blocks look--the colors work well together.


I got Week 4 finished tonight--all trimmed and everything. (Netflix got me through!)

For some reason, even though these are all the same colors as the above blocks, I'm not as keen on the way some of them turned out. Some of my reds are more of a brown-red that isn't quite as striking next to the purple. However, I'm relying on having all of it work together once I'm looking at the entire pieced top rather than individual units.

(Sorry the picture is a little blurry--it was pretty late when I finished!)


Be sure to check out Bonnie's blog and link-up to see how everyone else's are turning out--it's been fun watching how all the different colorways are playing out!

Reporting In...WIP (almost done!) and Easy Street W3

Easy Street Week 3 Progress

I got all my pieces cut for Easy Street W3 today, but decided I was going to space out my work on it this week for the sake of my soul. I get irritable when I have to do the same thing over and over again--it loses all sense of joy for me. (Something I've learned from my approach the last two weeks!) So this week I'm doing it in parts--cutting today, sewing tomorrow. Not sure I'll get all the sewing done tomorrow since I'm not sure how long I'll have to work on it, but I should be able to make significant progress after work.

Still can't post pictures of my postcard for Sandi yet, since she hasn't received it. I'm trying not to panic that I somehow misaddressed it! Meanwhile, I've received hers--it's wonderfully fun! I won't post pictures of that one either until the whole story is over. So that gives you something to look forward to. I'll also post more info about how I made mine once she gets it (I'm trying to think positively here....).

Another Work in Progress


Meanwhile, here's what I spent all of Sunday afternoon working on. This was originally going to be a donation quilt when I realized it would actually make the perfect Christmas gift for a family friend who is wheelchair bound. I do usually get her something every Christmas but haven't made her anything quilty yet. This will be a nice bright spot in her apartment, I think.

Hoping to get binding on tomorrow night, and then I'll be able to post it as a finish!


NOTE TO MY PODCAST LISTENERS

I just discovered that Podbean is down because it's moving everything over to Amazon Web Services. I don't know if this means anything to the administration end of my podcast--we didn't get any notifications that it was happening so I'm hoping for the best. (Working on the "no news is good news" theory.) However, it does mean that my podcast, as well as any other podcasts hosted on Podbean (which includes several of us quilty folks) are currently unavailable. Supposedly it should be back up tomorrow morning. Again, here's hoping for the best....

Easy Street Week 2 Progress and Sew-Day Report

I've completed Week 2 of Easy Street--so far, due to some well-timed days off, I've been able to keep up! I hadn't used the Companion Angle or Easy Angle rulers before (Bonnie Hunter's recommended rulers for her mystery quilts) so this was my first run with them. It took me a little bit to figure out the best way to use them without having my hands at odd angles while cutting and risking lopping off a major appendage. I used an Olfa rotating rotary cutter mat, which helped tremendously. If you don't have one of those, add it to your wish list! I use mine frequently.

I was cutting a lot of the purple pieces from small scraps so that took longer since I had to cut all three sides of each piece in most instances (to have straight edges) rather than a strip and a few slices to get multiple units at once. It felt good to use up some scraps I've had around for awhile, but it took so long that I'll be thinking long and hard about that trade-off in future steps, if it comes up again.

I had a sew-day on Friday and half of Saturday with one of my groups of quilty peeps, which is how I was able to get Easy Street done on the day the clue was posted. Woot! I did also get some other stuff done. I can't post a picture yet of my other completion this weekend until the recipient receives it. But it's of the postcard variety.

For more results from Easy Street Week 2, visit Bonnie Hunter's blog and linky.

#BFSI In Review

Friday was, yes, our Black Friday Sew-In! Woot! And a great time was had by all. The giveaway on my blog was great fun--loved reading everyone's responses! Congratulations to Brenda J (The Quilt Show subscription) and  Fiber of All Sorts (The Fat Quarter Shop certificate), the lucky winners of my blog giveaway!

Thanks to all the other bloggers who hosted their own giveaways and linked up here. It made the party even bigger!

And even more--I did four mini-giveaway challenges via Twitter through the day. Posted those winners via Twitter. Again, I loved reading everyone's responses to my questions!

What else did I get done on Black Friday, besides hang out on Twitter? (By the way, for me "BFSI lasted through Sunday morning--other than some Christmas decorating and going to a movie with the fam, I basically hung out in my sewing room most of the weekend--so this is a tally of everything done from Friday morning until this writing.)


I took an April Cornell charm pack (Portugal) I've owned for several years...
 ....made some 9-patch blocks out of it....

...and then turned it into this Disappearing 9-Patch.

The astoundingly oversized borders are because I'm making this a wheelchair quilt to donate to a local nursing facility and the one charm pack only makes a 26"x26" square center. Wheelchair quilts should be in the neighborhood of 36"x45" so I added 5" borders (finished) to either side and 9" borders (finished) to the top and bottom. Normally not a design choice I'd make but I think it works okay. I didn't have another charm pack that coordinated and I also didn't want to cut just a few squares from yardage in my stash, so I went with the honking-big-border technique. And hey, I got to use another yard out of my stash for the borders, 2 1/2 yards for backing and another part of a yard for binding. Big stash-busting happening this past weekend!

Disappearing 9-patches are fun. I'm already digging into the rest of my charm pack collection to see what ones I might work with next--they make very fast donation quilts! This only took about 90 minutes total to get to this stage. Since I'm just going to meander-quilt it, it won't take any time at all to finish completely.

Then, rather on a whim, I pulled another set of fabric off my shelf that's been there for a few years. I fell in love with a vendor's booth the last time I was in Houston in 2008. She did all her own hand-dyed fabrics with various surface treatments--super cool stuff. I bought a roughly one yard piece of fabric and then several small pieces that each had leaves stamped onto them. No idea what I was going to do with them, which is why they sat.

Finally today I just bit the bullet, did some arranging, lightly fused them into place as a basting method, pulled some yarn apart to make it a little thinner, then did some stitching and embellishing. I also loved the frayed edge of the background fabric so I frayed all the pieces to give it all a very organic, rough-hewn look.

It's not really a quilt since there's no batting, backing, or quilting. Let's call it a tapestry.


Leaf details 1


 Leaf details 2


I can't put a hanging sleeve on it because stitching would show through front so I need to find a hanging device with hooks that fits the mood of the piece.


And then I finished something I'd been playing with for a bit.

Karen Lee Carter teaches a dimensional flower technique that I've been wanting to try. Since this was a test piece I used some scrap fabric for it, so my fussy-cut flower (center) has a part of another flower overlapping the leaf. That particular fabric doesn't have any whole flowers untouched so it doesn't work well for fussy-cutting. Again, test piece, didn't worry too much. I did some satin-stitching for the first time--need to practice more on that. Then I also used it to test another technique I saw in Quilting Arts Magazine: cut a hole in the center of something and sew across it to create a web effect. Very cool!


Detail of dimensional flower


Detail of webby hole in the middle.

Love both techniques!

I also put together a few new "quilt sandwiches" to practice my FMQ on, and the rest of the time I spent poking away at Easy Street Week 1. I'll put pictures in the Flickr and Threadbias groups tomorrow (Monday) and be linking up to Bonnie's blog then. 

I had a very productive long weekend. What about you?

Quilt Top Complete and Easy Street Prep

You're Getting Sleepy
"You're Getting Sleepy" (aka Poppies) top complete.

 I've ordered more of the poppies fabric to use as the backing. I didn't have enough of any of the fabrics to piece a backing and I love the poppies fabric enough that I really wanted more of it anyway. Haven't decided how I'm going to approach the quilting yet, so it may be a few more weeks before this gets done.

Meanwhile, just a few days left until Bonnie Hunter posts the first "clue" for the Easy Street Mystery Quilt. I was just checking out the Flickr group to see everyone's fabric choices so far--very cool! Here's the slideshow from the group (if the embed works correctly).


 If you're on Threadbias, be sure to check out the Easy Street group I've started there as well--more pics of fabric choices.

Succumbing to Peer Pressure on Easy Street


So a few Twitter folks talked me into it. They talked me into walking down Easy Street with Bonnie Hunter and the crew.
Today I simply dug out my probable fabrics. May still swap some out. I still have a couple of weeks to live with them until it starts.


Care to join along?

Katie of Katie's Quilting Corner, Pam of Hip to Be a Square, and I have a Flickr group for anyone who wants to walk on Easy Street with us.

I've also set up a group in Threadbias (because you can post pics to Flickr and then simply import them into your Threadbias account--easy peasy to post them in two places at once).

Tomorrow is my sew day with my guild peeps. I've made pumpkin bisque with smoked gouda for our potluck lunch. I really have to remember to post that recipe someday. I guess I should start doing Food Fridays again, eh?

Of Pizzazz and Possibilities (and Soup)

Of Pizzazz


The center is pieced! Woot!

Debating borders. I have two fabrics left from this set that haven't been used yet. Both give some very interesting possibilities, but would take some finagling.

But maybe I don't want borders at all. I like the sort of vague ambiguity it leaves as it sort of wanders off the edge with no defined end.

I might ultimately want it bigger, though, so it can be more easily used as a cuddle quilt.

Pondering...

Of Possibilities

So here's the thing. I've already got a line-up of projects I want to do. The bins are sitting coaxingly on the floor near my sewing room door, just waiting for me to grab-and-go.

And yet...people are talking about Easy Street.

Who started this in my head? It was (like so many things) a conversation on Twitter among some of my tweeps. Was it @ddrquilter? Perhaps @Quiltedmagnolia? Or should I blame @quiltcabana? I know not to blame @Craftygardenmom due to her very succinct, but unrepeatable response indicating that clearly they had tempted her as well as she wasn't any too keen on it. I came in very late to the conversation--just to catch enough to get me thinking. And heading to Bonnie Hunter's website "Quiltville." And checking out her new mystery quilt that starts this month.

Kate from my guild did Orca Bay last year. It was gorgeous. But I'd watched her working on it at a retreat or two and had followed a lot of blogs of folks working on it--I know it was hard work! My first thought when I heard folks talking about Bonnie's new mystery quilt was, "I don't want to get into that. I have other things I want to get done!"

And yet Bonnie promises this one is going to be easier than Orca Bay. So maybe I could work on it and still have a life.

I emailed Kate to find out how she liked doing Orca Bay. So now she's working me over too: "Do it, do it, do it!"

Still haven't decided. I do, after all, still have those other projects in bins. Staring at me.

(And Soup)


Homemade chicken and rice soup tonight.

'Nuff said.

Sunday Progress--9-Patch Pizzazz

It was a quiet Sunday morning. We had our first snow. Sam was pensive as he watched. 


Later, we cleaned. I knew it was time to stop cleaning when blocks from my design wall decided to leap directly into the path of the oncoming vacuum cleaner.


By the time I'd hauled the vacuum all over the second floor, plus cleaned out a closet and two vanity cabinets and hauled all resulting garbage (it's been awhile) to the garage, I wasn't sure I was up to sewing. 

So I organized myself. 

This design means you can't sew blocks in rows. You must chunk. Jaye would be happy. 
 I just need to plan that out so I don't end up accidentally having set-in seams anywhere. 

Then I decided to do myself the favor of figuring out my seam pressing in advance too.


Those Fons & Porter directional pins have come in handy many a time. No, you don't absolutely have to press seams in opposite directions, but it sure can help.

I did get two chunks sewn, but I'm calling it quits for the day. It's a quiet, cold evening; time to sit in front of the fireplace with a quilt magazine or two while dinner's in the oven.

Saturday Progress--Organizing and Dreaming

Here's the latest version of the potential layout for my 9-Patch Pizzazz:
I think this is probably going to be the one. I posted it to Twitter and Threadbias to get opinions and people seemed to pretty much all agree it works. It's tough on this one to balance those two big blue blocks. My other 9-Patch Pizzazz had so little contrast it really didn't matter how I laid it out. This one has been trickier.

While I was waiting for responses from my online quilty consultants, I did some cleaning and organizing. I'd posted my niece's quilt on Threadbias and was remembering that the pattern was fairly easy and thought, "Gee, I could use up some fabrics from my stash pretty easily if I made another of these." So I pulled the pattern out and dug through my stash.

The pattern is on the right; the fabrics I'll be using are on the left. The red is really jumping out in this picture--it's really not quite that brilliant in real life. Bright, but not eye-dazzlingly so.

That's now in a bin ready to go with me to my guild sew day next weekend--I finally get to go to one! The pattern is easy enough I should be able to get it mostly pieced in one day.

(I love those fabrics--that'll be a keeper for me. Woot!)

Then I started thinking about potential Christmas gifts. May not actually get it done but thought it might be worth a shot. We have a couple of family friend-kids that should get quilts from "Aunt" Sandy, so if I can pull it off, hey, it would be nice. If not, no sweat--they'll get birthday gifts sometime in 2013.

One is a teenage girl. I've queried what her fave colors are. Meanwhile I'm contemplating a stack n' slash using these fat quarters:
 
And I also pulled out one of my favorite table runner patterns that uses charm packs. Yep, had a Christmas charm pack. I could use some more Christmas table runners.
 
So now I've got my collection to go to my sew day next week.


Hmmm. One would think I'm excited to finally be home for several weeks on end. Think my eyes are bigger than my sewing machine, so to speak?

Found Time--and Some Quilt Progress (WIP)

So my eponymous (sigh) hurricane downed our offices server-wise (we're based in Valley Forge, PA), so I ended up with today off. I could've spent the day working on another closet, but I'm a firm believer in "Found Time." When you end up with time you didn't expect to have, you should enjoy it! Thus, off to my sewing machine I went.

If you've been able to listen to the podcast episode I posted right before the storm hit on Monday evening, you'll know I'm working on a challenge project for my guild. If you haven't been able to listen to it yet, you might need to wait a bit. The podcast host servers also seem to be down now so if you didn't download it the night I posted it, you might not be able to for a few days. Sorry about that!

So, to recap for those of you who don't know what I'm talking about--this is the Untouchables Challenge, in which the challenge is to use that fabric that's been on your shelf for a long time and you (1) haven't wanted to cut into it because it's too pretty and you're sure you'll ruin it; (2) it's a tricky fabric and you're just not entirely sure how to use it; or, (3) it's butt-ugly and you can't imagine what you were thinking when you bought it.

Fortunately, my fabric for the challenge falls into categories (1) and (2). It's a McKenna Ryan collection. In my podcast episode, I talk about how I ended up landing on the technique I'm using so I won't go into that here. The nutshell version: It's the 9-Patch Pizzazz technique by Judy Sisneros.

Right now the blocks are all just hanging out on my design wall--I haven't actually figured out my final layout yet. This layout was simply me seeing whether I had enough blocks to work with.

I'll eventually have it in a layout that helps your eye travel more and blends better. It's very low contrast intentionally--sort of a spa feel. I may do something with the border to give it more definition. Or not. Haven't decided yet. I need to let it brew for a bit.

I think the colors blend in person better than they seem to in this picture. Lighting issues.

I made a 9-Patch Pizzazz a few years back. This one is named "Roman Pizzazz." It hangs in my dining room most of the year until I switch it out with a flag quilt that hangs from Memorial Day to Labor Day (or, like this year, until tonight when I realized, "Yeesh--the flag is still up!").

It's named "Roman" because the focus fabric felt very romanesque to me. Other than the border quilting which you can see pretty clearly in this picture, I quilted the rest of it with climbing leaf vines to give it an ancient ruins-kind-of-feel.

Whenever you do listen to my episode, you can probably see what I mean when I referred to some of the fabrics blending *too* well in this quilt--you can't even tell that most of those blocks are 9-patches. But still, I like the colors!

Boy, does it feel good to be making progress on projects again!

Food Friday--Report on CSA Week 8 and Pick-up Week 9 (and a brief moment of quilty)

If you're not a foodie and just want some fabric-quilty-stuff, here's a quick pic of one ongoing project I'm working on...

Now, back to food!

Oh, we have reached the bounty of summer!

Remember last week's haul? I've done pretty well at using it all this week, with the exception of one zucchini that's carrying over into this week's dinner explorations. (I might be resorting to zucchini bread.)

Fortunately, we had family over for dinner on Friday night so I used up quite a bit of the produce right away. We did a marinated flank steak--or three, since we had a couple of young adult males in the mix--and bought a loaf of French bread because I ran out of time to make homemade. Other than that, Dinner Brought to You by McCracken Farms.

Two cucumbers were turned into a cucumber and tomato salad with Italian dressing for starters. I had to use some storebought tomatoes for the salad because I used all my CSA tomatoes on the next dish. Unfortunately, I didn't think to get a picture. (My daughter ate the other two cucumbers--one straight up, the other in some sort of rice curry thing she makes herself. I've never been positive what all is in it, but she likes it, so hey. I won't even ask.)

The huge yellow squash, the honkin' big zucchini, the tomatoes, and the pattypan squash were cut into 1" chunks (more or less), tossed with some olive oil, salt, garlic powder (I was out of fresh garlic), and thyme, and roasted in a 400 oven for about 40 minutes. It probably would've taken a lot less time except the squash and zucchini were (have I mentioned?) freaking huge so the veggie mix took up two jelly roll pans that I rotated between two racks. Again, unfortunately, I didn't get a picture of that one either. Too busy trying to get everything on the table! It was yummy, though.

The corn on the cob was done straight up, and boy, was it amazing! Believe it or not, it was my first sweet corn of the season, and we all were raving about it--it was really, really good.

I had forgotten to include the watermelon in the original picture of last week's pick-up, so I snapped a pic as I cut into it a couple of days later. Yes, it is just that sweet and juicy!


Here it is as a salad before dinner one night--a little feta, a little fresh mint from the garden. (This has more feta on it than I'd normally do--the container got away from me. But that's okay, I like feta and watermelon. Nice combination.)


I made Italian sausage and peppers for dinner a night or two later again to use the green peppers. No pictures of that since I just blogged about it awhile back. Looked about the same, although I did better keeping the green pepper actually green. Tasty, tasty, tasty. Next time I'll use chicken sausage, to make the meat match the health factor of the rest of the dish.

The peaches disappeared pretty quickly, just eating out of hand. Very sweet.

The head of broccoli was simply microwaved and used as a side dish with chicken breasts one evening. I'm a bit of a purist where broccoli is concerned--I don't really like it covered in sauces or anything. Just steam it a little bit, add some salt, and I'm good to go.

Sunday morning I was in the mood for a big breakfast and, since I had a lot of those roasted vegetables to use up, I made myself an omelette. Or, at least, what's supposed to be an omelette. I can never get it to flip right. A couple of eggs, the roasted vegetables, a little goat cheese...nummy.


And, the next day, since I still had roasted vegetables left, I picked up some naan from the grocery store, heated it up in the oven for a bit brushed with a wonderful basting oil from Wegmans (love that stuff, use it on a ton of things), then spread some hummus on top, piled the roasted veggies on, shredded some chicken, and topped it with, you guessed it, goat cheese. I drizzled just a touch more basting oil on it, popped it back in the oven for a couple of minutes to heat the veggies back up again, and it was a very tasty lunch.

So that took care of everything, except the watermelon. Somehow I ended up being the only one in the house eating most of that watermelon. It's taking me awhile.

Tonight, I treated myself to a watermelon cocktail.

Don't notice me spitting out the seeds on the patio.


And now, we're up to Week 9! Another bounty!


  • 12 ears of corn this time! Woot!
  • 4 cucumbers
  • 1 zucchini (I dug through the pile to find a smaller one this time)
  • 1 yellow squash (same strategy)
  • 1 patty pan squash (I got a slightly larger one this time because I decided I like it)
  • 2 green peppers
  • tomatoes (maybe 10, still small, but smell amazing)
  • 6 Jersey Mac apples
  • 4 peaches--larger this time, I hope they're still as sweet!
  • 1 red onion
  • 1 yellow onion
  • about 7 or 8 jalapeno peppers
  • 1 eggplant
I've never been a big fan of eggplant. It's a texture thing, really. Eggplant parmesan just makes me gag. Too slippery. But I'm willing to give eggplant in another form a shot. I've seen a recipe for breading and frying slices of it that looks like it might work for me.

I'm not a huge heat person either so I'm going to gift the jalapenos to a family I'll be visiting tomorrow night. They're originally from Burma, so they're all about the hot peppers. They'll love them.

Probably a good thing there's no watermelon this week since I'm still working on last week's. Time for another cocktail.


Honey, I'm home!

Got back from my work trip a few days ago and am mostly recovered. Still a little nonverbal. It takes us introverts awhile to recover from having to pretend to be extraverts for a couple of weeks running. So I'm slowly getting myself into the swing of things. I sent out a few tweets this week, now I'm writing a blog post...eventually I'll work my way back up to recording a podcast episode.

Meanwhile, here's the project I'll be working on this month.

Pretty, ain't it?

This is the last of the Momufos. What's a Momufo?

Check here.

And here.

And maybe here too, if you're really into it.

There may have been others, but that's all I am awake enough to dig up in past blog posts. I consider this project the last of the Momufos because it's the last of her work-in-progress projects that I decided I'd finish myself. I have clear memories of talking about this project with her, and I had even given her some fabric out of my own stash to use with it if she wanted--that fabric is still in her project bag with everything else for the quilt. It's one she designed herself in EQ, and I know what she intended to do with it when she was done. So it was the last project of hers that I really felt I needed/wanted to finish on her behalf.

It'll take some doing. Unlike all the other projects of hers that I mostly needed to just bind, or quilt and then bind, this one hasn't been fully pieced yet. It's a combo platter of paper piecing and standard pieced blocks. There are 8 blocks left to finish, and unfortunately, she didn't seem to have gotten to the point of printing off all the paper piecing foundations for those blocks. There's one block from that set done, and one printed paper pieced pattern. Unfortunately, the two aren't the same size. Go figure. I need to do some math to figure out how much to blow up the printed pattern to get it the same size as the one finished block, and then try to print off additional foundations on my own printer and hope the size differential isn't too substantial. (Each printer prints a little differently, so there will always be some variance.)

Then I get to put all the blocks together and hope they all play nice in the sandbox!

It's a design and colorway that I appreciate but wouldn't necessarily do myself at the moment--not my current idiom. Which makes it almost more fun to do, I think. It's a little hard to tell right now, but I think it could be stunning when it's finished. (Beautiful design, Mom. Nice job.) I have a vacation coming up the middle of this month and this will be my primary vacation project--if the whole "resizing the foundation" thing goes well, I should easily be able to get the top pieced by the end of that week. Famous last words, of course.

I do have one other set of random blocks from Mom but that one isn't clearly a UFO to me. It could have easily been a class project that she never intended to finish, but stored the blocks away anyway. Those blocks weren't kept with all her other ongoing projects, so I don't think they were on her own UFO list. I love the blocks, though, so eventually I'll do something with them. They were too cute to toss. Through this process of finishing Mom's UFOs, by the way, I've found that I have a very clear definition of what a UFO is. In my mind, a UFO is a partially-done project that you actually intended to finish. Mull that one over for a bit.

Time for bed. The Olympics have been keeping me up far too late this week.


Sneak Peek...

Not to interrupt the Total Color Tuesday playtime, but I know this week's may not garner as many responses. It was a toughie.

Meanwhile, here's a sneak peek at my current work in progress...

Slow Quilt Monday--and a Few Other Items

I finally broke down and bought some Bobbin Mates so that I could stop guessing at which bobbin in my little bobbin holder actually matched the thread I wanted to use. They mostly work pretty well--and you'll see in a couple of cases you can pop two bobbins onto it if, like me, you realized that for some unknown reason you never finished one bobbin before loading a second.

The only thread I own that they don't fit well is my Aurifil which, as you know, is a significant proportion of my thread stash. But balancing it on one edge and propping it up on my thread holder on the wall just so actually isn't too bad. I haven't had any fall off yet. Workable, anyway. Now my thread stash feels just a little bit more organized.

In terms of works in progress, now that I finished Joy I'm feeling the need to finish the gift for my pregnant friend and get the baby quilt done this week, if possible. So I've started making all the required half-square triangles.

This is the method I'm using: Cut two squares an inch bigger than desired finished unit; draw quarter inch seam lines on either side of the center line; sew down each drawn line; cut in half. Press the triangles open, square up/trim down to necessary size. Easy schmeasy, and you can easily chain piece a bunch of them. (By the way, I cut my squares 1" larger than my desired finished unit because I wanted some wiggle room. The standard formula is 7/8" larger but, really, who is that 1/8" going to kill? I like nice round numbers in my math whenever possible. My brain hurts less that way.)

This method is even easier when you use a tool like the Fons & Porter Quarter Inch Seam Marker. Yes, I could line up a regular ruler to draw the line on one side and flip it to draw the line on the other, but there's always the chance for variation based on exactly where you line the ruler up along that center line each time. As we all know, 1/16" here and there can make a whole big difference when multiplied by lots of blocks. I prefer to use this ruler. It comes in a package of two sizes for the one price.

Where is my slow quilting this week in all my talk about chain piecing and efficiency-building rulers? It's in my head. While I'm going through the rater mundane, rote motions of drawing lines and cutting in half, I'm designing my next quilt in my head. I'm also finding that my Total Color Tuesdays are already influencing what my plans are for that next project. (Be sure to check out the linkies on those posts! Folks are playing along!)

Also, this weekend my husband and I went hiking. How can one not be inspired to quilt?


(Taughannock Falls State Park, near Ithaca, New York.)

Retreat Report

...And a good time was had by all.

Actually, a fabulous time was had by all! Have I mentioned before how much I enjoy my guild peeps? And there's a handful of women who aren't members of our guild but are linked through friends and such, so they come to our retreats on a pretty regular basis as well. Might I say, they fit right in. Very, very entertaining women.

I didn't bring the kitchen sink.

However, after a few years of going on retreat, the furniture I pack seems to grow each time. I just get a lot more done if I have a decent set-up. My Sew-Ezi table (somewhere under the bins on the left, there) is a godsend. Love that thing. I also have a lightweight, foldable craft table that's only an inch or so shorter than the Sew-Ezi. I brought that this time and mostly used it as a small pressing station with my travel iron, but sometimes moved it over to sit next to the Sew-Ezi to hold the extra bulk of larger projects while I worked. Also extremely useful, so that's now made it to my list of "always pack" items.


This time I'd also volunteered to bring my ironing board and iron as one of our four communal pressing stations, so that added just a bit to the stacks. Everything else pictured here are projects. My clothes? Last packed, least planned, lightest weight.

Sadly, the one project I really wanted to work on--a baby quilt for a friend--I stymied myself by packing all the fabric but forgetting to print off my EQ7 design and cutting instructions. Dang. Couldn't touch it. But I got a lot else done!

First, the setting...

A nice Methodist church camp/conference center on Silver Lake in Western New York. It was about 85 degrees most of the weekend. Gorgeous!


(Forgot to take a picture before I left so this one was shot out my car window as I was driving away--sorry about the rotten composition.)

This was the building we pretty much lived in for the weekend, although our bedrooms were in another building. The lower floor was our sewing room, the upper floor the dining room. There were a couple of other groups there that weekend but we only saw them briefly during meals. It's a nice space, although we can't plug too many irons in at once or we blow a fuse. Hence the communal pressing stations. However, we've also got fewer women going these days than a few years ago so we've been able to loosen up the restrictions on small travel irons. The conference center cook, Becky, is excellent. I probably gained five pounds.

Ah, but on to the quilting! What did I get done?


I got the binding put together and sewed onto the front of Fortune. All I have to do now is the hand-sewing on the back, a good TV project. (Planning on doing that tonight after I get this blog posted.)

And yes, our tradition is to tape our finishes to the wall as we go. Wall space gets slim by the end of the weekend!

(That's my little craft table with my pressing station on the left, btw, if you're curious. And our retreat schedule taped above it so I could keep track of when we were going to have our ice cream social so I didn't disappear at the wrong time. Priorities.)


I also finally found fabric (more about shopping trips below) for the third border on my medallion challenge quilt and was able to get that done. The colors are a complete departure from what I'd initially imagined, but the store didn't have what I'd thought I'd wanted and at this point, frankly, I was tired of trying to figure this out. So with guild-mate Florence consulting, I decided to go with this set of a light gray-with-blue/green speckles background, and a green and blue deconstructed star. The blue fabric is the same as the lighter blue fabric in the center block, so that was a happy find. Now I just have to do the last border, which will be that same black/gray as the other narrower border--if I still have enough! (I designed the border as paper pieced blocks in EQ7.)

...and I put borders on Paintstik Peacock. I'd made borders with blue/green/turquoise fat quarters using the stack n' slash method. I wasn't sure I wanted those borders all the way around because I was afraid they'd overwhelm the peacock. I had it all laid out on one of our communal cutting tables and a few folks walked over to see what I was doing and offer their two cents--as we quilters like to do. It was Vicki that hit on exactly the right idea--offset the borders. Only use the blue on two sides. Finish the third border with black, and leave the top alone.


Absolutely perfect.


Peacock has now been renamed Vicki's Peacock, although I told her that didn't imply she was going to get him!


I also started some receiving blankets but didn't get far on them, so more on that later.

Onto the shopping! Of course, any good quilter's gathering always includes some visits to local shops. A few of us went to Mt. Pleasant Quilt Company on Friday, and a couple of us went to Material Rewards on Saturday. Both great shops!


Got some fat quarters, just 'cause.


Some end-of-bolt stash fabric--pretty decently discounted so, why not?


Now, for just a minute, feast your eyes on this one. Mmmm.


A white batik.


Does anyone else love some fabrics so much you just want to ingest them?


Mmmmm.


So I had to find something to go with it.


Found these to start. Very pretty.


But it needed something.


Decided it needed more contrast. So I found the dark teal (bottom of picture) to add to the stack.


Still not quite enough.


There it is. Purple.


Mmmm.......


So that's my retreat report. Guild-mate Lori will be posting pics of everyone's projects on our guild blog, so as soon as that's up, I'll post a link. There was a lot of eye-candy going on!

Progress! One Finish, a WIP, and a Challenge (O My)

Yesterday was a banner day here in the "Quilting...for the Rest of Us" quilt studio. (Ooh, doesn't that sound all sorts of official?)

First, I started out with a little mini-project that I'd volunteered for last week. If you're following my Fabri-Sabbatical blog, you'll know I spend Wednesday afternoons with the Women's Learning Club, which is a group of recent arrivals to the U.S. from Burma. Last Wednesday, a couple of women from our church brought some fleece, hearts cut out of fabric, and embroidery threads to make baby blankets that will be donated. This is a project they've been doing with various groups for a few weeks, so we thought it would be fun to include our group as well, and in the process, teach a fast and inexpensive way to make extra blankets for your family if you should need them.

The women organizing the event decided it would take too long to do a blanket-stitch around the outer edge by hand, so they were taking them home to do by machine. I volunteered to take one as well, so I decided to knock that out first. It turned out OK, although I still prefer doing it by hand. It took about twenty minutes to sew, and then another twenty minutes to get all the fleece lint out of my machine.

One of our group had embroidered the heart onto this one, and she taught me how to do the chain stitch as she was doing it. My chain stitch doesn't look nearly as good as hers yet!

That project done, I moved on to my funky landscape quilt in progress.

This...

...became this.


Everything is just stuck down with glue stick at this stage, so I may still move some things around. I'm playing with perspective and balance and such. And I'm still working on getting the fern-y things to look more like ferns and less like Seussian birds. Quilting will help that a lot, though.

Haven't decided yet what's going in the center section. I'm going to live with it for a bit to see what comes to me.

Then I turned to my guild medallion challenge. The dang thing is due tonight, so I really wanted to get it done. And I did! (Only three more borders to go until the challenge is done. I'll find out tonight what the next border is supposed to be.)

Shazam!