Food Friday--Corn Chowder

All right, already, Lori, I'm posting the dang recipe!

Actually, a few of you have pointed out that although I raved several times last summer about my corn chowder made with my CSA corn, I neglected to ever let you in on the party by posting the recipe. My apologies. My only excuse is that I was too busy eating corn chowder to get to my blog. Man, it was great corn chowder. Admittedly, some of that greatness was probably due to the incredible corn we got from the CSA. But still, you can easily make this chowder with the frozen stuff from the grocery store. It just won't taste quite as fresh and, well, wonderful.

I believe the original recipe came from Food Network. I tweaked it a little.

Photo Aug 28, 2012, 9:50 PM

Corn Chowder 


 Ingredients:
  • 2 tbs butter 
  • Olive oil 
  • 1 onion, diced 
  • 2 garlic cloves, minced 
  • 6 sprigs fresh thyme, leaves only 
  • 1/4 c all-purpose flour 
  • 6 c canned vegetable stock (I used chicken if my vegetarian daughter wasn't home; gives it just a little extra flavor) 
  • 2 c whole or 1% milk (original recipe uses heavy cream; I was trying to cut fat a little)
  • 2 potatoes, peeled and diced (russet work best--you want them to break down a little)
  • 6 ears corn* (or a bag of frozen corn)
  • salt and pepper 
  • 1/4 c chopped fresh parsley leaves (optional--we're not fans of parsley so I usually opted out)

Directions:
  • Heat the butter and 1 tbs olive oil in a soup pot over medium heat. Add onion and cook until soft, 8-10 minutes. Add thyme leaves about halfway through. Add minced garlic right at the end--the garlic should only cook about a minute or so or it may overcook and get bitter.
  • Dust vegetables with flour and stir to coat everything well. Feel free to let the flour "toast" just a hair but be careful not to let it scorch on the bottom. Pour in the stock and bring to a boil.
  • Add the cream/milk and potatoes, bring to a boil and boil hard for about 7 minutes, until the potatoes break down to thicken soup.
  • Cut the corn kernels off the cob and add to the soup. Season with salt and pepper and simmer until the corn is soft, about 10-12 minutes. Stir in parsley and sprinkle just a little more olive oil+ over the top just before serving.

*Recipe doesn't require corn to be cooked. However, most often I was making this with leftover corn on the cob from dinner the night before so mine was already cooked. I didn't have any problem with the corn getting mushy.
+Are you a fan of flavored olive oils? This is a good opportunity to play with one. Just make sure it's a lightly flavored one as the corn chowder could easily get overpowered with anything strong.

And a Second Recipe If You Want It: Chicken Pot Pie


And by the way, just for another little treat since I've gone awhile without doing a Food Friday--I made myself Chicken Pot Pie last night. Very tasty! It took longer than the recipe said, so allow a little over an hour total for making this. I added some thyme and ground sage, although I don't think it really needs it.

Boy, do I wish I owned ramekins, though. Would've been better to be able to make single servings of this since I'm the only one in the house that eats it. Now I'll be reheating the leavings in the pie plate. For days.

Food Friday--CSA-I-Have-No-Idea-What-Week-It-Is

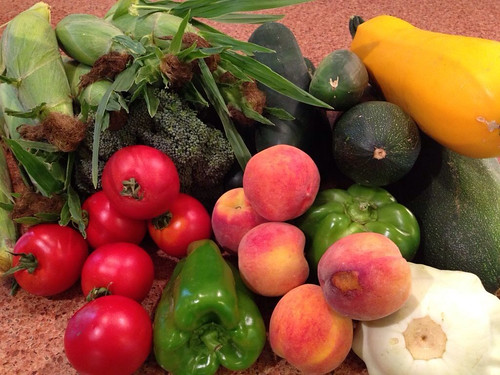
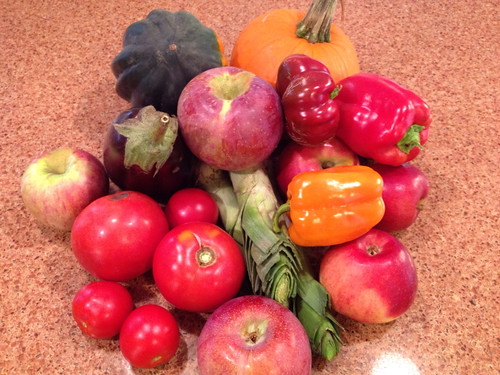
This week's pick-up. We're getting smaller as we reach the end of our growing season around here, but we're also getting into some of my favorite fruits and vegetables. Still going strong on bell peppers and getting into winter squash. Yum.

  • 3 large tomatoes
  • 3 small tomatoes
  • 3 bell peppers (1 red, 1 orange, and 1 different type of red I've never had before. Unfortunately the orange had an issue when I cut into it so it got tossed--and that's the beauty of real farm food--but the other red that was unfamiliar to me actually almost tasted like an apple--that one and the other red pepper, which had a really wonderfully intense red bell pepper flavor, were fantastic!)
  • 3 leeks
  • 1 eggplant
  • A few eating apples, and a few baking apples
  • 1 acorn squash
  • 1 baking pumpkin

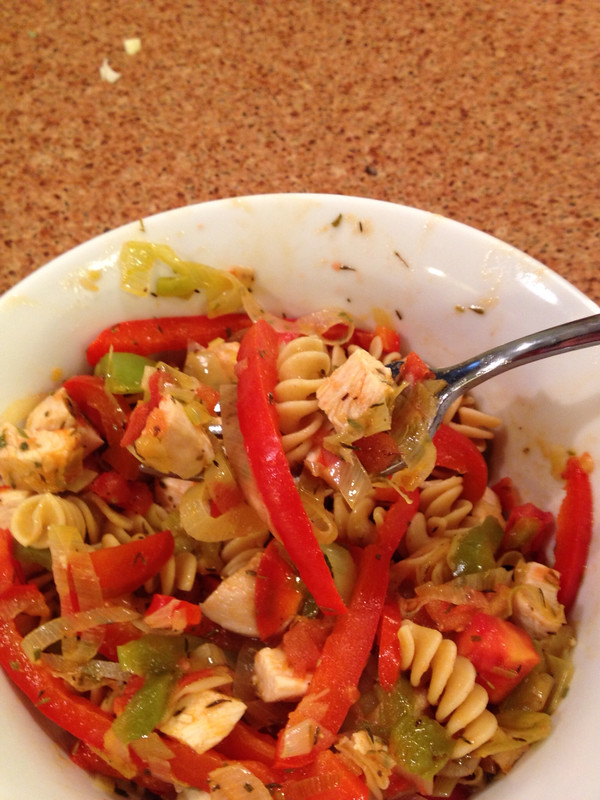
I immediately used the bell peppers, leeks, and two of the tomatoes for dinner by sauteeing those altogether in my Wild Mushroom and Sage-flavored oil with some garlic, salt, pepper, thyme, and tarragon. I added in some diced cooked chicken, and just a dash of my Lemon Bouquet Balsamic Vinegar right at the end to brighten it up a bit. I ate it over whole wheat pasta. Very, very tasty! Leftovers for lunch tomorrow--woot.

I wasn't able to use much of the CSA for the last few weeks because I was gone on weekends which is when I do most of my prep work with the fresh produce. I gave a lot to my MIL, but some just went bad before I could use it, unfortunately. I didn't even have time to freeze or do any other storage techniques, either. I'm actually relieved to be getting less every week now--it's much easier to use up while it's fresh.

Here are some other pictures I took along the way of what I was able to make over the last few weeks.

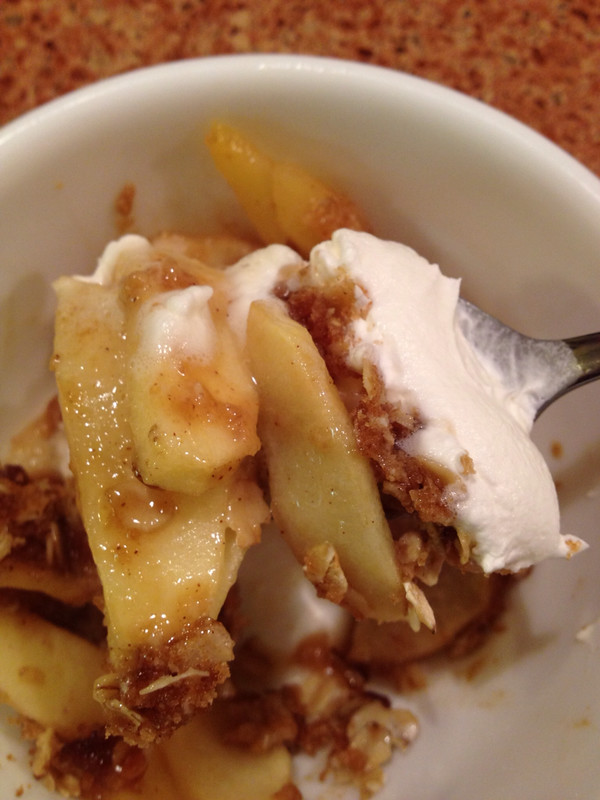
Apple crisp. Not bad, but I'm still looking for a better recipe. And, since I'm trying to eat a lot healthier these days, I'm not sure I should actually find a better recipe.


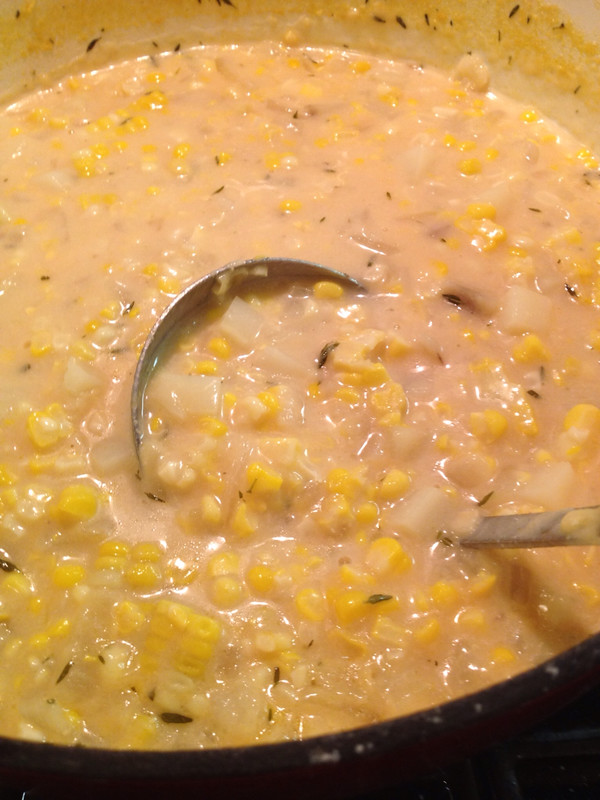
Corn chowder with fresh corn on the cob. This was my favorite new recipe of the season. My daughter and I are huge fans now. Yes, I can make it with frozen corn any time of the year but the corn I was getting through the CSA was the absolute best I've ever had, so frozen store corn just won't quite hack it.


And this is just a really pretty purple pepper we got a few weeks ago. It tasted like a normal bell pepper, but isn't it gorgeous? I love the green inside next to the purple outside. Beautiful.


At some point I'll do a summary of what I feel about CSAs now that I've done it for the first time. I've really enjoyed it, but there are certain things from the experience that surprised me. I'm still pondering a bit. Hopefully I'll be able to put up a few blog posts for next week that are back to quilty matters. Meanwhile, have a great weekend!

Food Friday--Report on CSA Week 8 and Pick-up Week 9 (and a brief moment of quilty)

If you're not a foodie and just want some fabric-quilty-stuff, here's a quick pic of one ongoing project I'm working on...

Now, back to food!

Oh, we have reached the bounty of summer!

Remember last week's haul? I've done pretty well at using it all this week, with the exception of one zucchini that's carrying over into this week's dinner explorations. (I might be resorting to zucchini bread.)

Fortunately, we had family over for dinner on Friday night so I used up quite a bit of the produce right away. We did a marinated flank steak--or three, since we had a couple of young adult males in the mix--and bought a loaf of French bread because I ran out of time to make homemade. Other than that, Dinner Brought to You by McCracken Farms.

Two cucumbers were turned into a cucumber and tomato salad with Italian dressing for starters. I had to use some storebought tomatoes for the salad because I used all my CSA tomatoes on the next dish. Unfortunately, I didn't think to get a picture. (My daughter ate the other two cucumbers--one straight up, the other in some sort of rice curry thing she makes herself. I've never been positive what all is in it, but she likes it, so hey. I won't even ask.)

The huge yellow squash, the honkin' big zucchini, the tomatoes, and the pattypan squash were cut into 1" chunks (more or less), tossed with some olive oil, salt, garlic powder (I was out of fresh garlic), and thyme, and roasted in a 400 oven for about 40 minutes. It probably would've taken a lot less time except the squash and zucchini were (have I mentioned?) freaking huge so the veggie mix took up two jelly roll pans that I rotated between two racks. Again, unfortunately, I didn't get a picture of that one either. Too busy trying to get everything on the table! It was yummy, though.

The corn on the cob was done straight up, and boy, was it amazing! Believe it or not, it was my first sweet corn of the season, and we all were raving about it--it was really, really good.

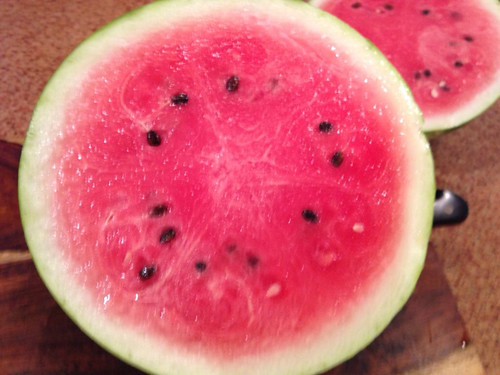
I had forgotten to include the watermelon in the original picture of last week's pick-up, so I snapped a pic as I cut into it a couple of days later. Yes, it is just that sweet and juicy!


Here it is as a salad before dinner one night--a little feta, a little fresh mint from the garden. (This has more feta on it than I'd normally do--the container got away from me. But that's okay, I like feta and watermelon. Nice combination.)


I made Italian sausage and peppers for dinner a night or two later again to use the green peppers. No pictures of that since I just blogged about it awhile back. Looked about the same, although I did better keeping the green pepper actually green. Tasty, tasty, tasty. Next time I'll use chicken sausage, to make the meat match the health factor of the rest of the dish.

The peaches disappeared pretty quickly, just eating out of hand. Very sweet.

The head of broccoli was simply microwaved and used as a side dish with chicken breasts one evening. I'm a bit of a purist where broccoli is concerned--I don't really like it covered in sauces or anything. Just steam it a little bit, add some salt, and I'm good to go.

Sunday morning I was in the mood for a big breakfast and, since I had a lot of those roasted vegetables to use up, I made myself an omelette. Or, at least, what's supposed to be an omelette. I can never get it to flip right. A couple of eggs, the roasted vegetables, a little goat cheese...nummy.


And, the next day, since I still had roasted vegetables left, I picked up some naan from the grocery store, heated it up in the oven for a bit brushed with a wonderful basting oil from Wegmans (love that stuff, use it on a ton of things), then spread some hummus on top, piled the roasted veggies on, shredded some chicken, and topped it with, you guessed it, goat cheese. I drizzled just a touch more basting oil on it, popped it back in the oven for a couple of minutes to heat the veggies back up again, and it was a very tasty lunch.

So that took care of everything, except the watermelon. Somehow I ended up being the only one in the house eating most of that watermelon. It's taking me awhile.

Tonight, I treated myself to a watermelon cocktail.

Don't notice me spitting out the seeds on the patio.


And now, we're up to Week 9! Another bounty!


  • 12 ears of corn this time! Woot!
  • 4 cucumbers
  • 1 zucchini (I dug through the pile to find a smaller one this time)
  • 1 yellow squash (same strategy)
  • 1 patty pan squash (I got a slightly larger one this time because I decided I like it)
  • 2 green peppers
  • tomatoes (maybe 10, still small, but smell amazing)
  • 6 Jersey Mac apples
  • 4 peaches--larger this time, I hope they're still as sweet!
  • 1 red onion
  • 1 yellow onion
  • about 7 or 8 jalapeno peppers
  • 1 eggplant
I've never been a big fan of eggplant. It's a texture thing, really. Eggplant parmesan just makes me gag. Too slippery. But I'm willing to give eggplant in another form a shot. I've seen a recipe for breading and frying slices of it that looks like it might work for me.

I'm not a huge heat person either so I'm going to gift the jalapenos to a family I'll be visiting tomorrow night. They're originally from Burma, so they're all about the hot peppers. They'll love them.

Probably a good thing there's no watermelon this week since I'm still working on last week's. Time for another cocktail.


Food Friday--CSA Week 4 Report and Week 5 Pick-Up

Beet & Goat Cheese Pizza
I used up most of week 3 and 4's CSA beets and beet greens on a Roasted Beet and Goat Cheese Pizza. Although I used the recipe at the link for a little guidance, it's very straightforward. You roast the beets with a little salt and pepper, then peel and slice them. Meanwhile, sauté the beet greens with some onion until they wilt down. Then you simply brush the dough with olive oil, and spread the wilted greens and beets on it. Finally, put the goat cheese on top. Bake it at about 400 or a little higher for about 10-15 minutes, depending on how thick your crust is, and you're good to go.

I used goat cheese crumbles available at my grocery store because I have those on hand for salads. But a really nice goat cheese would work better--the crumbles got a little dry. I made homemade pizza dough (did the breadmaker recipe without a breadmaker) and rolled it out really thin so I'd get a nice, crispy crust. The texture on the dough was a perfect complement to the soft beet topping.

I already love beets and goat cheese. Putting it on a pizza crust is a plus! I did decide, however, that I'm not overly keen on beet greens. If I get beets again next week, I may try the greens again with a different preparation, but I'd have preferred this pizza without the greens. Maybe some orange slices or an orange sauce or something.


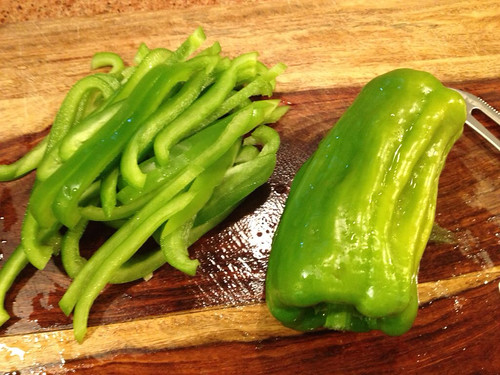
Remember the one CSA green pepper? (It's the one on the right--uniquely shaped but still tasty!)


We had some leftover Italian sausages from the 4th of July so I supplemented that one green pepper with a second from the store, a clove of garlic, an onion, a can of diced tomatoes, a couple of tablespoons of tomato paste, and some Italian seasoning. Very tasty sausage and peppers for dinner on Saturday night. Add in some of the dinner rolls I'd made last week and it was a pretty simple, mostly fast dinner. That was the last night for the rolls, though--they were somewhat dried out.

Other than that, this was a pretty light CSA week for me. I've been eating the CSA green beans raw (my fave preparation), and I have to confess the dogs got a couple of the CSA carrots because they looked ever-so-appealingly at me when I opened the vegetable crisper drawer. Plus, either my husband and I were out for dinner or I was home alone and didn't cook. So, admittedly, some produce ended up getting tossed because it turned before I could get to it, for which I feel forever guilty.

I did make some blueberry muffins, however, with fresh blueberries from a U-Pick farm I visited last weekend. Not CSA, but still supporting local agriculture! I used a recipe from my Betty Crocker cookbook. Not my favorite--a little on the bland side despite the crumble topping--so if I get out picking again, I'll be checking out different recipes.

Week 5 Pick-Up

My daughter did me the huge favor of doing our CSA pick-up this week since I was (ahem) otherwise occupied at the Ricky Tims Super Seminar during our pick-up time. (I'll be talking about that experience at a different time!)

Week 5:

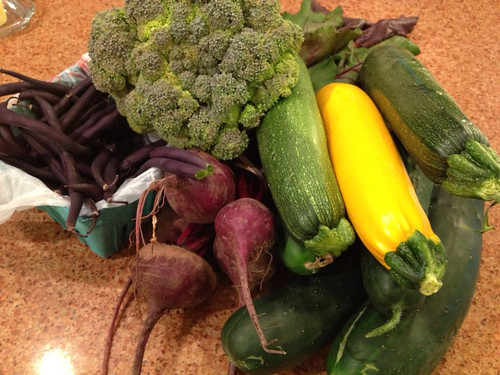
1 head broccoli (I think maybe it was supposed to be purple broccoli but ours wasn't very purple)

4 cucumbers

2 zucchini

1 yellow squash

4 beets (yay)

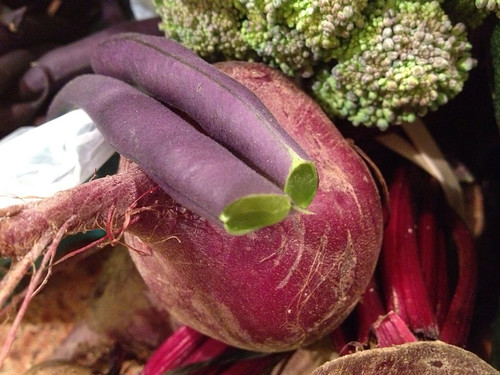
purple beans

I've seen these in magazines but haven't ever had them--they're just green beans of a different color, of course. But how pretty! Check out that closeup!

I may not have time to post much about this week's CSA produce since I'll be leaving town in a few days. I'll be making zucchini bread, that much I can guarantee you. (Still have zucchini left from last week.) And those beets? Roasting 'em. Maybe pizza again. The cucumbers are mostly getting eaten raw--DD and I are both big cucumber fans, although the farm provided a recipe for cucumber soup that's intriguing my daughter so we may end up making that over the weekend. And several of those beans didn't even make it into the fridge since I was gnawing them raw while I was prepping everything else.

The next two weeks I won't be around much, so my daughter has instructions to pick up the CSA deliveries and head them straight over to my mother-in-law's house. Unfortunately, I won't be able to get pictures of what my MIL does with them, so no CSA reports for a few weeks until I'm home again!


Food Friday--CSA Week 3

Sorry folks...last week was busy and I neglected to take pictures of my CSA adventures. Admittedly, I wasn't particularly adventuresome. I got big hunks of lettuce so I was mostly eating salads all week, although I did do roasted beets with goat cheese one night. Nummy. And I still have some green lettuce, and kale left from week 1 (boy, that stuff stores forever!).

CSA Week 3

Beets! More glorious beets! And all for me, since no one else in my family likes them. I'll try to do something marginally more creative with them this week, although I do love them roasted, and with goat cheese.


Also: 

  • 1 yellow squash
  • 2 zucchini
  • 1 head bok choy (will the bok choy never end?)
  • 1 head red lettuce
  • 1 bunch carrots
  • 1 head green lettuce (smaller than last week's, thankfully, since I'm still working off that one)
  • 1 head Chinese cabbage

My daughter is in the process of making dinner while I'm prepping this blog post--I'm writing this on Thursday night so it can go live Friday morning. She's making penne, and will just be eating it plain with a little olive oil, garlic, and parmesan, her favorite preparation. I do believe I'll be adding some zucchini to mine. Maybe a tomato. Saut<&eacute>e it up with a little olive oil, garlic, and toss some shredded parmesan on the top, and you've got something there.

On Friday night's menu is something we do frequently around here, and I've got pictures from the last time I did it, but never ended up posting. I've talked about grilled pizza before. It bears repeating. I'm figuring this will be a good way for me to use up some of this week's CSA.

First of all, for recipes for the dough and sauce, check out my blog post on homemade pizza (with thanks, again, to Susan of The History Quilter podcast for one of the sauce recipes). Here I'm just talking about the process of doing a pizza on the grill. 

Pizza on the Grill

When you've made the dough using your favorite recipe and method, you start out rolling it just like you would to make a regular pizza. However, when I'm grilling, I like to make a thinner crust. It's easier to work with, grills more evenly, and the center will bake before the outside chars. (The dark spots in the dough are herbs. I like a flavorful crust.)

We also usually do personal-sized pizzas when grilling. Not only does that accommodate varying tastes and creativity, but it's easier to handle smaller pieces on the grill than one big pizza crust.

You oil both sides of the dough when you grill pizza, so I like to make an oil concoction with more herbs and a little garlic powder. And yes, I oil both sides before it gets on the grill. You could oil one side and then quickly oil the second while it's on the grill, but often my husband or nephew are doing the grilling part, so I'd just as soon have everything done in advance.

It's crucial to put waxed paper between the pizzas. And make sure the paper completely covers the crust. The dough will stick to itself and you'll have a nasty mess on your hands otherwise.


Hey, whatever it takes to grill. 


You'll put a couple on the grill at a time, directly on the grill. Make sure you've cleaned your grill and oiled the rack with a rag or paper towel and vegetable oil.

It's much like making pancakes. You'll see them start to look dry around the edges and then that dryness moves in towards the center, and bubbles start forming. (I like to poke the bubbles. It's fun.) When you think the bottom is ready, flip it over and do the other side. You want them to get done enough to put toppings on, but not fully done. You'll be cooking them again with the toppings, so don't do the initial grilling past a very light golden brown.


When it's done on both sides, take it off the grill and add whatever toppings flip your switch. You don't want to go too heavy on toppings--again, it won't grill evenly if it's too slushy or piled too high. But you can still be pretty generous.

When you put them back on the grill with the toppings on, do it over indirect heat to give the toppings the best chance of cooking through/melting before the bottom of the pizza burns. (If we're doing these for a crowd, I usually finish them off in the oven so some can be going on the grill while others in the oven. However, this is a tricky menu for more than about eight people.)


And then it's time to eat!

One of my favorite combinations: parmesan sauce (see that previous blog post), spinach, carmelized onions, and goat cheese. 

Tomorrow night I'm going to have to come up with a combination using something from my CSA pile instead. I'm imagining something Asian-inspired, with sauteed bok choy, chicken, onion, maybe a little pineapple, soy sauce...

I texted my nephew earlier this afternoon.

Me: "Grilled pizza tomorrow night. Coming?"
Him: "I'm so there." 

Food Friday--Let the CSA Adventures Begin!

I've decided to do a CSA this year for the first time. What's a CSA, you may ask? CSA stands for Community Supported Agriculture. When participating in a CSA, you buy "shares" in a local farm and, in return, get fresh produce each week. The farmer's markets near us are at times that are difficult for us to fit into our schedule, and although I grow my own herbs, we've had terrible luck with tomatoes in the last few years and I travel quite a bit over the summer, leaving the bulk of the responsibility for summer gardening to my husband. He enjoys gardening, but works long hours himself. So our garden attempts the last few years have been pretty sad.

I finally tracked down a CSA near enough for me to make the weekly pick-ups pretty easily. Last night was our first pick-up.

In this week's bag: peas, kale, romaine lettuce, Swiss chard, and bok choy. I was afraid we'd get too much to handle but this feels do-able.


Both my daughter and I are fans of certain raw vegetables, straight off the vine. The raw peas made a very tasty appetizer while I was washing everything and figuring out what I was going to make for dinner.

My husband was out for the evening at a work thing, so it was just my vegetarian daughter and I. We decided to go on a cooking adventure and just make it up as we went. Well, "we" being in the royal sense, as it turned out. Normally my daughter does like to help cook but she had two late nights in a row so she begged off; I stuck her with loading the dishwasher after dinner instead. Not a bad trade-off, in my mind. I got to play with new toys, so to speak, as I messed around with new-to-me-produce, and she did most of the kitchen clean-up.

Here was my resulting dinner! (My daughter skipped the salmon and ate her bok choy with some vegetarian chicken nuggets.)

I wasn't as creative with the salmon as I could've been--just sprinkled some five-spice seasoning on it and baked it. I spent too much mental energy on the bok choy. Bok choy is something I've never cooked before, although I've eaten it plenty of times in Asian foods--usually in soups, I believe, although a lot of the Burmese meals I get to eat with my new arrival friends probably have it as well.

I put together a concept in my head and then checked my ideas by some recipes online. Yep! I was in the right ballpark. And it turned out mighty tasty, if I do say so myself! So, here's my recipe for this week:

Sandy's Sauteed Bok Choy
Ingredients:
2 bunches bok choy, chopped into 1-2" pieces.
1/2 medium onion, diced or sliced thin
1 tsp grated fresh ginger
garlic to taste (garlic powder or fresh garlic)
2-3 tbsp oil
3 tbsp low-sodium soy sauce

Directions:
  • Heat oil, then add onion and ginger and saute for a few minutes until onion begins to turn translucent.
  • Add garlic and saute for another minute.
  • Add bok choy and saute until it cooks down slightly, then add soy sauce.
  • Saute for about 7-8 minutes, or until bok choy stems are crisp-tender.
 Notes:
  • As usual with my own recipes, all amounts are approximate and depend on what you've got on hand, as well as personal taste. I had three or four bunches of bok choy but a couple of them were quite small, so knowing what I typically see available in the grocery story, I'm thinking two larger bunches would be the equivalent. I just used garlic powder this time but fresh garlic would be better, as fresh usually is.
  • I used low-sodium soy sauce and didn't add any other salt. If you use regular soy sauce, you may want to use less. This was just about the right saltiness for me.
  • The bok choy, like any leafy green when you put it in heat, cooks down quite a bit. Using all four bunches that we'd gotten gave me barely enough for my daughter and I, and you can see our servings weren't that big.
Food Friday posts are making a comeback this summer as I go on my CSA adventure! Here are two cookbooks that were highly reviewed on Amazon that I'll be consulting (although I didn't tonight):

The Farmer's Kitchen: The Ultimate Guide to Enjoying Your CSA and Farmer's Market Foods, by Julia Shanks and Brett Grohsqal (CreateSpace, 2012). Looks good, but no pictures with recipes. I miss having pictures. Looking forward to trying the recipes, though.

From Asparagus to Zucchini: A Guide to Cooking Farm-Fresh Seasonal Produce, by Madison Area Community Supported Agriculture Coalition (Jones Books, 2004). Again with the no-pictures-thing. When I'm trying to identify produce, a nice color picture would be extremely helpful.

Both of these books have good tips on storage, as well as a wealth of recipes. I have another book I've requested through my public library that was recommended by a friend--I'll let you know about that one when I get it.

I'll leave you with a moment of quilting inspiration...Swiss chard stems. 
(Match those up to your color wheels, why don't you?)


Food Friday--Homemade Pizza

I own a breadmaker. Do I ever use it to make bread? Uh, no. Let's name it a pizza-dough-maker and call it a day. Once every couple of weeks I make us homemade pizza. When it's just my husband and I home alone, I will make two personal sized pizzas and we each make whatever we want. Note: I'm much more creative than he is. He's happy with tomato sauce (and plenty of it), mozzarella cheese, and pepperoni. I lean towards a white sauce, spinach, caramelized onions, and goat cheese. But we'll keep it simple for this blog post.

I've adapted a bread machine pizza dough recipe I found on the Internet a little bit. Then I'm going to share with you three sauce recipes--I've tried them all, and they're all tasty!

Although the pizza dough recipe is made for a breadmaker, check out this link for some tips for how to make a bread machine recipe by hand instead: http://www.stretcher.com/stories/00/000117n.cfm.

Here we go:
Pizza Dough in Bread Machine
(Adapted from Allrecipes.com)

Ingredients

  • 3/4 cup water
  • 1 tablespoon vegetable oil
  • 1 teaspoon lemon juice
  • 1/2 teaspoon salt
  • 1 tablespoon white sugar
  • 1 tablespoon dry milk powder
  • 2 1/4 cups bread flour
  • 1 teaspoon active dry yeast
  • Optional: approximately 1 tablespoon Italian Seasoning or mix of dried oregano, basil, thyme, etc., if desired, to taste
  • Optional: grated parmesan or romano cheese for crust

If desired, make an olive oil mixture to brush on the crust before baking: olive oil, garlic powder, dried oregano or Italian seasoning, grated parmesan, or whatever seasonings you like.

Directions

1. Place ingredients in the pan of the bread machine in the order recommended by the manufacturer. Select dough cycle. Press start.

2. Remove dough from pan after rise cycle. Roll to 14-16". Allow to rest several times in the process of rolling--this will help it get to the desired size more easily.

3. Place in lightly sprayed pizza pan and allow to rise a few minutes.

4. Brush with plain olive oil. Poke holes in dough with a fork to prevent bubbles from forming. (Remember to also poke the edge of the crust.)

5. Bake in preheated oven at approximately 400 to 425 degrees for about 8-10 minutes, until slightly browned.

6. Optional: Sprinkle parmesan or romano cheese on crust after first baking, then bake again for a couple of minutes to melt the cheese, then add toppings.

7. Top with sauce and desired toppings, brush crust with olive oil or olive oil mixture, then bake again until toppings are at desired doneness. Brush crust with olive oil as soon as it's out of the oven if desired.

And now, onto the sauces!

Parmesan Sauce (not low fat!)
(Learned at cooking class at the New York Wine and Culinary Center)

Ingredients:
  • 1 clove garlic, minced
  • 2 tablespoons olive oil
  • 1/2 pint heavy cream
  • 1/2 cup grated parmesan cheese, or to taste
  • salt and pepper, to taste

Directions:

1. In a large skillet, heat oil over medium-high heat and saute garlic until softened but not brown.

2. Add cream and heat until foaming. Add parmesan, salt, and pepper to taste. Turn down heat and heat until thickened to desired consistency. Use over fettucini or pizza.


Simple Margherita Sauce
  • 1 can San Marzano Tomatoes
  • Salt and pepper to taste
Directions:
1. Open can and remove several tomatoes to lessen volume and set aside. Using immersion blender, puree remaining tomatoes in can (or pour tomatoes into blender). Give removed tomatoes a rough chop and return to can. Salt and pepper to taste; use cold over pizza. (Freeze into 2 cup portions for other pizzas, or use as a base for spaghetti sauce.)


Susan's Pizza Sauce
(From History Quilter Susan--who gave me permission to post this!)

Ingredients:

  • 1 28oz can diced tomatoes
  • 1 tsp sugar
  • 1 tsp garlic powder
  • 2 tbl olive oil
  • 1 tsp Kosher salt
  • 1 tsp pepper
  • 1 tsp oregano (add at end)
Directions:
Add all ingredients above (except oregano) to saucepan and let simmer about 20 minutes at the minimum. Puree to your desired consistency or keep it chunky. Add 1 tsp oregano just before you are ready to make your pizza. Makes about 1 1/2 cups - easily doubled/tripled.

(I made Susan's sauce for the first time tonight--thanks so much for sending it to me, Susan! We loved it!)

Food Friday--6-Week Bran Muffins

I always think of this as my mother's recipe since she made them frequently while we were growing up, but I later found that she'd gotten the recipe from a cookbook our church had put together when I was young. I've also since seen the recipe on the Internet, unattributed, so I don't know where it originally came from. Whoever originally came up with this one, thank you!

They're a favorite for my family-of-birth and were on the table for most holiday meals as well as for just regular-day-eating; when the grandkids started coming along, Mom would make batches of these when she knew they were coming over for the weekend. My niece got married just a few months after my mom had passed away, so for part of her wedding gift, I made a big batch of the muffins for her and her new husband to take on their honeymoon with them and included the recipe so we could pass along a family tradition to a new family. They told me later it was one of their favorite gifts, and my nephew-in-law has joined the ranks of Mom's bran muffin lovers.

Why are they called "6-Week Bran Muffins"? Because you can make up the batter and it will keep in your fridge for up to six weeks, allowing you to bake fresh muffins any time you want. Frankly, I've never had the opportunity to test the theory because I always end up baking them all within a week or so. I do recommend making the batter a day before you want to make them--you can bake the muffins immediately and they're good, but they're so, SO much better if you can wait at least a day and then give it another really good stir. The ingredients meld more. You can also bake up the entire recipe and freeze them...but why would you? There's nothing more enticing than smelling them baking and eating them warm from the oven!

You can make these lower fat by swapping out the oil for applesauce, and you can play with the proportion of egg whites to egg yolks as well. I've done several variations in that respect and the flavor is always good. However, I have found that the result is a bit too chewy for my taste, so I prefer to make them straight-up and just be careful how many I eat. Indeed, you need to be a little careful how many you eat at one time anyway. They are bran, after all.

6-Week Bran Muffins

Yield: approximately 7 dozen

Ingredients:
1 16-oz box Bran Flakes (with raisins if desired)
3 cups sugar
5 cups flour
5 tsp baking soda
1 tsp salt
4 eggs, beaten
1 cup shortening, melted, or vegetable oil
1 quart buttermilk

Directions:
1. Mix cereal with sugar, flour, soda, and salt in a very large bowl.
2. Mix eggs, shortening, and milk in a separate bowl, then pour into dry ingredients and mix thoroughly.
3. Store in covered container in refrigerator and use as needed. Batter will last 6 weeks.
4. To bake, fill greased muffin tins 2/3 full and bake at 400F for 15-20 minutes.

Remember--the batter is better if left for at least a day before baking. But if you don't want to wait, you'll still enjoy the results!

Food Friday--Beef Barley Soup

I finally wrote this one down, at my son's request. He moved into an apartment at school this fall and wanted to learn to cook for himself, and this was the first recipe he requested. I'm not sure if he's tried to make it himself yet--this is still the first thing he asks me to make whenever he happens to be home for dinner. By the way, this is the soup that converted my husband from his beloved Campbells canned soup. FTW.

Sandy's Beef Barley Soup
3 medium carrots, peeled and diced
3 stalks celery, sliced thin
1/2 medium Spanish onion, diced
1/2 clove garlic, minced (more garlic to taste)
2 tablespoons vegetable oil (or olive oil)
2 pounds chuck roast
salt and pepper, to taste
3 containers low-sodium beef broth (32 oz each)
1 tablespoon beef bouillon
1 can diced tomatoes (28 oz, no seasonings)
1/2 teaspoon celery seed
1/2 teaspoon ground thyme
1 tablespoon Worcestershire sauce
1 cup medium quick-cook barley

1. Prepare carrots, celery, onion, and garlic. Set aside (keep garlic separate). Trim most fat from beef and cut beef into cubes.

2. Heat dutch oven (no oil) on stove top over med-high heat. After several minutes, when dutch oven is hot, add meat. (No oil should be necessary; can add a little if you don't have much fat on the meat.) Brown on all sides, adding salt and pepper while browning. Remove meat from dutch oven and set aside. Do not wash dutch oven--leave the browned bits.

3. Heat oil in bottom of dutch oven until shimmery. Add onion. Saute until onion about 2 minutes. Add celery and carrots. Saute for about 3 minutes or until onion is transparent and maybe just a little brown. (You can put onion, celery, and carrot in all at the same time.) Add garlic and saute for another minute.

4. Add beef back into dutch oven with vegetables. Stir together, heating maybe one more minute. Pour in broth carefully, stir to combine.

5. Add bouillon, tomatoes, celery seed, thyme, and Worcestershire sauce. Stir to combine. Bring to a boil. (Taste after it's at a boil--add seasonings as necessary.)

6. Add barley, stirring while adding. Stir to make sure barley is not sticking to anything. Bring to a boil, then lower heat to simmer. Simmer for approximately 45-60 minutes, until barley is tender.

7. Barley absorbs liquid and seasonings, so taste every 15 minutes or so during cooking. If soup gets too thick, add water then beef bouillon to taste.

Notes:
  • As you can tell, I cook soup in vats. Whenever I'm making this one I'm expecting to send containers home with my son and usually also my nephew, so I make it in volume. You can obviously decrease ingredients proportionately if you're not cooking for an army.
  • You can use precut stew beef, but I usually end up cutting that into smaller pieces anyway so I don't know that it saves me time, and it's more expensive. You can also use different cuts of meat--when I want to step it up a notch, I've been known to use a sirloin. Too lean, though, and you don't get much beef flavor out of it. You could use leftover cooked meat if you wanted--just adjust your cooking time and seasonings accordingly.
  • I love thyme so I tend to use a lot of it. Adjust seasonings to your own taste.
  • I also love the depth of flavor that extra bouillon brings to the party but if you're concerned about salt you will probably want to omit that. Check the comments on my chicken noodle soup recipe post for some readers' suggestions about alternatives to bouillon. Link

Food Friday--Pork Chops with Balsamic Vinegar

I had a couple of pork loin chops that I needed to use up, but we'd just had pork a couple of days before. So I wanted something a little different, but I'd also been on my feet a lot that day so I was looking for something fast for which I already had all the ingredients. I went to my Mastercook software and did a quick search, and found a great recipe in one of the pre-loaded cookbooks that's definitely a keeper!

I made it straight-up this time, but I think next time I might try using fresh lemon zest instead. The lemon pepper seasoning I used tasted just a little stale to me, although my husband didn't notice. (I checked later and yep, should've used it a year ago!) I think fresh would be nicer, in any case. I also debated adding a little dried ground ginger--didn't this time, might next time. I usually don't start messing with a recipe until I've tried it as-is once. In any case, I definitely recommend this one. (It's apparently an older recipe because I tried the find the website so I could provide a link but the site no longer seems to exist.)
Pork Chops with Balsamic Vinegar
(based on one from Swift and Company)

Servings: 2
Preparation time: 20 minutes

2 boneless center pork loin chops (1 1/2" thick)
1 1/2 tsp lemon pepper
1 tbsp vegetable oil
2 tbsp chicken broth
3 tbsp balsamic vinegar
2 tsp butter

1. Pat chops dry. Coat with lemon pepper seasoning to taste.

2. Heat oil in heavy skillet over medium-high heat. Add chops; brown on first side approximately 8 minutes; turn and cook 7 minutes more; make sure both sides are nicely browned and it's cooked through. (Internal temperature should be 145 degrees.)

3. Remove chops from pan and keep warm. Add broth and vinegar to skillet; cook, stirring until syrupy (about 1-2 minutes). Stir in butter, blend well. Spoon sauce over chops. Serve immediately.

Notes:
  • Although the recipe is two servings, the sauce I ended up with could've been enough for four. It's a strong flavor so you don't need much.
  • I corrected a couple of seeming errors in the recipe (or, rather, perhaps I just didn't trust theirs--but my corrections seemed to work well in any case).

And on another note...

Last weekend, my mother-in-law and I took a wine tasting class at the New York Wine and Culinary Center in Canandaigua (if you're local and have never been there--it's a must-do!). In the class, we tried three different NYS wines--a chardonnay, one that's a bordeaux but can't be called such because it's not from France, and a desert wine--a late harvest white blend. We tasted each wine first by itself, and then were given three appetizer-sized dishes: an egg/cheese quiche, braised beef, and pumpkin pie. We then proceeded to taste each dish with each of the three wines; in other words, the quiche first with chardonnay, then with the red, then with the dessert wine...then moving on to the briased beef with the chardonnay, then the red, then...etc. I've done pairings before and it's always fascinating how completely different wine and food can taste together. I didn't like the red much at all on it's own, for example, but then that was my top pick of which I liked best paired with both the quiche and the braised beef--it was great with both of those! The other interesting thing was when the instructor had everyone raise their hands for which pairing they'd liked best in each category, and we were across the board. So the point of the class is, don't lock into certain assumptions, and know that different people at your table may have different preferences, so it's not a bad idea to have several selections at dinner parties.

That being said, taking what we'd learned in the class, I paired a light Pinot Noir with the pork recipe above. Tasty! I could've gone Reisling as well. Might do that next time since my husband and I both decided this recipe is a keeper!

Food Friday--Baked Oatmeal

I'm a bit of a late bloomer when it comes to the oatmeal front. I come from a big family and Mom didn't want to be a short order cook, so we were each allowed only one thing we could refuse to eat. Mine was oatmeal. It made me gag when I was little. Then, one day when I was older high school-aged, I was on an all-family church retreat, and Saturday morning the dining hall had oatmeal for breakfast. It was a very crisp fall morning and I'd been up late the night before with my peeps and just felt very in need of a more substantial breakfast than dry cereal. I decided to brave the oatmeal. And something clicked. Yum.

Much more recently I developed a fascination with the concept of baked oatmeal in my slow-cooker. Wouldn't it be wonderful to wake up on a cold winter morning with a hot bowl of oatmeal all ready and waiting, with no effort on my part? That just sounds the epitomy of cozy. So I hit the Internet. Unfortunately, the recipes I found were all for crowds: 6-10 servings or more. I'm the only oatmeal-phile in the house, so I really wanted to scale that down. The biggest issue with oatmeal in a slow-cooker is proportions. I wanted to have nice, creamy oatmeal waiting for me in the morning, not a dried out lump of gruel or, on the flip side, soup.

So I started playing around. I've eaten more oatmeal in the last two weeks than the last two years, now, I think. I couldn't quite get it down to a single serving; it clocks in at 2-3 servings, but it reheats in the microwave quite well, so you'll get a couple of mornings of tasty breakfast with minimal work.

Sandy's Slow-cooker Baked Oatmeal for One, with Leftovers

Equipment needed: 1.5 quart slow-cooker (see notes)

Ingredients:
butter
1/2 cup steel-cut oats
2 1/4 cups cold or lukewarm water

Seasonings (optional, to taste): cinnamon, nutmeg, pumpkin or apple pie seasoning, brown sugar, maple syrup, etc.

Add-ins (optional): dried cranberries, raisins, diced apples, nuts, etc. Dried fruits and nuts hold up to slow-cooking fine; apples will cook down a bit. Bananas or other soft add-ins would do better added in the morning. Don't add dairy products until morning.

Directions:

  1. Coat sides of slow-cooker with butter to keep oatmeal from sticking.
  2. Combine all ingredients in slow-cooker and stir. Cover and set on low, cook for 6-8 hours.
  3. When you're ready to eat, give it a good stir to mix the drier edges with the creamier center. (See below for additional tips.)

Notes:

1. I used a 1.5 quart slow-cooker. If you have a different size, you may need to mess with the proportions of liquid to oats a bit. I don't know that I'd try doing this small amount in significantly larger (3.5-6 qt) slow-cookers--I'd think it would dry out.

2. Steel-cut oats rather than regular rolled oats are highly recommended; they stand up to slow-cooking much better. In fact, I tried steel-cut oats on my stovetop and wasn't a fan, but I love them done in the slow-cooker. There are several brands of steel-cut oats; I use Quaker because they're readily available in my grocery store in the cereal aisle. You can google something like "best steel-cut oats" to find out what other options are popular out there. If you use rolled oats, you're probably going to have to lessen the amount of water. I didn't test those.

3. On seasonings and add-ins, just have fun. I used various combinations of cinnamon, nutmeg, allspice, dried cranberries, apples, and brown sugar. Use a light hand on seasonings the first time; you can always add more later but you can't take it out. (I found a pinch of each worked well for me.) The one issue with this method is you can't really taste-test it until it's all done. See leftover oatmeal recipes below, however; you may choose not to season the oatmeal until you've scooped it into your bowl, leaving your leftovers unseasoned for another use.

4. I found proportions that made my oatmeal creamy but not soupy; you may like yours a little drier or creamier, so you might want to mess with that some too. If it does seem a little dry when you first scoop it out of the slow-cooker into your bowl, some milk or hot water should moisten it up enough. If it seems a little soupy and you have some extra time, leave the cover off the slow-cooker and turn it up to high for another few minutes--that will help dry it out a little bit. I found myself doing that anyway--it makes a little bit of a soft crust on the oatmeal that was quite nice in my bowl.

5. Buttering the sides of the slow-cooker first really does help quite a bit. It's much easier to clean when it's been buttered first. Plus, it does add just a little bit of flavor. I'm not sure I'd go with a spray here--they can leave a residue that's harder to clean.

6. New to slow-cookers? Here's a link to some helpful FAQs. I have several sizes--smaller ones are great for hot dips or cheese/chocolate fondues at parties!

7. Here are some links to recipes you can make with the leftovers. Note that for these recipes, the oatmeal is cooked plain--no add-ins or seasonings--but you could play with the recipes to accommodate whatever you've made.

Leftover Oatmeal Cookies

Leftover Oatmeal Cookies with Butterscotch

Leftover Oatmeal Muffins

If you're looking for a slow-cooker baked oatmeal recipe that will serve a crowd, just google. There's a ton of them out there!

Food Friday--Buche de Noel

Back in my senior year of French class in high school, I learned how to make a Buche de Noel. For a few years after that, I made the cake for my family at Christmas. Then I did things like get married and have kids and forgot about the recipe still somewhere in Mom's files, and eventually it got lost. But I have reunited with the Buche de Noel finally, and am glad I did.

To the uninitiated: The Yule log is a particularly large log burned in the fireplace as part of the Christmas celebrations in several countries. There is disagreement about its origins, but this isn't "Large Log Friday," so I won't go into that here. Suffice it to say that the Buche de Noel, or Yule Log cake, is meant to represent the wooden log in a much tastier fashion. If you've never had one, think, "big Ho-Ho." It's a thin, flourless chocolate cake rolled up with a cream center. Traditionally, I think, it's chocolate cake with either chocolate or white cream, but in reality the cake and the cream can be any flavor you want.

This past weekend I hosted my side of the family for a belated Christmas celebration, and I decided to return to my high school roots and do a Buche de Noel for dessert. I stuck with chocolate. I made my first attempt on Saturday night at about 7:30 p.m. I have learned that I should not try to bake after sundown on a long day. I made the same mistake twice...did with the egg yolks what I was supposed to be doing with the egg whites and vice versa. Can't come back from that error, really. Next morning, I hied myself to local grocery store to pick up another dozen eggs...this time all went swimmingly.

Forgot to take a picture of the finished product, as things were a bit chaotic when I added the finishing touches to take it to the table after dinner (house-full n' all); but here's the cream that went into the middle!

I sprinkled confectioner's sugar and some mini-M&Ms over the top before serving; next time, I think I'd put the mini-M&Ms on the inside with the cream and do shaved chocolate or some other decoration on top. Lots of folks go all out and frost it to look like bark, add other branches, meringue mushrooms and the like.

The recipe below is inspired by one I found on allrecipes.com. I made some adjustments to the way it was written (to hopefully help others avoid making the same errors I did) and included a couple of extra things. Also, I've made notes at the bottom with additional suggestions.

Buche de Noel

Cream filling:
2 c heavy cream
1/2 c confectioner's sugar
1/2 c unsweetened cocoa powder
1 t vanilla extract

In a large bowl, whip cream, and slowly add confectioner's sugar, cocoa, and vanilla until thick and stiff. Refrigerate.

Cake:
6 eggs, divided into yolks and whites
3/4 c sugar, divided
1/3 c unsweetened cocoa powder
1 1/2 t vanilla extract
1/8 t salt
(confectioner's sugar for rolling and dusting, see below)

1. Preheat oven to 375, and line a 10x15" jelly roll pan with parchment paper. Spray the paper with nonstick spray, and set aside.

2. In large bowl using an electric mixer, beat egg yolks with 1/2 c sugar until thick and pale. Slowly blend in cocoa, vanilla, and salt. Set aside.

3. In a large glass bowl, using clean beaters, whip egg whites to soft peaks. Gradually add 1/4 c sugar and continue beating until whites form stiff peaks.

4. Immediately fold yolk mixture into the whites--do not stir; simply fold gently until two mixtures are combined.

5. Spread the batter evenly into the prepared pan, being sure it reaches the corners and is as evenly spread as possible.

6. Bake for 12-15 minutes, or until cake springs back when lightly touched. Meanwhile, lay a clean, lint-free dishtowel on a flat surface and dust the towel well with confectioner's sugar. (A thorough dusting is important to keep the cake from sticking to the towel.)

7. When cake is done, remove it from the oven, and immediately run a knife around the edge of the pan to help loosen the cake. Turn the warm cake out onto the towel. Carefully remove parchment paper, being sure not to remove a layer of cake with it. Discard paper. Starting at a short edge of the cake, roll the cake up with the towel. (The cake should be touching towel, not cake.) Cool for 30 minutes.

8. Carefully unroll the cake, and spread the filling to within about an inch of the cake edges. You may have more filling than can be expected to fit on the cake--that's fine. You can use it as topping later. (See notes.)

9. Roll the cake up with filling inside, and place seam-side-down onto serving plate. Refrigerate until serving. Dust with confectioner's sugar before serving.

Notes:

  • I used a 10x15 jelly roll pan and thought I probably could've gotten away with a slightly larger one. My cake baked a little thicker and took a little longer to finish baking than the recipe said.
  • Be careful not to overbake the cake--the drier it is, the more likely it is to crack while you're rolling it. Also, don't cool it longer than the 30 minutes. It also helps prevent cracking if it's still a little warm while rolling.
  • The original recipe did not say to spray the parchment paper with nonstick cooking spray--I found that later on message boards. I do wish I'd known to do that--I lost a little of the back of my cake on the parchment paper.
  • I had far more cream than would've fit in the cake--it'd have just splurted out the side as I rolled it. I thought about using it to frost the finished cake but was worried it might be too rich. So, I put the remainder in a pretty serving dish alongside regular "non-dairy whipped topping" and gave people the choice of which they wanted to put on their slice of the buche de noel, if any. Most went for the chocolate cream. I probably could've gotten away with using it as frosting after all.
  • Lots of people frost the cake with a buttercream frosting. I prefer it without, but you may want to experiment with that as well.
Have you ever made a buche de noel in a different flavor? Give us some ideas!

Food Friday--Chicken Noodle Soup

What better for a cold, blustery winter afternoon than a big bowl of chicken noodle soup?

Actually, what's better for just about any afternoon than chicken noodle soup?

Apparently a lot of people think the same thing. Check out wikipedia's exploration of chicken soup around the world.

My version isn't particularly global. In fact, it's quite local--based on my own kitchen and taste preferences. I don't know that I ever followed a recipe when I first started making my own chicken noodle soup--usually I start with a recipe and then jump off from there. This one just sort of came about. My mom used to make soup when I was growing up (although as I kid I liked Campbell's better, dang kid). So even though she never taught me how to make it, maybe something just sank in. In any case, here's my version.

By the way, as my family would tell you, I actually never make any of my own recipes the same way twice. My last Food Friday post mentioned going through your spice cupboard with your nose...that's exactly how I do it. So depending on what smells good to me that day, and depending on what tastes I feel particularly in need of, my seasonings may shift. Read my recipes as "in today's version, I used...." And my amounts are typically guess-work--I put a seasoning in, taste, put in a little more, taste...so read my amounts as "or so." I did do my best to track what I was doing when I made soup this time so it's pretty dang close. But you have permission to play!

Sandy's Chicken Noodle Soup (Today's Version)
4 quarts broth (store bought or homemade, chicken or turkey)
2 celery stalks, sliced thin
4 carrots, peeled and sliced thin
1 onion, diced
cooked chicken, 3-4 cups cubed
1-3 teaspoons kosher salt to taste (start small here--you can always add salt but can't take it back)
1/4 teaspoon white pepper (black pepper is fine, I just don't like the way it looks in soup)
1 teaspoon ground dried thyme
1/8 to 1/4 teaspoon dried garlic powder (or to taste)
1/4 teaspoon ground dried rosemary
(I sometimes add a teaspoon or so of chicken bouillon if I feel the taste needs to be deepened--remember, it's got salt so be careful)
Approx 2 cups dried egg noodles

Saute carrots, celery, and onion together in the bottom of a dutch oven with a little oil, until onion is almost translucent. Add broth, chicken, and seasonings. Heat over med-high heat for a bit to allow flavors to meld--I usually go maybe 10-15 minutes. Taste periodically to see if you need to adjust seasonings. Then bring it to a boil. Add noodles, cook for 8-10 minutes until noodles are done.

You can use rice instead of noodles--rice needs to cook longer, so adjust your times accordingly.

How many servings does this make?....How big is your bowl? :-)

If you make homemade chicken noodle soup, what seasonings do you like to include?

By the way, here are a couple of foodie-quilter blogs you should make sure you check out:
  • Susan, The History Quilter (You can find her blog and her podcast at the same site): http://www.historyquilter.com/
  • My buddy Lori from my guild has a great food blog: http://lipsmackinggoodness.blogspot.com/
  • and she has a quilty blog, The Crafty's Bees Knees: http://craftication.blogspot.com/

Food Friday--Stock

I'm working to get healthier (not a New Year's Resolution, rather, a resolution that occurs at almost regular intervals throughout the year), and thought that one way to keep me focused would be through this blog. After all, quilters have to eat! I follow several quilty-foodie blogs and enjoy them, so I'm paying it forward, I guess.

Therefore, for awhile anyway, I'm going to designate Fridays as Food Friday. On Fridays I'll post a recipe or technique or something I've tried. Keep in mind: not an expert! This is just me and my kitchen. So here we go, for what it's worth.

Today I'm talking stock. Years ago, I remember my mother-in-law saying something to me like, "of course, when you make your stock after roasting that chicken..." and I just laughed. Me, make stock? Why, when I can buy it at the grocery store for just a couple of dollars and not have to spend hours in the kitchen? I was a whole lot busier then with little bitties in the house. I still use a lot of bought stock. It is faster, and it's relatively cheap.

But in the last few years I've started making a lot more homemade soups, and finally decided I really should at least try making homemade stock to see whether it made a difference. The first time I tried, it was a miserable failure. The result basically tasted like water that had a drumstick dipped in it for all of five seconds. "Essence of broth," maybe? A couple of years later, I did some googling and tried again. Still tasteless. I know it's not supposed to be much, but really. I could have run tap water and it would've had more flavor.

A few months ago, listener Carolyn from the U.K. sent me a stock recipe that a friend of hers uses--a friend who apparently knows her way around a kitchen! I went from there and then allowed myself to start playing. Thank you so much, Carolyn, and Carolyn's friend--it worked!

I seasoned mine more than you probably normally would a stock, because the way I use stock, I tend to like the same base flavors anyway. It's now more like weak soup than a true broth, but I'm a lot happier with it than my first attempts!


Sandy's Variant on Carolyn's Friend's Turkey Broth
  • 1 honking big turkey carcass (ok, size doesn't matter, but in my case, it was honking big)
  • Enough water to nearly cover the carcass. (Cooks.com says allow a little less than 1 qt of water per pound of turkey, if you want a formula.)
  • 1 carrot, cut into chunks--I used two since my turkey was so big
  • 1 onion, quartered--I used two
  • 1 leek, sliced (Carolyn's friend's recipe had this--I left it out as I didn't have any leeks in the house.)
  • 1 celery stick, halved--I used two
  • salt and pepper to taste--you can skip salt if you need to go low sodium
  • Dried rosemary, thyme, sage, and I probably even tossed in some marjoram. (Tip here: Go through your spice cupboard with your nose--what smells like it belongs in there probably does. You could use fresh herbs tied together so you could pull them out after cooking. Carolyn's friend included parsley. I'm not a fan of parsley so I left that one out.)


Put everything in a large cooking pot and bring to a boil. Skim the surface to remove any scum, then lower the temperature and simmer gently with the lid on for about two hours. Strain the stock, cool, and remove the fat from the surface before using or freezing. (I removed fat twice--once before it went into the freezer, and then again when I was ready to use it.)

You may also have a lot of cooked meat now that you can pull off the bone and chop up for other uses. Messy, but worth it. My meat turned into turkey pot pie the next day...nummy.

Note: I couldn't get the lid on my pot because of aforementioned honking bigness, so I let it go without. This means more water loss, which intensified the flavor a bit, I think. But I still ended up with a lot of broth. I also let it go a little longer than two hours, mostly because I completely forgot about it. It's very forgiving that way. And the smell in your house while all this is going on? Undescribably delicious. My vegetarian daughter was a little creeped out but the rest of us were in heaven.

It's been in the freezer now since Thanksgiving weekend. Today I heated it up and made chicken noodle soup out of it. That'll be next week's recipe.

Do you have a favorite beef, chicken, or vegetable stock recipe? Leave it in a comment!