
Lookie what I've been doing all week...
UFO Finish! The "Cautionary Tale Quilt"
Actually, it's been done for a couple of weeks. I just finally have the time to sit down and blog about it. Doing lots of catch-up this week!
This is the "cautionary tale" quilt I talked about in episode 56 of my podcast, "Quilting...for the Rest of Us." (A lot of listeners shared their own cautionary tale quilt stories in episode 59 as well. Entertaining--be sure to check it out. And it's never too late to leave comments with your own cautionary tales!)
Due to the wonders of photo-editing you can't really see how completely out-of-square it is, although if you look closely you can figure it out. Do me a favor: Don't look closely.
Still, I love the fabric and the colors, and my niece will presumably love it as well. This is based--with the greatest apologies to--a Fons and Porter episode in which they did the "Flip-a-Coin" design. The issues are not with the design; the issues are completely the quiltmaker's. I'd put a link to it but you have to be a F&P member to see it anyway so, if you're a member, just search for "Flip-a-Coin" on their website.
Off to take advantage of an unscheduled afternoon and make more progress on other projects. Now that I'm done traveling for awhile, my blogging will resume it's usual much-more-regular schedule. I've missed y'all--glad to be back!
Lines in Quilts--Supplemental Post to Episode 63 of Quilting...for the Rest of Us
In this week's QFTRU podcast episode, Jaye and I spoke about line as a design element. These pictures of my mom's and my quilts will help illustrate some of the things we talked about it. (By the way, that's Jaye of artquiltmaker fame. The link takes you to her blog which has additional information on this topic.)
 First is a picture of Mom's Irish Chain (actually, technically, a Triple Irish Chain, I believe, as it's three rows of squares in a column). Clearly the blocks themselves create strong lines here--including the darks and the mediums in the squares themselves creating several visual lines in tandem. This photo was evidently taken before it was finished--whatever quilting she ended up doing on it (I don't remember and one of my sisters has this quilt) would have created another set of lines that either emphasized or complemented the strong diagonals. Dig those crazy 80s colors.
 Here is one of my early quilts, "Bugs in the Cabin." The basic log cabin is extremely versatile and a fantastic example of how blocks themselves create lines and understanding how those lines work are important in understanding design. Here I liked having the stair-step feel because this quilt was originally intended for a impending baby who would have been attracted by the repetition of high contrast. (This quilt was made using the Eleanor Burns quilt-in-a-day method, btw, one of my earliest quilts, probably circa 2000-ish. I later quilted it with invisible thread and made a huge mess and finally consigned it to the basement for my kids to use while watching TV. Too bad. It was a cute quilt. Said baby was probably about 6 or 7 years old by the time I finally sat down to try to fix my original mistakes and ultimately gave up. Fortunately, said baby's mother never knew I'd been working on a quilt and was quite happy with the set of onesies she got instead.)
 The log cabin block is one of my faves because of it's versatility. Here's another one I made a year or so after the one above--probably somewhere around 2002 or so.This one turned out much more nicely! Note that it's the same block as the image above. But a different setting creates an entirely different feel. In this case, you have a couple of different sets of lines--the light and dark "barn-raising" setting, plus the more zig-zaggy lines of the fabrics themselves: the heavy blue that appears as cross-shaped outlines, and the directional floral print also create lines of its own.
You can't see it in the picture but after consulting with Mom, she suggested that I could quilt each "log" down the center to make each individual piece of fabric look like two pieced together--very strongly emphasizing the lines of the blocks. And boy, did that make it look even more impressive! Loved that effect. Took for-freakin'-ever, but turned out nicely. This wasn't anyone's pattern--just a standard, traditional log cabin quilt I made for an extended family member. I miss it. Someday I'll make myself one with these exact colors, sigh.
Mom also made me a quilt with the log cabin that, using variable width and length "logs" (fabric strips) creates a circular line. Very cool. Unfortunately, I don't seem to have any pictures of it. I'll try to remember to take pics of that one later.
 Back to Mom's quilts for an example of how line can become evident through settings. Here's a sampler quilt with sampler blocks alternated with an Irish Chain variant block to create strong diagonals.
I don't know anything about this quilt--found it after Mom had passed away. Has the look of a block-of-the-month to me, and it's clearly a more recent quilt based on the fabrics, but Mom wasn't particularly consistent about labeling. If anyone recognizes the pattern and can identify it for me, let me know! (I kept this one--it's so cheery!)
 Here's another example out of Mom's lifetime compilation of quilt-work. I'm guessing 80s, again, based on colors and fabrics. No idea about the pattern or designer--anyone recognize it?
In any case, here the line is created by block, color, and quilting lines. Notice how the quilting lines in some places echo the general hexagonal shape of the overall design, whereas in other places it emphasizes the individual lines of the blocks themselves.
Keep this quilt in mind whenever we do start talking about balance. It's also a good example of radial symmetry. Gotta love a two-fer.
 Now we're going to get even more funky. How many lines does this design have in it? And how many types of lines?
Lots of wonderful eye-travel going on in this one--your eye follows the diamond around the center and then swirls through the fan shapes that are both diagonal and curvy at the same time. Very cool.
Another of Mom's quilts--it had been completed except for the binding when she passed away (although I think the top was several years old at that point), so I finished off the binding. This became a wedding gift for a close family friend that Mom would have most certainly given a quilt to had she still been with us.
Again, no idea on pattern or designer. If someone recognizes it, let me know. (Mom did design some quilts herself but not usually in this style.)
 Sorry about the bad picture--I think I might have taken this one on my cell phone. Mom did this one sometime in the late 90's, I think. Again, this is someone's pattern/design that I can't identify and (sigh) Mom didn't label it. Now you know why I'm such a label evangelist on my podcast.
Would you normally look at a design like this one and think "line?" Why or why not? What basic lines do you find here? How do the blocks work together to create those lines?
Does it help is allow your eyes to blur just a little bit so you're seeing shapes more than individual pieces? You'll get more of a sense of line that way.
 And finally, for a wild-and-crazy line. We're finishing with one of my favorite of Mom's quilts. And this one I can identify as a pattern by designer Karen K. Stone. I seriously dig it. It always reminds me of a story Mom told about another New York Beauty-esque quilt she'd made: Dad, who was normally extremely supportive of her quilting, had said he'd never sleep under that quilt because it looked "too sharp and pointy." So think about that design question next time you're making a quilt for a bed. Is it too sharp and pointy for comfortable snoozing? Tee hee.
In any case, what does this quilt tell you about line? (I did eventually get a binding on that one and it went to one of my very funky nieces.)
That's it for this week, podquilters!
You can't see it in the picture but after consulting with Mom, she suggested that I could quilt each "log" down the center to make each individual piece of fabric look like two pieced together--very strongly emphasizing the lines of the blocks. And boy, did that make it look even more impressive! Loved that effect. Took for-freakin'-ever, but turned out nicely. This wasn't anyone's pattern--just a standard, traditional log cabin quilt I made for an extended family member. I miss it. Someday I'll make myself one with these exact colors, sigh.
Mom also made me a quilt with the log cabin that, using variable width and length "logs" (fabric strips) creates a circular line. Very cool. Unfortunately, I don't seem to have any pictures of it. I'll try to remember to take pics of that one later.
I don't know anything about this quilt--found it after Mom had passed away. Has the look of a block-of-the-month to me, and it's clearly a more recent quilt based on the fabrics, but Mom wasn't particularly consistent about labeling. If anyone recognizes the pattern and can identify it for me, let me know! (I kept this one--it's so cheery!)
In any case, here the line is created by block, color, and quilting lines. Notice how the quilting lines in some places echo the general hexagonal shape of the overall design, whereas in other places it emphasizes the individual lines of the blocks themselves.
Keep this quilt in mind whenever we do start talking about balance. It's also a good example of radial symmetry. Gotta love a two-fer.
Lots of wonderful eye-travel going on in this one--your eye follows the diamond around the center and then swirls through the fan shapes that are both diagonal and curvy at the same time. Very cool.
Another of Mom's quilts--it had been completed except for the binding when she passed away (although I think the top was several years old at that point), so I finished off the binding. This became a wedding gift for a close family friend that Mom would have most certainly given a quilt to had she still been with us.
Again, no idea on pattern or designer. If someone recognizes it, let me know. (Mom did design some quilts herself but not usually in this style.)
Would you normally look at a design like this one and think "line?" Why or why not? What basic lines do you find here? How do the blocks work together to create those lines?
Does it help is allow your eyes to blur just a little bit so you're seeing shapes more than individual pieces? You'll get more of a sense of line that way.
In any case, what does this quilt tell you about line? (I did eventually get a binding on that one and it went to one of my very funky nieces.)
That's it for this week, podquilters!
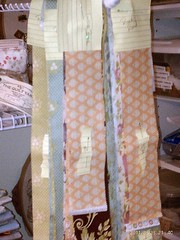
Snails Trail WIP
Had a marathon sewing session last night and got all the blocks pieced. Now I just have to square them up and get them put together. I think I will use this setting--I messed around with the other typical setting for snails trail blocks but I really sort of like the swirly nature of this one. The other one felt like it would compete too much with the applique.
Tonight I've got the first meeting of my quilt design study group--we're going to figure out our methods and meetings, to be very alliterative about the whole thing. I'm looking forward to it! I'll be talking more about that group in my podcast this week so stay posted.
Tonight I've got the first meeting of my quilt design study group--we're going to figure out our methods and meetings, to be very alliterative about the whole thing. I'm looking forward to it! I'll be talking more about that group in my podcast this week so stay posted.
Whenever I need a smile...


Golden Retriever Puppies, a group on Flickr.
All quilting aside, here's one of my fave groups on Flickr. Always makes me chuckle.
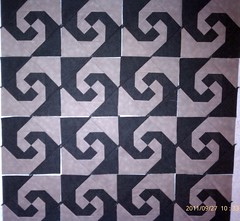
And the answer is...Snail's Trail!
I probably threw some of y'all off since I didn't exactly have things laid out where they'd eventually end up. Hard to do that when you only have half the pieces.
I've always wanted to make one of these blocks. Not quite sure what the allure is for me. It's just so charming. Or a little yiccky, if you allow yourself to imagine what it's actually named after. But I used to keep little snail "farms" in bowls over the summer when I was little, so maybe there's a nostalgia factor at work.
Not sure I'll end up with any time to start sewing tomorrow--packed day. Sunday looks a little better for progress on this front. I guess you could say I'm working at a (wait for it...) snail's pace, guffaw.
I can't get the lighting quite right--this is taupe and black, not taupe and green as it sort of looks in this pic. "But I thought it was a warm color challenge, Sandy?" Hold your horses, sister. It's coming!
This is actually a little higher contrast than I'd been picturing when I did the original design in EQ but it should still work. Could also turn out to be a hot mess. This is the stage at which I always start doubting myself. But I've learned that's just part of the process. I'll get over myself soon enough.
DD made her first solo trip home today from college for a weekend visit--something around 4 hours by herself involving expressways and thruways and tollbooths. I tried to busy myself with other things so I wouldn't keep imagining the burning heap of rubble at the side of the road. She made it safely as I really knew she would when my Catastrophic Thinker Brain wasn't taking over, and we saw her all of about two hours before she was back out the door again to hang with her local buds. Yep, she's a college girl for sure now!
Finally--a little progress on the stash challenge
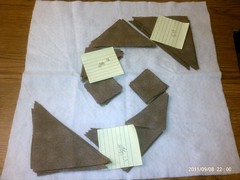
Shall we play "Name That Block?" "I can name that block in seven pieces, Bob." "I can name it in six..."
I got half the pieces cut tonight for the pieced blocks in my stash mystery challenge wallhanging before my back started whining at me. Some day I'll get one of those nice comfy pads they sell for you to use at the kitchen sink--I'd love one at my cutting table. I've got good carpet but I'm past the age where I can comfortably stand barefoot a couple of hours at a time, dang it. I really should've taken the time to put on a pair of shoes but I got involved and lost track of time until I realized I was starting to shift my weight back and forth repeatedly. Aging. Bah.
In any case, so far EQ7 hasn't steered me wrong. I had a brief moment of math panic when I couldn't figure out how I was going to get the requisite number of pieces out of the yardage I had, even though EQ assured me I could. Then I realized where it was saying "two patches," it really meant "cut that one piece and then slice it in half to get two patches." So I only had to cut half the pieces I originally thought I did. If that makes sense to you. It does to me, so we'll move on now.
I should be able to get the other half of these block pieces cut tomorrow night. It'd be nice if I came out of this weekend with the center pieced--we'll see. I know I won't have much time Saturday and Sunday is still a bit murky to me. And I suspect the piecing will be a bit pokey, for all I'll be doing it whiz-bang-chain-style.
B.T.Dubs, I'm glad to finally be using this fabric. I've had it for a couple of years, I think, and really love it, but hadn't yet found the right application. I think this is it. At least, I hope this all turns out as nifty-keen as it looks in my head!
Quilt Design Progress
 Remember these?
Finally. Phew. After poking away at it here and there all summer (well, okay, more "here" than "there" since I was on the road so much), I have finished my stash mystery challenge design for this quarter--the one using warm colors. I've had the design in my head since a couple of weeks after I announced the challenge itself last June, but wasn't able to take the time I needed to learn what I needed to learn in EQ7 to finally get the design done. Last night did the trick--I brought my laptop down to wrangle with EQ while my husband was watching "Top Shot." I could be companionable while still quilty, and mostly ignore what was going on on TV. Admittedly, some of their shots are pretty impressive, but I'm just not a ballistics kinda gal.
In any case, I got the design finished last night and just completed the process of printing off all the requisite rotary cutting and template pages this evening. Lots of templates. Dang applique. What am I doing to myself? Oh well--won't be too futzy; planning on doing it raw-edge-style by machine. I'm also still leaving a bit of room for design changes; I have the overall outline done, but may continue to tweak it as I go.
I should be able to start getting some of the cutting done tomorrow night, but I'll be gone this weekend. That being said, I still have some hope I might be able to make my own deadline for the challenge! How are you doing on yours? Remember, there's a fabricy prize awaiting!
A Little Perfume Behind Each Ear...
Fair warning: This blog post has nothing whatsoever to do with quilting.
I tend to be, oh, how would I say it, "reactive?", "sensitive?", "especially tuned in?" to smells. Sometimes that's not altogether a good thing--it's not unusual for me to be with my family and find my stomach suddenly turning from something I'm smelling...and no one else even notices. But usually it's a nice thing; I enjoy nice smells, and smells have strong memory associations. Certain twists of the wind and suddenly I'm a little kid back on the rock beach at my family's cottage on the lake growing up; another twist and it's a flashback to playing frisbee on the green between two dorms at college. I can't grind my coffee at the grocery store without burying my nose in the bag when I'm done and taking a good, deep, inhale. ("Yes, judge, that's right--I inhaled. Deeply and with great pleasure.") My husband sent me flowers for my birthday last week and every time I pass them on the kitchen counter I bury my nose in them again. OK, so a couple of them make me sneeze but it's worth the deep sniff.
I don't think I'm particularly unique in this--I think lots of us respond strongly to smells in one way or another. After all, it's instinctive. Our little animal selves aren't that far removed from those who rely on a sense of smell to tell them whether the one approaching is friend or foe. But what about how smells make us feel about ourselves?
I really enjoy wearing a nice perfume. I don't have many--just three or four (and a couple of random samples still sitting on my vanity as I milk them for all they're worth). I tend to swap out which I'm wearing by season. But those perfumes have lasted me an insanely long time because, sadly enough, I don't wear them out much anymore.
I work for a religious organization with boards and committees--when I travel, I'm usually traveling to be at meetings in stuffy conference rooms with said boards and committees. Over the last several years, we've inevitably had at least one, if not two, people on the board with severe allergies, for whom the slightest scent can send them into asthma attacks or severe migraines. I've seen it in action--I fully believe this is an issue for some. So we now use unscented candles in all of our worship times; we've stopped wearing perfume to meetings; we're careful about our hand creams and our hair sprays. It's all about avoiding the scents.
I've become so used to it, in fact, that I rarely wear perfume out at all anymore--somewhere in the back of my mind is always the caution: What if the person sitting in the airplane seat next to me is allergic? What about that person at the next table over in the restaurant? In church on a Sunday? At my quilt guild meeting?
A few weeks ago, I found myself looking at the perfume on my bathroom vanity with a little sadness and (admittedly) just a touch of resentment. "Shoot," I thought. "I miss wearing perfume." Suddenly I realized, well, duh. Just because I work from home and the only other ones who will smell it are my dogs doesn't mean I can't wear perfume every day! No more keeping the expensive stuff for special occasions. No more thinking perfume is for others to enjoy. I love the way my perfume smells, so why not enjoy it every day for myself? So for the last couple of weeks, every morning after I take my shower and get dressed, I put on my perfume.
I might be sitting here in shorts and a tank top, and haven't laid eyes on another human being since 8a when my husband walked out the door this morning, but dang it, I smell good. Wearing perfume somehow makes me feel just a little better about myself--a little more special or something. Like I'm doing something just for me, my own little quiet enjoyment in a day. Funny--my dogs haven't even noticed. Or maybe that's why they're laying especially close to my feet at my desk these days. Maybe they think I'm getting dressed-up-in-doggie-terms just for them. After all, their little black noses are all about the smells.
Regardless, I'm feeling just a little bit more special these days. So what do you do to help yourself feel just a little bit more special?
(Image by misteraitch through Creative Commons: http://www.flickr.com/photos/misteraitch/)
Birthday Mini-Quilt-Retreat Part 2
So after I finished those strips, I spent a few minutes posting the rest of my quilt library on GoodReads, then putting all those books away (thereby regaining some serious shelf space). A few more minutes of straightening up and my sewing room was once again a clean slate.
Steeling myself, I returned to the pinwheel quilt. Ah, the lowly pinwheel. It so innocently sparked such controversy in the quilting world a few months ago when it became the calm in the eye of a storm regarding the "dumbing down of quilting." Like all storms, I believe that one has subsided. Myself, I have no particular opinion as to whether pinwheels are beginner, intermediate, or advanced. I just think they're dang cute.
I wanted a light summer wallhanging, and I also wanted to use up some fabrics from my stash. This puppy is completely from stash. Woohoo! And then, the piece de resistance, which I can't put appropriate accents on at the moment--the Double Diamond Ruler from Bright Quilting Notions. (Kim, are you paying attention? Tee hee.)
Kim, a listener as well as the inventor of the DD ruler, sent me a sample ruler set to use as a giveaway and one for me to play with. I messed around with it immediately and loved the effect, although I didn't love my initial efforts. I made some bad fabric choices. Since it was just a tablerunner, I had no problem deep-sixing that baby and chalking it up to experience, but I really wanted to mess with the rulers again. The pinwheel quilt gave me the perfect opportunity.
I think this wallhanging will end up being named "Pinwheel Garden" or "Summer Garden" or something--not sure. But I like the idea of pinwheels as flowers and the DD affect as a picket fence around the outside.
I'm going to tackle the quilting this weekend too, I think. Should get more time on Sunday morning. Then I want to play with some embellishing. So keep posted!
Happy birthday to me--a mini-quilt-retreat
I took this afternoon as a half day vacation for my birthday, and am celebrating in my sewing room. My first task of the afternoon: Finish getting the Jelly Roll Sampler strips sorted for blocks.
If you buy this book, do pay attention when the authors say to sort all your strips first, before you start cutting the strips for blocks. I did fine for the first 6 or 7 blocks; the last 5 got a little trickier and I had to start doing some swapping off with earlier blocks to get better contrast. Although my jelly roll had the same number of overall strips as the one in the pattern I'm using, it has a different proportion of darks, mediums, and lights. And although I was quite freely recategorizing strips based on how they related to other strips in the set, there are some combos that just don't work as well. So by the time I got down to the last two blocks, I was digging into my 2 1/2" strip stash to find some alternatives.
Let me just say--if you're a jelly roll fan, be sure you buy the Moda Marbles jelly rolls. The link happens to go to the one I used today; but there are a couple other colorways available. I also own the Brights roll. These help support your other jelly rolls by providing a wide selection of solids or marbles to fill in gaps of whatever jelly roll you're using. At a quilt show recently, I also picked up a couple of rolls of 20 strips each of lights (made up by the quilt shop); I've found that often jelly rolls don't have enough lights or darks--they're heavy on the mediums. Makes sense, since they're strips from a collection of fabric and most collections produce mostly mediums with just a few darks and lights tossed in. Anyway, in today's case, I could've used a few more darks but was able to fill in with one strip from my Moda Marbles roll, plus a strip from my stash, and then just went with a more muted look on the final block than I would've normally. I think it could actually be kind of pretty. It'll be interesting to see how it all turns out.
Enjoying my quiet afternoon catching up on some other quilty podcasts, finishing up cataloguing my quilt books on GoodReads, and moving forward on another quilt project. My son, nephew, niece, and nephew-in-law (said niece's husband), are taking me out for a birthday dinner tonight as my husband's out of town today--that'll be fun, but I've got about 3 hours left of mini-quilt-retreat before that happens!
Jelly roll sampler in progress
This really poor picture is of the only sewing I've gotten done this week so far. And, technically, there's been no sewing involved yet. I'm puttering away at sorting a jelly roll for sampler blocks using the new Jelly Roll Sampler book by Pam and Nicky Lintott. The jelly roll I chose (Fig & Plum by Fig Tree Quilts for Moda) isn't high contrast, so the blocks will be fairly muted. I think the overall effect will be fairly shabby chic or something. If it turns out nicely, it might go well in my aunt-in-law's cottage, but I'm not marrying myself to any particular thoughts of how the end results might be used yet.
Also living in her dorm room, a lion quilt my mom made her when she was little--maybe 5 or 6. She was a huge Lion King fan most of her childhood, so she's surrounded by lions.
That's what every college girl needs, right?
That's what every college girl needs, right?
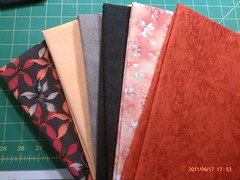
A Test and a Shop Hop
I took advantage of the fact that the town we had to do her test in is right in the middle of Amish country. Good food, great quilt shops. There's one I particularly like--an Amish family farm where she's set up a fabric shop in a shed in her driveway. It's bigger than that sounds, and she has a lot of nice fabric in there. I had recalled that she had several of the Moda Essential Dots collection last time I was there, and I'm a fan of those. Yep--still there! And more colorways than I recalled! So I bought colors I often use--a yard of each, except the one on the far right. I got three yards of that one because I'm planning on using some of it as sashing for an upcoming project.
After dinner tonight, baby girl took her first solo flight in the car, asking me if I wanted anything from the grocery store. Sure--we can always use another gallon of milk. Off she went! To keep my mind off her being out alone in my car, I spent a little more time prepping for an upcoming project from the Jelly Roll Sampler Quilt. Playing with fabric--the best therapy!
Book Review: Stack the Deck Revisited
 Stack the Deck Revisited: Updated Patterns from Stack the Deck! by Karla Alexander
My rating: 4 of 5 stars
It might be a little early to post a review of this since I just bought it today and haven't actually made anything from it yet. But I bought it because someone had taught me this technique at a quilt retreat a few years back; I've made a few quilts using the basic idea, but could never get it to work quite right. What a difference it made reading her actual instructions! Now it all begins to make sense...
Plus, I like some of the variations she presents on the basic concept. I'm particularly a fan of the stained glass window version towards the back of the book.
So, although I've already made three and a half quilts using this idea (the half being a UFO I really must finish before winter hits!), I can see a few more in my future. They're a hoot to do and, if you stick to fairly basic versions, pretty fast. Great gifts for babies, kids, and anyone needing a cuddle quilt.
View all my reviews
Another finish--Serengeti
| "Serengeti," designed by Toni Whitney (see post for info) |
To give you some perspective, this finishes about 26"x 24". I highly recommend Toni Whitney designs, and the kits for them through Bigfork Bay Cotton Company. The pattern was extremely well written and included all the drawings for the pieces in such a way that it was very easy to figure out which pieces were supposed to be done in which fabric, and in what order to fuse them down. As I have said before, I went ahead and bought the kit instead of just the pattern--it saved a tremendous amount of time trying to find the right fabrics, and I'm really not sure it was much more expensive than having done it all on my own would have been. Since this was to be a piece for my daughter's enjoyment and nothing that I intended as a piece that would show off my own talent, such as it is, I was fine with doing this one by kit. Usually picking out fabrics is my favorite part of a project, but this particular project would have made me crazy. I know my limits.
Then you put the backing on and quilt the borders. I just did a very simple stitch-in-the-ditch on the two narrow inner borders, and as simple as I could get in the outer border. Partly, I wanted to get the thing done so I didn't want to spend a lot of time on the borders, and partly I really wanted the focus to stay on the very cool and majestic lion.
I enjoyed doing this, and learned some things along the way. That being said, I'm also thrilled it's done. It'll be awhile before I tackle something that requires tweezers to move itty bitty pieces into place again.
Grilled Pizza Debriefing
I'm exhausted now--two days on my feet getting everything ready. But the upside is I have lots of leftovers of dough, grilled crusts, and toppings. I think I know what I'm having for lunch tomorrow!
A Foodie Post: Grilled Pizzas
This post is dedicated to Susan of The History Quilter. :-)
A few weeks ago, my nephew and I took a cooking class at our local culinary school (NY Wine and Culinary Center), learning how to make grilled pizza. I've made homemade pizza for a long time, but have always wanted to try grilling it, so I was really excited about the class. My sister (said nephew's mother), and a family friend and her daughter joined us. The class was an absolute hoot. Grilling pizza is surprisingly simple, plus I learned how to make a couple of different sauces on top of it.
So tomorrow we've invited my in-laws over and my nephew and I will be testing our grilled pizza chops. There will be somewhere between 7 and 9 people here. I'm planning on making fairly small personal-sized pizzas so that (1) they'll grill and bake pretty quickly and (2) people can play with topping combinations by doing a couple of different pizzas for themselves. My nephew will be the grill-master; I'll be in the kitchen. (He'll grill the crusts, then we'll bake them off both in the stove and over indirect heat on the grill--we'll need both going at once to get everyone taken care of in a decent time frame.)
Mind you--grilling pizza is easy, but providing a range of toppings takes a long time. I spent a few hours in the kitchen today in prep, and still have some left to do tomorrow in addition to the dough. (Of course, adding bruschetta and a fruit plate with yogurt dip into the menu as appetizers didn't help. I have problems with thinking small!)
Our options are going to be:
Sauces: Traditional red pizza sauce (store-bought, but a nice one); Margherita sauce (homemade); Alfredo sauce (homemade); olive oil and garlic or seasonings as desired
Cheeses: Mozzarella, feta, goat cheese, parmesan
Toppings: Roasted red peppers (my daughter did those--she's really good at it); spinach; sliced Roma tomatoes; black olives; pancetta; caramelized Vidalia onions; red onions; pineapple--if any is leftover from the fruit plate appetizer; pepperoni; fresh basil and fresh oregano from my garden; sliced garlic (yep, raw--that's my nephew's request). I may end up adding Italian sausage to the list tomorrow if my nephew decides to run out and buy some for me.
I also made a homemade acai salad dressing--which was supposed to be pomegranate but my daughter grabbed the wrong bottle at the grocery store and I didn't notice until we got home. But the acai juice was a blend with pomegranate anyway, so the recipe didn't seem to care. Still tasty. And I'm debating between two different yogurt dip recipes to put with the fruit tray--that'll take me all of about 5 minutes to do tomorrow so I'm not sweating it.
So wish me luck as we crank up the grill and see if we've remembered everything we learned. I'll try to remember to snap a picture somewhere along the way but can't make any guarantees!
Lolly's Fabric Purchase
OK--just a quick post because once again I'm sleeee-eeeepy. Still adjusting to time changes. It's only an hour difference but man, does that still wreak havoc on your internal systems!
In any case, on my way home from Wisconsin I took a side trip to Shipshewana, Indiana. One store clerk there said, "Wow, that's really out of your way, isn't it?" Hmmm.... Maybe a half hour off the expressway? When I'm doing a 30 hour round trip, half an hour doesn't sound "out of the way." It sounds more like, "Take the opportunity as long as you're in spittin' distance!" I joked with her that quilters will travel almost any distance for a nice quilt shop. Since I suspect Lollys brings the vast majority of the business in the door of their "mercantile of shops," I'm guessing she's used to that response.
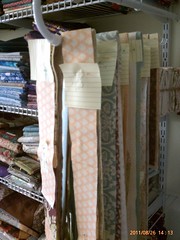
Lolly's was amazing, as usual.
 Here's what I buyed. Well, you'll see the stack in the bottom left that were from the Quilt Foundry. Everything else was from Lollys. The three fabrics across the top (purple, teal, cream) have a purpose. I just need to come up with a design, but I've got a year to do it.
The two packages in plastic with fabrics arranged in diamonds are sets of 5" squares, 40 0f them. Not by Moda so they can't call themselves a charm pack. Don't recall what they were named. But they're all batiks. Gorgeous batiks.
The four charm packs altogether (I can call them all charm packs without getting a cease and desist, can't I?) I bought with something in mind...

I have one "Little Charmers" pattern from designer Heather Mulder Petersen (I think that's her name--it's way too late for me to go dig the pattern out and check. If I don't correct this later, that means it's right) in her Anka's Treasures series. I made several table runners from that one pattern--it has three options in it--for Christmas gifts a couple of years ago and then made myself one this year. I was thrilled to see that Lolly's had several other in the series--I really like these. Hence, picking up a couple of charm packs as well. I see more table runners in my future. I only have so much wall and bed space, right?
The other two patterns at the bottom are the Five Yard Quilt series that I mentioned in my episode about the Quilt Foundry. The fabrics I bought will be used in the pattern on the left--it'll look really wonderful in all spa colors.
OK--I'm dozing off over the keyboard so I'll have to wait until later to post pictures of the physical shops themselves.
By the way, I did finally manage to get back to my sewing machine for the first time in weeks tonight. Got the backing pieced together for a UFO I'm sending off to a long-armer. Woohoo! I'll be so glad to see that one done--it's been hanging around for a little over three years!
In any case, on my way home from Wisconsin I took a side trip to Shipshewana, Indiana. One store clerk there said, "Wow, that's really out of your way, isn't it?" Hmmm.... Maybe a half hour off the expressway? When I'm doing a 30 hour round trip, half an hour doesn't sound "out of the way." It sounds more like, "Take the opportunity as long as you're in spittin' distance!" I joked with her that quilters will travel almost any distance for a nice quilt shop. Since I suspect Lollys brings the vast majority of the business in the door of their "mercantile of shops," I'm guessing she's used to that response.
Lolly's was amazing, as usual.
The two packages in plastic with fabrics arranged in diamonds are sets of 5" squares, 40 0f them. Not by Moda so they can't call themselves a charm pack. Don't recall what they were named. But they're all batiks. Gorgeous batiks.
The four charm packs altogether (I can call them all charm packs without getting a cease and desist, can't I?) I bought with something in mind...
I have one "Little Charmers" pattern from designer Heather Mulder Petersen (I think that's her name--it's way too late for me to go dig the pattern out and check. If I don't correct this later, that means it's right) in her Anka's Treasures series. I made several table runners from that one pattern--it has three options in it--for Christmas gifts a couple of years ago and then made myself one this year. I was thrilled to see that Lolly's had several other in the series--I really like these. Hence, picking up a couple of charm packs as well. I see more table runners in my future. I only have so much wall and bed space, right?
The other two patterns at the bottom are the Five Yard Quilt series that I mentioned in my episode about the Quilt Foundry. The fabrics I bought will be used in the pattern on the left--it'll look really wonderful in all spa colors.
OK--I'm dozing off over the keyboard so I'll have to wait until later to post pictures of the physical shops themselves.
By the way, I did finally manage to get back to my sewing machine for the first time in weeks tonight. Got the backing pieced together for a UFO I'm sending off to a long-armer. Woohoo! I'll be so glad to see that one done--it's been hanging around for a little over three years!
The Quilt Foundry fabric purchase
I'd write more, but I've been on the road for a long time today and looking forward to a l-o-n-g night's sleep. So g'night, catch y'all later!
(*with apologies for bad hotel-room lighting that's graying out the colors but good. Trust me, it's really pretty!)
Half the fun down, the other half to go
Since I'm going to be gone for a couple of weeks, my husband suggested he and I do an overnight at a B&B in the Finger Lakes, something we haven't done very often. Here we are, near the Finger Lakes, and we've never gone to an inn on one of them. So last night we packed up and hit the road as soon as work was done; an hour and a half later it was like we were in a different world. Well, not entirely. It looked an awful lot like the town I grew up in and not too far off the town we live in. But it still, it was away. We had a great time. Already have plans to go back.
 There was an antique fair going on while we were there and I found one of my favorite things: printing press letters. So I now have the word "quilt" displayed in mismatched printers letters displayed in my quilting area. Very cute. I love them. They make me smile.
I also got some foodie stuff at a cute little kitchen boutique shop (I'm a sucker for a good finishing sauce), and some really wonderful "found item" frames for antique pictures that will look great in my dining room.
There's a really nice quilt shop (rumored, anyway--I've never been there) nearby, but it was 10 minutes in the wrong direction so I didn't get to check it out. Next time!
After our overnight, my husband dropped me off at the New York Wine and Culinary Center for a cooking class I had registered for with my nephew, his mother (my sister), and a couple of very close family friends. The class was on grilled pizza. It was great fun! I picked up a couple of great cooking tips and came right home to put one of them into practice...not on pizza, but on fettucini. Can't wait until I'm back from my trip and can make some grilled pizza!
Tomorrow I'm taking my daughter to meet my in-laws for a local arts/crafts festival that I'm usually out of town for, so I'm looking forward to that. Absent the fact it's supposed to be 90 degrees or more. But we're not going to stay long because I have to finish packing when I get home.
I probably won't be able to blog again until I'm home in a couple of weeks. Stay quilty!