In Defense of Good China

When my husband and I were engaged, our mothers told us we had to go register for our china pattern.

We stood in the department store, in front of the display of china patterns, and giggled. Really? China? We weren't old enough for good china!

Eventually, a few weeks later, our heads more firmly wrapped around growing up, we returned and chose our china pattern.

We received a total of 8 place settings as wedding gifts.

Moving from apartment to apartment (6 times in our first 7 years of marriage), and then eventually into our first house--overwhelming jobs, two little bitty kids, no room to entertain, the china stayed in a box for most of its early years.

Once every two or three years, I'd pull it out for a holiday dinner, just us four. My little kids would help set the table, their eyes wide, their hands unusually careful.

The china is out. This must be a special meal.

Five years ago, we moved into our new house. New construction--we could choose the floor plan. I was adamant: I wanted a separate dining room.

"Really? The trend is towards open floor plans and no formal dining rooms. No one ever uses them anymore!" I was advised. As I read in magazines that mix-matched china from garage sales and using your casual everyday plates was now the modern trend, I kept picturing my china in a falling-apart box under a kitchen cabinet. "No. I want a formal dining room. I want to use my china."

Now we have a formal dining room, a dining room set that I love. We have now become one of the regular host homes for extended families at holidays. And, approaching our 25th anniversary in 2012, I just bought the remaining four place settings to fill out a complete set of 12.

My daughter still asks if she can be the one to set the table. At 18, her eyes are still just a little bit wide. She's still a little extra-careful.

The china is out. This must be a special meal.

Post-ABFSI Breather

This is it. The last official hoorah of Thanksgiving dinner at my house. My first ever homemade Turkey Pot Pie. Leftover turkey, leftover peas, leftover corn. I was going to use the turkey stock I made on Friday but forgot to take it out of the freezer and since I still had gallons of chicken broth in my pantry I went the store-bought route on that instead. (Also store-bought crusts. I'm basically pasty-lazy.)

I don't own ramekins. They'd have made this so much easier. The crust is all ugly because the innards were spilling out all over the counter and I was trying to clamp it's escape route down, aesthetics be darned.  I'll also adjust the recipe next time and play more with seasonings. My nephew (who always knows just when to call and get invited over for dinner!) loved it. I thought it needed more something. Not sure what something yet. Just more of it. And, apparently, ramekins. But still, good way to clean out the fridge. No more Thanksgiving in the Kenmore!

And this is as close as I got to fabric tonight. One of the things I had taken from Mom's stash as we were cleaning out her studio after her passing was a full-size, Cotton Theory quilt kit from The Quilt Yard. Something like $140 worth of fabric. The pattern had gotten separated, although I have a vague tickling memory that I did eventually track it down and it's lurking in my pattern files somewhere. I had kept it together for nearly three years because I had originally thought, "Sure, I'll make that." That eventually morphed into, "Well, I don't think I'll make that, but Mom would probably have a fit if I separated everything," But I don't have much interest in doing a full-sized Cotton Theory quilt, so tonight I decided I really ought to break down the kit and let the fabric pieces go live with the rest of my fabric in one big happy family, rather than sequestered off in their own little gated (or tied-with-twine) community. Mom was all about family. She'd like to see her fabric making new friends. And by now, she's probably tapping her foot in mild annoyance and saying, "Oh, would you just get on with it already? Just use the dang fabric!"

Lots of fabric, by the way. More than I'd thought when it was all tightly folded and bound. Most of the ones on the upper left are 5/8 yard pieces, some a little bigger. Most of the near stack are a yard and more--one 2 1/2 yards. That one in the middle? Well, that's a wierd one. Something like 82" long by 22" wide. Basically, slightly over two yards of fabric, cut in half lengthwise. Maybe meant for borders? Not sure. Odd, but then, all families have that eccentric aunt or uncle. She fits right in.

There's something so very relaxing about folding fabric, isn't there? I love it.

I've got a fairly open weekend coming up, so I'll get back to my sewing machine then. Apparently after my super-productive mode of last weekend, I just needed a breather. So I spent an hour petting fabric. Mmm.

ABFSI Report--Anti-Black-Friday Sew-In

Got all my hexies cut...finally... (218 in total.)

Got my Christmas table runner done. 

(Well, technically, that project stretched into Saturday and Sunday but it all blurred together so I'm counting it as ABFSI.) This was the one that I started at my quilt retreat--just had to do the backing, quilt and bind it. This was a "Triangle Tablerunner" kit from Generations Quilt Shop in Pottstown, PA. It's almost 50" long, about 13" wide. I even remembered to put a little label in the corner--which will be handwritten with a sharpie where right now you can barely see my pencil markings. Nothing fancy there. The backing is something I inherited from my Mom--she'd have appreciated this particular use. Stitched in the ditch, no quilting on the border. Very, very basic. This is going to be a gift for a home with little tots so I wanted something sturdy and that wouldn't be fancy enough that it would break anyone's heart if something happens to it. A Very Practical Christmas. But aren't those pudgy birds with Santa hats just the cutest dang thing?

I was supposed to go somewhere Sunday afternoon and it got cancelled, so I made very good headway on my pinwheel wallhanging, too. It was a banner weekend for quiltmaking up in these parts!

Get 'er done...Niece's quilt on to the next steps

"Shadow Boxes" Full
I was able to get the top and the backing completed tonight--woohoo! Now I've just got to put in a call to My Fabulous Long-armer and see if I can drop it off tomorrow. The pattern is "Shadow Boxes" by Mary Danielson, #506 in the Five Yard Quilt collection from easyquilter.com. Fast pattern for a gift. The fabric is the Sausalito collection from P&B Textiles. I'll be talking about this project, the pattern, and the fabrics in my next episode--hopefully posting tomorrow...
"Shadow Boxes" Close

WIP: Niece's quilt (Take 2)

Got the center pieced yesterday (while my dogs were still in recovery mode and therefore leaving me very much alone). Today I just have to put a couple of borders on, then get the backing together so I can drop it off with the long-armer tomorrow.

Unfortunately, we've got high winds today which makes me really super-headachy (sinuses) so I'm seriously dragging. I'm doing a little self-care this morning in hopes that I can perk up this afternoon and get done what needs to get done.

In the realm of "what needs to get done" also lives grocery shopping for Thanksgiving dinner and posting a podcast episode. So here's hoping I can get a little more giddy-up in my get-along or whatever the appropriate phraseology would be!

Paint Chip Challenge...the story continues...

Kona Solids charm packs to the rescue! I ordered three charm packs of Kona Solids from Fat Quarter Shop: Brights, Pastels, and one in grays and blacks that I think was named "Silent Movie" or something like that. Even though I technically only needed three colors, I decided it wasn't such a bad idea to add some solid charms to my charm stash to help round out charm packs for projects. As I've talked about in past episodes, pre-cut packs are always way heavy in the mediums and struggle a bit with lights and darks; plus, solids in small pieces can sometimes provide a nice counterpart to a whole lot of pattern going on.

In any case, I matched my paint chips pretty dang closely, don't you think?

I also got another fabric to go with this too--but can't show a picture of it because it would completely give-away what my plans are for the challenge project. And I want to keep that a surprise...at least, until I know if I can actually pull it off!

By the way, don't forget to leave your own thoughts about what you'd make from these colors on the first post on this topic to have your name entered for a give-away. (Please do leave it on that first post--can't guarantee I'll catch your name for the drawing if you leave it on a different post!) Thanks to everyone who has already commented--I've really enjoyed reading them!

WIP: Niece's quilt


IMAG1042.jpg
Originally uploaded by sandyquiltz
A quick update on my goings-on, as I've been going-around. I was out of town for a few days again this week...last trip until February! Woohoo! But that meant I had to do a little radio silence again as I had very little Internet access while I was gone. I did manage to knock out some more blocks on my niece's Christmas quilt on Sunday afternoon, though, so here's a sneak preview of what we're aiming for.

I hope to get the center pieced tonight, and then borders on tomorrow, so I can get it to Andrea (my fabulous long-arm quilter) early next week.


What Would (a) Quilter Do?


Paint Chip Challenge Chips
Originally uploaded by sandyquiltz
My guild is doing another paint chip challenge--one of my faves! We draw three paint chips at random from a jar. We then have to use fabrics in those colors, add a black and a white, and make it work. We're not supposed to use fabrics that have any other colors in them--and no shades or tints. It has to be as close to that actual color as we can manage to get. I'm thinking it would be virtually impossible to avoid having any other colors at all in our projects unless we all only use solids--I'm trying to remember what I did last time we did this a few years back. However, our guild can be quite forgiving, shall we say. And there's really nothing at stake--it's just for fun. So although I'm interpreting it pretty darn closely (yes, I am using predominantly solids), I may veer just a hair off the path.

I know what I'm doing--I immediately saw it in my mind when I looked at these three colors in my hand. I just went online this morning and bought the fabric I'll be using; although I've got plenty of black and white in my stash, I didn't have anything distinctly any of these colors.

I'm curious: What would you do with these? What do they say to you? (Leave your own response by November 27th and I'll draw one lucky commenter's name for a fabricy gift! *Editor--I've extended the deadline a few days because of a glitch in my podcast that meant I couldn't give listeners as much lead-time as I'd like. So you have a few more days to respond!)

Yes, it's another WIP


IMAG1037.jpg
Originally uploaded by sandyquiltz
I just can't seem to stop myself. Yet another project in progress. This is the Sausalito line from P&B Textiles--very purdy. The quilt should come together pretty quickly...a girl can dream, anyway.

I'll keep you posted!

Working on this week's podcast episode--should go live tomorrow...

Hand-dyeing Fun

Like my last post, this one is also related to episode 66, "In Which We Go on Retreat," of my podcast series. In that episode I described the class we had in dyeing fabric. What a hoot!

The first example is my least favorite, which is why I'm starting out with it. Maybe seeing the others below will blank this one out of your memory.

That being said, parts of the stripes look like a reflection on a calm lake...so I can easily see some fussy-cut-utility here.


I heart this one. Blues, greens, and lots of white space.


My first attempt at the Shibori technique. (For a great blog post about Shibori, visit here.)

Didn't work so well because my fabric really wanted to come unwrapped when I scrunched it down the PVC pipe. I like the colors and it's still a very usable result, but I wanted a more distinct pattern...
...and so I tried it again. Got a much better pattern this time, but traded off the heavy orange at the end of the last one with a lot of white at the end of this one. This technique takes some practice.
I had no idea the blue was going to turn out this brilliant...and no, no photo-editing involved! The other color is raspberry, which also came out pretty intense, but I did dunk the hey out of it so I suppose it's no surprise. Digging the results.

I believe I just wadded this one up randomly and wrapped rubber bands around it at a variety of angles.

No idea how I did this. Wish I could remember because it's a look I'd love to replicate in other colors. It's a mix of teal and plum. (The center looks bright white in this picture--it's actually more of a very, very soft teal.)


And my other fave. Looks like a frosty windowpane, doesn't it? Super cool. Too bad I have no idea how I did that one either.

I had a blast dying fabric. So much so that I've promised myself I'm not going to buy any of the supplies to do more until I've used at least a few of these pieces in a project.

So I guess that means I have to get to work!

Retreat Progress


In episode 66, I give an overview of my quilt guild retreat a couple of weeks ago, with some product reviews and project updates. I promised pics...here they be!


One of the only two blocks I got done for the Jelly Roll Sampler quilt, "Tulip" block. (From Jelly Roll Sampler Quilts by Pam and Nicky Lintott. I think this is the Fig & Plum jelly roll by Fig Tree Quilts for Moda.)

Because of the way the dark strip gets cuts, some of the print makes certain pieces blend a lot with the background. Fussy-cutting isn't really an option when you're trying to stick with just using a single jelly roll with no additions for the project. Oh well. C'est la vie.


"Rocky Road" block (from same).
I really like the blue in this fabric line. Nice cross between beachy and cottage-y.

"Triangle Tablerunner" kit from Generations Quilt Shop.
(I talk about Generations in episode 64.)

Not hard to put together as long as (as they suggest) you keep track of where the straight-of-grain edge is on each of the triangles and make sure they're on the outside edge--keeps the strip a lot more stable. I like the red sashing.


Close-up of part of "Triangle Tablerunner" kit to show fabrics.

I'm bumming I can't see more of my fat little birdies with Santa caps. They're dang cute, aren't they?
...And finally, the "stack n' slash" using flannel fat quarters. I didn't do too much variation in this. When I've done others in the past, I've divided into two or three different piles so I'd have different looking blocks. Rotated throughout, in some cases it's hard to tell where the blocks are. In this, all the blocks are the same so there are definite visual lines.

But it's still a nice cuddle quilt for a rainy day.

Of course, now that I'm looking at it again, I'm seeing blocks I'd like to swap around. Random. Pshaw.

Stay tuned for another blog post in a couple of days with hand-dyed goodness!

Fabric Mysteriously Appearing on My Shelves

I have nothing to do with this...really...it just keeps showing up, somehow.

The first few pics are from my most recent purchase at The Quilter's Daughter during my quilt retreat weekend. (They don't have a website yet but this link gives you their info.)

Picked these out as rough coordinates but may not keep them together. A couple are from the "Swanky" line by Chez Moi for Moda. It's a couple of years old now so I couldn't find any good links to use--sorry! (Yellow dots is from Deb Strain's "LoveU" line for Moda. The green floral had no selvedge on it to label it.)
 General blender fat quarters. Always helpful!

 Another collection of bright, fun fat quarters. One of these (the trees) is from "Summer Song" by My Mind's Eye for Moda; the print with flowers and butterflies is from Deb Strain's "LoveU" line for Moda. Neither of the other two had selvedges so I can't identify them for you. Apologies!


This was my souvenir from Stitch, the fabric and yarn shop I found in Jordan, Ontario. I got two identical charm packs from the Modal "Little Apples" line, and then bought a half yard of the fantastic dog fabric--it coordinates with the Little Apples line but it's from a previous line. My family-of-birth raised English Springer Spaniels when I was growing up so these little spaniel-esque doggies are very nostalgic for me.
 And this grouping was my souvenir from Ye Olde Fabric Shoppe in Stratford, Ontario--I talked about that in episode 60. I love the fact that these are holiday fabrics without being overtly traditional Christmas colors of green and red. I put some green and red in there with the coordinates I chose, but they're still more muted than typical. And I love the neutrals and gray-blues.

I have more Christmas fabric than I know what to do with. Some year I'll just have to do a year-long holiday project challenge to clean out my collection!

UFO Finish! The "Cautionary Tale Quilt"

Yippee! It's finally done!

Actually, it's been done for a couple of weeks. I just finally have the time to sit down and blog about it. Doing lots of catch-up this week!

This is the "cautionary tale" quilt I talked about in episode 56 of my podcast, "Quilting...for the Rest of Us." (A lot of listeners shared their own cautionary tale quilt stories in episode 59 as well. Entertaining--be sure to check it out. And it's never too late to leave comments with your own cautionary tales!)

Due to the wonders of photo-editing you can't really see how completely out-of-square it is, although if you look closely you can figure it out. Do me a favor: Don't look closely.

Still, I love the fabric and the colors, and my niece will presumably love it as well. This is based--with the greatest apologies to--a Fons and Porter episode in which they did the "Flip-a-Coin" design. The issues are not with the design; the issues are completely the quiltmaker's. I'd put a link to it but you have to be a F&P member to see it anyway so, if you're a member, just search for "Flip-a-Coin" on their website.
Here's a close-up of the quilting detail. The quilting was done by Andrea Nardi of Olde Glory Quilting. She doesn't have a website, but if you live more or less in my area email me and I'll send you her contact info. She does pantograph (all-over) designs--no custom--but has a great eye for what patterns will enhance a quilt. Love her work!

Off to take advantage of an unscheduled afternoon and make more progress on other projects. Now that I'm done traveling for awhile, my blogging will resume it's usual much-more-regular schedule. I've missed y'all--glad to be back!

Lines in Quilts--Supplemental Post to Episode 63 of Quilting...for the Rest of Us

In this week's QFTRU podcast episode, Jaye and I spoke about line as a design element. These pictures of my mom's and my quilts will help illustrate some of the things we talked about it. (By the way, that's Jaye of artquiltmaker fame. The link takes you to her blog which has additional information on this topic.)

First is a picture of Mom's Irish Chain (actually, technically, a Triple Irish Chain, I believe, as it's three rows of squares in a column). Clearly the blocks themselves create strong lines here--including the darks and the mediums in the squares themselves creating several visual lines in tandem. This photo was evidently taken before it was finished--whatever quilting she ended up doing on it (I don't remember and one of my sisters has this quilt) would have created another set of lines that either emphasized or complemented the strong diagonals. Dig those crazy 80s colors.

Here is one of my early quilts, "Bugs in the Cabin." The basic log cabin is extremely versatile and a fantastic example of how blocks themselves create lines and understanding how those lines work are important in understanding design. Here I liked having the stair-step feel because this quilt was originally intended for a impending baby who would have been attracted by the repetition of high contrast. (This quilt was made using the Eleanor Burns quilt-in-a-day method, btw, one of my earliest quilts, probably circa 2000-ish. I later quilted it with invisible thread and made a huge mess and finally consigned it to the basement for my kids to use while watching TV. Too bad. It was a cute quilt. Said baby was probably about 6 or 7 years old by the time I finally sat down to try to fix my original mistakes and ultimately gave up. Fortunately, said baby's mother never knew I'd been working on a quilt and was quite happy with the set of onesies she got instead.)

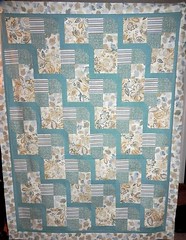
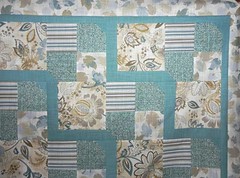
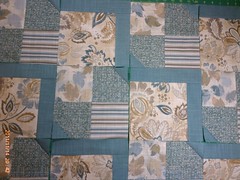
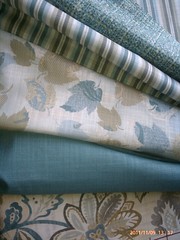
The log cabin block is one of my faves because of it's versatility. Here's another one I made a year or so after the one above--probably somewhere around 2002 or so.This one turned out much more nicely! Note that it's the same block as the image above. But a different setting creates an entirely different feel. In this case, you have a couple of different sets of lines--the light and dark "barn-raising" setting, plus the more zig-zaggy lines of the fabrics themselves: the heavy blue that appears as cross-shaped outlines, and the directional floral print also create lines of its own.

You can't see it in the picture but after consulting with Mom, she suggested that I could quilt each "log" down the center to make each individual piece of fabric look like two pieced together--very strongly emphasizing the lines of the blocks. And boy, did that make it look even more impressive! Loved that effect. Took for-freakin'-ever, but turned out nicely. This wasn't anyone's pattern--just a standard, traditional log cabin quilt I made for an extended family member. I miss it. Someday I'll make myself one with these exact colors, sigh.

Mom also made me a quilt with the log cabin that, using variable width and length "logs" (fabric strips) creates a circular line. Very cool. Unfortunately, I don't seem to have any pictures of it. I'll try to remember to take pics of that one later.

Back to Mom's quilts for an example of how line can become evident through settings. Here's a sampler quilt with sampler blocks alternated with an Irish Chain variant block to create strong diagonals.

I don't know anything about this quilt--found it after Mom had passed away. Has the look of a block-of-the-month to me, and it's clearly a more recent quilt based on the fabrics, but Mom wasn't particularly consistent about labeling. If anyone recognizes the pattern and can identify it for me, let me know! (I kept this one--it's so cheery!)

Here's another example out of Mom's lifetime compilation of quilt-work. I'm guessing 80s, again, based on colors and fabrics. No idea about the pattern or designer--anyone recognize it?

In any case, here the line is created by block, color, and quilting lines. Notice how the quilting lines in some places echo the general hexagonal shape of the overall design, whereas in other places it emphasizes the individual lines of the blocks themselves.

Keep this quilt in mind whenever we do start talking about balance. It's also a good example of radial symmetry. Gotta love a two-fer.


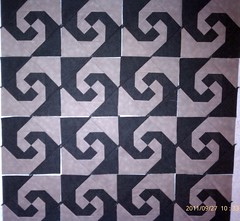
Now we're going to get even more funky. How many lines does this design have in it? And how many types of lines?

Lots of wonderful eye-travel going on in this one--your eye follows the diamond around the center and then swirls through the fan shapes that are both diagonal and curvy at the same time. Very cool.

Another of Mom's quilts--it had been completed except for the binding when she passed away (although I think the top was several years old at that point), so I finished off the binding. This became a wedding gift for a close family friend that Mom would have most certainly given a quilt to had she still been with us.

Again, no idea on pattern or designer. If someone recognizes it, let me know. (Mom did design some quilts herself but not usually in this style.)

Sorry about the bad picture--I think I might have taken this one on my cell phone. Mom did this one sometime in the late 90's, I think. Again, this is someone's pattern/design that I can't identify and (sigh) Mom didn't label it. Now you know why I'm such a label evangelist on my podcast.

Would you normally look at a design like this one and think "line?" Why or why not? What basic lines do you find here? How do the blocks work together to create those lines?

Does it help is allow your eyes to blur just a little bit so you're seeing shapes more than individual pieces? You'll get more of a sense of line  that way.

And finally, for a wild-and-crazy line. We're finishing with one of my favorite of Mom's quilts. And this one I can identify as a pattern by designer Karen K. Stone. I seriously dig it. It always reminds me of a story Mom told about another New York Beauty-esque quilt she'd made: Dad, who was normally extremely supportive of her quilting, had said he'd never sleep under that quilt because it looked "too sharp and pointy." So think about that design question next time you're making a quilt for a bed. Is it too sharp and pointy for comfortable snoozing? Tee hee.

In any case, what does this quilt tell you about line? (I did eventually get a binding on that one and it went to one of my very funky nieces.)

That's it for this week, podquilters! 


Snails Trail WIP


Snails Trail WIP
Originally uploaded by sandyquiltz
Had a marathon sewing session last night and got all the blocks pieced. Now I just have to square them up and get them put together. I think I will use this setting--I messed around with the other typical setting for snails trail blocks but I really sort of like the swirly nature of this one. The other one felt like it would compete too much with the applique.

Tonight I've got the first meeting of my quilt design study group--we're going to figure out our methods and meetings, to be very alliterative about the whole thing. I'm looking forward to it! I'll be talking more about that group in my podcast this week so stay posted.

And the answer is...Snail's Trail!


IMAG1010.jpg
Originally uploaded by sandyquiltz
I probably threw some of y'all off since I didn't exactly have things laid out where they'd eventually end up. Hard to do that when you only have half the pieces.

I've always wanted to make one of these blocks. Not quite sure what the allure is for me. It's just so charming. Or a little yiccky, if you allow yourself to imagine what it's actually named after. But I used to keep little snail "farms" in bowls over the summer when I was little, so maybe there's a nostalgia factor at work.

Not sure I'll end up with any time to start sewing tomorrow--packed day. Sunday looks a little better for progress on this front. I guess you could say I'm working at a (wait for it...) snail's pace, guffaw.

I can't get the lighting quite right--this is taupe and black, not taupe and green as it sort of looks in this pic. "But I thought it was a warm color challenge, Sandy?" Hold your horses, sister. It's coming!

This is actually a little higher contrast than I'd been picturing when I did the original design in EQ but it should still work. Could also turn out to be a hot mess. This is the stage at which I always start doubting myself. But I've learned that's just part of the process. I'll get over myself soon enough.

DD made her first solo trip home today from college for a weekend visit--something around 4 hours by herself involving expressways and thruways and tollbooths. I tried to busy myself with other things so I wouldn't keep imagining the burning heap of rubble at the side of the road. She made it safely as I really knew she would when my Catastrophic Thinker Brain wasn't taking over, and we saw her all of about two hours before she was back out the door again to hang with her local buds. Yep, she's a college girl for sure now!