
(Looking for the 2014 Quilty Resolutions Check-in Giveaway and Linky Party? It ends at midnight Saturday! Click here. Meanwhile...)
Kati and I both got one another's postcards, so I can now do "the big reveal" blog post!
Kati of Kati's Quilting and Sewing (and one of my #twilter peeps!) and I were partnered up by Sandi of Quilt Cabana Patterns for Sandi's Spring Postcard Swap. I love doing these postcards! It's a great, bite-sized way to try out new techniques, play with design principles or color combinations, and just all around have a good time.

Here's the postcard Kati sent me--a much-needed glimpse of spring while it was still snowing outside (despite the calendar).
It's wonderful! I love the colors she used, the shape of the tulips and the leaves, and the stitching designs. I especially like how the leaves look like they're jumping right up off the postcard. They're so happy!
Thanks so much, Kati! It's still sitting on my desk, reminding me that yes, spring WILL come eventually!

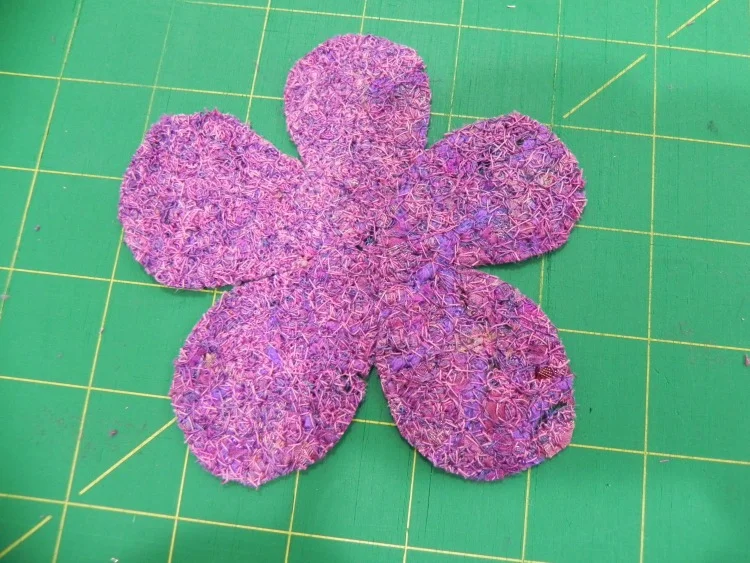
And here's the postcard I sent Kati.
I was double-dipping and used the postcard as homework for my design study group. We were supposed to do something using a triadic color scheme, so I chose purple, orange, and green. I made the "binding" by fusing narrow strips of one of my hand-dyed fabrics down, intentionally cutting it so I'd get the gradation of color along the edges.
I would've been happier if I'd used a brighter white background, I think. The cream color sort of tones everything down more than I'd like. Overall, though, I was pleased with the results. I mailed it in an envelope, though, as I wasn't sure the thread fabric would survive if I didn't!

Here's a detail shot--I was trying to catch the light so you could see the sparkles in the orange center. That's caused by the Angelina fibers I included in the thread fabric.
You can also sort of see that I did a running stitch a little in from the edge of the thread fabrics to tack it down securely but allow for some fringing on the outside all the way around.
I got to play with a couple of techniques on this.

The background and leaves were basically crumb blocks I made using random pieces of fabric--no foundation. I just started stitching stuff together until I made something big enough that I could then use to cut my shapes/background from. It's an age-old method, though I used Victoria Findlay Wolfe's 15 Minutes of Play book for inspiration. I've not done it before, though, so it was fun to mess with!
The petals and center are made from "fabric" I created using thread and water-soluble stabilizer. I did this technique once a year or more ago as a test project. This time, I wanted to see what would happen if I created a larger piece to cut into shapes. It worked great, though you need to use it for something you really want fuzzy edges on.
I've showed this to a couple of people and they wanted to learn how to do it, so I'm including a tutorial here. I didn't make this up myself, but have seen the technique in so many places now I honestly can't remember where I saw it first, and I just do it off the top of my head with no reference to specific instructions anywhere. So don't give me credit for the technique...just for this particular explanation of it!
I didn't remember to take pictures of each step, so I've added the pictures I did remember to take here and there; sometimes they relate to the step, sometimes they're just so you can see a little detail here and there. I'm also posting them slightly higher res than usual so you may be able to click in closer to see the detail of the thread fabric.
Thread Fabric Tutorial
To do this, you need:

- Water soluble stabilizer. There are several options for this type of stabilizer; yours may not look like mine as mine's quite old at this point (Sulky brand, inherited from Mom, probably at least 5-7 years old or more). You just need a stabilizer that dissolves in water, regardless of brand or appearance.
- An embroidery hoop that will easily fit within the throat space of your sewing machine, and is narrow enough to be able to fit under the presser foot. (Mine's an 8" diameter plastic cheapo-model; works great for this!)
- Thread in the color of your choice to use for anchoring everything down (variegated is very nice; type of thread doesn't really matter much--whatever works best for you in free motion quilting);
- Scraps of yarn, funky thread, cording, tiny scraps of fabric, Angelina fibers, or other textiles to create the fabric. Avoid anything too nubby as it might rip the stabilizer while you're working.
- A bowl of water or a sink, and a drop or two of fabric softener (optional)
A note about color choice: Use whatever you want--the funkier the better! Make sure you've got at least some color variation for interest, but also keep in mind that the more you stitch, the more the colors of textiles will get blended into your stitching thread. On my orange piece, I went back in with a different variegated thread at the end because it had blended too much and didn't have quite enough color variation for my taste. That's the beauty of this technique, though--you can keep stitching away until you're happy with the results!
The Play-by-Play
1. Cut two pieces of water soluble stabilizer approximately the same size, a few inches larger than you want your finished piece to be.
2. Lay one piece inside one half of your embroidery hoop. (It's easier to do this now than move it into the hoop later when it's covered in scraps!) Make sure enough extends outside the hoop that it holds firm when the hoop is assembled. Press the stabilizer down so it's sitting on the table surface, and squish the sides over the sides of the hoop as much as possible--the less the scraps get shaken around later when you put the hoop together, the better.
3. Randomly spread your scraps of textiles, fibers, and so forth, on the stabilizer within the space of the embroidery hoop. Be sure to leave enough margin around the edge that you'll be able to get your sewing machine presser foot as far to the edges of your scrap pile as possible. You can pile scraps on top of each other, but try to keep the level of the pile fairly even all the way across. The thicker/more evenly spread your pile, the more opaque your thread fabric will be; a looser, more spread out pile will give a lacier effect. You don't have to be exact about it, but it helps in the stitching if things are pretty even. Higher spots can catch the presser foot and cause problems. If you have a longer length of yarn, loop it around on itself a bit to create interesting designs. Adding some Angelina fibers can create fun sparkle. Cut loose and play with what you can throw in there!

4. When you're satisfied with your collection, lay the other piece of stabilizer on top of it and secure it in the embroidery hoop. Note: Have it so that the stabilizer lays flat on the surface when it's in the hoop, not raised from the surface. In other words, it should be the reverse of what you'd normally do if you were embroidering by hand. Does that make sense? (You should be able to see that in the picture here.)
5. Now comes the really fun part! With a great thread in your machine, and your machine set up for free motion quilting, slide that puppy under your needle and go to town! Stipple, loop-de-loop, jiggidy-jaggedy...just make sure you've stitched enough to secure all those little bits and scraps down. As mentioned above in the "piling your thread" section, stitching more densely makes a more opaque thread fabric, stitching more spaced apart makes a lacier effect. Just make sure you stitch enough that the fabric actually holds together when the stabilizer is removed.
What's even better? Tension doesn't matter! If you see skipped stitches or "eyelashes" on the back, who cares? You're creating fabric! Thread nests can be easily disguised simply by stitching over them again--they become part of the texture of the fabric. (Ahem. Ask me how I know.)
The only problem that can occur in this step is if your stabilizer tears apart while you're stitching. (Again. Ahem. I know these things because....) This can happen if your pile is uneven or you have a textile that's too nubby, as mentioned above. Dull needles may also cause it. Small rips--just back up, and stitch over it to make sure the thread fabric is intact. Big rips, carefully dismantle the hoop and lay a third piece of stabilizer over the top, then start stitching again.

6. When you're happy with where you're at, take a deep breath, grin, then pop that sucker out of the embroidery hoop. If you want to avoid too much extra goop having to dissolve, you can trim off any excess stabilizer as I did in the picture here, but it's not necessary. Soak your thread fabric in a bowl of warm water to dissolve the stabilizer, or follow the directions on the package. I found it helpful to soak it for awhile, then rinse it under running water and rub it gently in my fingers, and then soak it again. I think I did this maybe three times over the course of a couple of TV shows that evening. In the last soak, I added a couple of drops of fabric softener--it helps release the last of the stabilizer and make a more pliable thread fabric.
I don't know exactly how long it takes to dry, since it was a full day before I had time to get back to it again, but I'd allow a few hours to be on the safe side. You can always hit it with a blow dryer as well, depending on what fibers you used.
Use good fabric scissors to cut it into shapes if desired. In fact, if you can, try to use really, really good applique scissors--the kind with the little grippy teeth work great to slice right through the variety of textiles without shredding. Again, I just used a straight-stitch about 1/8" in from the edge all around to stitch mine down, but you can attach it by hand, or tacking it in a few places--all depends on the effect you want in the end.
This is a super-super fun technique. I've gotten in the habit of saving all the raveled threads off the edges of my newly-washed hand-dyes for future use as thread fabric!
So, gonna try it? Huh? Huh?