Staycation Day 1 & Online QuiltFest Class 1

Today is my first day of my “staycation”—today, tomorrow, and all next week. I did have to put in a couple of hours work today and I’ll likely have to put in maybe an hour tomorrow with things I just couldn’t get finished up and am waiting on other people in order to get them squared away, but it is what it is.

I way overslept this morning as I had a slew of Zoom calls yesterday and a webinar in the evening, and was just fried. It’s okay to sleep in on a vacation day but I felt like I lost the whole morning as it took me awhile to get myself actually feeling awake. So the morning was mostly reading blogs, news, social media, and such.

By the way, Have you heard of the app Serial Reader? You choose the book you want to read and it gives it to you in daily 15-minute-reading increments. It’s got a bunch of the classics. I’m reading The Narrative of Sojourner Truth. I really like doing it in these short snippets because her writing style is, obviously, an older one and not always easy to get through. I think if I sat down and started it as a book, I’d get partway through and feel overwhelmed. But knowing I just have a few pages to get through makes it easy. It’s a really good book!


Getting ready for class

Getting ready for class

The main focus of my first day of vacation, however, was my first class of the Online Quilt Festival. I took “Not So Boring Stippling” with Julia Quiltoff, a three-hour class to help inspire us with all sorts of ways to do more interesting stippling designs.

The instructions were to log in at 11:30a (the class started at noon) so that she could check to make sure everyone’s audio and video were working. Since I’m a Zoom Maven, I was able to just say “yep” and “yep” and then I turned my video and audio off and proceeded to straighten up my sewing area while other folks were doing the usual, “Can you hear me? Can you hear me? What mute button?” or being really chatty (which I still wasn’t feeling awake enough to do).

Here’s a quibble for me, though: The teacher never took the time to walk people through the basics of using Zoom—mute yourself, use the chat room, pin the video. Turns out, partway through the class, the third time she froze and had to log out and back in again, this was the first time she’d used Zoom herself. She had used other platforms so clearly assumed it would be close enough. I wish she’d taken a little time to familiarize herself a bit more. I ended up being the Zoom Tipmaster for the class in the chat box. Don’t get me wrong—I certainly understand participants who may not have been comfortable with it (although please, people, look it up before you try to log in for the first time!). But for the teacher to not take the time to walk people through the basics? It just wasted a lot of time later in the class. And it felt WAY too much like a regular work day for me again rather than a fun vacation-day-quilt-class. But I got over myself.

(Really fun side note: Guess who was another student? Pokey Bolton! I private messaged her that I had her books and was happy she was in the class, which she appreciated. Julia Quiltoff clearly had no clue who she was so I wanted to let Pokey know that she was recognized!)


Julia demonstrating tips for better pearls

Julia demonstrating tips for better pearls

Julia started out by saying she was cramming a 10-hour class into our 3 hours so we should get ready for an intense class. It actually wasn’t that bad, although by Hour 2 I was having problems staying engaged. She went through five “tricks” for creating more complex designs at top speed, drawing everything out in a notebook. I was also drawing things out in my sketchpad along with her, but by Trick 4 it was pretty easy to figure out what the variation would be. I’m guessing in her 10-hour version, you do a lot of actual machine practice with each section so it breaks it up more.

Somewhere in Hour 2 she asked one of the participants to demonstrate a problem the participant had asked about. Said participant then took a good 5 minutes to get herself set up with her phone camera aimed at her sewing machine needle (including having to call someone in from another room to hold the phone), then sewed for a few minutes, and then the two of them talked it through. That’s exactly what classes are for, of course, but in a normal class, she’d have been standing with that student at a sewing machine while the rest of us were working away on whatever we were working away on. It was just really annoying to have to sit there and wait while everything got set up and such. I know. I sound like a crankbucket. I just spend WAY WAY WAY too much time on Zoom to have patience anymore.

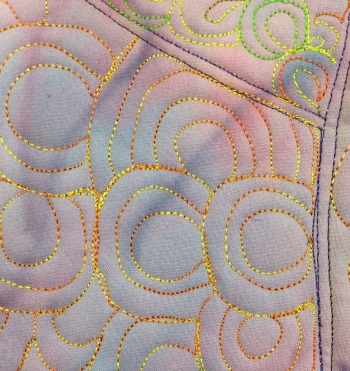
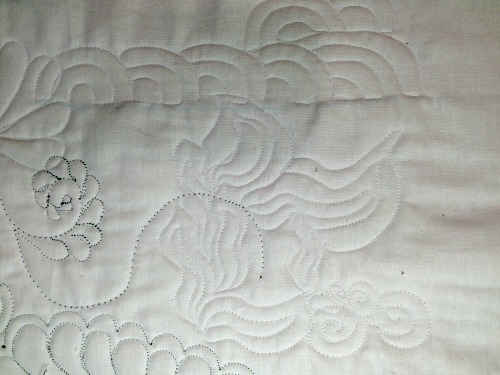
So I turned on my sewing machine, grabbed some quilt sandwiches I made several years ago for practice (and then quickly stopped quilting at all, so I’ve still got quite a stash!), and with my video and audio still muted, just took the next half hour or so to practice myself.

Yikes.

IMG_0781.JPEG

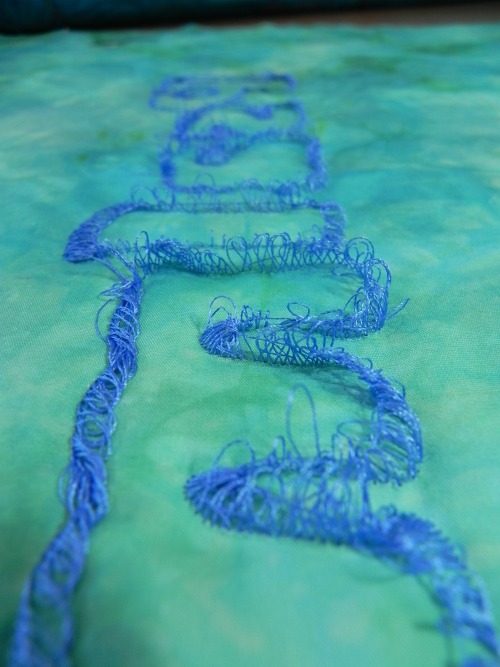
It’s really not just like riding a bike. I was never a fantastic FMQer but I’d at least reached “Confident Beginner” stage, if not dabbling my toes into intermediate. I actually had gotten some decent feathers going on occasion. Today? Not so much.

One thing I did remind myself of, though. I had learned, back when I was doing this FMQ thing more regularly, that my drawing skills had nothing to do with my FMQ skills. I can’t draw worth a lick. But when I take a hen-scratch design from my sketchbook and did it as FMQ, I often had far better results.

Not today, of course. But there’s still a whole lotta rust on this girl from lack of use. I’ll get there again.

So, I think I’d give the class—in this online format—an overall grade of a B-. I got good ideas, but I could’ve gotten them in a shorter amount of time with a book and without the frustration of technological issues. That being said, I did like Julia Quiltoff quite a bit—she’s got great personality and clearly knows her stuff. I’d take an in-person class with her anytime. Some classes just translate better to an online format than others. She is sending us memory sticks with her full 10 hour class on them so that will help me feel like I got my money’s worth.

Now it’s time to do as much cutting as I can get done for tomorrow’s class on the curved log cabin. I’m really looking forward to that one—it’ll be good to have a project with progress to measure during the class!

Product Review: Janome Free Motion Couching Foot

Recently I read an article from Quilting Arts Magazine when I was in a bit of a weak spot, I suppose, and I immediately bit and ordered the foot it spoke of, without reading any reviews of the foot first. Fortunately, I wasn't overly disappointed--I think I've probably used enough of these tools now to know none of them is perfect. The product in question is a free motion couching foot for Janome machines*. Couching is when you hold one larger cord or yarn down on fabric by crossing back and forth over it with a smaller thread--you can do it by hand, of course, or you can do it with a sewing machine by using a zig-zag stitch. I've done it by machine a handful of times; it works okay, but it's hard to do tight or really smooth curves by the standard methods. I thought this FMQ couching foot may be the answer. 

It is, partly. I give it maybe a 6 out of 10--possibly a 7 if I have more practice with it.

I talked about this foot on my podcast episode this week, so here are the photos that may help illustrate some of the drawbacks I talked about.

It comes with two sizes of feet in the package; one with a slightly larger hole and one slightly smaller. It would probably take some trial and error to figure out which foot you need for the yarn/cording you're trying to use.

Here's how you thread it--it was a little tricky to get the yarn up and over from the back of the foot. It involved lots of bending over and squinting, but I persevered.

You have to pay attention to the settings the package tells you to use for your needle. I broke my first needle. Oops. There's a very tight little hole for that needle to zig-zag over the couched thread so you've got to make sure the zig-zag settings are correct. 

The package suggests to allow the cording/yarn that you're couching to "pool" behind the foot. Believe them. It really needs a lot of slack to work right--every time it used up the pool and started feeding right off the little ball of yarn I had, it would start skipping stitches and missing the yarn altogether. This might be tricky if you were couching on a larger project that would limit the amount of space you have for pooling the yarn; I was just doing a small test piece so I didn't have any problem.


As long as you move slowly and work with the limitations, it does actually work. Here's some of what I was able to do. This is all free-hand; I didn't sketch anything out ahead so I was truly, truly free-motioning. 

Normally I'd probably use an invisible or matching thread so the thread wouldn't be visible; I used a beige thread because that's what happened to be in my machine at the time, and this was just a test. Plus, I thought it might be helpful to be able to see the stitches. (The metallic thread you see sticking out is actually part of the yarn.) 

The stitch tended to shred this particular yarn--it would work better with a tighter ply, or a cording. Still, this sort of "foamy" look could be cool if that's what you're going for. Just test any cording you're planning to couch with this foot first to make sure you're getting the results you expect.

The foot works remarkably well, really, given that the concept of couching and the concept of free motion quilting are sort of counter to one another. The only consistent time I had problems (other than when the yarn wasn't pooled loosely enough behind the foot) was when I moved left to right. It missed the yarn just about every time. That's where I'd have to do more experimenting to see if I could figure out a way to counterbalance that.

Anyway, using the free motion couching foot worked better than doing the same thing with a regular foot. It still has weaknesses, but with what I'm doing, they probably aren't huge weaknesses. The long and short of it is, I'm glad I got this foot; I think it'll be fun to play with in the future.

*There are also FMQ couching feet for other brands of machines. Just Google!

Craftsy Class Review: Small Changes, Big Variety with Angela Walters

Craftsy

I'm celebrating Valentine's Day weekend by writing up another Craftsy class review!

Yep, another free motion quilting class. At this point I'm just looking for inspiration for designs. And this class was chock-full of that! So, here's my review for Machine Quilting: Small Changes, Big Variety, with Angela Walters.

Do I have to say again that Angela Walters is an enjoyable teacher to watch? I've lost track of how many of her classes I've reviewed on this blog now. And although I've done several of her classes and own several of her books, I have to give her props for not noticeably repeating herself. This class really felt like all new material. Sure, I'd already done spirals before, for example, but getting a few ideas for how to change it up to look like an entirely different design was very helpful.

As always happens with every FMQ class I take, just watching the teacher do the design helps me grasp more easily how to travel from one section to another, how to work my way back out of the corners I almost inevitably end up in, and how to ignore the couple of bobbles here and there and simply drive on. After all, as Angela Walters continually points out, for the most part I'd be using a thread that blends and those little bobbles would be completely unnoticeable. 

I decided to practice some of the designs on a practice quilt sandwich, but to make it interesting for myself I used one of my [less favored] hand-dyes to make the sandwich and then played with a lot of my funkier threads while I was quilting. I intentionally used contrasting thread so I could see what I was doing, so it's clear where my brain and hands periodically refused to play nicely together. But still n' all, I can definitely see the improvement in my FMQ skills after a full year of so many classes and practice. And that's nice. 

In any case, this class is just jam-packed with designs. Packed. I think I counted up something like 32 total designs, and that's just to get you started. Once you see her suggestions for variations it gets your mind running with "What ifs". 

Detail of practice 

Detail of practice 

If you've never free-motion quilted before, you'll need to start somewhere else because she really doesn't spend any time teaching about how to set up your machine, basting, tensions, threads, or any of that. But if you at least know the basics, you'll have no problem doing this class. Each lesson goes from a fairly simple version of the design to increasingly more complex variations. 

The Basics

  • 7 lessons. The 1st is a short introduction; the rest range from 19-27 minutes long.
  • The main designs include pebbles, swirls, ribbon candy, feathers, squares, and clamshells. For each design, she gives between four and six variations, plus ideas for additional variations you can try. 
  • The downloadable class materials are set up like her Free-Motion Quilting Workbook, with a drawing of all of the designs, each with a blank box next to it for you to do your own practice drawing before trying to stitch it on the machine. Although part of me struggled a bit with printing off so much blank space, I have to admit it was useful having the reference drawing directly next to the space I was drawing in rather than on a computer screen or something where I'm bouncing my eyes back and forth.

So, all in all, two thumbs way up for Machine Quilting: Small Changes, Big Variety, with Angela Walters.. I got a lot out of it, I'm still practicing some of the designs, and I'm brewing ideas for some of them on current projects.

By the way, it's on sale this weekend, too! Just click any of the Craftsy links on this blog and it'll take you to the sale.

(Using Craftsy and Amazon links on this post helps support this podcast and blog. Thanks so much!)


Craftsy Class Review: Free Motion Quilting A Sampler with Leah Day

(If you're looking for the 2015 Quilty Resolution Challenge, click here.)

Craftsy

True Confessions: I started "working" on this class a long, long time ago. At that stage, working on it meant watching the lessons and not much more. But when it came up in my queue again, I decided this time around I really needed to make some decisions about how I was going to approach Leah Day's Free Motion Quilting a Sampler class. 

I'd already decided I didn't want to make the sampler, nor did I want to purchase the pre-printed sampler panel available through Spoonflower for this class. Kudos to Leah, though, for making that an option! I did consider it, as it would've been an easy way for me to really practice all her designs in the way she guides them during the class. So I give her two thumbs up for having made that available. Woo! Options!

Ultimately, I decided I'd just watch through all the lessons again, choose a few designs I particularly liked to practice, and then put one or more into action on a current project. The main thing I can definitely say for this class: There is a boatload of quilting designs here!

For those of you who are already familiar withLeah Day, this won't come as a surprise: This is probably the most content-rich class I've taken from Craftsy to date. You'll see in The Basics (below) the sheer volume based on number and length of lessons. In fact, that's part of why it took me so long to get through the class--it felt a little overwhelming when I was over my head in life this past fall. Some lessons took me two or three tries to get through, and that was just watching the lessons, not even doing the project! After I got back from my trip and had some time over the holidays, though, I was finally able to finish watching all the lessons and do some practicing on quilt sandwiches. I still haven't used a design in a project, but that's just because I'm dithering between two or three of the designs from the class for the project I'm working on. When I finally beat this cold that's laid me out this week, I'll make myself decide on a design and just knock it out. 

Practicing designs from Leah's class (one feather is from previous practice--the rest are based on her class)

Practicing designs from Leah's class (one feather is from previous practice--the rest are based on her class)

This class is excellent for beginners who have never done any machine quilting before. She starts from the very beginning (as the song goes), and talks about prepping your quilt for quilting--starching, pressing, backing, batting, basting...41 minutes' worth of how to get your quilt ready. 

If you've been quilting for awhile, it's still definitely worth watching this lesson. Her method for basting (especially for securing the quilt to the surface while you're basting it) is very different from other methods I've seen. You might pick up some good ideas for your own setting.

Then she spends over half an hour in the next lesson talking about supplies, FMQ feet, how to modify a foot if you need to, machine settings, and the basics of the quilting process itself. 

The next 8 lessons are all different types of designs, from stitching in the ditch, to all-over designs and fillers, to motifs. Tons and tons and tons of designs. And tons. Each lesson has several designs within it. Did I say it? Tons. And the class materials include drawings of each design with little arrows to help you remember the best way to execute the design (and leaving yourself an escape route). 

More practice on the back of a previously-used quilt sandwich--green thread showing is from the other side of old practice. All designs in white are new from Leah's class.

More practice on the back of a previously-used quilt sandwich--green thread showing is from the other side of old practice. All designs in white are new from Leah's class.

The last two lessons are borders and binding, with the addition of how to do a sampler as a "quilt as you go" quilt, quilting one block at a time and then attaching them together at the end. 

She has a unique element in this class: In one of the early lessons, she brings in Sadie, who has never free motion quilted before. While Sadie is doing some stitching, Leah is talking about how hard we all are on ourselves. She then examines Sadie's results and talks about how normal they are, first of all, but then gives her some tips about how to improve. If I'd seen this back when I was first starting to FMQ, I'd have found it very empowering. It took me a long time to realize that I was actually doing not-half-bad.

This is a really, really full class. You definitely get your money's worth here, no matter what price you end up paying for it. Leah Day as a teacher is very easy to watch--she's very good at explaining what she's doing, she includes information about what to do when things go wrong, and she doesn't have any particular mannerisms that start wearing on you after watching her for several hours on end. Which is good, because this class is several hours! I still enjoy Leah just as much after finishing this class as I did when I was watching her 365 project on YouTube (the designs are now available in a book). 

The Basics

  • 13 lessons, ranging from 10 minutes (the introduction) to 92 minutes--yes, that's right, one lesson is an hour and a half long. Most fall in the 45 minute-ish range. 
  • Lesson 1 is the introduction to Leah Day and the Craftsy platform. Lesson 2 is all about basting (see above). Lesson 3 is Basics and Supplies--I picked up some good tips here. Lesson 4 talks about stitching in the ditch--which she's an advocate of doing before you do anything else. She does address in later lessons how you may be able to sometimes incorporate the ditching at the same time as you're doing other designs, but for the most part, she does it first, and then does whatever else she's going to do.
  • Lessons 5-11 are all the different designs and, again, a ton of them. There are plenty of options here. 
  • Lesson 12 is finishing (borders)--including another design thrown in here for kicks n' giggles, plus trimming and squaring up.
  • Lesson 13 is binding, using a quilt-as-you-go method or traditional. However, she mostly addresses the quilt-as-you-go method here. 

I give Leah Day's Free Motion Quilting a Sampler two thumbs up although, as I said at the beginning, there were times it felt overwhelming. I'd almost have preferred two shorter classes from her. To a degree, it felt like she wanted to cram everything she could into the one class she thought she'd ever do on Craftsy. But, either way, I was able to practice several designs I'd not practiced before, and I've got some good ideas for projects I need to finish. So, yay!

(As usual: Using Craftsy links in this post helps support this podcast and blog. Thank you so much!)


Gift Project Complete

A friend commissioned me to make a gift for her daughter who graduated from high school a few weeks ago. Yes, "graduate-d." I missed the deadline a bit. But still, she hasn't started college yet so it's still good. Isn't that in the etiquette books somewhere?

In any case, it took me a long time to decide what to do. When I'd asked my friend whether she wanted me to hand-dye something or quilt something, she said, "Whatever you want to do!" So, as it turned out, I did both. This projects is done on my hand-dyed fabrics, and its quilted. To within an inch of its life, actually.

I decided to do a word quilt. I chose a Scripture that felt to me like it fit her daughter, who is a tremendous vocalist, planning on continuing music in college, and whose faith is very central to her life. Since I didn't have it in me to do a lot of words, I just cited the verse. I thought it might be a little intuitive, anyway, since it'll make people have to go look it up. I'm a teacher at heart, I guess. That's my story and I'm sticking to it.

I started out by using a new product: Sticky Fabri-Solvy.

I. Love. This. Stuff.

This photo is from my test sample--I kicked up the contrast in the photo so you could see it well enough. You can run Sticky Fabri-Solvy right through your printer. So after I designed my lettering in some software or another, I just printed it right off on the stabilizer. I didn't have to reverse it or anything, because it has a paper backing that I peeled off and it adhered to the right side of my fabric. I then stitched around the design, and soaked  the stabilizer off the fabric. Easy Peasy.

I decided to do it that way after my chalk-stencil method was a big fat fail (the chalk wouldn't stay in place long enough for serious stitching); and this was just so much faster. And, to be honest, I wanted to play with the stabilizer to see how it worked. The test sample worked beautifully, so I went right to work on the real thing. After I soaked the stabilizer off, I put my quilt sandwich together and then just outline-stitched the lettering again. That also gave the letters two thicknesses of thread/outline, which helped set it off even more.

I did have a bit of a glitch at that point.

I'd practiced on a test sandwich to set my tension and everything--it was all working beautifully.

I started stitching away on the real thing and it all felt like it was going swimmingly. I'd flipped up the back and checked after the first half inch of stitches or so, and it looked fine.

I should've paid more attention to how the bobbin was sounding. Something got unhooked somewhere and chaos was breaking loose on the back. I didn't see it until I came to the end of the word. Out came my new electric seam ripper. And then the Havel. And then my traditional seam ripper. Eventually, between the three of them, I did get it all undone. (Each seam ripper has its special gifts!)

That being said, that was really the only major snafu in the whole project. Everything else went pretty well, given how many new-to-me techniques I was throwing in this thing.

Free-motion feathers, using techniques I learned from Ann Petersen.

Background quilting circles and straight lines--the straight lines particularly being a design thought I got from Cindy Needham.

Shiva Paint stick highlights--it's been awhile since I got to play with my paint sticks and I haven't used them on a quilt like this ever.

Metallic thread--which I haven't used in probably over 10 years.

And bling. I've never blinged before. What a hoot.

And so...the end result. (Drum roll please.....)

Psalm 98 quilt complete. Approx 14'x16".

Psalm 98 quilt complete. Approx 14'x16".

And, because it's hard to see the sparkle in that lighting...

(Actually, the picture above is also the result of what I've been learning in my Craftsy photography class. To try to get the sparkle to show, I worked with some settings I recently learned that I have on this camera. But more about that class in a different blog post.)

Can you see the metallic thread outlining the feathers in this picture?

It's subtle, but it's there.

I'll probably talk more about this in my podcast episode this week (which, as of this writing, hasn't been recorded yet). I'll talk about using that metallic thread, especially, and some other slight hiccups along the way, and what I did about them.

So, there it is. Of course, as I look at it, I see all the things I'd have liked to have done better. But it's done, and it's not bad, and I think both the mom and daughter will enjoy it. And I had fun doing new stuff. Though, admittedly, it'll be awhile before I'm ready to sit down and stitch little bitty circles and very-close-together lines again.


Machine Quilting with Wendy Butler Berns (Craftsy class done!)

I've already reviewed this class in my podcast, but just to make it official for my 2014 Quilty Resolutions, I now consider myself to have completed Machine Quilting with Wendy Butler Berns.

I really enjoyed this class. Well, to be fair, I enjoy Wendy Butler Berns in general, which is a good thing because I own every one of her Craftsy classes. In any case, her style is very laid back, and she gives great tips and demonstrations. The class includes several designs, starting with simpler ones and building up to slightly more complex (although none of them are overly challenging); it also has lessons devoted to information about needles and threads, ideas for whole-cloth quilting, and troubleshooting. You won't get formal designs needing stencils or measuring or math here--it's very free-flowing and organic, the kind of thing you can (once you get the hang of it) just start rockin'-n-rollin' and having a ball.

I'm not new to free motion quilting (FMQ). I've been poking away at it for years--including having watched all the lessons in Wendy's class when I first bought it maybe 18 months ago. The difference is, this time I actually practiced what she was teaching!

WBBsketchbook.jpg

I watched every lesson with a sketchbook in my hand. As she was describing each design, I'd sketch it out several times in pencil, and sometimes play around with different sizes, variations on the design, and how to tweak the designs into smaller filler designs.

When the lesson was complete (or as soon as I could manage to get to my sewing machine), I'd set my phone timer for 15 minutes and spend 15 minutes--or more, if I was really getting into it and had the time--to practice the designs from that lesson. Some designs came relatively easily as they were similar to things I'd done in the past. Some were trickier. Depending on the design, as is common, I often do better going in one direction than the other, and it's never the same direction from one design to the next! I've learned that half the battle is figuring out what direction you most naturally move in order to make the design work best. Sketching it out first does help, although in a limited way--it's a very different motion to move fabric under the needle. Still, every little bit of practice helps, be it with a pencil or fabric.

WBBFMQpractice.jpg

I'm very pleased to see that the back of my FMQ has improved tremendously over the years--nary an eyelash in sight! On the front, my stitches are generally pretty even*. I seem to have the rhythm between needle speed and hand speed mostly down now. I still have some work to do on hand-eye coordination and actually ending up where I'm aiming, but that's something only practice will help. If I were doing these designs right now on a real-live quilt with blending thread, most of them would actually look pretty decent from a galloping horse.

This consistent practice also gave me the chance to compare my open-toed FMQ foot with my closed, specialty FMQ foot and FMQ bobbin case made for my machine (Janome 6600) and sold as a set, I believe. I've owned that bobbin case and foot for a couple of years, purchased based on a recommendation on someone's blog or something along the way. I've discovered I really don't like it. The bobbin was spinning too fast or something and I kept ending up with thread knots on the top--you can sort of see them in the feathers at the bottom of the sample. Once I switched back to my normal bobbin case and open-toed foot, no more thread knots. So that's good knowledge, too.

FMQcolorsketch.jpg

Just for kicks n' giggles, I was also practicing the designs with colored pencil while watching TV at night. Those bubbles are now completely filled in and I'm playing with other filler designs in other parts.


I'm going to consider this class complete although it's a hard class to determine when you've actually "finished," as it has no project involved. But I will continue to practice the designs during my 15-minutes a day, and they're in my toolkit for future reference. I've got a couple of projects in the works in which I could easily imagine doing one of the designs from this class.

I highly recommend this class, especially if you are brand-spanking-new to machine quilting or free motion quilting. It's a great way to introduce yourself to a variety of designs and ideas.

Full disclosure: If you use this link to purchase the class, you will help support this podcast and blog. Still n' all, my review is honest-n-true; I'm not saying good things just to encourage people to use the link. If you're a podcast listener, you'll have heard past reviews of other things about which I'm not quite so positive!