

Oops. I wanted to get this review done in April. When did it suddenly become May? I think when part of April suddenly became winter again it threw my whole sense of the calendar off.
If you've been listening to my podcast or following my blog at all in the last few weeks, you'll know that I've just completed a Craftsy class that probably had just as much impact upon me as Jane Dunnewold's The Art of Cloth Dyeing did a couple of years ago. This time it was Embroidering Texture and Dimension by Hand with Sue Spargo. I am off and running with this embroidering thing now! Woo--just watch me go!
I have been a fan of Sue Spargo's designs for years, starting back when I went through my first felted wool stage probably a decade ago or so. I enjoy Spargo's slightly more bright and fun primitive style. She can do the Americana/country thing (popular in the felted wool world), but she also does straight-up funky, which I love. I had bought her Creative Stitching book a year or two ago; it's pricey, but especially after doing this class* it's also become my go-to. Love that book. I'd tried teaching myself some embroidery from books before but there's absolutely no substitute for watching someone do it, so when I saw she had a class on Craftsy, I bit.
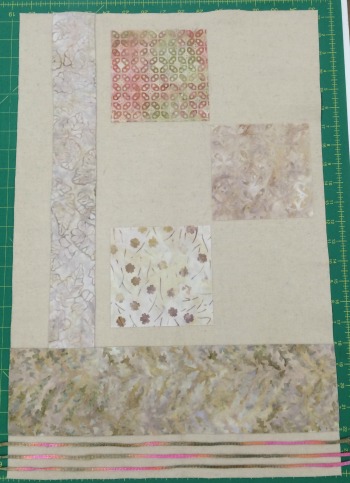
I decided to, for once, do the class project. It's been awhile since I've done that, as I usually use techniques on things I've already got going or had already planned to do. But as I looked at her design, I realized it would be a great way to use some of my stash of felted wool that was languishing. Plus, her "project" is more a lot of design suggestions that you can put together any way you want--which suits my "independent cuss" nature. When I started working with her suggestions for building a layered background, I ended up with something I really kind of dig. I went an entirely different colorway than she has (she used brights), based on the wool I already had in my collection. It took me so long to pull fabrics for this that I took some short-cuts on building the background--I fused, rather than needle-turn applique like she does, and later I learned why a standard applique technique would've been far preferable. But that's why we take classes, isn't it? Now I know.

She suggests 15 butterflies for the project, so 15 butterflies I did. I ended up ordering just a little more felted wool for the butterflies because I didn't have quite enough in a color range that really worked together. As a point of interest here, I bought my wool fabrics from Erin Rissberger of Quilting Acres on Etsy. She'd sent me some samples years ago when I interviewed her for the podcast (Episode 45) and I just love her colors, so I was thrilled to be able to use them in this project.
The butterflies took a long time to put together too, as you layer those as well. I'd approach how I did all that layering very differently next time, so I really should've payed better attention to Sue's advice in the class (and in class discussion). Here's a tip: watch and read before doing! Another note--I also ended up buying her book Creative Texturing to help me make some decisions here. This book walks through the process of fabric selection and layering to create more visual interest on your projects. I'll be referencing that book a lot more in the future too.
Finally, I got to the embroidery. This class walks through several stitches, generally in order of complexity, which often means in order of difficulty. However, I did find stitches in later episodes that were actually easier for me to manage than ones in earlier episodes, so it's not entirely a progressive thing.
Some stitches I took to like a duck to water. Others took a little more trial-and-error. One was my Waterloo--just couldn't quite get that Rosette Chain stitch down. I'll go back to it again after I've got more experience to see if I can't conquer that darn thing. (She does say it's the hardest one she teaches in the class, so there is that.)

And this ain't the half of it...
Mostly, I had a ball taking Spargo's advice to heart--play with as many threads as possible! There is so much more to the world of embroidery than DMC embroidery floss and a #8 perle cotton, for as much as both of those are quite nice. Still a fan of the perle cotton, especially hand-dyed types. Yums.
I've used a huge variety of threads in this project so far, and still have more to try. Fair warning: It easily becomes a new addiction. It does also make learning embroidery slightly more complex because threads behave differently and require different needles, so every new stitch I tried was a test of trial-and-error before I finally found the right combination for what I wanted to do. But that's also just practice and experience--after just a few weeks of this I already have a better eye for what types of threads are likely going to give me more immediate (read: stress-free) success for certain stitches.

I also got into adding beads to my embroidery based on one of her lessons. Another dangerous addiction.
So, can you tell I loved this class? It's definitely two thumbs up! If you're brand new to embroidery (like I was, for the most part), I advise making liberal use of the "30-second repeat" button and changing the speed of the video to go more slowly for certain stitches. (I had to watch the cast-on stitch technique a few times since I'm not a knitter.)
Sue Spargo is an excellent teacher, by the way. I really feel like this class gave me a very firm foundation in embroidery, even if I never took another class again. That being said, I'm now working on my second Craftsy embroidery class, already bought a third, and the fourth is sitting in my wishlist for later. I haven't finished the butterflies yet, so I'm currently using it as the project for these additional embroidery classes--meanwhile, I'm already mentally designing my next embroidery project.
The Basics
- 7 lessons ranging from about 17 minutes to 30 minutes.
- The first lesson is about creating the project you'll later be embroidering. I could've done with a little more information here, I think. I suspect the issue is that she's not giving directions for a specific pattern but, rather, making suggestions for things you may want to do; I think, since it was a new technique for me, I'd have preferred seeing her walk through a specific project first, and then talking about how to launch off from that to whatever you wanted to do yourself. In any case, I did figure it out and, of course, you don't have to do a specific class project at all, if you don't want to.
- The second lesson talks about tools--needles and threads. I found this very helpful the first time, but even more helpful when I went back later after I'd done a lot of embroidery and watched it again. That time I had a better frame of reference for what she was talking about. The second lesson also gives the first couple of stitches--the Pekinese stitch (one of my faves!), and couching.
- Lesson three is decorative edging stitches, including the fly stitch--which quickly became one of my go-to stitches, crested chain--another great one, and the aforementioned Waterloo stitch, the Rosette chain.
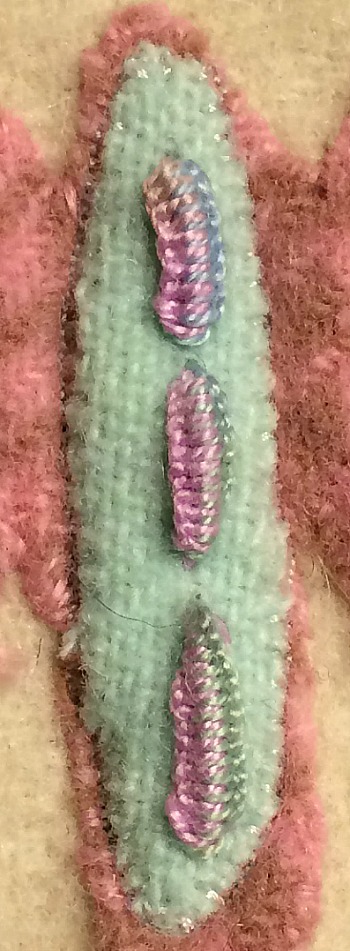
- Lesson four is dimensional stitches and I had great fun here--bullion knots, drizzle stitches, bullion cast-on stitch, and double cast-on stitch (which I skipped because by then it had taken me so long to circumnavigate a butterfly with bullion knots I wasn't inclined to take on the even-longer-term double cast-on).
- Lesson five is woven stitches--loved doing the circle with a gorgeous thread on this one.
- Lesson six is beaded stitches. "Danger, Will Robinson, Danger!" I now have a storage container specifically for the beads that somehow magically appeared in my house after doing this lesson.
- Lesson 7 is finishing touches, with another couple of slight more extensive stitches, plus a lot of really cool ideas for using embroidery in bindings. Can't wait to get my butterfly project finished so I can revisit this lesson.
- The class materials are so-so; 6 pages, three of which are templates for the suggested project. There's an extensive supply list that felt overwhelming at first--and you don't actually need all of it to do the project, but you're likely to want all of it and more if you really get into this! The second page gives some hints and tips, which were partially useful.
A long review, I know. But I. Loved. This. Class. Remember, embroidery doesn't need to just be for embroidery projects and crazy quilts. It's easily done as an accent on any quilt or quilted project. I'll definitely be using a lot more of it in my art quilts. If you think you may even vaguely be thinking about adding embroidery to your quilting repertoire, you really need Embroidering Texture and Dimension by Hand with Sue Spargo.
*You don't need the book to do the class, but it was quite helpful to have on hand when I was practicing the stitches she demonstrated.
(Using Craftsy links and banners on this page helps support my podcast and blog. Thank you!)