A (Belated) Postcard Reveal

Once again, I participated in a postcard swap hosted by Sandi of Quilt Cabana Corner podcast. This time our theme was "fall," and the deadline was Halloween, if I recall. I don't remember for sure because (ahem) I actually had mine done a few weeks early. Cookin' with gas.

My partner this time was Glenna, aka @gfcsailor (and here's her website).  I love the postcard she sent me! 

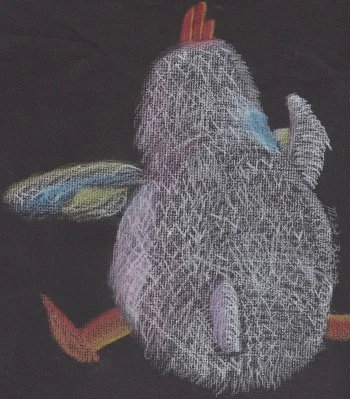
She says it started life as a pumpkin, so I call it "Funky Punkin'." It's hanging in my postcard gallery, one of the favorite spots in my office. I really love the abstract and jazzy nature of it. Very fun.

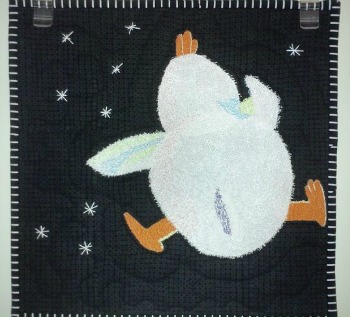
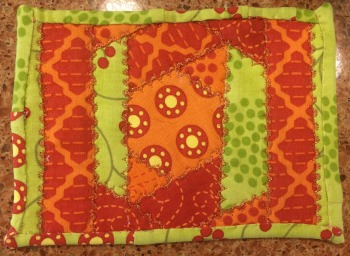
And here's the one I sent her. I don't really have a name for it. "Leaves" seems a bit prosaic. 

I have a package of die-cut leaves of various shapes I inherited out of Mom's stash. I've been using a leaf here, a leaf there, and still have a lot left. I decided to play a little with the dimensionality thing again, so I used two leaves wrong sides together with a lightweight stabilizer in between, then FMQd the veins on and did a loose satin-stitch around the outside with one of the variegated threads I've picked up from Superior along the way. I then tacked the leaves onto the background (already fused to the heavyweight Pellon I use in postcards), hiding the tacking stitches in the veins. I fused the backing on last to cover all the tacking stitches. It's possible I ended up using two layers of fabric on the back because the tacking stitches were in black thread; I don't really remember now, but that's sort of ringing a bell. Then I fused on a binding to cover up all those raw edges. The mitered edges were just trimmed before fusing to look mitered. Shhh. Don't tell Glenna. 

I couldn't mail it by itself because it was all hanging off all over the place, so I used an envelope. 

If I do the die-cut/satin-stitch combination again, I may try hitting the edge with some Fray-Check first. I was gritting my teeth over the fuzz that was going on.  

I really enjoyed doing these postcard swaps this year--it was a great way to play around with different techniques. I'm glad all my swap partners were game to get my experiments! I've heard rumor that Sandi will be doing swaps again in 2015 but may change the format--mug rugs, perhaps, or something else small and fun. Make sure you're watching her blog or following her on Twitter to find out what she decides to do! 


Postcard Swap Reveal (and a Little More about Cindy Needham)

If you're looking for the original resolutions check-in blog post with the Rafflecopter giveaway and Linky party, click here.

...but life moves on...

Thanks so much, once again, to Sandi of Quilt Cabana Corner for hosting another seasonal postcard swap! This time around the theme was summer, and we were supposed to get them to our partners by June 21st, the first day of summer. Oops. Well, if I got my postcard *finished* on the first day of summer, that still counts, right? I got it in the mail on Monday, the 23rd, so I wasn't too far off. Sorry, partner!

My partner for this swap was @eileensideways (aka Sue). She sent me her postcard way in advance because she's in the midst of a move and was afraid she'd lose her supplies in boxes. Here's the card she sent me.

It definitely took me back to childhoods at our summer cottage on Lake Ontario. The bay our cottage was on was always filled with sailboats. We even had sailboats of our own periodically, although of the little "sunfish" variety, with all the requisite adventures and misadventures ensuing. This postcard breathes summer to me--thanks, Sue!

Great fabric choices, by the way--and I love the detail of the star on the sail. Altogether, a very fun postcard that I love having hanging on my wall!

For the postcard I was to make, I'd known immediately what design I was going to use as soon as I signed up for the swap. It just took me awhile to get around to doing it. Ain't that always the case?

If you've been following my blog for awhile, you might recall Chicken Butt. I ran a challenge about three years ago to do something based on children's artwork, using fabrics entirely from your stash. Chicken Butt is based on an art class project of my daughter's when she was in high school (original drawing pictured at left). Here's the blog with the backstory.


And here's the finished product. I just love this guy--he makes me grin every time I see him. Consequently, I've been wanting to do a series about the Adventures of Chicken Butt. And so, the summer postcard gave me the perfect opportunity.


Introducing: "Chicken Butt Takes a Dive."

It's all fusible applique, all with my own hand-dyes, except Chicken Butt himself, who was done with a tone-on-tone white I had in my scrap bin. I'd debated whether to do his feet and cockscomb as threadpainting, but ultimately ended up doing them as little-bitty-put-them-on-with-a-tweezer fused pieces because I didn't have a thread the right color. Really. Tweezers.

I made some quilting design choices based on Cindy Needham's Design It, Quilt It class on Craftsy (see my review here).  I'd outline-stitched Chicken Butt and the clouds, but he still wasn't standing out enough. Recalling what Cindy Needham had said about "sunshine and shadows", I used her scribble stitch throughout the sky to really make everything else pop. It worked beautifully. Then my swirls in the waves didn't turn out quite as well as I'd hoped, so again recalling Needham's lessons ("If you have an awkward moment, fill it with a distraction") I went back in and just did a few more whonked swirls and, overall, it doesn't look half bad. I did a fused binding again, a la Laura Wasilowski's Hand-Stitched Collage Quilts class on Craftsy. I find fused bindings the easiest for me to do on postcards. easy, stable, and a whole lot faster than satin-stitching those edges.

And so, Summer Postcard Swap complete. Thanks, Sandi--and thanks, Sue!

My daughter got a kick out of seeing how her past art lives on. I may have to do a larger version of Chicken Butt Takes a Dive to hang on my wall next to the original Chicken Butt.

Which begs the question: How many more times can I manage to say Chicken Butt in one blog post? Chicken butt chicken butt chicken butt...


Spring Postcard Swap and A Tutorial

(Looking for the 2014 Quilty Resolutions Check-in Giveaway and Linky Party? It ends at midnight Saturday! Click here. Meanwhile...)

Kati and I both got one another's postcards, so I can now do "the big reveal" blog post!

Kati of Kati's Quilting and Sewing (and one of my #twilter peeps!) and I were partnered up by Sandi of Quilt Cabana Patterns for Sandi's Spring Postcard Swap. I love doing these postcards! It's a great, bite-sized way to try out new techniques, play with design principles or color combinations, and just all around have a good time.

Here's the postcard Kati sent me--a much-needed glimpse of spring while it was still snowing outside (despite the calendar).

It's wonderful! I love the colors she used, the shape of the tulips and the leaves, and the stitching designs. I especially like how the leaves look like they're jumping right up off the postcard. They're so happy!

Thanks so much, Kati! It's still sitting on my desk, reminding me that yes, spring WILL come eventually!

And here's the postcard I sent Kati.

I was double-dipping and used the postcard as homework for my design study group. We were supposed to do something using a triadic color scheme, so I chose purple, orange, and green. I made the "binding" by fusing narrow strips of one of my hand-dyed fabrics down, intentionally cutting it so I'd get the gradation of color along the edges.

I would've been happier if I'd used a brighter white background, I think. The cream color sort of tones everything down more than I'd like. Overall, though, I was pleased with the results. I mailed it in an envelope, though, as I wasn't sure the thread fabric would survive if I didn't!

Here's a detail shot--I was trying to catch the light so you could see the sparkles in the orange center. That's caused by the Angelina fibers I included in the thread fabric.

You can also sort of see that I did a running stitch a little in from the edge of the thread fabrics to tack it down securely but allow for some fringing on the outside all the way around.

I got to play with a couple of techniques on this.

The background and leaves were basically crumb blocks I made using random pieces of fabric--no foundation. I just started stitching stuff together until I made something big enough that I could then use to cut my shapes/background from. It's an age-old method, though I used Victoria Findlay Wolfe's 15 Minutes of Play book for inspiration. I've not done it before, though, so it was fun to mess with!

The petals and center are made from "fabric" I created using thread and water-soluble stabilizer. I did this technique once a year or more ago as a test project. This time, I wanted to see what would happen if I created a larger piece to cut into shapes. It worked great, though you need to use it for something you really want fuzzy edges on.

I've showed this to a couple of people and they wanted to learn how to do it, so I'm including a tutorial here. I didn't make this up myself, but have seen the technique in so many places now I honestly can't remember where I saw it first, and I just do it off the top of my head with no reference to specific instructions anywhere. So don't give me credit for the technique...just for this particular explanation of it!

I didn't remember to take pictures of each step, so I've added the pictures I did remember to take here and there; sometimes they relate to the step, sometimes they're just so you can see a little detail here and there. I'm also posting them slightly higher res than usual so you may be able to click in closer to see the detail of the thread fabric.

Thread Fabric Tutorial

To do this, you need:

  • Water soluble stabilizer. There are several options for this type of stabilizer; yours may not look like mine as mine's quite old at this point (Sulky brand, inherited from Mom, probably at least 5-7 years old or more). You just need a stabilizer that dissolves in water, regardless of brand or appearance.
  • An embroidery hoop that will easily fit within the throat space of your sewing machine, and is narrow enough to be able to fit under the presser foot. (Mine's an 8" diameter plastic cheapo-model; works great for this!)
  • Thread in the color of your choice to use for anchoring everything down (variegated is very nice; type of thread doesn't really matter much--whatever works best for you in free motion quilting);
  • Scraps of yarn, funky thread, cording, tiny scraps of fabric, Angelina fibers, or other textiles to create the fabric. Avoid anything too nubby as it might rip the stabilizer while you're working.
  • A bowl of water or a sink, and a drop or two of fabric softener (optional)

A note about color choice: Use whatever you want--the funkier the better! Make sure you've got at least some color variation for interest, but also keep in mind that the more you stitch, the more the colors of textiles will get blended into your stitching thread. On my orange piece, I went back in with a different variegated thread at the end because it had blended too much and didn't have quite enough color variation for my taste. That's the beauty of this technique, though--you can keep stitching away until you're happy with the results!

The Play-by-Play

1. Cut two pieces of water soluble stabilizer approximately the same size, a few inches larger than you want your finished piece to be.

2. Lay one piece inside one half of your embroidery hoop. (It's easier to do this now than move it into the hoop later when it's covered in scraps!) Make sure enough extends outside the hoop that it holds firm when the hoop is assembled. Press the stabilizer down so it's sitting on the table surface, and squish the sides over the sides of the hoop as much as possible--the less the scraps get shaken around later when you put the hoop together, the better.

3. Randomly spread your scraps of textiles, fibers, and so forth, on the stabilizer within the space of the embroidery hoop. Be sure to leave enough margin around the edge that you'll be able to get your sewing machine presser foot as far to the edges of your scrap pile as possible. You can pile scraps on top of each other, but try to keep the level of the pile fairly even all the way across. The thicker/more evenly spread your pile, the more opaque your thread fabric will be; a looser, more spread out pile will give a lacier effect. You don't have to be exact about it, but it helps in the stitching if things are pretty even. Higher spots can catch the presser foot and cause problems. If you have a longer length of yarn, loop it around on itself a bit to create interesting designs. Adding some Angelina fibers can create fun sparkle. Cut loose and play with what you can throw in there!

4. When you're satisfied with your collection, lay the other piece of stabilizer on top of it and secure it in the embroidery hoop. Note: Have it so that the stabilizer lays flat on the surface when it's in the hoop, not raised from the surface. In other words, it should be the reverse of what you'd normally do if you were embroidering by hand. Does that make sense? (You should be able to see that in the picture here.)

5. Now comes the really fun part! With a great thread in your machine, and your machine set up for free motion quilting, slide that puppy under your needle and go to town! Stipple, loop-de-loop, jiggidy-jaggedy...just make sure you've stitched enough to secure all those little bits and scraps down. As mentioned above in the "piling your thread" section, stitching more densely makes a more opaque thread fabric, stitching more spaced apart makes a lacier effect. Just make sure you stitch enough that the fabric actually holds together when the stabilizer is removed.

What's even better? Tension doesn't matter! If you see skipped stitches or "eyelashes" on the back, who cares? You're creating fabric! Thread nests can be easily disguised simply by stitching over them again--they become part of the texture of the fabric. (Ahem. Ask me how I know.)

The only problem that can occur in this step is if your stabilizer tears apart while you're stitching. (Again. Ahem. I know these things because....) This can happen if your pile is uneven or you have a textile that's too nubby, as mentioned above. Dull needles may also cause it. Small rips--just back up, and stitch over it to make sure the thread fabric is intact. Big rips, carefully dismantle the hoop and lay a third piece of stabilizer over the top, then start stitching again.

6. When you're happy with where you're at, take a deep breath, grin, then pop that sucker out of the embroidery hoop. If you want to avoid too much extra goop having to dissolve, you can trim off any excess stabilizer as I did in the picture here, but it's not necessary. Soak your thread fabric in a bowl of warm water to dissolve the stabilizer, or follow the directions on the package. I found it helpful to soak it for awhile, then rinse it under running water and rub it gently in my fingers, and then soak it again. I think I did this maybe three times over the course of a couple of TV shows that evening. In the last soak, I added a couple of drops of fabric softener--it helps release the last of the stabilizer and make a more pliable thread fabric.

I don't know exactly how long it takes to dry, since it was a full day before I had time to get back to it again, but I'd allow a few hours to be on the safe side. You can always hit it with a blow dryer as well, depending on what fibers you used.

Use good fabric scissors to cut it into shapes if desired. In fact, if you can, try to use really, really good applique scissors--the kind with the little grippy teeth work great to slice right through the variety of textiles without shredding. Again, I just used a straight-stitch about 1/8" in from the edge all around to stitch mine down, but you can attach it by hand, or tacking it in a few places--all depends on the effect you want in the end.

This is a super-super fun technique. I've gotten in the habit of saving all the raveled threads off the edges of my newly-washed hand-dyes for future use as thread fabric!

So, gonna try it? Huh? Huh?


Another postcard...

One of our friends at church was sworn in as a U.S. citizen this week. I had a little bit of a plan in my head of a small quilted wallhanging I would make him to celebrate the occasion, and on Friday, while on the Shirley DeMott Memorial Annual Shop-Hop* with a friend, I picked up some appropriately patriotic-themed fabrics.

When my husband and I were out for dinner that night, I mentioned and briefly described what I thought I might make for our friend. My husband said, "Why don't you make another postcard? I like your postcards."

Well, okay then. As I like to give positive reinforcement for any positive reinforcement my husband gives me for my rather expensive creative endeavors, a postcard it is, tee hee. "Plus," I thought, "a postcard is smaller and may go a little quicker than what I'd planned anyway."

flagpostcard12-14-13.jpg

Yeah, well, that never quite works out, does it? I decided to do a design that was quite time-consuming. (Yep, all those red and white stripes are separate little strips of fabric.) Still n' all, it was done in a couple of hours. And of course, I didn't end up using any of the fabrics I'd bought on Friday and just dove into my stash instead.

Sadly, on the very, very last swipe with the iron to make sure all was happily fused down, my iron decided to spit. I hate my iron. And one of the fabrics bled. I hate that fabric.

Here's some irony for you--with all the work I've been doing with my hand-dyes and nothing ever bleeding, this was a commercial fabric. Go figure. My fault--usually when I'm fusing I use a different iron that's never had water in it. But I recently handed that iron over to my son, and didn't bother to take the time to empty the water out of my regular iron before starting to fuse. I hate that water.

I took this picture after I'd gone after the bleed with a dab of Synthrapol, followed by a second attempt with a dampened color catcher. So believe it or not, it does actually look a little better than it did. I'm going to wait to see how it dries, then probably do the ol' paint touch-up. Surely I've got white fabric paint somewhere. I really hate to see all that time--cutting narrow little strips, satin-stitching the hey out of everything--go to waste. But I also hate giving something to someone that's clearly in error. And I don't have time for a Plan B, other than buying him a card at Hallmark. Last I checked, they didn't sell "Happy Citizenship!" cards.

Now, that being said--here's the good news: I've got this whole postcard thing down! I like doing little mini art-quilts. They're fun! (This one is 5x7", btw, rather than the 4x6" I've been doing, as I'm not mailing it so I decided I could go a little larger.)

LATER ADDENDUM:

postcardrepaired12-14-13.jpg

A little white Tsukeniko ink, judiciously applied. One would never know there was a problem.


*Mom and I used to often go on a shop-hop in an Amish area about an hour away on a Friday in December. I'd take a vacation day, and we'd visit three or four shops, then have lunch at an Amish restaurant that had the best dang corn chowder. After Mom passed away, various of my friends have been happy to keep up the tradition with me, and so the Shirley DeMott Memorial Annual Shop-Hop was born. Sadly, the Amish restaurant closed a couple of years ago, but I think this time around we may finally have found a good little pub to replace it. Not Amish, and no corn chowder, but great burgers!

Postcard Swap Reveal

Whoopee! Let me start with a big thanks to Sandi of Quilt Cabana Corner for hosting a postcard swap this year. Those of us who participated had a great time--and pictures have been flying this week as people started receiving their postcards in the mail. My partner and I have both received our postcards so now we can do the Big Reveal! (Cue theme music...)

Here's the postcard I received from Beth:


bethpostcard.jpg

I love the way she did the snowflakes, and the different fabrics in the tree. And did you notice that trunk is thread-sketched? Very cool stuff! Love it, Beth!

And here's the postcard I sent to Beth:


2013postcard.jpg

The square motif is from an old Laurel Burch Christmas fabric. The background fabrics and fused binding are all my own hand-dyed fabrics.

I talked about how I did this in my most recent (as of this writing) podcast episode, Episode 136 In Which We Make Fabric Postcards. For what it's worth, anyway. My technique definitely needs some polishing, but I have fun with it, and that's the main point!

These postcards really do become a permanent part of my Christmas decoration collection. Proof: Sandi's postcard from last year and Beth's postcard from this year have pride of place on my mantel!

postcardsonmantle.jpg