Carol Doak Mariner's Compass Star block done!

Finally! It's done!

After several ill-fated attempts at a Mariner's Compass block using one book, I finally called it a day on that one and pulled off the shelf one of my beloved Carol Doak books.

Mind you, I've never actually made a Carol Doak block before. But between what I had purchased myself and what I'd inherited from my Mom, I'd guess I probably have most of what Doak has published over the years. I own and use her DVD on paper piecing quite frequently. Her directions are so clear and straightforward, she doesn't leave anything to guesswork. So when I couldn't make it work with the other designer, I decided to give Carol Doak a shot, and it worked. This was so much easier!

First, she did the math for me. Always a plus in my book. Rather than having to try to expand a smaller design to get the size block I needed, Doak's designs happened to be the right size already. Doak also gives cutting lists for each of her designs, so I didn't have to try to figure out what size fabric piece would cover the needed space. Third, her compass blocks are done in square quarters rather than the traditional circles, which just make them easier to handle.

(As a note, I'd already determined my color choices and placements before going to Doak's book. It just happened that I ended up choosing the Africa block from the book, which has very similar colors and placement! I was just looking for something that had roughly the same number of pieces that I'd been doing before so I could use the same fabrics. Go figure.)

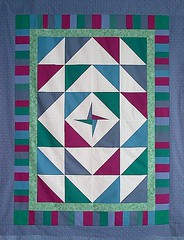
This isn't quite a traditional Mariner's Compass block, which is why I refer to it as a "compass-esque" block. Still, I was able to use the same fabrics I'd intended to use the first time around and get pretty much the same effect, so I'm a happy camper.

Isn't that Stonehenge line just absolutely gorgeous? I'm in serious love.

Now, by my next guild meeting next Tuesday night I really should have two more borders done. Maybe three. I forget how many, I'm so far behind now. The first border is supposed to be pieced. My original thoughts were a very complicated applique but the center block turned into such a saga I'm thinking I'm going to cut myself a whole lot of slack and do something much simpler. But that's a problem for tomorrow.

BTW, the picture makes the light green in the center look a little more neon than it does in real life. Everything blends better than it looks like it does. The darker green on the other half of the center also has splotches of purple in it so it really pulls everything together. Mmmm. Stonehenge. Yum.

And just because I could.... I had to make a stop at a quilt shop yesterday and they had these stacks of gorgeous batik fat quarters, so I picked out a bunch in teals, aquas, greens, & turquoises, and paired them with blacks and grays. I'm thinking maybe disappearing nine-patch, but don't hold me to that. Right now they're just seducing me from their stack on the cutting table.

So all that's to say, I've decided I'm sending Fortunate out to my long-arm quilter because I have too many other projects I want to get to!

And also by the way, my sister and niece just came back from a mission trip to Ghana and she informed me tonight that she bought me fabric. Yay! Can't wait to see it!

Back on a Roll...Jelly Roll, That Is...

I got another block in the Jelly Roll Sampler project done (using the book by the Lintott Gals) today. This is the one I started last fall and worked on during my October guild retreat. Got two blocks done then; just got block #3 done this afternoon. They're not hard--just pokey. The project has been sitting in a bin on my shelf since shortly after I got home from the retreat. It's not a high priority project so it kept getting shuffled down the line behind other stuff. I'm going to try to keep poking away at the remaining 9 blocks over the next few weeks as I'm finishing up other projects.

The Mariner's Compass? Deep-sixed. (Going back to the jelly roll project was a bit of therapy for me--Quilt Trauma Recovery.) I'm working on another concept for the guild challenge now. One thing I've learned in years of quilting: When to cut my losses and move on. My theory is that when I used my copier to expand the block it didn't expand both units equally. There is often a slight variation in a copy. Well, what can be just a hair's breadth off for one unit, multiplied by 8, can create real issues by the time you're done. I had the same issue with matching certain points with each unit, very consistent, even though I was dead on that line every time. That says to me there's something wrong with the unit itself as it came off my copier. Too bad--I liked the color combinations. I'm using basically the same color combination with some slight variation in my new attempt, so hopefully I'll be as happy with it. And hopefully it'll actually work this time. Still paper-piecing, just using a Carol Doak book this time and a slightly different approach to a mariner's compass. I think I'll call it "compass-esque." I've got the fabrics figured out, so after I run some errands this afternoon I'll probably start working on that one.

I'm now in week four of my sabbatical and just now feel like I'm getting into a groove. Illness, travel, and the hectic first couple of weeks of taking care of stuff that had gotten put off for months before meant I didn't accomplish as much quilty-wise as I wanted. So I'm struggling not to let myself "feel behind," because I'm really trying to take seriously my goal to accept what I'm able to do as I'm able to do it and not get into mind games with myself over what I feel like I have to get done. But if I don't get called up for jury duty this week (I have to call every afternoon to find out whether I need to show up the next day) I'll have lots of time to make some progress on current projects and play with some new ideas.

Here's to playing with fabric. Yay.

Slow Quilt Monday

"A mind too active is no mind at all."
(Theodore Roethke)

Many days I think my doofus dog has it right.

Eat.
Sleep.
Play.
Occasionally ask for a scratch under the chin.

No self-imposed deadlines to meet. No sense of obligation or overblown feelings of responsibility. No need to feel productive.

"The most potent muse of all is our own inner child." (Stephen Nachmanovitch)

Eat. Sleep. Play.

I think I'll do all three of those this week. And I'll scratch Doofus under the chin in thanks.

Food Friday--6-Week Bran Muffins

I always think of this as my mother's recipe since she made them frequently while we were growing up, but I later found that she'd gotten the recipe from a cookbook our church had put together when I was young. I've also since seen the recipe on the Internet, unattributed, so I don't know where it originally came from. Whoever originally came up with this one, thank you!

They're a favorite for my family-of-birth and were on the table for most holiday meals as well as for just regular-day-eating; when the grandkids started coming along, Mom would make batches of these when she knew they were coming over for the weekend. My niece got married just a few months after my mom had passed away, so for part of her wedding gift, I made a big batch of the muffins for her and her new husband to take on their honeymoon with them and included the recipe so we could pass along a family tradition to a new family. They told me later it was one of their favorite gifts, and my nephew-in-law has joined the ranks of Mom's bran muffin lovers.

Why are they called "6-Week Bran Muffins"? Because you can make up the batter and it will keep in your fridge for up to six weeks, allowing you to bake fresh muffins any time you want. Frankly, I've never had the opportunity to test the theory because I always end up baking them all within a week or so. I do recommend making the batter a day before you want to make them--you can bake the muffins immediately and they're good, but they're so, SO much better if you can wait at least a day and then give it another really good stir. The ingredients meld more. You can also bake up the entire recipe and freeze them...but why would you? There's nothing more enticing than smelling them baking and eating them warm from the oven!

You can make these lower fat by swapping out the oil for applesauce, and you can play with the proportion of egg whites to egg yolks as well. I've done several variations in that respect and the flavor is always good. However, I have found that the result is a bit too chewy for my taste, so I prefer to make them straight-up and just be careful how many I eat. Indeed, you need to be a little careful how many you eat at one time anyway. They are bran, after all.

6-Week Bran Muffins

Yield: approximately 7 dozen

Ingredients:
1 16-oz box Bran Flakes (with raisins if desired)
3 cups sugar
5 cups flour
5 tsp baking soda
1 tsp salt
4 eggs, beaten
1 cup shortening, melted, or vegetable oil
1 quart buttermilk

Directions:
1. Mix cereal with sugar, flour, soda, and salt in a very large bowl.
2. Mix eggs, shortening, and milk in a separate bowl, then pour into dry ingredients and mix thoroughly.
3. Store in covered container in refrigerator and use as needed. Batter will last 6 weeks.
4. To bake, fill greased muffin tins 2/3 full and bake at 400F for 15-20 minutes.

Remember--the batter is better if left for at least a day before baking. But if you don't want to wait, you'll still enjoy the results!

Donation Quilt Wednesday--Jaye's blocks

Jaye just posted this week about her own donation quilt blocks for her guild. http://artquiltmaker.com/blog/2012/02/donation-blocks/.

I've been trying to be more methodical and regular about cutting my scraps to usable sizes. The sizes I decided to go with are 10" squares, 5" squares, 3" squares, 2 1/2" squares, 2" squares, and 2 1/2" strips. Basically, I start with the largest sizes I can get out of any given scrap and work my way down from there. The sizes I chose to focus on are those used in a lot of the books I own (layer cakes, charm packs, jelly rolls), and those used in the ScrapTherapy method, another book I own. I figured if I kept it simple and easy for me to use them without having to use a whole lot of math (!), I'd be more likely to actually use them.

As we know from recent posts, I've been able to use up some of my 2 1/2" strips in donation quilts. I'm looking forward to more possibilities in my future. Jaye, thanks for the inspiration! Great blocks!

Playing with New Toys

Still in recovery from Mid-Atlantic Quilt Festival, I didn't want to do anything yesterday that required actual...well...brain cells. And so, I thought, that might be the perfect time to simply play with some new toys that I purchased in VA because my brain wouldn't get in my way.

I pulled a piece of kimono silk scrap out of a scrap bag I bought from Laura Murray's booth (Laura Murray Designs). For just a few dollars, I got a bag stuffed with scraps of silks that she'd dyed or painted. It's always a hoot when someone's rejects are so gorgeous!

Choosing a scrap, I got my Shiva paint sticks ready. The first thing you have to do is rub the tips with a paper towel to get the skin off. I rubbed away, accidentally snapping the top of the gold one off as I went after it a little too aggressively. No loss, though, since I can still use the snapped-off tip. Next, I chose one of the new rubbing plates I'd picked up, sprayed it lightly with a spray baste so the fabric would stick to it, smoothed the fabric over it, then went to town using the method that Laura had been demonstrating in her booth--short, light strokes with one color, then another, then another. Loved the result.

Next, I pulled out my Perfect Pearls Mists spray bottles that I'd picked up from Jane Davila's booth. I chose one of the stencils I'd bought from another booth (sorry--forgot to write down the name of that one) and spritzed some pearl white onto the stencil. That will take some practice, but it was fun to test. You can see the smudgy result on the right of the ginko leaves in the center. For the other three sprays, I just lightly spritzed the color over the surface of the fabric just to see what it would look like. I really love that effect--just a very light shimmer.

I've got several books in my quilt library on surface embellishment that I'm perusing again for ideas and inspiration, and I'll just keep playing--I know I'll discover a method or combination of colors and fabric that will create a piece that can be expanded upon or used in another way. I've already got some ideas!

For the record, since I didn't have specific plans for what I was buying, I stuck with basic metallics. So I have paint sticks in silver, gold, and bronze, and mists in gold, bronze, pewter, and white pearl. I figured those would be the most versatile to start with. The vast majority of rubbing plates and stencils are abstract or natural designs, although I have a gorgeous peacock stencil that I grabbed when the vendor reminded me I was buying enough to get one free. Bingo!

On the Stonehenge Mariner's Compass front, I decided while I was gone that I was definitely going to start from scratch. I didn't need a whole lot of brain cells for the first step so I did manage to at least make the new copies of the paper-piecing pattern, this time on my Carol Doak Foundation paper. Today I plan on getting those pieced together. So (hopefully), more updates later.

Slow Quilt Monday--Art

As I mentioned in a recent podcast, one of my sabbatical objectives is to watch several of the Great Courses lecture DVDs I've had stacked up in my house for a bit, as part of the course-swap with my sisters. (We all own different titles and a couple of years ago I swapped some with one sister, and am just now getting to watching them.)

The set I started out with is Museum Masterpieces: The Louvre, a 12-lecture series highlighting some of the artists and periods represented in the Louvre. I'll never remember the detail of which artist created which work and how they compare with other artists of the period, but what definitely sticks with me is the concept of light, color, motion, balance...all those design principles that Jaye and I are talking about and that I'm studying in my quilt design study group.

I'm also working my way through The Artist's Way, by Julia Cameron, which is a 12 week series of readings and activities meant to unlock one's creativity. In the first week, she describes "artist dates," a period of time you're to spend by yourself doing a variety of things that will lead to an expanding of your creativity. One of her first suggestions is to visit a museum by yourself. (She emphasizes "by yourself" because then you're free to ponder what you need to ponder and you're not being rushed through or distracted by others' needs or interests.)

I find myself going back again and again to thoughts about light. Some paintings in the DVD series had particular qualities of light, particular uses of light for emphasis and mood, that simply intrigue me. I've seen quilts that seem luminous in their use of color and value to portray light. I'm finding myself inspired to explore that further.

So for today's Slow Quilt Monday thoughts, I'd like to encourage you to find a way to look at some art from another media this week--paintings, sculptures, whatever, anything that doesn't use fabric--to explore what you can carry away from that work to your own.

Mid-Atlantic Quilt Festival--Early Report

Here's the haul. You'll be hearing about all of this in more detail in the days to come, once I wake up and can put two coherent sentences together...in a row, even. I'm a little non-verbal today so I'm making an intentional decision to communicate as little as possible* and simply take the day to regroup. I will quite possibly be posting an episode tonight...one that requires very little communication on my part to put together. Here's a sneak peek of things to come, not necessarily in this order:

  • A conversation with the Waterfall Gals.
  • An interview with Karen Lee Carter, quilt teacher and listener.
  • An interview with a new quilt shop owner who came at quilting from another artistic field and conversation about how that design training affects her quilting.
  • My own reflections on the Mid-Atlantic Quilt Festival.

OK, I think those are all the words I have in me at the moment. Time to go play with my new toys.

(*Today's Slow Quilt Monday post, posted just prior to this one, was written last week before I fried my brain at the quilt festival. I'm thankful for technology and the ability to take care of business ahead of time!)

Food Friday--Beef Barley Soup

I finally wrote this one down, at my son's request. He moved into an apartment at school this fall and wanted to learn to cook for himself, and this was the first recipe he requested. I'm not sure if he's tried to make it himself yet--this is still the first thing he asks me to make whenever he happens to be home for dinner. By the way, this is the soup that converted my husband from his beloved Campbells canned soup. FTW.

Sandy's Beef Barley Soup
3 medium carrots, peeled and diced
3 stalks celery, sliced thin
1/2 medium Spanish onion, diced
1/2 clove garlic, minced (more garlic to taste)
2 tablespoons vegetable oil (or olive oil)
2 pounds chuck roast
salt and pepper, to taste
3 containers low-sodium beef broth (32 oz each)
1 tablespoon beef bouillon
1 can diced tomatoes (28 oz, no seasonings)
1/2 teaspoon celery seed
1/2 teaspoon ground thyme
1 tablespoon Worcestershire sauce
1 cup medium quick-cook barley

1. Prepare carrots, celery, onion, and garlic. Set aside (keep garlic separate). Trim most fat from beef and cut beef into cubes.

2. Heat dutch oven (no oil) on stove top over med-high heat. After several minutes, when dutch oven is hot, add meat. (No oil should be necessary; can add a little if you don't have much fat on the meat.) Brown on all sides, adding salt and pepper while browning. Remove meat from dutch oven and set aside. Do not wash dutch oven--leave the browned bits.

3. Heat oil in bottom of dutch oven until shimmery. Add onion. Saute until onion about 2 minutes. Add celery and carrots. Saute for about 3 minutes or until onion is transparent and maybe just a little brown. (You can put onion, celery, and carrot in all at the same time.) Add garlic and saute for another minute.

4. Add beef back into dutch oven with vegetables. Stir together, heating maybe one more minute. Pour in broth carefully, stir to combine.

5. Add bouillon, tomatoes, celery seed, thyme, and Worcestershire sauce. Stir to combine. Bring to a boil. (Taste after it's at a boil--add seasonings as necessary.)

6. Add barley, stirring while adding. Stir to make sure barley is not sticking to anything. Bring to a boil, then lower heat to simmer. Simmer for approximately 45-60 minutes, until barley is tender.

7. Barley absorbs liquid and seasonings, so taste every 15 minutes or so during cooking. If soup gets too thick, add water then beef bouillon to taste.

Notes:
  • As you can tell, I cook soup in vats. Whenever I'm making this one I'm expecting to send containers home with my son and usually also my nephew, so I make it in volume. You can obviously decrease ingredients proportionately if you're not cooking for an army.
  • You can use precut stew beef, but I usually end up cutting that into smaller pieces anyway so I don't know that it saves me time, and it's more expensive. You can also use different cuts of meat--when I want to step it up a notch, I've been known to use a sirloin. Too lean, though, and you don't get much beef flavor out of it. You could use leftover cooked meat if you wanted--just adjust your cooking time and seasonings accordingly.
  • I love thyme so I tend to use a lot of it. Adjust seasonings to your own taste.
  • I also love the depth of flavor that extra bouillon brings to the party but if you're concerned about salt you will probably want to omit that. Check the comments on my chicken noodle soup recipe post for some readers' suggestions about alternatives to bouillon. Link

Donation Quilt Wednesday--and some Progress!

As I was doing some surfing-of-the-cyber-type recently, I ran across another great site full of free, downloadable patterns that make great donation quilts, the Q.U.I.L.T.S. group in Schenectady, NY. (QUILTS stands for Quilters United in Learning Together, Schenectady--love that acronym!) Check it out.

Remember to share pictures in the Quilting for the Rest of Us Flickr group for donation quilts!

On to the progress: I also finally got back to my sewing machine yesterday--woot.

We're doing a "roosting robin" in our guild this year--in other words, a round robin that you don't pass. (Someone in my guild used the term "roosting robin" for it--I don't know if that's the official name or was just her joke but I find it a good descriptor so I'll roll with it.) The way it works is that we each do our own projects rather than passing them along, but the leader tells us what we're adding to it each month. We started in January and I'm already behind. The first month (for January) we were to make a 12 1/2" unfinished center block, then the second month, for February, we were to have made 4 1/2" borders. I'm just working on my center block now. I decided to do a simplified Mariner's Compass for the center, made entirely from the Stonehenge line. I've been collecting Stonehenge for awhile waiting for just the right project, and I hope this is it. The concept I have in my mind is something that will look like inlaid tile.

I had to refresh my memory on paper-piecing since it's been a couple of years since my last pp project. But Carol Doak lives on my bookshelf (she's very comfortable in her little DVD home) so I invited her in for a visit for a refresher course and then dove in. I have 8 Unit As and 8 Unit Bs to do for the compass. Got through all the Unit As with only one little, easily flixable glitch (sometimes a little hard to tell right side from wrong side on some of those Stonehenge, until you've done it the wrong way once and it sticks out like a sore thumb). Finished Unit As are pictured.

Unit Bs started out well, but when I got to seam 2, I couldn't for the life of me figure out how to sew the piece on to get it to cover the space needed. I knew it really should work, I just couldn't figure out how to make it work. Turned everything every which way; no dice. My brain had just completely shut off.

I glanced at the clock. Oh. 9:00 p.m. Yep, that's why. I learned years ago I can't sew past 9:00. My brain completely shuts down, like clockwork. Even, like tonight, when I have no idea what time it is, there's some little internal trigger. Bam. Stupid Time.

So this morning, after caffeinating, I sat down again to look at the Unit Bs and decided, actually, I think it's OK--I may just have to press it a little crooked to get it to fit exactly right. The angle of the seam doesn't really match how the cut piece of fabric would fold across the space needed, if that makes sense without a diagram--so I'm sewing on the seam and but pressing a little off. Probably not paper-piecing-standards but works for me. Unit As and Unit Bs have the same pieces and the same angles--it's just that on Unit As you sew top to bottom and Unit Bs you're sewing bottom to top, and that makes a surprisingly big difference in the geometry.

I've only sewed one test Unit B so far and am about to try to sew a Unit A and Unit B together to see how it all comes out. Once I see that they really do fit together, I'll finish the rest of the Unit Bs. Should have enough time this morning before I need to head out for the day. I've got a lot going on today so I probably won't be able to put the the whole thing together until tomorrow.

Feels good to be back at the machine, even if I did have my Stupid Time glitch. Actually, that felt welcomingly familiar as well. Sandy's back.

Meet at the Waterfall! Mid-Atlantic Quilt Festival


You've been hearing us talk about it--the details have finally been worked out! Join me (Quilting...for the Rest of Us), Pam of Hip to Be a Square, Frances of Off-Kilter Quilt, AJ of The Quilting Pot, and Tanesha of Crafty Garden Mom podcasts, and a whole bunch of our listeners at the Waterfall Meet-up at the Mid-Atlantic Quilt Festival in Hampton, Virginia!

Make your way to the indoor waterfall in the main lobby of the convention center starting around 11:30 a.m. on Saturday, February 25th. We'll gather there, wait until a few minutes after noon in case there are folks in morning classes, and then possibly move to another nearby location depending on how many people we have with us and what's available. (We've got some tentative locations on hold but it's hard to know what will work best until we see how many people we're talking about.)

I know all of us podcasters are anxious to meet each other and our listeners face-to-face! So, meet at the waterfall! Hope you can join us...leave a comment if you plan to be there! (Leave a comment even if you don't--and we'll wave to you from afar!)

Slow Quilt Monday: Scrap Zen


I missed posting last week due to a combination of business travel and an insanely busy couple of weeks. So I wasn't exactly doing the slow quilting thing. Actually, I was doing the "no quilting" thing.

That, combined with my usual seasonal affective stuff going on, has led to a very low-key approach to quiltmaking of late. As of Friday Feb 10th, after I finished the last task of the workday, I entered my sabbatical. That means 12 weeks of a very different schedule with a slightly different focus (although not entirely). Frankly, part of my sabbatical is the slow quilting focus.

On Sunday I ended up with an unexpected day at home. We'd originally had things scheduled one end to another, but due to a snow-storm everything got cancelled. I spent a fair amount of time doing cyber-housekeeping (cleaning out email files, catching up with blogs, planning future posts and newsletters, etc.), but then I really wanted to get my hands on fabric. I was still not feeling up to tackling a quilting project but wanted to get myself ready for today--the first "real day" of my sabbatical (read: the first day I would realize I didn't have to be at work). Today will be the inaugural day of my new schedule, a day that includes professional study and growth as well as exploring how to express myself more effectively through textiles. Today includes copious sewing time.

So I spent a few minutes yesterday organizing my fabrics and tools and thoughts for today, then I decided to take a page out of listener Holly U's book and spend some time cutting scraps. And therein I discovered some zen.

There's something to be said for standing for a period of time simply cutting fabrics into pieces with no plan in mind. What size can I get out of this piece? 2 1/2" squares? Then I'll cut 2 1/2" squares. So let it be done. And what size here? A 5" square and then a couple of 2"-ies of out of the remainder? Then that's what I'll cut. So let it be done. On the one hand, I could feed my need for productivity and accomplishment by seeing the pile of random scrap fabrics diminished and the pile of neatly cut pieces of usable sizes increase. On the other hand, rather than keeping count and worrying about having the right proportion of values, I could simply enjoy the possibilities represented by the plastic baggie of squares on the cutting table in front of me.

Cutting scraps with no immediate plan clearly fits into Slow Quilting, in my mind. It's taking steps to a quilt without rushing; it's allowing possibilities to unfold; it's allowing the fabric to speak for itself. "What size do you want to be? So let it be done."

Maybe this week you'll take 10 minutes, or an hour, to simply cut some scraps without worrying for the moment what they'll become. Just enjoy the fabric, and the possibilities.

**After writing this post, I came down with a stomach virus. Go figure. Day 1 of sabbatical has now been reconfigured to sleeping, sipping water, watching TV, maybe some reading. Serious doubts I'll be able to stand at my cutting table. Had to see that coming.

Food Friday--Pork Chops with Balsamic Vinegar

I had a couple of pork loin chops that I needed to use up, but we'd just had pork a couple of days before. So I wanted something a little different, but I'd also been on my feet a lot that day so I was looking for something fast for which I already had all the ingredients. I went to my Mastercook software and did a quick search, and found a great recipe in one of the pre-loaded cookbooks that's definitely a keeper!

I made it straight-up this time, but I think next time I might try using fresh lemon zest instead. The lemon pepper seasoning I used tasted just a little stale to me, although my husband didn't notice. (I checked later and yep, should've used it a year ago!) I think fresh would be nicer, in any case. I also debated adding a little dried ground ginger--didn't this time, might next time. I usually don't start messing with a recipe until I've tried it as-is once. In any case, I definitely recommend this one. (It's apparently an older recipe because I tried the find the website so I could provide a link but the site no longer seems to exist.)
Pork Chops with Balsamic Vinegar
(based on one from Swift and Company)

Servings: 2
Preparation time: 20 minutes

2 boneless center pork loin chops (1 1/2" thick)
1 1/2 tsp lemon pepper
1 tbsp vegetable oil
2 tbsp chicken broth
3 tbsp balsamic vinegar
2 tsp butter

1. Pat chops dry. Coat with lemon pepper seasoning to taste.

2. Heat oil in heavy skillet over medium-high heat. Add chops; brown on first side approximately 8 minutes; turn and cook 7 minutes more; make sure both sides are nicely browned and it's cooked through. (Internal temperature should be 145 degrees.)

3. Remove chops from pan and keep warm. Add broth and vinegar to skillet; cook, stirring until syrupy (about 1-2 minutes). Stir in butter, blend well. Spoon sauce over chops. Serve immediately.

Notes:
  • Although the recipe is two servings, the sauce I ended up with could've been enough for four. It's a strong flavor so you don't need much.
  • I corrected a couple of seeming errors in the recipe (or, rather, perhaps I just didn't trust theirs--but my corrections seemed to work well in any case).

And on another note...

Last weekend, my mother-in-law and I took a wine tasting class at the New York Wine and Culinary Center in Canandaigua (if you're local and have never been there--it's a must-do!). In the class, we tried three different NYS wines--a chardonnay, one that's a bordeaux but can't be called such because it's not from France, and a desert wine--a late harvest white blend. We tasted each wine first by itself, and then were given three appetizer-sized dishes: an egg/cheese quiche, braised beef, and pumpkin pie. We then proceeded to taste each dish with each of the three wines; in other words, the quiche first with chardonnay, then with the red, then with the dessert wine...then moving on to the briased beef with the chardonnay, then the red, then...etc. I've done pairings before and it's always fascinating how completely different wine and food can taste together. I didn't like the red much at all on it's own, for example, but then that was my top pick of which I liked best paired with both the quiche and the braised beef--it was great with both of those! The other interesting thing was when the instructor had everyone raise their hands for which pairing they'd liked best in each category, and we were across the board. So the point of the class is, don't lock into certain assumptions, and know that different people at your table may have different preferences, so it's not a bad idea to have several selections at dinner parties.

That being said, taking what we'd learned in the class, I paired a light Pinot Noir with the pork recipe above. Tasty! I could've gone Reisling as well. Might do that next time since my husband and I both decided this recipe is a keeper!

Donation Quilt Wednesday--Other Sewing Projects

Just for a quick change of pace this week, as I was perusing sites with free patterns that work well for donation quilts (fast, easy, but attractive), I came across this list of other sewing projects that would provide some much needed donations as well. If you're looking for some alternatives, maybe you could get some friends together for a sewing day and put together some of these options:
http://www.sewing.org/html/charitysew.php

Some great ideas in that list!

(More on those sites with free patterns later!)

No-Theme-Tuesday

OK, so with all my themed blogging days I may have been able to sneak it by you that I haven't actually done any quiltmaking of my own lately. I could say it was because I was spending all my free time experimenting with oatmeal, but that's not exactly true. Well, a little true. But not that true.

I've just not been motivated...which led me to the realization today that yes, indeed, despite the unseasonably warm winter we've been having and a slightly higher-than-usual number of days with actual, real live sunshine, I'm still in my usual winter funk. It's not quite as bad this year as it's been in years past, which is why it took me awhile to catch onto it. Still, there it is. It has lumbered into my life and shoved everything else aside for a bit.

I learned long ago not to fight it. If I were to try to force myself to my sewing machine at the moment, likely I'd make a mess of it and get highly irritated to boot, and that's not the quilting Zen I like to achieve. So meanwhile, I'm taking advantage of the time to live out some of my slow quilting tenets--I'm playing with color, I'm petting my fabric, I'm spending time nose-deep in books (quilt design and otherwise), and I'm just riding out the quiet period.

I do actually think these quiet periods are a gestation of sorts. I could get all pastor-y about it and compare it to the ebbs and flows of spiritual experience, but I do believe I have another blog for that sort of thing now. For the purposes of this blog, suffice it to say that one shouldn't be afraid of the quiet periods. I don't worry that I've lost my quilting mojo by any means. I know that it's just gone into a short period of hibernation--a sleepy time necessary to regroup and allow the snoring subconscious to mull over all sorts of wonderful possibilities of color and setting.

My mojo will come back, presumably when it's about 5o degrees out and there's a break in the clouds. Well, since that doesn't happen until sometime in mid-March, hopefully it'll decide to poke its nose out of the cave sometime before that. Whenever. I'll be ready.

(Photo note: don't recall what critter that is sleeping in a cave in Disney's Animal Kingdom; surely not a hibernating kind. But he was the only thing close in my photo files so you'll need to allow me some mammalian metaphor license.)

Slow Quilt Monday--The Wisdom of Winnie the Pooh

"Weeds are flowers, too, once you get to know them."

And more thoughts from A.A. Milne's Winnie the Pooh, my favorite sage, for you to ponder this week:

"Rivers know this: there is no hurry. We shall get there some day."

"Poetry and Hums aren't things which you get, they're things which get you. And all you can do is go where they can find you."

"It's the best way to write poetry, letting things come."

(Where Pooh may be talking about poetry and hums, we can think quilts. And weeds? Well, I'll let you interpret that in your own life.)

Food Friday--Baked Oatmeal

I'm a bit of a late bloomer when it comes to the oatmeal front. I come from a big family and Mom didn't want to be a short order cook, so we were each allowed only one thing we could refuse to eat. Mine was oatmeal. It made me gag when I was little. Then, one day when I was older high school-aged, I was on an all-family church retreat, and Saturday morning the dining hall had oatmeal for breakfast. It was a very crisp fall morning and I'd been up late the night before with my peeps and just felt very in need of a more substantial breakfast than dry cereal. I decided to brave the oatmeal. And something clicked. Yum.

Much more recently I developed a fascination with the concept of baked oatmeal in my slow-cooker. Wouldn't it be wonderful to wake up on a cold winter morning with a hot bowl of oatmeal all ready and waiting, with no effort on my part? That just sounds the epitomy of cozy. So I hit the Internet. Unfortunately, the recipes I found were all for crowds: 6-10 servings or more. I'm the only oatmeal-phile in the house, so I really wanted to scale that down. The biggest issue with oatmeal in a slow-cooker is proportions. I wanted to have nice, creamy oatmeal waiting for me in the morning, not a dried out lump of gruel or, on the flip side, soup.

So I started playing around. I've eaten more oatmeal in the last two weeks than the last two years, now, I think. I couldn't quite get it down to a single serving; it clocks in at 2-3 servings, but it reheats in the microwave quite well, so you'll get a couple of mornings of tasty breakfast with minimal work.

Sandy's Slow-cooker Baked Oatmeal for One, with Leftovers

Equipment needed: 1.5 quart slow-cooker (see notes)

Ingredients:
butter
1/2 cup steel-cut oats
2 1/4 cups cold or lukewarm water

Seasonings (optional, to taste): cinnamon, nutmeg, pumpkin or apple pie seasoning, brown sugar, maple syrup, etc.

Add-ins (optional): dried cranberries, raisins, diced apples, nuts, etc. Dried fruits and nuts hold up to slow-cooking fine; apples will cook down a bit. Bananas or other soft add-ins would do better added in the morning. Don't add dairy products until morning.

Directions:

  1. Coat sides of slow-cooker with butter to keep oatmeal from sticking.
  2. Combine all ingredients in slow-cooker and stir. Cover and set on low, cook for 6-8 hours.
  3. When you're ready to eat, give it a good stir to mix the drier edges with the creamier center. (See below for additional tips.)

Notes:

1. I used a 1.5 quart slow-cooker. If you have a different size, you may need to mess with the proportions of liquid to oats a bit. I don't know that I'd try doing this small amount in significantly larger (3.5-6 qt) slow-cookers--I'd think it would dry out.

2. Steel-cut oats rather than regular rolled oats are highly recommended; they stand up to slow-cooking much better. In fact, I tried steel-cut oats on my stovetop and wasn't a fan, but I love them done in the slow-cooker. There are several brands of steel-cut oats; I use Quaker because they're readily available in my grocery store in the cereal aisle. You can google something like "best steel-cut oats" to find out what other options are popular out there. If you use rolled oats, you're probably going to have to lessen the amount of water. I didn't test those.

3. On seasonings and add-ins, just have fun. I used various combinations of cinnamon, nutmeg, allspice, dried cranberries, apples, and brown sugar. Use a light hand on seasonings the first time; you can always add more later but you can't take it out. (I found a pinch of each worked well for me.) The one issue with this method is you can't really taste-test it until it's all done. See leftover oatmeal recipes below, however; you may choose not to season the oatmeal until you've scooped it into your bowl, leaving your leftovers unseasoned for another use.

4. I found proportions that made my oatmeal creamy but not soupy; you may like yours a little drier or creamier, so you might want to mess with that some too. If it does seem a little dry when you first scoop it out of the slow-cooker into your bowl, some milk or hot water should moisten it up enough. If it seems a little soupy and you have some extra time, leave the cover off the slow-cooker and turn it up to high for another few minutes--that will help dry it out a little bit. I found myself doing that anyway--it makes a little bit of a soft crust on the oatmeal that was quite nice in my bowl.

5. Buttering the sides of the slow-cooker first really does help quite a bit. It's much easier to clean when it's been buttered first. Plus, it does add just a little bit of flavor. I'm not sure I'd go with a spray here--they can leave a residue that's harder to clean.

6. New to slow-cookers? Here's a link to some helpful FAQs. I have several sizes--smaller ones are great for hot dips or cheese/chocolate fondues at parties!

7. Here are some links to recipes you can make with the leftovers. Note that for these recipes, the oatmeal is cooked plain--no add-ins or seasonings--but you could play with the recipes to accommodate whatever you've made.

Leftover Oatmeal Cookies

Leftover Oatmeal Cookies with Butterscotch

Leftover Oatmeal Muffins

If you're looking for a slow-cooker baked oatmeal recipe that will serve a crowd, just google. There's a ton of them out there!

Donation Quilt Wednesday--Some Inspiration

Here's a nice example of a very "fortunate" donation quilt! Cute design, attractive, but still relatively easy to make.

Central Star  (#3617)

And here's another one:
Crazy Quilt Top - Final Border Added

And another:
Lopsided Log Cabin (5387)

These are all by AllThatPatchwork on Flickr. (If this link works, it should take you directly to her charity quilt set.) I had a hard time choosing which I was going to post! I got her permission to use her pics; when she responded she said, "my whole idea in posting them all is to encourage others to do more donation quilts." Here here. What she said.

I've gotten some good ideas from looking at her quilts for future donation quilts of my own. I'm also fascinated by all the many places that receive quilts--we get used to hearing the "big names," (Project Linus, Quilts of Valor, etc.), which are fantastic. But there are so many other places that a lot of you have named: nap mats for inner-city school kindergarten classrooms, birthing kits for Haiti, local shelters, places that have had natural disasters.... Seems everyone needs a quilt to show them a little love, doesn't it? So, what are you sitting around reading this blog for? Go forth and quilt!

Slow Quilt Monday--What If?

It's time to play "What If?"

One of my favorite activities to do when I'm working with small groups is playing "What if?" In my line of work, the "what if" factors tend to be things like, "what if you had more money than you needed," or "what if the building burned down and you had to plan an event somewhere else," or "what if you had 15 more volunteers show up tomorrow?" What if...what if...what if.... Trying to loosen our minds from their usual knee-jerk restrictions: not enough money, not enough people, not enough space, not enough time... or just doing the same ol' same ol' because we're trapped in habits of behavior and attitude.

Quiltmaking isn't all that different from your average not-for-profit small group. Too often we can get stuck in rather comfortable, albeit pretty, ruts. We like certain color schemes that we find ourselves repeating. We are comfortable with certain styles so we keep going back to that well. We get really good at a particular technique so we find ourselves slipping it into as many projects as possible. None of that is bad, of course. We get very nice and enjoyable results from it. But a rut by any other name is still a rut.

And often ruts come from a need for speed. When I'm driving in snow, I find myself choosing those lanes or roads that are already well-traveled because I can go faster driving in other people's ruts. I know it's safe. I won't get stuck. But I'm also not breaking any new ground. And I'm likely to eventually get bored from seeing the same route over and over and over again, as fast and easy as it may be.

What If is actually a big part of slow quilting. It's taking the time to imagine "what if I put these two colors together," or "what if I took this block and flipped this one unit the other way," or "what if I did a quilt in a different shape?" It's taking time with a sketchbook or computer program to just mess around for fun. It's looking at a pattern in a book and imagining it with different colors or different borders or a different setting. It's leaving your blocks on your design wall for just another few days to allow your brain to play with a few more What If scenarios.

It's also, occasionally, "What if I actually did have X skill, or knew Y technique? What could I do?"

In small groups, when we play What If?, we end up with newsprint hung all over walls with multi-colored lists of possible scenarios, arrows pointing this-a-way and that-a-way, lines criss-crossing connecting one idea with another, stars or dots next to some, lines through others. You see, not every What If response will actually work. But some of them do. Some of them lead to new ideas. Some of them inspire entirely new directions. Some of them become catalysts for significant change. If you never play What If, you never find those gems hidden in multicolored lists on newsprint.

This week, I want to play What If? Will you join me?

We can play this in any number of ways--play it however you think you most need to. In future SQM posts, I may come back to playing What If and give a little more direction about particular things to What If about. But for now, I'd rather leave it open-ended for you to think about how it applies to you specifically. The best way to know what kind of What If you need to play is to think about what habits of thought or behavior you've gotten into, or what areas of your quilting life you may tend to focus more on the "don't haves" rather than the "do haves."

For now, just make the What If lists (newsprint and smelly markers optional). Don't worry so much about choosing which ones may actually be worth following. There's plenty of time for that. We're doing this slow, after all, remember?

Don't forget to download Squim the Slow Quilt Movement Snail and put him on your blog!

Food Friday--Buche de Noel

Back in my senior year of French class in high school, I learned how to make a Buche de Noel. For a few years after that, I made the cake for my family at Christmas. Then I did things like get married and have kids and forgot about the recipe still somewhere in Mom's files, and eventually it got lost. But I have reunited with the Buche de Noel finally, and am glad I did.

To the uninitiated: The Yule log is a particularly large log burned in the fireplace as part of the Christmas celebrations in several countries. There is disagreement about its origins, but this isn't "Large Log Friday," so I won't go into that here. Suffice it to say that the Buche de Noel, or Yule Log cake, is meant to represent the wooden log in a much tastier fashion. If you've never had one, think, "big Ho-Ho." It's a thin, flourless chocolate cake rolled up with a cream center. Traditionally, I think, it's chocolate cake with either chocolate or white cream, but in reality the cake and the cream can be any flavor you want.

This past weekend I hosted my side of the family for a belated Christmas celebration, and I decided to return to my high school roots and do a Buche de Noel for dessert. I stuck with chocolate. I made my first attempt on Saturday night at about 7:30 p.m. I have learned that I should not try to bake after sundown on a long day. I made the same mistake twice...did with the egg yolks what I was supposed to be doing with the egg whites and vice versa. Can't come back from that error, really. Next morning, I hied myself to local grocery store to pick up another dozen eggs...this time all went swimmingly.

Forgot to take a picture of the finished product, as things were a bit chaotic when I added the finishing touches to take it to the table after dinner (house-full n' all); but here's the cream that went into the middle!

I sprinkled confectioner's sugar and some mini-M&Ms over the top before serving; next time, I think I'd put the mini-M&Ms on the inside with the cream and do shaved chocolate or some other decoration on top. Lots of folks go all out and frost it to look like bark, add other branches, meringue mushrooms and the like.

The recipe below is inspired by one I found on allrecipes.com. I made some adjustments to the way it was written (to hopefully help others avoid making the same errors I did) and included a couple of extra things. Also, I've made notes at the bottom with additional suggestions.

Buche de Noel

Cream filling:
2 c heavy cream
1/2 c confectioner's sugar
1/2 c unsweetened cocoa powder
1 t vanilla extract

In a large bowl, whip cream, and slowly add confectioner's sugar, cocoa, and vanilla until thick and stiff. Refrigerate.

Cake:
6 eggs, divided into yolks and whites
3/4 c sugar, divided
1/3 c unsweetened cocoa powder
1 1/2 t vanilla extract
1/8 t salt
(confectioner's sugar for rolling and dusting, see below)

1. Preheat oven to 375, and line a 10x15" jelly roll pan with parchment paper. Spray the paper with nonstick spray, and set aside.

2. In large bowl using an electric mixer, beat egg yolks with 1/2 c sugar until thick and pale. Slowly blend in cocoa, vanilla, and salt. Set aside.

3. In a large glass bowl, using clean beaters, whip egg whites to soft peaks. Gradually add 1/4 c sugar and continue beating until whites form stiff peaks.

4. Immediately fold yolk mixture into the whites--do not stir; simply fold gently until two mixtures are combined.

5. Spread the batter evenly into the prepared pan, being sure it reaches the corners and is as evenly spread as possible.

6. Bake for 12-15 minutes, or until cake springs back when lightly touched. Meanwhile, lay a clean, lint-free dishtowel on a flat surface and dust the towel well with confectioner's sugar. (A thorough dusting is important to keep the cake from sticking to the towel.)

7. When cake is done, remove it from the oven, and immediately run a knife around the edge of the pan to help loosen the cake. Turn the warm cake out onto the towel. Carefully remove parchment paper, being sure not to remove a layer of cake with it. Discard paper. Starting at a short edge of the cake, roll the cake up with the towel. (The cake should be touching towel, not cake.) Cool for 30 minutes.

8. Carefully unroll the cake, and spread the filling to within about an inch of the cake edges. You may have more filling than can be expected to fit on the cake--that's fine. You can use it as topping later. (See notes.)

9. Roll the cake up with filling inside, and place seam-side-down onto serving plate. Refrigerate until serving. Dust with confectioner's sugar before serving.

Notes:

  • I used a 10x15 jelly roll pan and thought I probably could've gotten away with a slightly larger one. My cake baked a little thicker and took a little longer to finish baking than the recipe said.
  • Be careful not to overbake the cake--the drier it is, the more likely it is to crack while you're rolling it. Also, don't cool it longer than the 30 minutes. It also helps prevent cracking if it's still a little warm while rolling.
  • The original recipe did not say to spray the parchment paper with nonstick cooking spray--I found that later on message boards. I do wish I'd known to do that--I lost a little of the back of my cake on the parchment paper.
  • I had far more cream than would've fit in the cake--it'd have just splurted out the side as I rolled it. I thought about using it to frost the finished cake but was worried it might be too rich. So, I put the remainder in a pretty serving dish alongside regular "non-dairy whipped topping" and gave people the choice of which they wanted to put on their slice of the buche de noel, if any. Most went for the chocolate cream. I probably could've gotten away with using it as frosting after all.
  • Lots of people frost the cake with a buttercream frosting. I prefer it without, but you may want to experiment with that as well.
Have you ever made a buche de noel in a different flavor? Give us some ideas!