My Guild Retreat pics

If you're interested in seeing pictures of what happened at my guild retreat last weekend, you may want to check out our Canal Country Quilters blog. My quilty peep Lori and I administrate it, although she does the lion's share of the work. (Thanks, Lori!) She's working on getting the pictures from the weekend posted--she's gotten the first day, including our paintstik class, done so far. She's hoping to have the rest up this week.

You can find it at http://canalcq.wordpress.com/.

Consider subscribing! We always post pictures of our show n' tell there now, plus periodically other helpful information. I'll have a post about paintstiks going up in a couple of days that give a lot of information about how to use them (more than I've posted here, I believe).

As you know, I love love love my guild. We have a blast. So, you're welcome to have fun with us vicariously! (And if you live in the area, consider coming for a visit. There's an "about" page that lists our meeting times and locations.)

Another finish and some homework


 I finished the first of two receiving blankets tonight. These are going to be for a friend of mine who is expecting her first baby, a little girl, this July. I'm also going to be making her a quilt but just couldn't resist making a couple of these really cute receiving blankets using the same Missouri Star Quilt Company technique I used for all the donation quilts I helped new sewers make back in March.

I'll finish the second one tomorrow or Wednesday--it's all cut and ready to go.

Tomorrow night is our quilt design study group. Since we had to shuffle our schedule around a bit in April to accommodate travel schedules, we ended up with a six-week stretch between meetings. I suggested we do homework, which is supposed to be a regular part of our experience but we've been skipping a lot. (We do a lot more in-session, however, so it's sort of a toss-up.) I figured with six weeks, it wouldn't be a problem. Of course, I left it to tonight to do. Yes, I can spell procrastination.

We had just done a segment on color and Vicki, who led the session, had prepped all the materials for us to each make our own fabric color wheel and it contains little spinny cards to put in the center with a variety of color schemes on them. Our homework was supposed to be to choose a color scheme we wouldn't normally use and do something with it.

So, tonight, I pulled out the color wheel and threw all the little center spinny cards face down on my table and shuffled them up. Drawing one at random, I then put it in the center of the color wheel and, eyes closed, spun it around a few times then landed it somewhere. Opening my eyes, this is what I found:
(The writing says, "4 points on a square.")

Yep, that's definitely a color scheme I wouldn't normally use. Yellow, blue-green, purple, red-orange. My first thought was, "ick."

I burrowed through my scraps for awhile, still thinking at that point that I might just do a little fused something-or-other, so I didn't want to commit whole pieces of fabric. I found the blue-green and purple pretty easily--those are colors I do drift towards on occasion. Red-orange was a little trickier mostly because it's hard to find something truly red-orange and not red or orange. I finally landed on one. But yellow? Wow. That was a toughy. I've discovered I don't actually have a lot of yellow in my stash. I had a few random yellow scraps but they were all a lot more shaded (and I use that word in its official artistic sense) than I wanted to go with the other colors. Finally, I dug into my fat quarters and there it was. The perfect yellow. 

And, in fact, a lovely combination altogether. Bright, admittedly, but just imagine it with a some white thrown in there to calm it down. I'm picturing festive appliqued flowers on a white background with the yellow as a border. Or cute little mini-stars pieced into that yellow as a background in a mini-quilt.
But, to be honest, that's an image that will never get made into reality. I've got too many other more pushy designs in my head demanding my attention. It was a fun project, though, finding those colors. And now I do have some new color combination possibilities in my head. Try it yourself sometime!

Retreat Report

...And a good time was had by all.

Actually, a fabulous time was had by all! Have I mentioned before how much I enjoy my guild peeps? And there's a handful of women who aren't members of our guild but are linked through friends and such, so they come to our retreats on a pretty regular basis as well. Might I say, they fit right in. Very, very entertaining women.

I didn't bring the kitchen sink.

However, after a few years of going on retreat, the furniture I pack seems to grow each time. I just get a lot more done if I have a decent set-up. My Sew-Ezi table (somewhere under the bins on the left, there) is a godsend. Love that thing. I also have a lightweight, foldable craft table that's only an inch or so shorter than the Sew-Ezi. I brought that this time and mostly used it as a small pressing station with my travel iron, but sometimes moved it over to sit next to the Sew-Ezi to hold the extra bulk of larger projects while I worked. Also extremely useful, so that's now made it to my list of "always pack" items.


This time I'd also volunteered to bring my ironing board and iron as one of our four communal pressing stations, so that added just a bit to the stacks. Everything else pictured here are projects. My clothes? Last packed, least planned, lightest weight.

Sadly, the one project I really wanted to work on--a baby quilt for a friend--I stymied myself by packing all the fabric but forgetting to print off my EQ7 design and cutting instructions. Dang. Couldn't touch it. But I got a lot else done!

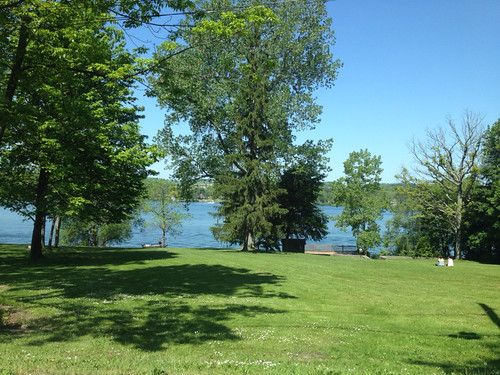
First, the setting...

A nice Methodist church camp/conference center on Silver Lake in Western New York. It was about 85 degrees most of the weekend. Gorgeous!


(Forgot to take a picture before I left so this one was shot out my car window as I was driving away--sorry about the rotten composition.)

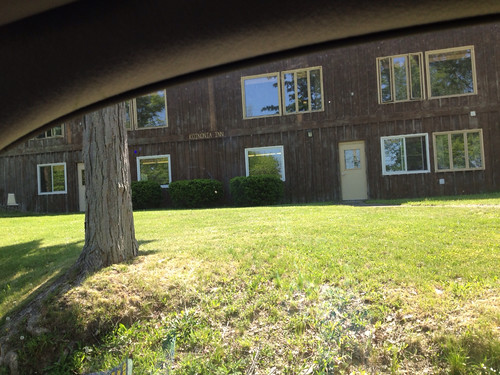
This was the building we pretty much lived in for the weekend, although our bedrooms were in another building. The lower floor was our sewing room, the upper floor the dining room. There were a couple of other groups there that weekend but we only saw them briefly during meals. It's a nice space, although we can't plug too many irons in at once or we blow a fuse. Hence the communal pressing stations. However, we've also got fewer women going these days than a few years ago so we've been able to loosen up the restrictions on small travel irons. The conference center cook, Becky, is excellent. I probably gained five pounds.

Ah, but on to the quilting! What did I get done?


I got the binding put together and sewed onto the front of Fortune. All I have to do now is the hand-sewing on the back, a good TV project. (Planning on doing that tonight after I get this blog posted.)

And yes, our tradition is to tape our finishes to the wall as we go. Wall space gets slim by the end of the weekend!

(That's my little craft table with my pressing station on the left, btw, if you're curious. And our retreat schedule taped above it so I could keep track of when we were going to have our ice cream social so I didn't disappear at the wrong time. Priorities.)


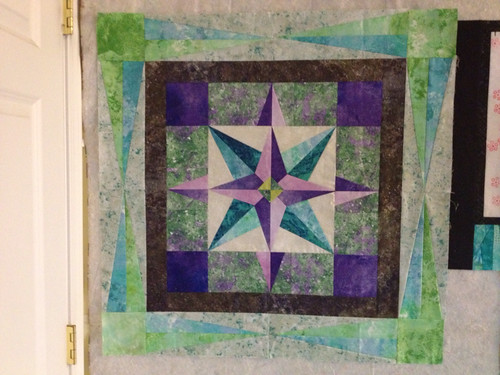
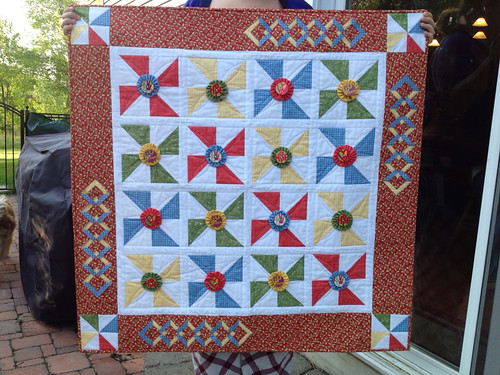
I also finally found fabric (more about shopping trips below) for the third border on my medallion challenge quilt and was able to get that done. The colors are a complete departure from what I'd initially imagined, but the store didn't have what I'd thought I'd wanted and at this point, frankly, I was tired of trying to figure this out. So with guild-mate Florence consulting, I decided to go with this set of a light gray-with-blue/green speckles background, and a green and blue deconstructed star. The blue fabric is the same as the lighter blue fabric in the center block, so that was a happy find. Now I just have to do the last border, which will be that same black/gray as the other narrower border--if I still have enough! (I designed the border as paper pieced blocks in EQ7.)

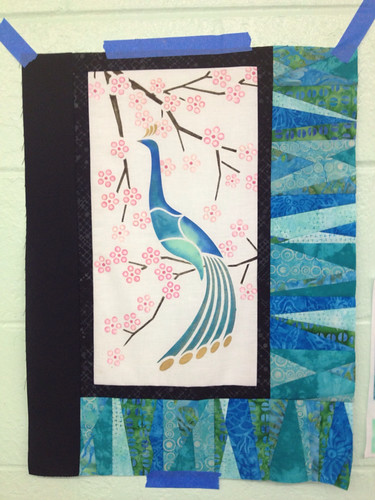
...and I put borders on Paintstik Peacock. I'd made borders with blue/green/turquoise fat quarters using the stack n' slash method. I wasn't sure I wanted those borders all the way around because I was afraid they'd overwhelm the peacock. I had it all laid out on one of our communal cutting tables and a few folks walked over to see what I was doing and offer their two cents--as we quilters like to do. It was Vicki that hit on exactly the right idea--offset the borders. Only use the blue on two sides. Finish the third border with black, and leave the top alone.


Absolutely perfect.


Peacock has now been renamed Vicki's Peacock, although I told her that didn't imply she was going to get him!


I also started some receiving blankets but didn't get far on them, so more on that later.

Onto the shopping! Of course, any good quilter's gathering always includes some visits to local shops. A few of us went to Mt. Pleasant Quilt Company on Friday, and a couple of us went to Material Rewards on Saturday. Both great shops!


Got some fat quarters, just 'cause.


Some end-of-bolt stash fabric--pretty decently discounted so, why not?


Now, for just a minute, feast your eyes on this one. Mmmm.


A white batik.


Does anyone else love some fabrics so much you just want to ingest them?


Mmmmm.


So I had to find something to go with it.


Found these to start. Very pretty.


But it needed something.


Decided it needed more contrast. So I found the dark teal (bottom of picture) to add to the stack.


Still not quite enough.


There it is. Purple.


Mmmm.......


So that's my retreat report. Guild-mate Lori will be posting pics of everyone's projects on our guild blog, so as soon as that's up, I'll post a link. There was a lot of eye-candy going on!

Finally--A Finish!

This wallhanging has been almost a year in the making--and it was supposed to be a fast, simple project. I wanted something for my dining room wall that would say "summer!" and would rotate with the flag wallhanging I have that goes up Memorial Day and Fourth of July, but that I didn't necessarily want hanging up the entire summer. So I thought, "I know! Primary colors! Pinwheels!"

The basic pinwheel part was done pretty quickly. Then I pondered borders. "I know! I'll use the Double Diamond Ruler by Kim Templin!" (See episode 41 for my interview with Kim.) I thought it would look like a cute garden fence around my pinwheels, thereby turning the pinwheels into flowers. My summer wallhanging was beginning to take on a theme.

Unfortunately, I didn't have quite enough of the fabrics I needed to use for the double diamonds to do a full border of them, so I did half borders and framed the center with them. I actually like the way that looks better, anyway.

And, of course, I couldn't leave it at that. With the more complex border, the pinwheels now looked just a little bit plain. And they had morphed into flowers--so how could I make them more flower-esque? "I know!" I thought, yet again. "I'll do yo-yos!" This required finding fabric in my stash that coordinated but didn't stick out like a sore thumb...which was a task unto itself. But I persevered...and I think I only ended up having to buy the yellow because that's not something that typically exists in my stash much.

Yo-yos made (using the Clover yo-yo tool, which makes it very easy), I realized I'd need something in the center. Wait for it.... "I know!" I decided to use buttons. The first buttons I bought were white, because I thought I'd like the clean, fresh look of white buttons unifying the different colors of the pinwheels and yo-yos. The only buttons I could find at Joanns with 16 that matched were on the small side, but I thought I could make it work.

I sat down one night and started sewing those dang yo-yos and buttons onto the pinwheels by hand. It took me almost half an hour to get one done--it ended up all cock-eyed and didn't have the clean affect I wanted, plus I had 16 of those stinking things in total to finish. At a half hour a pop I wasn't sure it was worth it. I threw it to the side in frustration.

You guessed it. By now I was sorry I'd ever started the stupid project.

"I know!".... and I pulled out my sewing machine manual to check a niggling memory I had that I could sew buttons on by machine. Sure 'nuff, there it was. I sat back down with my wallhanging and little white buttons and started on the first one, high hopes and dreams of having it done by the end of the afternoon.

Urgh. And more urgh. The buttons were too small for me to really easily hold them in place while I was sewing, and they were just high enough that my presser foot couldn't quite mash them down far enough for the needle to do its work. I finally got one sewn on, but when I pulled it out and looked it...all cock-eyed and nasty again. Threw is to the side in frustration again.

A couple of weeks later, I decided to go to Joanns and see if I could find bigger buttons. Standing in front of the collection of white buttons, I kept counting and recounting different designs in mounting frustration again--there weren't 16 of any one design. And none of them were interesting enough to warrant getting different designs.

I was just about to bag the whole yo-yo button thing as I turned to walk away when my eyes lighted on a set of buttons that were very different than anything I'd pictured in my head. Interesting. The more I thought about it, the more it tickled me. Suddenly I went from "simple, fresh summer wallhanging" to "funky hippy fun wallhanging."

The new buttons worked swimmingly. I wasn't able to get the four different designs I wanted so I held up for a bit while I tried to order one of the designs online--and ended up losing money when the secure site I'd purchased from suddenly disappeared with no trace and...no buttons. But it was only $11 so I'm not sweating it. Just yet another delay in getting this supposedly simple project done. I ended up back at Joanns buying the other set of four buttons that I hadn't liked as well the first time but can live with, because done is better than perfect.

So, all that being said, introducing "Sandy's Hippy Peace Garden."


Podcastaversary Give-Away--Week 4--American Quilter's Society Gift Certificate

If you're a long-time follower of my blog or podcast, you know that my mother gets all the credit for introducing me to the world of quilting. After her passing, as I was working on cleaning out a set of drawers in her quilt studio, I came across her collection of pins from quilt shows she'd attended through the years, and a significant number of pins indicating her long-time membership in the American Quilter's Society. Once again following in her footsteps (my mom was a smart woman!), I joined the AQS as well and have enjoyed the benefits that membership has afforded me.

 For the final week of my two year podcastaversary give-away, I'm offering up a $25 gift certificate to the American Quilter's Society. 

You can use the gift certificate to become a member of AQS for a year, buy great quilting books, or subscribe to The Quilt Life Magazine--one of my favorites. Becoming a member of AQS gives you discounts galore, including reduced registration fees at AQS-sponsored quilt shows. (Paducah, anyone?) I've enjoyed my membership and am glad to have the opportunity to pay it forward!

To enter into this drawing, leave a comment below telling me what you think you would do with the gift certificate if you were to win. It's a random drawing--I won't be "grading" your answers. Just curious!

Leave your comments by midnight Eastern time (NY) on Saturday, April 28th, 2012. I'll be using my old friend "random number generator" to choose the winner! (Don't forget to make sure your email address is in your profile or comment so I can contact you. Hate to have to skip you if your name comes up but I have no way to be in touch!)

(Please note--I will be out of the country until May 2 and will only have intermittent email access. Although I'll make my best efforts to check in and do the drawing, I may not be able to announce the winner of this giveaway until after my return. So go ahead and enter, and spread the word to all your friends by tweeting this post or pasting it into your Facebook status update or whatever--but you may need to be a little patient in hearing the results. Thanks!)

Podcastaversary Give-Away--Week 3--Fat Quarter Shop

As an avid fan of fabric, I'm so pleased to announce that the sponsor of this week's giveaway in celebration of my two-year podcastaversary is...drum roll please...


The Fat Quarter Shop

As a fan of fabric, I'm definitely a fan of the Fat Quarter Shop. Back when I was a pretty new quilter, my sister (not a quilter) had done her research and gave me a gift certificate to the Fat Quarter Shop for my birthday--my first introduction to the online store. I thank her to this day! The Fat Quarter Shop has great selection and prices, a user-friendly shopping experience, and excellent customer service. So I highly recommend them!

The Fat Quarter Shop is sponsoring this week's giveaway by offering two (count 'em, two!) gift certificates of $50 each. Two winners! Woot woot!
All you have to do to enter your name is leave a comment below letting me know what fabric you might purchase if you were to win one of the gift certificates. Is there a new line that's caught your eye? Is there one you've been drooling over for awhile but holding off ordering it? Do you need some blenders or neutrals in your stash? Decided to do some jelly roll patterns? Need a kit for a quick gift? What would you use the gift certificate for, if you were to win?

By the way, if you're not already a subscriber to my podcast or blog, it sure would warm the cockles of my heart if you were to become so now. You can also follow me on Twitter and Pinterest, and friend me on SeamedUp and GoodReads--I'm sandyquiltz in all those places. However, that won't affect your chances in this giveaway. I'm just having fun this week!

Post your comment by midnight Eastern Time (NY) on Saturday, April 21st, 2012, to be entered in the drawing. (Don't forget to make sure your email address is in your profile or comment so I can contact you. Hate to have to skip you if your name comes up but I have no way to be in touch!)

Looking forward to hearing from you. And thanks whole bunches to the Fat Quarter Shop for being a sponsor!

(Please note--I will be out of the country for a couple of weeks and will only have intermittent email access. Although I'll make my best efforts to check in and do the drawing, I may not be able to announce the winners of this giveaway until after my return. So go ahead and enter, and spread the word to all your friends by tweeting this post or pasting it into your Facebook status update or whatever--but you may need to be a little patient in hearing the results. Thanks!)

Two Year Podcastaversary Giveaway Week 2--It's Aurifil Week!

Thanks to everyone who played along on Week 1: A Celebration of Quilty Podcasts! Congratulations to all the winners, and thanks again to my fellow podcasters who helped me celebrate! (I'll announce my winner on my next podcast episode; I'm in the process of getting in touch with her to let her know she's won.)

And now it's time for Week 2: Aurifil Week!


As you know if you're a listener to my podcast series, I'm an Aurifil girl. I use other threads on occasion for different kinds of projects, but for piecing, it's strictly Aurifil 50 wt. I love how thin it is, so it doesn't take up a lot of extra bulk in the seams, but at the same time it's really strong. It's also amazingly low-lint. Because it's thin, one spool lasts a l-o-n-g time. This is the current collection I'm working with, although I've got a few more in my thread drawer waiting their turn.


I've also gone through my share of the 28 wt thread in machine quilting. It's also incredibly strong, low breakage and low lint--great for free-motion quilting. It's also good for hand quilting, hand applique, and hand piecing--according to Aurifil's website. I do remarkably little by hand, so can't really speak to that!


I was intrigued to find out awhile back that Aurifil also has a wonderful wool thread, so I bought some to explore doing felted wool projects by machine. Can't report on that yet--haven't gotten to those projects on my to-do list at this stage. However, I am seeing some potential usage opportunities coming up soon in some of my art quilting--it'll be great for some hand-stitched accents.


I'm also looking forward to using Aurifil's monofilament (invisible) thread that I own--the invisible thread has gotten great reviews. That'll probably get put to use pretty soon--I've got a project in the offing that it'll be perfect for.


So, yes, I'm a fan. I'm thrilled that Aurifil has sponsored this week's giveaway, so now I have the opportunity to try to make a few more fans out there too!

Aurifil has provided several sampler packs for me to pass along. Each sampler pack has five spools of thread: (1) wool, (1) 40 wt, (1) 28 wt, (1) 50 wt, and (1) variegated 12 wt. Colors vary per pack.

I'm going to send one sampler pack to each of seven winners. Count them--seven winners! I'm going to give you two chances to enter in the drawing.

1. Leave a comment here telling me how you'd like to use your sampler pack, if you won one. Your name will get entered once in the drawing.

2. You can leave a second comment telling me that you've subscribed to my podcast series. (If you're already a listener--thanks tons! And leave a comment telling me so--you'll still be entered.)

Leave your comments by Friday, April 13th, 2012, at midnight Eastern-Sandy-Time (New York). I'll draw the winners on Saturday. Can't wait to share!

Thanks for helping me celebrate, and good luck! (Be sure to spread the word--tweet or post this giveaway to your sewing friends who may want to have some Aurifil in their thread collection too!)

Podcastaversary Give-Away--Week 1 "Celebrate Podcasts!"

Yay! It's my two-year podcastaversary! My, how time flies. When I started this venture, I had no idea that (1) I'd still be doing it two years later and (2) I'd have made friends doing it! A community has been created amongst quilting podcasters and our listeners and I thoroughly enjoy being part of that.

To kick off a month of celebrations, this first week, we're celebrating podcasts!

The giveaways officially start Sunday, April 1st. I've got to post this on Saturday to give the podcasters time to link up here--so if you're reading this on Saturday, come back tomorrow and see who all has joined in! :-)

First, my own giveaway:

You can win yourself this set of four fat quarters by leaving a comment answering the question, "Where do you listen to your podcasts?" If you don't listen to podcasts, you might want to subscribe to mine and everyone else's! But you can still leave a comment anyway. I'll put your name in the mix even if you're not a listener!

Leave your comment by Friday night, April 6th, midnight Eastern-Sandy-Time (U.S.)--I'll do my drawing on Saturday the 7th.

Don't forget: Your email address needs to be in the comment itself or visible on your profile for me to be able to get back to you to tell you you've won! If I don't have an email address, I'll have to award the prize to someone else.

And before we move on, want to help spread the word about the month-long giveaway? Grab the blog button at the top of the right-hand side of this page and put it on your own blog! Make sure people know they'll have the opportunity to win Aurifil thread, gift certificates to the Fat Quarter Shop, and more!

Check out below for other podcasters' pages and giveaways--support the podcasting community!


Slow Quilt Monday--Oh, the Possibilities

I don't have many words of wisdom today because I'm deep in the midst of finishing a UFO (which has developed a real back-story, by the way, but more about that later in the week when it's actually done). So I haven't been practicing "slow quilting" these last couple of days so much as "get 'er done quilting." There are seasons for both of those in our quilting lives, to be sure.

However, I started out this morning in an endeavor that might indeed fit well under the slow quilting rubric, as it's all about imagining the possibilities.

You see, I've developed a thing for Shiva paint sticks. I picked up a few at the Mid-Atlantic Quilt Festival and have been playing with them here and there. A couple of weeks ago I brought them with me when I made a quick drop-by to our guild's March Sew-Days. I knew my buddy Lori would appreciate them--I didn't realize the number of other folks who would fall in love with them too. Soon enough I had a crowd around me as we played with rubbing plates, sketching, and blending. Lori, Florence, and I decided a short shop-hop to an art supply store was in order. So, this morning we met in a grocery store parking lot, hopped into Lori's car, and did some financial damage in a short amount of time!

Today's purchases:
More paint sticks, of course; a few pigma pens, some stencil brushes and a couple of small stencils, some regular paint brushes of three different shape/sizes, and brush cleaner. And then a random bag of little bitty hair scrunchies to keep my bobbins in control, because they've started to bug me of late ($1 for a bag of 300 at Family Dollar, if you're interested).

Florence and Lori also picked up a few paint sticks and some other accoutrements. I'll let Lori blog about hers. Florence doesn't blog, so her quilting life will just need to remain a mystery to you all. Let me just say, though, Florence is a seriously prolific quilter. It's a rare guild show n' tell that she doesn't have at least three finishes to show, and often more. And she does tremendous charity quilting. We love Florence. She da woman.

I've done as much as I can get done on my UFO for the day--waiting for a shipment of remaining parts. :-) So now it's time to cover a work surface and get down to some serious play. I love me some paint sticks. Playing is a big part of slow quilting--you need to mess with something to get a feel for what it will let you do.

So, go mess with something. And have fun!

Sew-Day Tomorrow

It's like bunnies, the way guilds are multiplying in my life these days.

Y'all know how much I love my usual guild-that-is-not-a-guild. I've been with that one for about six years now. Actually started talking to people about four years ago. (That's the "i" word thing that we won't talk about at the moment.) Now they're my peeps. My main quilty squeezes. No one will ever replace them.

But a few months ago, I decided to go ahead and join a second guild. The second one is the big guild in the region--maybe something like 400 members? They've been around since the dawn of time, too--they're one of the oldest/longest running guilds in the country. However, they meet on a weekday. In the morning. Urgh. So really, I can pretty much never make meetings. But they do have good speakers and classes and such, so being a member means that if I can plan far enough in advance, I might be able to periodically take a vacation day and attend something. Meanwhile, I keep up through the newsletter and news groups. While I'm technically a member of that one, it's hard to feel like a member when I'll probably only be physically present maybe once or twice a year.

This week, a bit on a whim, I joined a third guild. This one doesn't have meetings, from what I've been told. They just do sew-days on a Friday and Saturday once a month. And, as it turns out, of the 30-ish people in that guild, about 10 of them are also in my Main Quilty Squeeze Guild. Always a bit easier for this i-word-person to join a group where I already know a third of the people. My thought process is that when I'm back to work in a few weeks, between my MQS Guild's sew days and this new one's sew days (never scheduled on the same weekend), I should be able to make one or the other every month. All the more opportunity to "go get my quilty on" on a regular basis.

New Guild has their sew days tomorrow and Saturday, so I'm getting my thoughts and supplies together about what I'll be bringing with me to do. Hence, this:

Remember the self-mitered receiving blanket from yesterday's post? I went back to the sale at Joann's this afternoon to pick up a bunch more fabrics and will be cutting the sets of 30" and 40" squares tomorrow. I'm planning on using this as a project to teach some of the women I've been volunteering with how to use a sewing machine. It's really perfect. All they have to learn to do is find the middle, pin, sew in a straight line,  mark a line, cut on that line, then sew a zig-zag stitch. Easy Peasy. And, what's more important, they end up with usable receiving blankets for all the many babies being born into their community!

I lost track. I think those three hangers of fabrics add up to about 15 receiving blankets or so. I had them all sorted out as to which ones were pairs when I was stacking the bolts in my cart, but then the woman doing the cutting kept flipping my piles back and forth, mixing the sets up. I decided I'd better take care of sorting them back out again as soon as I got home before I completely forgot what my original intentions were. There are a couple that I'm questioning, but ultimately I ended up with even sets so it's good enough for horseshoes.

I haven't decided yet what else I'll work on tomorrow. Here is my usual criteria for a sew-day (different from a retreat since I'm there for shorter periods of time):
  • No machine quilting. I only do that on my regular set-up at home.
  • Nothing that requires intense concentration. Who can concentrate with a cast of thousands?
  • Nothing that requires a lot of parts. Hate packing it all just for a few hours.
I still have some hexies to mark, so those will probably come with me, then I may just bring my scrap bins and work on cutting everything to usable sizes. That's the kind of tedious work that's nice to do while I can be entertained by everyone else!

Donation Quilt Wednesday--Receiving Blankets

I wanna make me a bunch of these! How cute and easy are they?! Thanks to Missouri Star Quilt Company for this idea--great for donating to hospitals, women's shelters, clothing cupboards, and so forth. (As always, check with the intended recipient organization first to make sure there are no special requirements.)


I thought this looked like so much fun I picked up some flannel on sale at Joann's ($2.79 a yard! and a coupon on top of that!) and made one myself. It works! (Not terribly keen on the decorative stitch I chose for the finishing touch--it worked well on the sample but I didn't like it in the end. Next time I'll just do a zig-zag, I think.)


And here's the fabric I've got to make a second, more boy-like one.


Notes:
1. Make sure you bring the measurements with you when you go to buy the fabric. Oops. Since I made these on a whim, I stopped at Joann's while running other errands and didn't have the ability to double-check the measurements. I had in my head 20" and 30". Nope. That would be 30" and 40". Fortunately, while I'd only intended to buy a yard of each of the four fabrics, one in each pairing I'd picked up was the last of the bolt so I got a few extra inches. Bingo. Saved by happenstance.

2. It's flannel. Yikes. Flannel is hard to work with in the best of circumstances. In this case, you're sewing something smaller to something bigger, which involved a lot of smoodging around to get things to line up under the presser foot, so that was kind of a pain. Ultimately, it didn't turn out to be that big a deal when all was said and done. The miters still worked well.

3. The video could have used a little more detail in the "sewing everything together" section. Since you sew from the center out on all the sides, that means one seam you sew with one side up, then you have to flip it over with the other side up to get it under the presser foot correctly. Which affects how you pin or mark things. It wasn't a huge deal but took me a couple of sides to figure out how to do best, and it was still a lot of flipping around. If I'd thought ahead, I could have done four seams on one side, then flipped and done the other four on the other side. I didn't think ahead. I suppose you could try just sewing straight down one side without going center out, but with flannel as stretchy as it is, I'd think you'd risk not having things line up in the end.

4. Ten minutes? I don't think so. The first one took me about an hour. It took me ten minutes just to get the cutting done because my cutting table isn't set up well to do a 40" square. However, I think the second one will take me significantly less time, and if I were to do a bunch of them, I could probably get it down to under half an hour. I still don't buy 10 minutes. Still n' all, half an hour isn't bad either! And this could be a good project for a group to do in assembly line fashion--some folks cutting, some folks pinning, others sewing, etc. You could knock out a bunch in a few hours.

So I've now got a receiving blanket ready to donate. I'm hoping to knock out the second one today, as well as make progress on my other projects.

Have you ever made these? Leave a comment!

Slow Quilt Monday--I Think I Can

When my son was about going on 3 years old, we went through an entire summer of reading The Little Engine that Could every single night--sometimes two or three times a night. He had it memorized within the first couple of nights. Even though he couldn't read yet, he knew when we tried to speed things up on the umpteenth time through the story by skipping words here and there. He'd call us on it. "No, mommy, you missed a part!" (Sigh. Flip back a page, start again.)

At 21, he's now a very confident guy who thinks he can do pretty much anything he can set his mind to. Can I attribute my son's confidence to his early passion for Watty Piper's story of the little train engine that believed itself up the steep hill? Probably not entirely. But something in his little 30-month-old brain recognized that there was something to that story that he could relate to. Or that there was something to that story that he needed to remember for later life.

I've been reading a lot about creativity these last few weeks, and really, it all boils down to one salient point: If you think you can, you will. Yes, you may need to learn a new technique to be able to adequately execute that vision in your head. But there's nothing keeping you from learning that technique. Yes, you may have a few disastrous starts to a project before ending up with something at least closely approximating what's in your head. But who cares? It's only fabric. I've been reading about a number of great artists and novelists who were all angsty with fear every time they started out creating, and who were positive that what they were creating was just every sort of wrong through the whole process. But they kept thinking they could. And so they did.

What's the difference between me and the man or woman who created that gorgeous quilt I'm admiring in the show? Simply this: They thought they could. So they did.

This week, I think you should find a copy of The Little Engine that Could. Remember what it feels like to think you can.

A Little Bit about a Lot of Nothing

Random thoughts on a Sunday.

Here's what I'm reading:

The Brutal Telling, by Louise Penny. This is #5 in the Inspector Armand Gamache series. I just started them a few months ago and am trying to slow myself down--she's just started work on book #9, if I recall (I follow her blog), so I'm pacing myself. Love these books. I enjoy the characters, the storylines, the writing. Best mysteries I've read in a long time.


Quiet: The Power of Introverts in a World that Can't Stop Talking, by Susan Cain. I'm finding this book entertaining. Cain's a good writer--you have to love nonfiction that keeps you coming back for more as much as a good story does.


Bird by Bird: Some Instructions on Writing and Life, by Anne Lamott. I read this book several years ago and got a lot out of it the first time. I'm getting as much out of it, if not more, the second time around. I've read several of Anne Lamott's books, although none of her fiction. She's earthy, funny, and wise. This book of advice for writers is full of her typical self-deprecating humor and sometimes pointed jabs; note that it's not about being published--it's about writing for the sake of writing. Great stuff.

And get ready for an upcoming episode on my podcast about some quilt design books I've been reading: A Fabric Journey: An Inside Look at the Quilts of Ruth McDowell; Transitions: Unlocking the Creative Quilter Within, by Andrea Balosky; Journey of an Art Quilter: Creative Strategies and Techniques, by Barbara Olson; and probably others by the time I get around to recording that episode. I'll also be talking at more length about my experience with The Artist's Way by Julia Cameron.

What I'm watching:
Modern Family, The Amazing Race, The Voice, American Idol (although I could skip that one pretty easily), The Bob Newhart Show (the original one, being shown on Hallmark Channel); just started watching Cranford on DVD from Netflix, but not sure it's grabbing me yet. Have some Masterpiece Classic DVDs of the Jane Austen persuasion that I'll be watching this week too, as my husband has a lot of evening commitments for work. And yes, I confess to watching Hoarding: Buried Alive. I don't understand why or try to explain it, but there it is. On the Great Courses front, I've finished Museum Masterpieces: the Louvre--which was wonderful, by the way. Now I'm working on From Monet to Van Gogh: A History of Impressionism. I hit a great sale in their catalogue a couple of weeks ago and picked up three new lecture series so I'm ready to go. Now that my daughter has gone back to college after her spring break, I get a lot more control over the TV again.

What I'm working on this week:

My still-unnamed funky landscape


The next border on my medallion challenge--it's supposed to be 6" finished, and somehow involve stars and/or pinwheels. I'm still pondering.


Remember "Fortune?" I'd intended to do the quilting myself but have decided I really want to move onto other projects now, so Fortune is making it's way to my wonderful long-arm quilter tomorrow. I'm sure it won't take long--just a basic overall pantograph, since this is a donation quilt. Not sure where I'm donating it yet, although I have an idea. I just need to do some asking first.


And it's time for me to start working on my paint chip challenge for my guild. It's due next month. Not that I'm waiting until the last minute or anything...

So that's where we're at as we look at the week ahead. What are you planning on reading, watching, or working on this week?

Food Friday--Homemade Pizza

I own a breadmaker. Do I ever use it to make bread? Uh, no. Let's name it a pizza-dough-maker and call it a day. Once every couple of weeks I make us homemade pizza. When it's just my husband and I home alone, I will make two personal sized pizzas and we each make whatever we want. Note: I'm much more creative than he is. He's happy with tomato sauce (and plenty of it), mozzarella cheese, and pepperoni. I lean towards a white sauce, spinach, caramelized onions, and goat cheese. But we'll keep it simple for this blog post.

I've adapted a bread machine pizza dough recipe I found on the Internet a little bit. Then I'm going to share with you three sauce recipes--I've tried them all, and they're all tasty!

Although the pizza dough recipe is made for a breadmaker, check out this link for some tips for how to make a bread machine recipe by hand instead: http://www.stretcher.com/stories/00/000117n.cfm.

Here we go:
Pizza Dough in Bread Machine
(Adapted from Allrecipes.com)

Ingredients

  • 3/4 cup water
  • 1 tablespoon vegetable oil
  • 1 teaspoon lemon juice
  • 1/2 teaspoon salt
  • 1 tablespoon white sugar
  • 1 tablespoon dry milk powder
  • 2 1/4 cups bread flour
  • 1 teaspoon active dry yeast
  • Optional: approximately 1 tablespoon Italian Seasoning or mix of dried oregano, basil, thyme, etc., if desired, to taste
  • Optional: grated parmesan or romano cheese for crust

If desired, make an olive oil mixture to brush on the crust before baking: olive oil, garlic powder, dried oregano or Italian seasoning, grated parmesan, or whatever seasonings you like.

Directions

1. Place ingredients in the pan of the bread machine in the order recommended by the manufacturer. Select dough cycle. Press start.

2. Remove dough from pan after rise cycle. Roll to 14-16". Allow to rest several times in the process of rolling--this will help it get to the desired size more easily.

3. Place in lightly sprayed pizza pan and allow to rise a few minutes.

4. Brush with plain olive oil. Poke holes in dough with a fork to prevent bubbles from forming. (Remember to also poke the edge of the crust.)

5. Bake in preheated oven at approximately 400 to 425 degrees for about 8-10 minutes, until slightly browned.

6. Optional: Sprinkle parmesan or romano cheese on crust after first baking, then bake again for a couple of minutes to melt the cheese, then add toppings.

7. Top with sauce and desired toppings, brush crust with olive oil or olive oil mixture, then bake again until toppings are at desired doneness. Brush crust with olive oil as soon as it's out of the oven if desired.

And now, onto the sauces!

Parmesan Sauce (not low fat!)
(Learned at cooking class at the New York Wine and Culinary Center)

Ingredients:
  • 1 clove garlic, minced
  • 2 tablespoons olive oil
  • 1/2 pint heavy cream
  • 1/2 cup grated parmesan cheese, or to taste
  • salt and pepper, to taste

Directions:

1. In a large skillet, heat oil over medium-high heat and saute garlic until softened but not brown.

2. Add cream and heat until foaming. Add parmesan, salt, and pepper to taste. Turn down heat and heat until thickened to desired consistency. Use over fettucini or pizza.


Simple Margherita Sauce
  • 1 can San Marzano Tomatoes
  • Salt and pepper to taste
Directions:
1. Open can and remove several tomatoes to lessen volume and set aside. Using immersion blender, puree remaining tomatoes in can (or pour tomatoes into blender). Give removed tomatoes a rough chop and return to can. Salt and pepper to taste; use cold over pizza. (Freeze into 2 cup portions for other pizzas, or use as a base for spaghetti sauce.)


Susan's Pizza Sauce
(From History Quilter Susan--who gave me permission to post this!)

Ingredients:

  • 1 28oz can diced tomatoes
  • 1 tsp sugar
  • 1 tsp garlic powder
  • 2 tbl olive oil
  • 1 tsp Kosher salt
  • 1 tsp pepper
  • 1 tsp oregano (add at end)
Directions:
Add all ingredients above (except oregano) to saucepan and let simmer about 20 minutes at the minimum. Puree to your desired consistency or keep it chunky. Add 1 tsp oregano just before you are ready to make your pizza. Makes about 1 1/2 cups - easily doubled/tripled.

(I made Susan's sauce for the first time tonight--thanks so much for sending it to me, Susan! We loved it!)

Progress! One Finish, a WIP, and a Challenge (O My)

Yesterday was a banner day here in the "Quilting...for the Rest of Us" quilt studio. (Ooh, doesn't that sound all sorts of official?)

First, I started out with a little mini-project that I'd volunteered for last week. If you're following my Fabri-Sabbatical blog, you'll know I spend Wednesday afternoons with the Women's Learning Club, which is a group of recent arrivals to the U.S. from Burma. Last Wednesday, a couple of women from our church brought some fleece, hearts cut out of fabric, and embroidery threads to make baby blankets that will be donated. This is a project they've been doing with various groups for a few weeks, so we thought it would be fun to include our group as well, and in the process, teach a fast and inexpensive way to make extra blankets for your family if you should need them.

The women organizing the event decided it would take too long to do a blanket-stitch around the outer edge by hand, so they were taking them home to do by machine. I volunteered to take one as well, so I decided to knock that out first. It turned out OK, although I still prefer doing it by hand. It took about twenty minutes to sew, and then another twenty minutes to get all the fleece lint out of my machine.

One of our group had embroidered the heart onto this one, and she taught me how to do the chain stitch as she was doing it. My chain stitch doesn't look nearly as good as hers yet!

That project done, I moved on to my funky landscape quilt in progress.

This...

...became this.


Everything is just stuck down with glue stick at this stage, so I may still move some things around. I'm playing with perspective and balance and such. And I'm still working on getting the fern-y things to look more like ferns and less like Seussian birds. Quilting will help that a lot, though.

Haven't decided yet what's going in the center section. I'm going to live with it for a bit to see what comes to me.

Then I turned to my guild medallion challenge. The dang thing is due tonight, so I really wanted to get it done. And I did! (Only three more borders to go until the challenge is done. I'll find out tonight what the next border is supposed to be.)

Shazam!

National Quilting Day giveaway!

I'm always up for a party--especially one focused on quilting! This coming Saturday is National Quilting Day, and SeamedUp is hosting an NQD Sew-In with giveaways and all sorts of other fun. I'm ready to play along!

Feel like spring? I'm offering a one-yard cut of a happy, vibrant focus print, with four coordinated fat quarters to get you started! Or, if you want to break them up and use them in five different projects, that's fine by me. I just want these fabrics to find a good home.

The focus fabric is "Fondly Flowers" by Laura Heine for Kings Road. This is no longer available--so you want it in your stash! (The fat quarters have no selvedges so I can't identify them for you, sorry. But they're also great stash-builders.)

You can enter for the giveaway several times. Here's how:

1. Leave me a comment on this post describing what affect the changing seasons has on your quilting. Do you start using different colors? Do you start making placemats for picnics? Do you hurry to get all your quilt projects done before summer so you can hang out in the back yard as much as possible rather than being on your sewing machine? Do you go on a fabric diet so you can fit into that fat quarter before summer? (Tee hee.) For those of you in the other hemisphere where things may be starting to get cooler rather than warmer, the same question applies, just in reverse. How might you be switching quilty-gears now as you start to look towards winter months?

2. Leave me a comment that you have subscribed to my podcast, "Quilting...for the Rest of Us." (Subscribe through the podcast page or through iTunes.) Already a subscriber? Just let me know. It'll count!

3. Like the Quilting...for the Rest of Us Facebook page and leave a comment here to let me know you've done so. Already liked the page? Just tell me!

4. Follow this blog and leave a comment here to let me know you've done so. (You'll see some follow options on the right of this post.) Already a follower? Just tell me!

5. Friend me on SeamedUp! I go by sandyquiltz there, so seek and ye shall find. Already buddies with me on SeamedUp? You know what to do.

(I also hope you will track me down on Twitter, Pinterest, GoodReads, and just about everywhere else in cyberspace. I go by sandyquiltz everywhere I hang out. I'm not including those in this drawing, though. Just 'cause.)

Winners will be chosen randomly using the random number generator. Be sure you are NOT a no-reply blogger when you leave your comments. Make sure your email address is on your profile, or in your comment itself. I'll need to know who you are and what your email address is in order to contact you if you win the giveaway. Any anonymous postings will have to be automatically disqualified since I won't be able to be in touch with you.

Be sure to check out the SeamedUp blog post for more giveaway fun. And join in their Twitter party on Saturday, March 17th. I know it's also St. Patrick's Day, but you can always wear your Irish while sitting at your sewing machine!

My giveaway will be open from the time of this posting on Monday, March 12th, until midnight (my time, Eastern U.S. time) Sunday, March 18th. I'll draw the winners on Monday, March 19th. Looking forward to sending out some fabricy-love to someone somewhere!

Slow Quilt Monday--A Spring in My Step

I heard the birds singing this morning.

OK, so, yes--I've been hearing certain intrepid birds sing right along even in the darkest days of winter. Our yard backs up to woods so we're never entirely without birds even on the coldest days. A peep here, a cheep there. Not much, but a reminder that they're around. On the other hand, this winter has been so mild that the robins I've been seeing over the last few weeks are positively pudgy--they've not had a problem finding things to eat this year.

But this morning, there was a slightly different quality to the song. It seems to me, anyway, in my just-emerging-from-my-February-funk-self, that it's happier. More hopeful. Warmer.

Today is our second day in a row of mid-60s weather, after a weekend of snow and freezing rain. I'm just starting to see some buds starting to appear on trees and shrubs (pictured is one of my dwarf Japanese maples). I was checking out my forsythia yesterday. No yellow yet, but a few more days of this--which we're supposed to have--and I'm sure I'll start seeing a little extra color there too.

It'll break our Western New York hearts just a little bit when it snows again, because I'm sure it will. It's not unusual for us to get snow on Mother's Day, frankly, although you get past March and snow doesn't stick around for long. We may whine when we see it, but ultimately it just makes spring all that much more welcome. So I'm definitely a little perkier today--a little giddy, in fact. I can smell spring in the air!

When it comes to slow quilting, I've been poking away at a project I started, by surprise, last week.

I had a whole week to myself last week--sort of a personal retreat. The kids were still away at college, and my husband was out of town on business for the entire week. I missed them all terribly, of course, but it allowed me to set a rhythm for my week that worked for me. Well, me and the dogs. Somehow they wanted to keep being fed and getting to go outside--go figure. In any case, mostly I realized how little TV I watch when left to my own devices. I finished more "Great Courses" lectures, did a lot of reading, and got some more work done on quilt projects. I got just enough social life out of my volunteer commitments and was happy to spend the rest of the week pretty much solo.

One evening I decided to test my need for control. I decided to just start snipping fabric into shapes and fuse it down, not really planning ahead too much. I ended up having a ball with it. It's been fun to watch this project evolve. This picture was taken after the first night. I've now added a lot more flora to it in various places and will keep working on it later today as well, although I've got the borders for my Medallion Challenge project for guild to work on--I want to catch up by tomorrow night's guild meeting.

My daughter got home from college for her spring break on Friday afternoon, and my husband got home Friday night. And I've not made a lick of progress on my quilt projects since. But today is another day and my daughter has a friend coming over, so they will actually prefer if I stay holed up in my sewing room. So I'm trying to get back into a rhythm today that works around other people.

But it doesn't matter. I can smell spring in the air. I'm good.

Donation Quilt Wednesday--Quilts for Kids

You may well have heard about this organization already, and perhaps you've already helped out. If so, great! If not, well, you need to know about it: Quilts for Kids, founded in 2000, has distributed tens of thousands of quilts worldwide. Quilts for Kids transforms discontinued, unwanted and other fabrics into quilts that comfort children with life-threatening illnesses, as well as children of abuse.

You may have a chapter of Quilts for Kids near you--you can check the interactive map on their website to find out. If you work through a local chapter, the quilts stay in your community. If you don't have a chapter near you, just send your completed quilts into the national office and they'll get used where needed most.

You can create a quilt from your own stash--they give some guidelines and offer several free downloadable patterns if you need one. If you work through a local chapter, they may have donated fabrics you could use. If you would like, you can request a kit from the national office--all you have to add is your own batting. (Quilts created from these kits need to be returned to the national office.)

The website highlights that there is a real need for quilts appropriate for teenage boys. So if you think you might have something appropriate in your stash, go for it!

If you decide to do a quilt for Quilts for Kids, please pay close attention to the guidelines--the guidelines are primarily related to health issues so if you don't follow them, your quilt may not be able to be used.

For more information about Quilts for Kids, visit their website at www.quiltsforkids.org.