Craftsy Class Review: Cut to It: Strategies for Smarter Quilting with Debbie Caffrey

Craftsy

I got talked into this class. Really--they really had to twist my arm. (Stop that laughing. I can hear you.) I love Twitter, but sometimes those #Twilters, they can be real enablers. Still n' all, in this case, it was a tremendously useful enable!

I was reading tweets about Debbie Caffrey's Cut to It: Strategies for Smarter Quilting at a weak moment: I'd just decided I should make a gift for someone that will involve a ton (a TON) of cutting of the same units, over and over. I wasn't looking forward to it, so anything that sounded like it might help me be faster and more accurate at the same time seemed like it would be worth a try. 

I loved this class. It's not the kind of class that I can post pictures of projects I made because of it, nor have I really been able to put into use most of the techniques taught in the class...yet. I've not been doing that kind of quilting recently. However, watching her did convince me to finally pony up for something I've thought about for awhile--I used a Joann's coupon to buy a second large cutting mat for my cutting table. I keep one mat upside down so it's just a plain surface to make it easier to see ruler lines without the competing lines from the cutting mat beneath, just like she suggests in the class. And it really is nice to have both surfaces available to me. I can still flip either over as I need, but it's nice to have one of each to go back and forth.

I used a double-sided poster-hanging tape to hold both cutting mats steady in place. It just made me fall in love with my cutting table all over again. 

I have also started holding my ruler differently based on this class. I've always done the, well, let's call it the Spider Grip--that I was taught early on: fingertips splayed on the ruler (palm lifted up) with the pinky on the mat next to the ruler to hold it in place while cutting. It works well enough, but my hand gets tired after awhile. Debbie has a slightly different hold that works as well in terms of steadiness--if not better--and is more comfortable for long sessions of cutting.

Some of the techniques she's teaching made me almost want to do the "Doh!" forehead slap: Why didn't I think of that before? Such a simple, seemingly small change to how I approach my cutting, but how much more quick and potentially much more accurate it could be. Her charts and graphs in the downloadable materials, which she goes over in good detail in the lessons, may seem confusing at first but once you get the concept, they will make things go much more quickly in the future. 

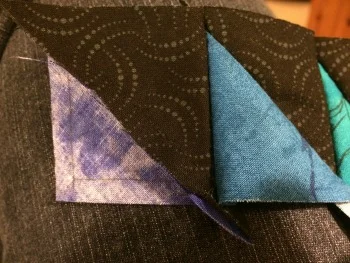
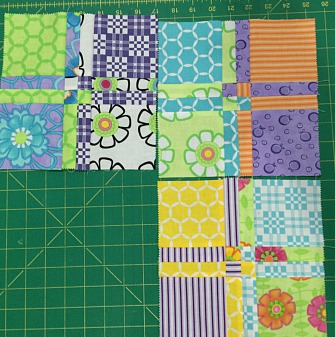
I particularly liked the lessons on jelly rolls and fat quarters because I have a lot of them and she offers a lot of helpful tips for dealing with issues they can sometimes bring with them. I tweeted after watching some of those lessons that I wanted to run right into my sewing studio and start slicing away! I may not be much of a traditional quilter these days, but I loved the blocks from Lesson 4, especially when she laid three of them out side-by-side. I immediately thought, "Boy, I wouldn't mind using that for a holiday table runner." 

There aren't really projects related to the tips she teaches per se, but she does include a quilt pattern that does use the tips if you want to do it. However, it's not emphasized in the lessons--she references it here and there, but there's not really a step-by-step instructional piece just on that project. This is truly a technique class. 

She also shows both right-handed and left-handed positions for different techniques,how to use rulers in lieu of templates (something I'm going to start trying on my Jinny Beyer Block of the Month which is Template Central), working on the bias, trapezoids, and so forth. Lesson 6 is a really interesting look at how to figure out how many pieces you can slice one unit into for very different results. Fun stuff!

So, in other words, this was an incredibly useful class. It's one that, even though I watched it all the way through, I'm sure I'm going to keep going back and watching individual lessons or parts of lessons to refresh my memory before I start certain types of projects. Including that gift I mentioned. Yikes. 

The Basics

  • 7 lessons, ranging from 20 minutes to 34 minutes, mostly in the 30 minute range. (She doesn't mess around!)
  • Lesson 1 gets through the basic introduction stuff pretty quickly; she then dives right into some foundational guidelines for holding different types of rulers and the most efficient way to approach some standard cutting tasks--strips, cross-cutting, diamonds, chevrons, and so forth.
  • Lesson 2 is all about strips; lesson 3 is half-square triangles (HSTs), quarter-square triangles, and trapezoids; lesson 4 is fat quarters and templates; lesson 5 is squares into Delectable Mountain blocks of various types;  lesson 6 also addresses squaring up, and slicing simple blocks up to form more complex units; and lesson 7 is doing bias HSTs. 
  • Class materials include a 15-page reference for everything she talks about in class, plus another PDF with the quilt pattern. Even if you don't want to make the quilt, it's worth downloading this PDF as she does address the pattern specifically at one point to demonstrate how to calculate for cutting and you may want to be looking at it for reference as she does.

Debbie Caffrey's Cut to It: Strategies for Smarter Quilting was a great purchase. This is definitely reference material for some time to come. She has a second class available that I'm now eyeing: Clever Cuts for Efficient Quilting. I'll probably be picking that one up once I knock out another class or two that I already own.

(Using Craftsy links in this post helps support my podcast and blog. Thanks so much!)

February 2015 Craftsy Class update

Craftsy

Time for my monthly update! My son gave my husband AppleTV for Christmas. I use it more than my husband does. What do I use it for most, you ask? Why, streaming Craftsy class videos so I can watch while eating breakfast, of course!

New Completions

(+5)

*Normally I don't count it as completed until I've gotten that review posted on the blog, but it's been a pretty busy couple of weeks so I'm cutting myself a little slack. I will be getting those reviews out next week, though!

    Classes in Progress

    (3)

    Classes added this month

    (+5) With all the frigid cold and lack of sun, I was weak. However, I already knocked out two of them so it's not quite as bad as it seems.

    • Learn to Sew: Simple Bags with Nicole Vasbinder. Already done, already reviewed (link above).
    • Fun Techniques with Fabric Paints with Cindy Walter. Because, well, you know.
    • Cut to It: Strategies for Smarter Quilting with Debbie Caffrey. Kati of @katisquilting is the enabler on this one. However, I bought it and had watched it all the way through within a few days. She was right!
    • Secrets to Cooking Fish: Eight Essential Techniques with Joel Gamoran. I've been wanting to do another class on fish and have looked at both in-person and Craftsy for awhile. I did a different fish class on Craftsy, but I needed one for the rest of the year when my grill is buried under three feet of snow. Ahem. In any case, I was thrilled to see this one pop up in the new classes listing and, since it was on sale, I grabbed it immediately.
    • Sew Sturdy Travel Organizers with Annie Unrein. I blame listener Jamie for this one. She commented on my review of Nicole Vasbinder's class that I may want to check out Annie Unrein. As I liked the look of those travel organizers, and since this class was also on sale for a good price, I decided to go ahead and buy it. Let it be on Jamie's head...

    Classes To Be Completed

    Current count:  14 (broke even with last month)

    I've been a busy bee!

    I've been a busy bee!

    Completed Classes

    Current count: 51 (+5--woot woot!)

    Oops...Some Snow Dyes I Never Posted...

    I got so caught up in my sewing room I forgot that there was a set of snow-dyes I never revealed here. Plus, I got some regular hand-dyeing done too. These are all from a week or two ago. They're not terribly exciting and I had some issues with a couple of them. But still n' all...

    Fuchsia and grape scrunched

    Fuchsia and grape scrunched

    Fuchsia and grape folded

    Fuchsia and grape folded

    Fuchsia and grape spiraled

    Fuchsia and grape spiraled

    Strong orange, mixing red, fuchsia spiraled

    Strong orange, mixing red, fuchsia spiraled

    Same mix as above, but folded. And clearly there was a little drop of a former dye bath still left on the grate that I hadn't seen when I washed it. Oops. This just shows what havoc one tiny little drop of the wrong color can wreak! Oh well, not one…

    Same mix as above, but folded. And clearly there was a little drop of a former dye bath still left on the grate that I hadn't seen when I washed it. Oops. This just shows what havoc one tiny little drop of the wrong color can wreak! Oh well, not one of my faves anyway. Ripe for overdyeing.

    A v-neck shirt done in the same color combo as the above. This didn't have nearly as much going on with it as I thought it might, but it's fine as a knock-about summer shirt.

    A v-neck shirt done in the same color combo as the above. This didn't have nearly as much going on with it as I thought it might, but it's fine as a knock-about summer shirt.

    Lounge pants--woo! These are pretty oversized on me; PFD clothes from Dharma are often on the small size, plus they're 100% cotton so they shrink when washed. These didn't shrink as much as I thought they would, so they're very comfortable but not p…

    Lounge pants--woo! These are pretty oversized on me; PFD clothes from Dharma are often on the small size, plus they're 100% cotton so they shrink when washed. These didn't shrink as much as I thought they would, so they're very comfortable but not particularly flattering! Fine for quilt retreats, though! This is teal, intense blue, and turquoise.

    Here's a closer-look at the embroidery thread I dyed along with these lounge pants. A little tangled, but I think I could sort it out to use. 

    Here's a closer-look at the embroidery thread I dyed along with these lounge pants. A little tangled, but I think I could sort it out to use. 

    Some of these other embroidery threads are going to take a little more untangling, though....

    Some of these other embroidery threads are going to take a little more untangling, though....

    This set is a more prosaic gradation of blacks. The two on the bottom are a blue-black and a purple-black--I wanted different tones. There was something going on, though, as many of these ended up with sort of an orange-y tinge to them. I'm thinking…

    This set is a more prosaic gradation of blacks. The two on the bottom are a blue-black and a purple-black--I wanted different tones. There was something going on, though, as many of these ended up with sort of an orange-y tinge to them. I'm thinking I may have left them too long without soda ash (I forgot to put it on until several hours later), so it's possible the belated addition reacted differently with the dyed fabric. Anyone...?

    And, just for kicks n' giggles, I dyed some scraps of cotton batting, inspired by some things that @madquiltlady (aka Charlotte) did awhile back. You can see one of the batting scraps was pieced--apparently it had scrim on one side and not on t…

    And, just for kicks n' giggles, I dyed some scraps of cotton batting, inspired by some things that @madquiltlady (aka Charlotte) did awhile back. You can see one of the batting scraps was pieced--apparently it had scrim on one side and not on the other. When you flip the piece over, it's the reverse of this side (one half lighter than the other). No idea what I'll do with these but it's fun to know what it looks like!

    Snow-dye Challenge Reveal

    Sandi of Quilt Cabana Corner and I have both completed our snow-dye challenges early--or, at least, we're both close enough to do reveals this week. Mine's completely done--hers is pretty dang close by all accounts. 

    Abundant natural resources...

    Abundant natural resources...

    If you've listened to either of our more recent podcast episodes you'll know the backstory--we're both happy snow-dyers, but often have difficulty deciding how to use the resulting fabric. So we challenged one another to do something that used at least one snow-dye, if not more. 

    When I took the Designing Art Quilts class with Tina Somerset on Feb 7th (which I talked about in this episode), I came home with a notebook full of sketches and stacks of hand-dyes picked out for several of them. It was so much fun, I knew I just had to stay on that roll!

    For one of the exercises in the class, Tina had us listen to a few different songs she'd selected, and we sketched as we listened, making notes of what images came to mind. This is actually something I do periodically in my head when my husband and I go to the Philharmonic, but I can't tote a sketchbook into the theater with me and certainly wouldn't be able to see what I was sketching once those theater lights dim. So images dance in my head and disappear as soon as the piece is over. It was fun to do the same thing when I actually had pencil and paper in hand! 

    artquilt notebooks.jpg

    The sketch that ultimately became my snow-dye challenge project is at the left. The song it's based on is "Grace," by Michael Jones on his album Touch (1996--scroll down to find a sample of the song). If you listen to the sample, you'll hear that it's a pretty spare arrangement--lots of air. I kept seeing long rectangles, muted colors, space. 

    And so, that sketch became "Neume."

    The background is one of my recent snow-dyes done with Camel, Old Rose, and Smokey Grey. The rectangles are all my own hand-dyes. This project just kept building--I started with the base rectangles as in my sketch, but then decided they needed more dimension so I did a second layer. I fused the rectangles and did a very simple outline quilting around them. After consulting with my daughter, we decided the best quilting design would be straight horizontal lines, which really sealed the image it had come to represent as it developed--notes on a music staff. The rectangles float over the top of the horizontal lines. I did a faced edge so there wouldn't be any visual barriers on the piece.

    "Neumes" is the name given to musical notation that developed in the Middle Ages, the precursor to today's written music. (You can still find them today in some chant music.) Neumes were square and mostly represented ascending or descending pitch, but not necessarily specific notes or rhythm until later in their development. The word "neume" comes from the Greek word for breath, "pneuma." I knew about the square notation but I didn't know what it was named until I looked it up after I had the piece done--the fact that it is related to the word for breath really sealed for me what this piece came to represent--a quiet peace. And so, it became the name of the quilt. 

    The quilt shop where I took Tina's class is having a quilt show coming up in March--I think I'll be putting this in the show. Now it's time to get to work on some of those other sketches!


    Craftsy Class Review: Learn to Sew: Simple Bags with Nicole Vasbinder

    Craftsy

    So, if you've been listening to my podcast or following my blog for awhile, you'll know my intense dislike for fiddly bits and anything that even vaguely smacks of garment sewing. 

    I love seeing other people's completed fabric purses, totebags, and duffle bags. But let's just say that my own brief forays into the field haven't been stellar. I made one totebag years ago that I still use frequently but I can still see the places where seams didn't match up and I didn't quite box the bottom correctly. Still, it's pretty functional and nice fabric so I live with it. I had another attempt at a purse that ended up in the trash. My biggest issue? I'm not a garment-sewer, and a lot of purse/tote/duffle patterns are written with the assumption you are.

    Foldover tote completed

    Foldover tote completed

    While toodling through Craftsy classes a week or so ago to see what was new, I saw Learn to Sew: Simple Bags with Nicole Vasbinder. I thought, maybe that's the ticket. Maybe if I take a step back and put myself in garment-sewing school (just the basics, ma'am), I'd grow more comfortable and wouldn't find these kinds of projects as frustrating. 

    I completed the class in one weekend. It wasn't too painful, and I completed both projects in a reasonable length of time and with only a few curse words here and there (all while working on the dang boxed bottom of that pouch when my machine decided to throw a hissy). Enough background. Here's the review:

    Demonstrating the pockets on the front (1 pocked subdivided into 3 parts)

    Demonstrating the pockets on the front (1 pocked subdivided into 3 parts)

    This class would be great for someone who's never touched a machine before. It really does start out with how to sew, as per the name of the class, "Learn to Sew." The first lesson walks through parts of a sewing machine (in brief), how to thread machine and bobbin, and so forth. There are some neat graphics in the first lesson about how the sewing machine works. The second lesson is sewing seams--of course, this class is doing it "garment-style" so seams are generally wider than this quilter is used to. I was proud of myself that I only went to default-mode of 1/4" seams twice--for the most part, I remembered to do those gargantuan 1/2" seams she uses. 

    The third lesson had a little information about fabric in general, as well as some suggestions for picking fabric for the totebag. From there, it goes directly into the projects with some "teachable moments" interspersed. 

    Showing the interior pocket and lining

    Showing the interior pocket and lining

    True confessions: I watched most of the lessons on 2x speed, until I got to parts I felt I needed to watch more carefully. I did get frustrated a few times because the video doesn't always completely match the written instructions in the downloadable materials, and the instructions sometimes leave out key information about placement and so forth. I had to keep referencing the video over again to make sure I was doing things correctly. It's not a huge issue in this case, but I would have wished for more accuracy in having the written and verbal instructions match. I made notes on the written instructions just in case I ever go back to use them again and don't want to have to watch the whole lesson over.

    Zipper pouch completed

    Zipper pouch completed

    My suggestion is, if you're new to sewing or new to this kind of sewing, watch each whole lesson first, and then back up and start doing the steps with her. In some things it's confusing until she gets to later steps and finally explains how she's got things laid out or why she's doing something the way she's doing it. 

    I can't say this class has made me all gung-ho to run out and start churning out purses and bags. But I think it did increase my comfort level with the differences between garment-sewing and quilting to a degree. The totebag and zippered pouch are cute, but if I were to make either of them again there are several adjustments I'd make to them to have them work better for me. I'm just not committed enough to either design to poke at them like that. I already own a lot of patterns for totes and purses; I guess this is something I can just keep plugging away at when I get in the mood...once in a blue moon.

    Interior

    Interior

    The Basics

    • 7 lessons, ranging from 11 minutes to nearly 30 minutes
    • The first two lessons are introductions to the basics of your sewing machine and sewing in general. Lesson 3 includes some more of that introductory information, but then goes into the cutting of pieces for the tote.
    • Lessons 4 and 5 are the foldover tote, and lessons 6 and 7 are the zippered clutch. 
    • The class materials give some troubleshooting information about sewing on your machine, and then supply lists, instructions, and templates for the two projects. As noted above, I was disappointed that there were some discrepancies between the materials and the video lessons. Just have the materials in front of you while you're watching the lessons so you can make notes to yourself as you go.

    This is a tough one for me to rank because it's a topic that I come to having a bit of an attitude already. In the grand scheme of learning how to do garment/accessory sewing rather than quilting, I guess I can give Learn to Sew: Simple Bags with Nicole Vasbinder my usual thumbs up. But I'm still not an enthusiastic garment/accessory sewist. 

    Don't forget, Craftsy is having a Valentine's weekend sale--lots of great classes to check out. I'm working on another one I just picked up this weekend that's just chock-full of great information and much more in my wheelhouse...but more on that one in a later post!

    (Using Craftsy links in this post helps support my podcast and blog. Thanks so much!)


    Craftsy Class Review: Small Changes, Big Variety with Angela Walters

    Craftsy

    I'm celebrating Valentine's Day weekend by writing up another Craftsy class review!

    Yep, another free motion quilting class. At this point I'm just looking for inspiration for designs. And this class was chock-full of that! So, here's my review for Machine Quilting: Small Changes, Big Variety, with Angela Walters.

    Do I have to say again that Angela Walters is an enjoyable teacher to watch? I've lost track of how many of her classes I've reviewed on this blog now. And although I've done several of her classes and own several of her books, I have to give her props for not noticeably repeating herself. This class really felt like all new material. Sure, I'd already done spirals before, for example, but getting a few ideas for how to change it up to look like an entirely different design was very helpful.

    As always happens with every FMQ class I take, just watching the teacher do the design helps me grasp more easily how to travel from one section to another, how to work my way back out of the corners I almost inevitably end up in, and how to ignore the couple of bobbles here and there and simply drive on. After all, as Angela Walters continually points out, for the most part I'd be using a thread that blends and those little bobbles would be completely unnoticeable. 

    I decided to practice some of the designs on a practice quilt sandwich, but to make it interesting for myself I used one of my [less favored] hand-dyes to make the sandwich and then played with a lot of my funkier threads while I was quilting. I intentionally used contrasting thread so I could see what I was doing, so it's clear where my brain and hands periodically refused to play nicely together. But still n' all, I can definitely see the improvement in my FMQ skills after a full year of so many classes and practice. And that's nice. 

    In any case, this class is just jam-packed with designs. Packed. I think I counted up something like 32 total designs, and that's just to get you started. Once you see her suggestions for variations it gets your mind running with "What ifs". 

    Detail of practice 

    Detail of practice 

    If you've never free-motion quilted before, you'll need to start somewhere else because she really doesn't spend any time teaching about how to set up your machine, basting, tensions, threads, or any of that. But if you at least know the basics, you'll have no problem doing this class. Each lesson goes from a fairly simple version of the design to increasingly more complex variations. 

    The Basics

    • 7 lessons. The 1st is a short introduction; the rest range from 19-27 minutes long.
    • The main designs include pebbles, swirls, ribbon candy, feathers, squares, and clamshells. For each design, she gives between four and six variations, plus ideas for additional variations you can try. 
    • The downloadable class materials are set up like her Free-Motion Quilting Workbook, with a drawing of all of the designs, each with a blank box next to it for you to do your own practice drawing before trying to stitch it on the machine. Although part of me struggled a bit with printing off so much blank space, I have to admit it was useful having the reference drawing directly next to the space I was drawing in rather than on a computer screen or something where I'm bouncing my eyes back and forth.

    So, all in all, two thumbs way up for Machine Quilting: Small Changes, Big Variety, with Angela Walters.. I got a lot out of it, I'm still practicing some of the designs, and I'm brewing ideas for some of them on current projects.

    By the way, it's on sale this weekend, too! Just click any of the Craftsy links on this blog and it'll take you to the sale.

    (Using Craftsy and Amazon links on this post helps support this podcast and blog. Thanks so much!)


    Snow Dyes Chapter 3

    Get ready for some serious cool.

    In more ways than one. (Ar ar ar.)

    Here are the results of the second batch of snow-dyes I did this weekend, the 3rd batch for the winter (hence, "chapter 3"). I may do another batch tonight since we have about 12" or more of fresh snow out there. Hate to let it go to waste!

    For each set, there are two 1/2 yard pieces, and then I took detail shots just so you can really get a feel for the effect that snow-dyeing creates.

    First batch: Turquoise and Black.

    (Sorry--forgot to write down which black was which. I used 628 for one and 629 for the other--ProChem names.)  Yes, it looks like I threw purple in there, but I didn't! That's the black breaking.

    The next batch was one of my favorite combinations to ice dye or snow dye, because it breaks so wonderfully. 

    Batch 2: Teal, Grape, and Black.

    (Whatever number black the other one wasn't). Teal is a Dharma color, the other two are Pro-Chem.

    1st piece

    1st piece

    1st piece detail 1

    1st piece detail 1

    1st piece detail 2

    1st piece detail 2

    1st piece detail 3

    1st piece detail 3

    2d piece

    2d piece

    2d piece detail 1

    2d piece detail 1

    2d piece detail 2

    2d piece detail 2

    Third batch: Ecru, Old Rose, and Camel.

    Now, the final batch heads in a completely different direction. Neutral dyes are just so much fun to break!

    Ecru, Old Rose, and Camel 1st piece

    Ecru, Old Rose, and Camel 1st piece

    1st piece detail

    1st piece detail

    2d piece

    2d piece

    2d piece detail

    2d piece detail

    It all looks so cosmic, doesn't it? Groovy.

    If you've listened to my most recent episode (posted 2/1/15), you'll know that Sandi of Quilt Cabana Corner and I have challenged one another to a Snow-Dye Duel. Well, okay, a Snow-Dye Art Quilt Challenge. We've both been snow-dyeing lately (she's in MA, I'm in Western NY, we have a lot of raw material to work with these days) so, in order to be sure we use some of these wonderful new creations we're making, we've challenged one another to make some sort of project using at least one--if not more--of our snow-dyes by March 15. At some point, I'm going to have stop dyeing and figure out what I'm going to make.

    But wait...What's that I see? More snow falling outside my window? Heading to the basement...


    More Snow Means More Snow Dyes

    We got more snow! So, of course, I ran to the back yard, shoveled some into a bucket, and headed for the basement.

    I did half yards this time, and in this batch stuck with variations on yellow/orange/red (mostly) so I could play with proportions of each, variations on each (tangerine dye versus orange dye, etc.), and also be able to more easily rinse/wash it all together.


    Tangerine and Strongest Red combination. The one in the back has more tangerine and the one in the front more red.


    Once the snow has melted--so you can see how I had the fabrics arranged for the dye process.


    Tangerine and Strongest Red #1 (the one from the back of the snow picture)


    Tangerine and Strongest Red #2 (the one in the front of the snow picture)


    Next batch: Golden Yellow, Strong Orange, and Mixing Red


    Now with snow melted.... These were both just sort of scrunched up, although I did a few little loose spins in the one on the bottom. I used a lot less red in the one in the back, emphasizing more of the yellow and orange; the one in the front got a lot more of the Mixing Red.


    Golden Yellow, Strong Orange, and Mixing Red #1. 


    Golden Yellow, Strong Orange, and Mixing Red #2. Although it was quite interesting to me that some of it looks more fuchsia. I'm thinking that must come from the Strong Orange breaking.


    Finally, the yellows. In this one I combined Sun Yellow and Antique Gold. I wanted to see how Antique Gold would break.


    Here they are dyed. I did a loose pleat on the one in the back. The one in the front is just scrunched, nothing fancy. I believe I used about the same proportions of dye on both, although the one in the back may have gotten a little less of the gold.


    Sun Yellow and Antique Gold result #1. The white splotches at the top are likely places where a little bit of fabric hung out over the edge and wasn't getting hit directly by snow and dye. I tried to keep track of that but things can move around when you're stacking the snow up.

    The pleat isn't all that pronounced, but I could use this fabric for depicting reflections on water and that kind of thing. (The "Rorschach Test" of hand-dyeing: "What do you see in this fabric?")

    And obviously Antique Gold has a lot of green/brown in it. Makes sense, when you think about tarnish and all that.


    Sun Yellow and Antique Gold result #2.

    You can see a lot more of the green coming through in this one. That's why snow dyeing is so much fun. You never quite know what you're going to get!

    Stay tuned for Snow-Dye Batch #3, which is in the rinse/soak cycle as I write this. And we're due for another storm tonight and tomorrow, woo!

    Craftsy Class Review--Cooking the Perfect Steak with Bruce Aidells

    Hello, World!

    I finished all the cooking classes I had bought from Craftsy in 2014. I love taking cooking classes because even with stuff you think you know how to do, you can generally pick up some great new tips. (Brendan McDermott changed forever how I scramble my eggs, and Molly Stevens put a big twist on how I'll be roasting chicken from now on.) So, one weekend in January when I was hanging out in my hotel room trying to turn my brain off from a day of meetings so I could go to sleep, I was tooling around in Craftsy's sale section and landed on Cooking the Perfect Steak with Bruce Aidells. 

    Now, mind you, my husband has it down when it comes to using our grill in the summer. No problem there at all. But he was convinced there was no point in having steak in the winter. In his mind, there was no way you could do a steak as well in the kitchen. So I figured this class might offer us some alternative cooking methods that could keep us in steak year-round. 

    NY Strip Steaks with two different dry rubs to suit our differing tastes, searing pleasantly in their cast iron skillet.

    NY Strip Steaks with two different dry rubs to suit our differing tastes, searing pleasantly in their cast iron skillet.

    Bruce Aidells clearly knows his stuff and he's good at explaining everything he does. I still have difficulty remembering which cut of beef is which when I'm facing the butcher case trying to pick out the right cut for the method I want to use it for, but Bruce's explanation of the different types of steaks and their respective levels of tenderness was very helpful and clarified for me some things I've run into over the years.

    His class does cover outdoor grilling techniques, and I may have picked up a tip or two there; however, for me, the real benefit of the class was the first couple of lessons that all involve the stove and oven. I bought a couple of strip steaks and used his techniques to make them for dinner one night, fervently hoping I didn't mess something up because those puppies aren't cheap.

    Fortunately, I didn't mess anything up. I used a dry rub we already had on hand because I discovered I'm out of a few of my go-to seasonings (when did that happen?). He gives a recipe for a dry rub but it didn't appeal to me--he has other recipes for condiments in the class I can more easily see myself adapting, but I get a kick out of creating those things myself anyway. But this time, I just cut to the chase and opened a jar.  

    The steak turned out very well--I was shooting for medium-rare and hit the target. It was an easy enough process, of course, and paying attention to what Bruce Aidells had said to look for at various stages helped me keep on track with getting the level of doneness I wanted. DH and I both liked the results, although he wouldn't quite get to saying it was just as good as the grill in the summer. But hey, it was still good! 

    Yum!

    Yum!

    The Basics: 

    • 7 lessons ranging from 14 to about 24 minutes. The first lesson includes information about what to look for in a good cut of meat, terms, grading, aging, and so forth.
    • Lessons 2-5 each address a different cooking technique--the first two indoor, the second two outdoor. In each, he talks about different cuts of meat that work well for each technique, and gives a recipe (with ideas for variations) for a rub, marinade, or side dishes to go with the steak.
    • Lesson 6 talks about how to measure doneness and gives a very thorough look at different types of thermometers.
    • Lesson 7 addresses knives, carving, and additional condiments.
    • The class materials are 11 pages of recipes, both for the steaks as well as the condiments, side dishes, and so forth.

    There was only one "miss" that I noted in the class, and several people had commented on it in the class discussion so he was able to explain. In lesson 6, as he describes each level of doneness (rare, medium rare, etc.), he doesn't show an example of what it looks like. It should have been easy enough to have one steak of each doneness sitting in front of him or flashed on screen as an image. He explained that he expected pictures to be in the class materials but the graphic had gotten inadvertently left out. First of all, there's a reason why you do a PDF: you can fix it and upload a new version easily enough. But even without that, why leave it to the PDF? You're on video, show the examples on the video.

    Still n' all, that's my only quibble with the class--and for me, it wasn't a big deal because I know what the degrees of doneness look like. But if I were a new cook, I'd have struggled a bit with that section.

    So I give Cooking the Perfect Steak with Bruce Aidells one thumb up, one thumb mostly up but maybe leaning just a hair off-center. Still, if you're a carnivore, this is a good class!

    (As usual, using the Craftsy links on this blog post help support my podcast and blog. Thanks so much!)


    January 2015 Craftsy Class Update

    I had this done before January 31 but was out of the house yesterday and forgot to post it. Oops. 

    As I'd said at the end of 2014, although my Craftsy classes are no longer part of my quilty resolutions for 2015, I do want to keep making progress. I've learned so much from them! Therefore, I'm going to keep posting my monthly updates here. I've found, however, that a couple of the classes I'm now working on are definitely long-term classes so you'll be seeing them listed in the "in progress" section for some time to come.

    By the way, one of my podcast listeners wrote in with her own Craftsy count, and she's got me seriously beat in terms of quantity! (You know who you are!) So I'm not the only one out there...

    New Completions

    (+1)

     (Does finishing the January block of the Craftsy BOM count? I could count that as a new completion every month!)

    Classes in Progress

    (5--ahem. Maybe some more "in progress" than others. But still.)

    Classes added this month

    (3)

    • 2015 Craftsy Block of the Month with Jinny Beyer (see blog about this here)
    • Cooking the Perfect Steak with Bruce Aidells--I finished all the cooking classes on my list and was really hankering for a new one. I've got a few on my wish list but I figured my husband would prefer me to get this one over Thai or Mediterranean cooking. This one will go fast--I'm sure I'll be using a technique or two quite soon!
    • Crazy Quilts with Allie Aller--this was on my wish list for several months and I knew I'd buy it after finishing an embroidery class or two. When Craftsy had it's big sale over a weekend I was out of town and feeling a bit self-indulgent, I bit. I've watched the first lesson or two and I'm really looking forward to digging in. She's a good teacher and I'm a huge fan of crazy quilts. But a few other projects need to move along further first.

    Classes To Be Completed

    Current count:  14 (+2--oops, lost some ground there!)

    Completed Classes (all topics)

    Current count: 46 (+1)

    2015 Quilty Resolution--January Journal Quilt Done

    So the one thing I've always wanted to do that I hadn't done yet--my 2015 Quilty Resolution challenge--is to make one journal quilt per month in 2015. 

    Several years ago, there was a national quilt challenge named "Journal Quilts."  I was first introduced to the Journal Quilt project when I went to the International Quilt Festival in Houston with my mother in 2005 (if I can believe the festival pin that's sitting in my sewing cabinet). I fell in love. I spent more time in that exhibit than in any other part of the show. I even bought the book. I highly recommend it--I've spent a lot of time with that book over the years.

    I'm using my journal quilts as experimental fun. My personal rules are:

    • Each one will be 8 1/2" x 11" (based on the original Journal Quilt challenge size).
    • Each one will be an opportunity to experiment with something I've not done before or want more experience with.
    • I won't take too much time with them--they'll be spontaneous and fun, even if they ever end up dealing with more serious themes.
    • I won't worry about the product, just the process. If it turns out looking like cr*p but I had fun and learned something, it's all good.

    For January's journal quilt, I really wanted to try my hand at using sheers. I've seen it done, I've read about it a lot, I've just never done it myself. Just as I was starting to think about it, I saw an article on sheer collages in Art Quilting Studio magazine Winter 2015 (the same issue that our very own #twilter Carol McDowell is in!) and I was off and running.

    For my image inspiration, all I had to do was remember the glorious sunsets I'd seen in Burma, especially in Bagan. It's probably the most famous tourist spot in Burma and I can see why although my personal favorite was somewhere else, but that'll wait for another blog post. We spent one evening on top of Shewsandaw Pagoda--famous for its sunset-viewing opportunities.

    Shwesandaw Pagoda--all of the sunset photos are mine; the photo of the steps up the pagoda was taken by one of my friends.

    Shwesandaw Pagoda--all of the sunset photos are mine; the photo of the steps up the pagoda was taken by one of my friends.

    Rather than lock myself into trying to represent a single image, I didn't even look at the photos before I started working on my journal quilt. I wanted something that would capture the shadowing of the landscape, and also give some sense of the immensity of that pagoda and the insanely steep/high stairs you had to climb to the top. So I mentally compiled all the images in my memory and abstracted a bit from there.

    And thus: January's Journal Quilt "Sunset in Bagan" is complete.

    In the name of "getting over myself," I didn't sketch anything out ahead of time. First, I fused backing to a piece of batting, and then I put fusible on the front of the batting as well. I free-hand cut most of the fabric pieces although I did loosely sketch the pagoda shape on the cloth, but in cutting it I didn't really follow my own lines so it was still spontaneous. Then I just laid things out as they looked good to me, and did a quick fuse-tack to get it all in place. The fabrics for the background and pagoda are all my own hand-dyes.

    I used a piece of nubby silk for the sun and highlights on the sky fabrics. Finally: the sheers. I only ended up using two as I didn't want to entirely lose the fabrics behind. There's a darker burgundy sheer that I layered in a way that reminded me of the mists drifting through the valley--you can see a couple of strips of it in the photo on the left. IT's got a beautiful gold sheen to it that just very barely comes out in the finished product. 

    Then I layered a very light gold sheer with a bit of sparkle to it over the whole top, again because it reminded me of the mist on the valley. I used a fusible spray on the burgundy sheer because I was afraid my Misty Fuse would show through. I was a little concerned when I first put the spray on but it did dry entirely invisibly. I didn't fuse the overlay sheer--just pinned it to hold it in place until I quilted it. 

    For quilting, once again, I made myself just haul off and start quilting lines. Oh, but I wanted to draw it out first! Still, the name of the game was "experimental fun" so I just did something that represented the stairs and the different levels on the pagoda that you could stand on to view the sunset (we were on the top one). The background just got swirlies and lines to show rolling ground and a slight breeze.

    Finally, I did a zig-zag to stabilize the outside edge and then couched yarn as a binding*. One pass of yarn looked kind of skimpy, so I went through a second time with another round of yarn. Bingo! I really like how that turned out.

    So when I compared my finished product to the photos, did I get the shape of the pagoda exactly right? Nope. Do the stairs really stand out in my quilting as much as they do in the photo? Nope. 

    But do I care? Nope. 

    I had a ball. And I got to play with my hand-dyes and with sheers. And I learned a few things in the process. 

    So the January Journal Quilt experiment is a success!

    *Thanks to Carol Ann Waugh's Stupendous Stitching class on Craftsy--I first learned this technique when I did her class last year. (The link to her class is an affiliate link--thanks for supporting this podcast and blog! The second link is to my review of the class.)

    Mad Quilt Scientist Walks Again--Snow Dyeing

    When life hands you lemons, you make lemonade.

    When life hands you bales of snow...

    When I started feeling somewhat better from the Great Sinus Infection of 2015, I decided I could probably handle doing a little dyeing. It's been a long while since I've been in my dye studio in the basement, so after I did a little cleaning up and removing of cobwebs (!) I made good use of the dogs' time outside and filled up three buckets of snow while they were snuffling about. 

    This is not the first time I've snow-dyed, but last year when I did it, I followed directions on on a few blogs that all said about the same thing, but I wasn't pleased with the results. Most snow-dye instructions I've found call for creating the dye concentrate with water first, then using the water dye on the snow. Well, what happens when you take a water-based dye and let it melt with snow? Of course--it dilutes. I got very pale pastels. Pastels are all well and good but I like a little more saturation, so this time I did what I do with ice dyeing--I just dumped that dye powder right on top of the snow.

    It does, indeed, use up more dye powder that way but hey, I only do this a couple of times a year so I'm okay with that. 

    I did three different color combos and three different folds on the fabrics (one yard each). 

    The first was fuschia and intense blue, and I folded the fabric in quarters lengthwise and then did a loose pleat.

    The second was stormy grey, old rose, and boysenberry, and I spiraled the fabric.

    The third was turquoise, lemon yellow, and tangerine, and I just scrunched it up.

    So here's what I remembered while I was rinsing the fabric. Turquoise and tangerine are pretty close to being complementary colors, which means that mixing them gives you something in the neighborhood of brown or gray.

    I'd been thinking more about the turquoise and yellow, and about the tangerine and yellow, without really thinking through the tangerine and turquoise. So, this isn't the most attractive end result but I already have some ideas for possible overdye designs I might do. (I like a nice neutral but I'd want it a little more intentional and not just muddy like this.)


    And here's what I learned: Boysenberry is an aggressive little fella. I used more gray and rose than I did boysenberry--I just barely dotted the boysenberry on there. But it ran amuck.

    I was surprised with the amount of light I ended up with in the middle (a very pale gray-purple with one bright random splotch showing). I thought I'd spun it more loosely than that. However, I can play with that, so no worries there. I don't mind this result at all--it's just not what I was picturing it would be. But that's what I like about hand-dyeing. There's always that surprise element involved.


    Finally, the fuschia and intense blue combination--this one I knew what I'd get, more or less. There's a lot less variability when you're only working with two colors.

    Because of the way it was folded and pleated, one end has more blue than the other. I'd planned on cutting all of these into fat quarters but I'm thinking this one will probably do better has half yard pieces so each piece would have both blue and pink; the spiral one above will stay as a whole piece; and the muddy mess at the top needs more work done on it anyway.

    It was fun to be in my dye studio again, but I want to actually have a plan for my next dye session so I've got to do some thinking first. Plus, I think it's time for me to break out the wax resist (batik) supplies...

    January Block for 2015 Craftsy BOM with Jinny Beyer

    Yep, it's all hand-pieced. 

    Nope, it didn't convert me to hand-piecing. 

    Or templates. 

    It came out to around 9 1/4" instead of the required 9 1/2", something that a lot of people in the class said in their message boards, so it's a common issue. I had measured my PDF print-out of the templates quite carefully, so that wasn't the problem. I suspect it had to do with the multitude of error possibilities in the template process that I talked about on my podcast, plus when I was hand-piecing I was stitching right on the lines, whereas perhaps I should've been doing scant seam allowances instead. Who knows?

    templates and pieces marked

    templates and pieces marked

    I'm very tempted to rip it all out and re-do it by machine to see if I could get it closer to the required size, but I've decided to wait until after February's blocks--there's two of them--to see what size those measure out to. There are some bias edges involved, and I don't think I've got enough fabric to recut pieces, so it would be almost more of a risk to take everything apart and re-do it. Hence, pushing the pause button and adopting a "wait-and-see" attitude.

    I'll be doing February's blocks by machine. Although I did get into a groove and had pretty even stitches after the first couple of pieces, I just didn't find the process Zen enough to warrant taking that long on a single block again. I withheld my final judgment until I saw the finished block--I was willing to decide it would be the way to go if my final block were somehow a better or at least equal product to what I can do by machine. Ahem. Nope.

    Yes, it's possible to sew a piece on upside down even when "slow quilting" (snail's pace) by hand. At least it's easier to rip the seams out!

    Yes, it's possible to sew a piece on upside down even when "slow quilting" (snail's pace) by hand. At least it's easier to rip the seams out!

    I know, I'd get better and more accurate if I kept doing it by hand, I'm sure. But here's the thing--ya gotta wanna. I'm not sure I'm particularly interested in becoming an expert hand-piecer. 

    I'm still doing hand-work with the embroidery, so I've got plenty of TV-ready work to do. Meanwhile, I'm a machine-piecing-girl at heart, as it turns out. Not overly a surprise.

    Meanwhile, I've got some snow-dyeing happening in the basement. Feels good to be playing with dyes again! 

    Quarantine Has a Silver Lining

    So this cold that's had me down for the week took an interesting left turn this weekend. I had already cancelled out of a couple of things so I could spend most the weekend resting and recuperating. I had a couple errands to run but otherwise was pacing myself with time in my sewing room alternating with time on the couch. I felt some slight improvement by last night so I had high hopes for today. And then this morning (Sunday) I woke up with what I strongly suspect is pink eye. I've never had it myself, but my kids did when they were little and a quick check of the Internet confirmed my symptoms. Still, I'll be calling my doctor in the morning to be sure. Fortunately, it's not too bad--my eye's a little swollen but it's not really bothering me much in terms of pain or anything. 

    image.jpg

    The biggest impact is that I consequently had to quarantine myself. My husband got groceries instead of me (love that man), and I carry disinfectant wipes with me everywhere I go to wipe down any surface I touch. I've had a hand towel tossed over my shoulder all day for drying my hands so I wouldn't use any of the bathroom towels. I had DH pick me up a box of latex gloves so I could help put away some of the Christmas decorations and then tonight, when my son and a friend, and my nephew and his girlfriend, showed up to play games, I could participate safely. 

    I call it, "practicing safe game." Ahem.

    But for the most part, I tried to stay sequestered in my sewing room. It doesn't matter what I touch in there because no one else ever goes in that room.​

    image.jpg

    I got all the pieces done for the Jinny Beyer BOM. I haven't started hand-piecing it yet. I do think I've already decided I won't be hand-piecing the rest of the quilt. Holy cow. I mean, I'd like to have this done before I'm 95.  

    I also want to shout my thanks to the person who invented the rotary cutter and rulers. I'd never have become a quilter if I had to do it this way. More power to all y'all who started quilting in the days of templates and scissors--every one of you is a better person than I am!

    It's a fine line between Zen and Tedium. 


    image.jpg

    I also got one butterfly--count it--one--of fifteen appliqued on my other Craftsy class project-in-process, Sue Spargo's embroidery class. I'll be blogging more about that class some other time. For now, let's just say I was having thread issues. 'Nuff said.  

    I'm probably going to be working on this more tonight. I had to tap out of game night when talking more than I'd talked for the last several days all together got my coughing started up again, so my nephew tapped in to finish out my role in Careers, and now they're gathered around the dining room table playing Settlers of Catan. I'm having fun just listening in on their trash talking.

    image.jpg

    The other big project I wanted to get done this weekend is now complete. I'd bought two hand-woven fabric pieces from a woman in Myanmar---straight off her loom; I needed to cut each piece in two to turn them into four shawls as gifts for colleagues. I had to hem them up, which was more of a challenge than I thought it would be. I'll talk more about this process on my next episode--whenever that is. In any case, I got those finished tonight too. That felt particularly good--now I just need to get two of them in the mail. The other two go to womenn I'll be seeing this coming weekend.

    I also knocked out a lot of other things---little niggly things like getting a bunch of printed Craftsy materials organized into a binder, ssome other stuff labeled, a few necklaces fixed, some other Myanmar souvenirs boxed up and rready to get packaged for mailing.

    image.jpg

    All in all, quarantine allowed me to knock this post-it task list... 


    image.jpg

    Down to this.  

    I guess I can handle being quarantined.  

    For now, anyway. 


    Craftsy Class Review: Free Motion Quilting A Sampler with Leah Day

    (If you're looking for the 2015 Quilty Resolution Challenge, click here.)

    Craftsy

    True Confessions: I started "working" on this class a long, long time ago. At that stage, working on it meant watching the lessons and not much more. But when it came up in my queue again, I decided this time around I really needed to make some decisions about how I was going to approach Leah Day's Free Motion Quilting a Sampler class. 

    I'd already decided I didn't want to make the sampler, nor did I want to purchase the pre-printed sampler panel available through Spoonflower for this class. Kudos to Leah, though, for making that an option! I did consider it, as it would've been an easy way for me to really practice all her designs in the way she guides them during the class. So I give her two thumbs up for having made that available. Woo! Options!

    Ultimately, I decided I'd just watch through all the lessons again, choose a few designs I particularly liked to practice, and then put one or more into action on a current project. The main thing I can definitely say for this class: There is a boatload of quilting designs here!

    For those of you who are already familiar withLeah Day, this won't come as a surprise: This is probably the most content-rich class I've taken from Craftsy to date. You'll see in The Basics (below) the sheer volume based on number and length of lessons. In fact, that's part of why it took me so long to get through the class--it felt a little overwhelming when I was over my head in life this past fall. Some lessons took me two or three tries to get through, and that was just watching the lessons, not even doing the project! After I got back from my trip and had some time over the holidays, though, I was finally able to finish watching all the lessons and do some practicing on quilt sandwiches. I still haven't used a design in a project, but that's just because I'm dithering between two or three of the designs from the class for the project I'm working on. When I finally beat this cold that's laid me out this week, I'll make myself decide on a design and just knock it out. 

    Practicing designs from Leah's class (one feather is from previous practice--the rest are based on her class)

    Practicing designs from Leah's class (one feather is from previous practice--the rest are based on her class)

    This class is excellent for beginners who have never done any machine quilting before. She starts from the very beginning (as the song goes), and talks about prepping your quilt for quilting--starching, pressing, backing, batting, basting...41 minutes' worth of how to get your quilt ready. 

    If you've been quilting for awhile, it's still definitely worth watching this lesson. Her method for basting (especially for securing the quilt to the surface while you're basting it) is very different from other methods I've seen. You might pick up some good ideas for your own setting.

    Then she spends over half an hour in the next lesson talking about supplies, FMQ feet, how to modify a foot if you need to, machine settings, and the basics of the quilting process itself. 

    The next 8 lessons are all different types of designs, from stitching in the ditch, to all-over designs and fillers, to motifs. Tons and tons and tons of designs. And tons. Each lesson has several designs within it. Did I say it? Tons. And the class materials include drawings of each design with little arrows to help you remember the best way to execute the design (and leaving yourself an escape route). 

    More practice on the back of a previously-used quilt sandwich--green thread showing is from the other side of old practice. All designs in white are new from Leah's class.

    More practice on the back of a previously-used quilt sandwich--green thread showing is from the other side of old practice. All designs in white are new from Leah's class.

    The last two lessons are borders and binding, with the addition of how to do a sampler as a "quilt as you go" quilt, quilting one block at a time and then attaching them together at the end. 

    She has a unique element in this class: In one of the early lessons, she brings in Sadie, who has never free motion quilted before. While Sadie is doing some stitching, Leah is talking about how hard we all are on ourselves. She then examines Sadie's results and talks about how normal they are, first of all, but then gives her some tips about how to improve. If I'd seen this back when I was first starting to FMQ, I'd have found it very empowering. It took me a long time to realize that I was actually doing not-half-bad.

    This is a really, really full class. You definitely get your money's worth here, no matter what price you end up paying for it. Leah Day as a teacher is very easy to watch--she's very good at explaining what she's doing, she includes information about what to do when things go wrong, and she doesn't have any particular mannerisms that start wearing on you after watching her for several hours on end. Which is good, because this class is several hours! I still enjoy Leah just as much after finishing this class as I did when I was watching her 365 project on YouTube (the designs are now available in a book). 

    The Basics

    • 13 lessons, ranging from 10 minutes (the introduction) to 92 minutes--yes, that's right, one lesson is an hour and a half long. Most fall in the 45 minute-ish range. 
    • Lesson 1 is the introduction to Leah Day and the Craftsy platform. Lesson 2 is all about basting (see above). Lesson 3 is Basics and Supplies--I picked up some good tips here. Lesson 4 talks about stitching in the ditch--which she's an advocate of doing before you do anything else. She does address in later lessons how you may be able to sometimes incorporate the ditching at the same time as you're doing other designs, but for the most part, she does it first, and then does whatever else she's going to do.
    • Lessons 5-11 are all the different designs and, again, a ton of them. There are plenty of options here. 
    • Lesson 12 is finishing (borders)--including another design thrown in here for kicks n' giggles, plus trimming and squaring up.
    • Lesson 13 is binding, using a quilt-as-you-go method or traditional. However, she mostly addresses the quilt-as-you-go method here. 

    I give Leah Day's Free Motion Quilting a Sampler two thumbs up although, as I said at the beginning, there were times it felt overwhelming. I'd almost have preferred two shorter classes from her. To a degree, it felt like she wanted to cram everything she could into the one class she thought she'd ever do on Craftsy. But, either way, I was able to practice several designs I'd not practiced before, and I've got some good ideas for projects I need to finish. So, yay!

    (As usual: Using Craftsy links in this post helps support this podcast and blog. Thank you so much!)


    December Craftsy Class Update (Final for 2014)

    Craftsy Logo

    Well, dang. I had a November Craftsy Class Update all written and intended to schedule it to post while I was gone. Apparently I never did, because I just found it still sitting in my drafts folder. So this month I'm catching both my November completions and December completions--not that I've gotten a lot done in December because...well, you know. Something about travel, about only being home one week of the month. Still n' all, I managed to complete two classes this month to add to the four last month, so that's not bad!

    Check out the very end of this post for my grand summary of my progress on my 2014 Quilty Resolution regarding the completion of Craftsy classes.

    New Completions

    (+6)

    Classes in Progress

    (3)

    Proof I've already started working on the Sue Spargo class...

    Proof I've already started working on the Sue Spargo class...

    Classes added this month

    (+2)

    I succumbed to the Craftsy end-of-year sale and got two more classes at $19.99 each. I can't be very sorry about that, especially since I immediately finished one and got started on the other.

    Classes To Be Completed

    Current count:  12 (-4 from last month as I added 1)

    Completed Classes (all topics)

    Current count: 45 (+5)

    2014 Quilty Resolution Summary

    A few of my Craftsy class pics from 2014

    A few of my Craftsy class pics from 2014

    So, how did I do, in total, on my 2014 quilty resolution regarding completing Craftsy classes? I never set a specific number to be completed, nor did I have the real intention of wiping the slate clean by the end of the year. I was far too realistic for that. Plus, as you know, I bought new classes through the year in addition to working on ones I'd already owned. For the most part, the new classes got finished pretty quickly. New is always more interesting, to be honest. So I'd say about half of the classes I didn't get finished have been in my queue for a long time; the other half were purchased in 2014. I suppose that's not a bad balance.

    When I started in January 2014, I had:

    • 14 completed Craftsy classes.
    • 21 to-be-completed classes (those I already owned but hadn't finished or, in many cases, even started yet).

    At the end of December 2014, I now have:

    • 45 completed Craftsy classes (+31 from 2013)
    • 12 to-be-completed, 3 of which are currently in progress (-9 from 2013, but the math doesn't show the true picture because...)

    ...this means I purchased 22 classes during 2014, most of which I then completed.

    It certainly would be understandable if you were thinking, "Yeah, but did you really learn anything? Is it possible to take that many classes and absorb the material?" The answer is, yes. Sure, there are some classes I went through and decided, "Nope, not for me, not right now, anyway." But they're in my memory banks (and on my computer) for future reference. Some are classes with techniques that I continue to work on--such as spindling, dyeing, and free motion quilting. I can indeed say that I picked up hints or tips from just about every class, even if most of the class turned out to be not my bag or stuff I already knew. That being said, there are several things I do now that I didn't do before--making homemade pasta being a major stand-out, and spinning, and being far more brave and confident in my machine quilting. So yes, those 45 completed classes (or 31 completed in 2014, anyway) were all worth the time, and have helped me improve. 

    I can also say, however, that though I'll continue to do my monthly updates in 2015 (it keeps me plugging along and I really do want to finish the 12 remaining on my list) and will most likely continue to buy new Craftsy classes on occasion, in general I'll be doing a lot fewer this coming year as I have other things on my horizon that'll be taking up some time. So no, Craftsy classes aren't continuing as part of my 2015 Quilty Resolutions. I have another plan for that. Stay tuned.

    (Usual transparency statement: This post contains affiliate links and I will be compensated if you make a purchase after clicking on my links. Thanks for supporting this podcast and blog!)

    Craftsy Class Review: Simple Soups from Scratch with Kathy Gunst

    Despite the fact that I came home from 90 degrees in Myanmar/Burma looking forward to a white Christmas, and got off the plane instead to mid-spring weather here in Western NY (50 degrees and rainy), I still declare it to be Soup Season. Every year for the last several years I've stated that "This will be the Year of the Soup!" And most years I miss that mark, only making soup once or twice, at best. My husband only likes one or two soups so, since it's hard to make soup in any less quantity than "Vat," I don't end up making it much. However, this year Dear Husband has a fair amount of travel coming up in the next couple of months so I'll be on my own, and happy enough to cook up said Vat of Soup over the weekend and live off it during the week. All the more time to spend in my sewing room, donchaknow.

    So I've taken two soup classes on Craftsy now. You might recall reading my review of Building Flavorful Soups with Peter Berley awhile back. This time, I spent my jet-lag recovery time last week watching Simple Soups from Scratch with Kathy Gunst. I'm far more likely to make recipes from this second class than from the first, mostly because they are, as the title states, simple. (True confessions, though: I skipped the lesson on seafood soups. Not my bag.) 

    Pureed Leek and Potato Soup--not a great picture as I took it on the fly as I was prepping for a party and it steamed up my cell phone camera lens.

    Pureed Leek and Potato Soup--not a great picture as I took it on the fly as I was prepping for a party and it steamed up my cell phone camera lens.

    Kathy Gunst is easy to watch and does a nice job explaining what she's doing, giving extra information while she's waiting for whatever is on the stove, and offering suggestions for substitutions or variations on the recipe she's demonstrating. I really enjoyed her rather high-energy engagement with the studio broiler in Lesson 6--she handled a tricky situation with good humor and was still able to teach while having to keep an eagle eye on what was under the flame. Finally--a Craftsy class with an edge. "Will she burn it? Will she save it? I'm on the edge of my seat!"

    The class, like most of this type, is structured around certain types of soups, and each lesson has one recipe she demonstrates while showing how it can be adapted for other ingredients. I knew immediately I wanted to try several of her soups, so I made the Pureed Leek and Potato soup of lesson 3 for my side of the family's Christmas gathering on December 28 (aka Second Christmas). It's very basic, and very tasty. Leeks, potatoes, vegetable broth, seasonings, and some shredded white cheddar at the end. No cream, so other than the cheese it's pretty dang healthy, and very filling. I had some leftover soup the next day for lunch and didn't need anything else.

    My one-year-old great niece was a particular fan of the soup. That was her dinner!

    My one-year-old great niece was a particular fan of the soup. That was her dinner!

    I included her suggested garnish of Cheddar Chive Walnut Swirl, which was also a big hit. It adds just the right Something to the soup.

    On tonight's menu is her Lemon Orzo Chicken Soup, although my version will be Lemon Rice Turkey Soup. I roasted a turkey to make sandwiches for Second Christmas. The store only had one HUGE turkey or lots of very small ones, so I got the behemoth. Lots of leftovers to make the soup, and a great big carcass for making broth, also one of her lessons in the class. (I made the turkey broth yesterday using her recipe--it seems successful. I'll know when I pull it out to use it for tonight's dinner soup.) 

    The other one I really want to play with is her roasted vegetable soup, only I'm going to do it with parsnips and apples. I had a parsnip apple soup at a restaurant the other night and found myself thinking, "I'm sure I could do this better!" The restaurant soup just didn't have enough flavor for me, so I'm looking forward to using Gunst's techniques and playing around with ingredients.

    As you can tell, this class was a big success for me. The class materials are extensive: 10 pages of recipes from the class, including the many garnishes. The only thing I really wish--as I've mentioned in my other reviews of cooking classes--is that she include a helpful list of types of soups and ingredient combinations to help you learn (or become more creative about) how to mix-and-match your own. That was probably the most helpful, and my favorite part, of Molly Stevens' Secrets of Slow Cooking: Mastering the Braise class. I would love to have a chart of different types of soups and sort of a "pick one from this category, three from this category," type of thing. I know--that's asking a lot. I'm just sayin'. It would be helpful. That's all.

    The Basics

    • 6 lessons, ranging in length from about 18 to 28 minutes.
    • The introduction uses the Lemon Orzo Chicken Soup recipe to demonstrate "modern chicken soup," including adding egg and using lemon to brighten flavors.
    • Lesson 2 is roasted vegetable soup, in which she also discusses choosing which vegetables will work best, how to prepare them for roasting, and deglazing the pan.
    • Lesson 3 is Pureed Leek & Potato Soup, in which she also discusses helpful tips when adding dairy, although the recipe she demonstrates doesn't use it.
    • Lesson 4 is a seafood chowder. Can't speak to this one as I skipped it. Not a seafood soup fan--but given the other lessons, I'm sure she does it well!
    • Lesson 5 talks about meat and vegetable stocks, as well as very useful information about how to store your stock. She also discusses how to enhance store-bought stock if you're short on time.
    • Lesson 6 is all about the garnishes--a couple of pestos, croutons, and other ways to add flavor and texture to your soups. 

    As you can tell from my sudden uptick in soup-making at my house, Simple Soups from Scratch with Kathy Gunst. was a big hit. Two thumbs up. Even without the useful chart of my dreams.

    (Using Craftsy links in this post helps support this podcast and blog. Thank you!)

    #BFSI Craftsy Class Review: A Modern Take on the Mother Sauces with James Peterson

    Craftsy

    Yes, it's Black Friday, and once again I'm refusing to shop. However, I'm also not really hosting my usual #BFSI (Black Friday Sew-in) because I dropped my machines off for cleaning/tune-ups already--since I'll be gone three weeks, I figured this was the best time to do without. Unfortunately, I ended up with more time on my hands today than I thought I would and I'm really missing those machines!

    However, it did give me time to finish up a Craftsy class, and I figured I'd quick post the review today since Craftsy is having a big Black Friday sale with all classes $19.99 or less. So grab the ones you've been looking at now!

    This morning, sans machine, I took the time to finish A Modern Take on the Mother Sauces with James Peterson. To a certain degree I've been working on this class for awhile, watching lessons here and there, waiting until I had the time to try out one of the techniques. This one was a little trickier to decide what to try than the other sauce class I took awhile back, Homestyle Pan Sauces with Martha Holmberg (see my review here). Homestyle Pan Sauces is geared more at simple and relatively quick sauces you can make even on a weeknight when time is short. Mother Sauces take more investment of time, and willingness to wash a few more pots and pans afterwards. To tell the truth, some of what I learned from this class is, "Unlikely to make that one at home!" But that's part of the learning process--discovering what your limits are. None of the sauces are difficult, really; it's just a matter of time and, again, being willing to wash a bunch of pans. 

    Holding steady...

    Holding steady...

    However--one of his lessons that I was willing to take on: I made myself a cranberry rosemary mayonnaise this morning to use on my leftover turkey sandwich for lunch, it being the day after Thanksgiving and all. I've made homemade mayo before, but I wanted to try his technique. I've used my food processor for this before; this time, I did it by hand. I picked up a nifty technique from him for keeping the bowl in one place on the counter while you're whisking--wrap a damp cloth around the base. My bowl was so lightweight it still bounced around a little unless I held onto it but it did make it wander a lot less than usual. He made some great suggestions for mayonnaise variations and how he serves them at barbecues that I may need to call on sometime over the summer when we've got a crowd over--they sound tasty!

    I may do his aioli technique at some point--it's in the same lesson, and takes the same time and number of bowls (one) that the mayo takes. I could see myself doing a Hollandaise sometime, on a weekend or for a brunch. I thought all of the other sauces looked quite wonderful, really, but they're mostly going to have to wait until I have a stay-cation or retire.

    I enjoyed James Peterson's teaching style quite a bit. He's very laid-back and can come out with some very funny expressions here and there--he referenced stealing the soul of a particular ingredient, for example, which tickled me. I did find that some of the lessons I was able to watch on 1.5x speed because he speaks relatively slowly, so if I was just wanting an overview of the technique to determine if it was something I'd do again, speeding it up a little was great. Besides, it's fun to watch someone whisk that quickly. Once I decided I wanted to use a technique, I went back and watched it again at regular speed to make sure I hadn't missed anything. Plus, of course, I took lots of notes--one of my favorite parts of the Craftsy platform.

    Cranberry Rosemary mayo--tasted far better than it looks.

    Cranberry Rosemary mayo--tasted far better than it looks.

    The lessons are very comprehensive--in addition to teaching how to make the basic sauce, he gives several variations (sometimes demonstrating them, sometimes simply talking about them), and in most of them he also gives one quick recipe or demonstration of how you'd use the sauce--a cauliflower gratin, for example, or poached fish, and so forth. 

    If you're a foodie and are willing to invest some time in getting great results, this would be an excellent class for you. Even if you're not into cooking, I actually found it very interesting to learn what goes into sauces I like to order at restaurants--now I finally know what they're made from and what makes them special, even if I don't ever tackle making them at home. 

    The Basics

    • 8 lessons; the intro is 3 minutes, but the remaining 7 lessons range from 20-30 minutes long.
    • Lesson 1, the introduction, does the usual teacher introduction, but then explains what a "Mother Sauce" is and why they're good to learn how to make.
    • Lesson 2 is Béchamel Sauce; Lesson 3 is Beurre Blanc (another one I'm likely to try at some point); Lesson 4 is tomato sauces, although not necessarily "your grandma's Italian pasta sauce cooking on the stove all day," but other types of sauces using tomatoes; Lesson 5 is Brown Sauce, Demi-Glace, Glace de Viande, and Bordelaise; Lesson 6 is Velouté (this was a new one on me!); Lesson 7 is Mayonnaise and Aioli--inclduing a brief discussion of why much of what you see called aioli in restaurants isn't actually aioli; and Lesson 8 is Hollandaise and Béarnaise sauces.
    • The class materials are also very comprehensive. Not only do they include the recipes he demonstrates in class but a ton of variants on a lot of the sauces, and a glossary of terms at the end. 

    Even though, the day after Thanksgiving, I'm watching this class and saying, "Nope, not gonna wash that many pots again," the likelihood is that once I'm a few weeks removed from kitchen chaos I'll decide on some relaxed weekend that spending a few hours making a really wonderful, fancy French sauce for dinner sounds like a lot of fun. I would definitely take other classes from James Peterson. Two thumbs up.

    Again, that's A Modern Take on the Mother Sauces with James Peterson. And yes, it's on sale today!


    A Couple of Finishes and a WIP

    scarves.jpg

    Yep, got those purple scarves done. The ones on the bottom are those I had leftover from the summer events. And yes, they are darker. I must have used a slightly different concentration for this newest batch. Which tends to happen when you don't write things down. Which is the beauty of handmade--the individual uniqueness. Which I'm going to say is my reason rather than just "I didn't bother to take the time to write the darn proportions down."

    These will be gifts to women I meet on my trip. I have 25 altogether--no idea how many women I'll actually be meeting.

    I'd also mentioned on somewhere along the way that I made a last-minute decision to make something for a special visit I'm hoping to make. This will be for the man who in the 1990s invited my father to work with him on peace-making. I thought a peace dove would be a suitable recognition of their shared work and token of my great appreciation for him and all he's done. 

    It's roughly 9" square. Commercial fabric for the dove, my hand-dye for background, backing, and binding--all the same piece. The dove is fused to the background, and I did a hand blanket-stitch around the outside with a variegated perle cotton (I don't recall where I got it--I think from a vendor at Lancaster). Even though I've done blanket-stitches a whole lot, I had difficulty keeping my stitch even because I'm too used to doing it on felted wool, not fabric, and I was struggling to hold the piece comfortably in my hand. For some reason it was all kinds of awkward. But overall it looks okay.

    I then hand-embroidered the olive branch with a variegated hand-dyed perle cotton from Artfabrik. Love those perle cottons--very tasty.

    As opposed to the blanket stitch, I'm really pleased with the way the olive branch turned out. First time ever doing a stem stitch, first time ever doing a herringbone stitch for the leaves. It looks a little more pine-y than olive-y but hey, you know what it's supposed to be so it's all good. 

    It's possible I should've done the quilting first and then done the olive branch. Oh well.

    I really enjoyed doing hand embroidery. I may do more free-form embroidery of my own designs in 2015. And yep, I've already got Craftsy classes on my wish list to help me out with that! BTW, I also talked about this on my last podcast episode and mentioned the book I used as reference. Oh, and yes, I did remember to put a label on the back of this too. Cookin' with gas.

    And then, also on a whim but with far less purpose than the dove... Remember that Jenny Doan trunk show I went to? Ever since, I've been jonesing to dig into my pre-cut stash and whip something up. Last weekend, when I'd gotten all my scarves pressed and done as much work on the dove as I felt up to doing that day, I pulled out a charm pack, consulted a Missouri Star Quilt Company tutorial, and started cutting.

    Introducing: My Disappearing 4-Patch Work in Progress As-Yet-To-Be-Named

    I'm hoping to get the blocks done before I leave; I'll not worry about getting it put together into a top until I'm back. I only had one charm pack of this fabric (Good Morning by Moda, an older collection) so it'll be a baby-sized quilt. At the moment, this quilt has no purpose--no one in mind. I don't think I'll donate it, though. I'm starting to realize it may be helpful for me to have a certain number of finished quilts on hand for those last-minute gifts (illness, shower gifts, etc.). And, if truth be told, every other time I've started a quilt without a designated recipient, it seems the designated recipient appears before the quilt is done anyway. So who knows?

    Here's the tutorial!


    Craftsy Class Review: Strip Your Stash with Nancy Smith

    I've owned this class for awhile. A l-o-n-g while. I waffled frequently about whether or not I was going to use it to actually make a quilt. I've ultimately decided that this kind of quilt is a fantastic retreat project, and since I'm not likely going on retreat anytime soon due to scheduling issues, I may as well go ahead and review it in concept, because I know it's a concept that works. (I've done similar in the past.) So, unfortunately, no photos of my own work based on the class!

    Strip Your Stash with Nancy Smith shows how to cut your stash fabrics into strips of varying sizes, sew them back together to make a new "fabric," then cut different types of shapes out of that fabric to create some really fun quilts. It's more or less string quilting, although with bigger and, in her examples, more color-coordinated "strings."

    Why would it make a great retreat project? Because part of the process is extremely repetitive--cut, cut, cut, cut...sew, sew, sew, sew. Once you've got your new fabric made, of course, then it gets really interesting again. So I need the kind of setting in which I can have all sorts of other things going on to entertain me while I'm cutting, cutting, cutting, and sewing, sewing, sewing. 

    In the class, Nancy walks you through how to choose effective color combinations, and then walks you through the cutting, sewing, and pressing of the strips. This is the lesson you'll really want to pay attention to as she gives good advice for how to keep those strips from going all whacked when you're sewing them together. (Never sewn a bunch of long strips together side-to-side? It's not as easy as it feels like it should be!)

    After the fabric is created, the remainder of the lessons go through several possible block variations cut from this stripped yardage, including very helpful tips relevant to each one. And let me tell you, the quilts are all just so much fun. I do really like the designs and could easily see myself designating one of them as a retreat project in the future.

    The last lesson, entitled "Good to the Last Scrap,' gives several examples of how to use up the progressively-smaller pieces of scrap stripped-fabric you'll have left from doing any of the previous quilts. There are some cute ideas here!

    Want to see some pictures of projects based on the class? Check out the class project page here. (You may have to be a member of Craftsy for that link to work--apologies if that's true!)

    The Basics

    • 8 lessons, ranging from 8 to 35 minutes, though most are in the 20 minute range.
    • Lesson 1 is Nancy's introduction, as well as a really good discussion of color choices.
    • Lesson 2 is making the stripped yardage. She really takes her time with this and offers a lot of tips along the way, so it's worth paying attention to even if you already know the concept.
    • Lesson 3 starts the block designs with Carnival Squares in two variations--I love this block; Lesson 4 is Candy Strips; lesson 4 is Paint Box--another of my favorites; lesson 5 is Kaleidoscope with some great information about putting the rows together; and lesson 7 is Curved Play, which introduces curved piecing. '
    • Finally, as mentioned above, Lesson 8 gives several great ideas for using up the scraps. 

    I did enjoy watching Nancy Martin and I really do like several of the block designs. As I said above, I could see myself doing this sometime in the future--just not right now. So, with apologies for a photo-free-post, I'm giving Strip Your Stash with Nancy Smith two thumbs up.