Gee, have you heard? I'm about to take a trip. A *Big* Trip. Therefore, I've been brushing up on my photography skills, and Jad Davenport's Travel Photography: The Essential Guide seemed just the ticket.
His main theme of the class is to take your time. Get to know the area. Get to know the lighting. Think through themes you want to convey in your photos of the trip. He states at the outset: You're not just taking photos, you're making pictures.
As I was watching these lessons, I realized that, for the most part, I have been working on everything in this class for many years. Not only do I enjoy photography myself, but as I do most of the marketing and all of the resources for my organization, I'm also consistently trying to improve my photography so we can use my photos rather than having to pay for stock--as well as the fact that when I take photos at an event to use in publicity for future events, I know exactly what photos I want to have. I did pick up a couple of tips and the conversation with the teacher available on the Craftsy platform is quite helpful.
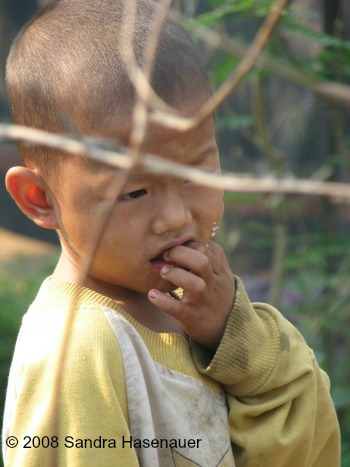
Boy behind wire fence at refugee camp in Thailand
I've always known that I want to take pictures that "tell a story." Jad's discussions of making pictures with intention (lesson 2) are exactly that. Think through what story you want to tell--what theme you want to explore with your photos. He discusses the theme "edges" that he often uses--where are the edges between things? As I was listening to him talk about that I immediately recalled one of my favorite photos I took during my 2008 trip to Thailand, of a man carrying a basket on his back walking down the side of a road with a motorcycle going by (included in this post). I took it because it represented to me the strange blend of ancient and modern I saw all around me in Thailand. I also have several photos of people standing behind the fences on the edge of the refugee camp, representing their lack of freedom. Apparently I also explore the theme "edges" without realizing it!

Juxtaposition of ancient and modern in Thailand
That being said, with apologies to Jad and his emphasis on taking your time to find the best photos, usually when I'm traveling I'm not able to just wander about at will, going back to places at different times of day, waiting in one location for half an hour to get the perfect shot, asking people to pose for a series of 25 shots to make sure I get one good one. Few of us have the luxury of time; rather, we generally have to grab photos on the fly. This means training our eyes to know immediately what will likely make a good photo; being willing to get into a different position to capture just a particular angle; knowing ahead of time what story we want to tell. And, of course, taking thousands of pictures so we'll get a handful of good ones. Thank you, digital technology.
This class will help you train your eye. Jad discusses issues of composition, getting unique perspectives, using available light, and the importance of "moments." For someone new to photography or someone who is trying to improve upon the shots she normally takes, I would recommend this class. For me, while I enjoyed Jad as a teacher and loved seeing his photos as examples (beautiful stuff!), I didn't learn as much from this class as I'd have liked; but then, I've been working on these concepts already. Sometimes I just don't give myself enough credit for what I already know. However, it did put some ideas back in the forefront of my mind for when I'm traveling. And I picked up a great tip for a portable tripod-hack that he learned from the Navy Seals. I have to get myself to Home Depot this week to pick up the parts to make it for myself!

"Joy"--of girls playing on the beach in Oregon when we finally let them out of meetings.
The Basics
- 7 lessons, ranging from 17 to 32 minutes in length.
- Lesson 1 includes the usual teacher introduction (and he's got some serious street cred), but also addresses planning ahead, travel gear, and basic camera techniques to set yourself up for success.
- Lesson 2 lays the foundation, including how to assess the location for possibilities, four elements of a good photo, and "building" a photograph.
- Lessons 3-6 then each explicate one of those four elements of a good photo in more detail. There are some great tips here in things to be paying attention to as you line up for a shot. Even if you don't have a lot of time or if you have a point-and-shoot with no manual controls, you can still usually take just a minute or two to think through where to stand, where to aim, how close to be, how to compose the best possible photograph.
- Lesson 7 talks about putting together an "artful presentation," rather than just showing people pictures willy-nilly. How do you put your photos together to tell a story or create a mood?
For me, I gave Jad Davenport's Travel Photography: The Essential Guide one thumb up. (Although that might go to two thumbs if this tripod hack thing works for me!) For anyone who is newer or less confident in their photography, it's two-thumbs up. Great guidance, helpful tips, and it's almost worth it just to see his photos!