
It's been a year of fun and creativity! Thanks, everyone!
#Scrapitude Step 1--Finally!
With my "found time" yesterday and a couple of hours this afternoon, I finally have Scrapitude Step 1 done--woot!
(If you're not seeing the image below in the emailed-blog version, use this link to see it in Flickr. Not that it's really all that exciting at this stage...)
I'll probably do another Scrapitude linky sometime next week to let everyone check in on their progress. So you may want to put that on your to-do list for #BDSI!
Found time...ice storm 12-22-13
Yesterday we had this...referred to on one website as "freezing fog," which sounds like something evil out of a video game.

Mind you, normally we can see houses. And trees. And the hill across the road covered in pines....
This morning, we have this:

At least we can see the houses again. And at least most of the trees, although the dark green pine is now coated in a half-inch of ice. I almost hate to refer to this as an "ice storm" because we've lived through some real doozies around here that this barely measures up to. But still n' all, it's ice. And it's a storm. So there is that. We're fortunate compared to many other areas of the country--I'm thinking of y'all!
Ice storms do create a dangerous beauty. Here are some close-ups around the yard. As it's a very soft gray light outside, I had to get creative with the photo-editing...and then just started having fun. No ice was added in the creating of these images. :-)


As for the "found time" in the title, due to the ice we're not heading out to church this morning, so I'm about to spend some quality time in my sewing room. We'll be doing some holiday stuff through the day--I believe my daughter may be doing some cookie baking, and we'll be decorating the tree tonight, so it'll be a nice, cozy, relaxed day at home.
As long as we don't lose power...
Announcing the Boxing Day Sew-In! Woo!
For me, the day after Christmas has always been a Jammie Day. When I was growing up, that was a day set aside for being lazy and reading all the great new books I'd been given, and playing games with my sibs. Occasionally we'd get bundled up and go sledding down the hill on our property--a hill that emptied right into a pond at the bottom so you had to learn exactly when to roll of the sled lest mayhem ensue.
Once I had kids of my own, the day after Christmas was set aside for reading stories to the kids, helping them assemble new toys and get stickers in all the right places, and maybe going for a visit out to Nana and Papa's house to go sledding on the hill with the pond.
Now we no longer have Nana and Papa's house in the family, and I no longer have little kidlings in the house. My son has an apartment of his own and, working retail, will likely be working all day anyway. My college-aged daughter will be curled up in her "nest" on our family room couch, reading or hanging out online. We'll still likely play games, but sledding takes a lot more work to get somewhere with a good hill and, frankly, I notice the bumps and bruises a whole lot more now in middle-age. Plus, given that it's currently raining outside, I don't hold out a lot of hope for decent sledding snow anyway.
So now my favorite way to spend the day after Christmas--known as Boxing Day in some parts of the world, is to sew, or read quilting books or magazines, or watch Craftsy classes. Or a combo package thereof.
I--as always--invite you to join me!
Drum roll please... It's time for the
Boxing Day Sew-In!

Logo courtesy Pam of Hip to Be a Square podcast
Join in on the fun on Thursday, December 26th.
I'll be doing some giveaways that day--you don't have to be home and sewing in order to get in on the fun, as I'll be doing all of mine off my blog. I'll also add a linky for any other podcasters or bloggers who want to offer a giveaway that day too--list your giveaway on my blog and please list mine on yours so people will find all their opportunities to win regardless of who's door they walk in through!
My linky will go live at 9:00 p.m. on December 25th to give everyone the opportunity to join up regardless of your time zone. Each podcaster/blogger will have their own deadlines so be sure to pay attention.
We'll also be having all sorts of fun on Twitter--hijinks will most definitely ensue. So if you're on Twitter, I'm @sandyquiltz. You'll be able to find all sorts of other bloggers and podcasters in my follow/follower list and follow them as well. If you're not on Twitter, you may want to think about it!
So, be ready for the 26th! Now I need to get off the computer and organize what I want to get done that day...
2014 Quilty Resolutions Giveaway--Submit your responses!

First, you'll need to listen to episode 138 In Which We Make 2014 Quilty Resolutions to understand what this year's theme is!
Once you've listened, use this link to submit your responses and be entered in the giveaway. Deadline is January 31st, 2014. I'll update this blog post later when I have pictures of what's being given away... :-)
First day of vacation"Little Dresses"
Today was the first day of my prolonged holiday break--I don't go back to work until January 2nd. You can bet I have a whole lotta sewin' plans going on. I'll be happy if I even get a third done of what's in my head for the week.
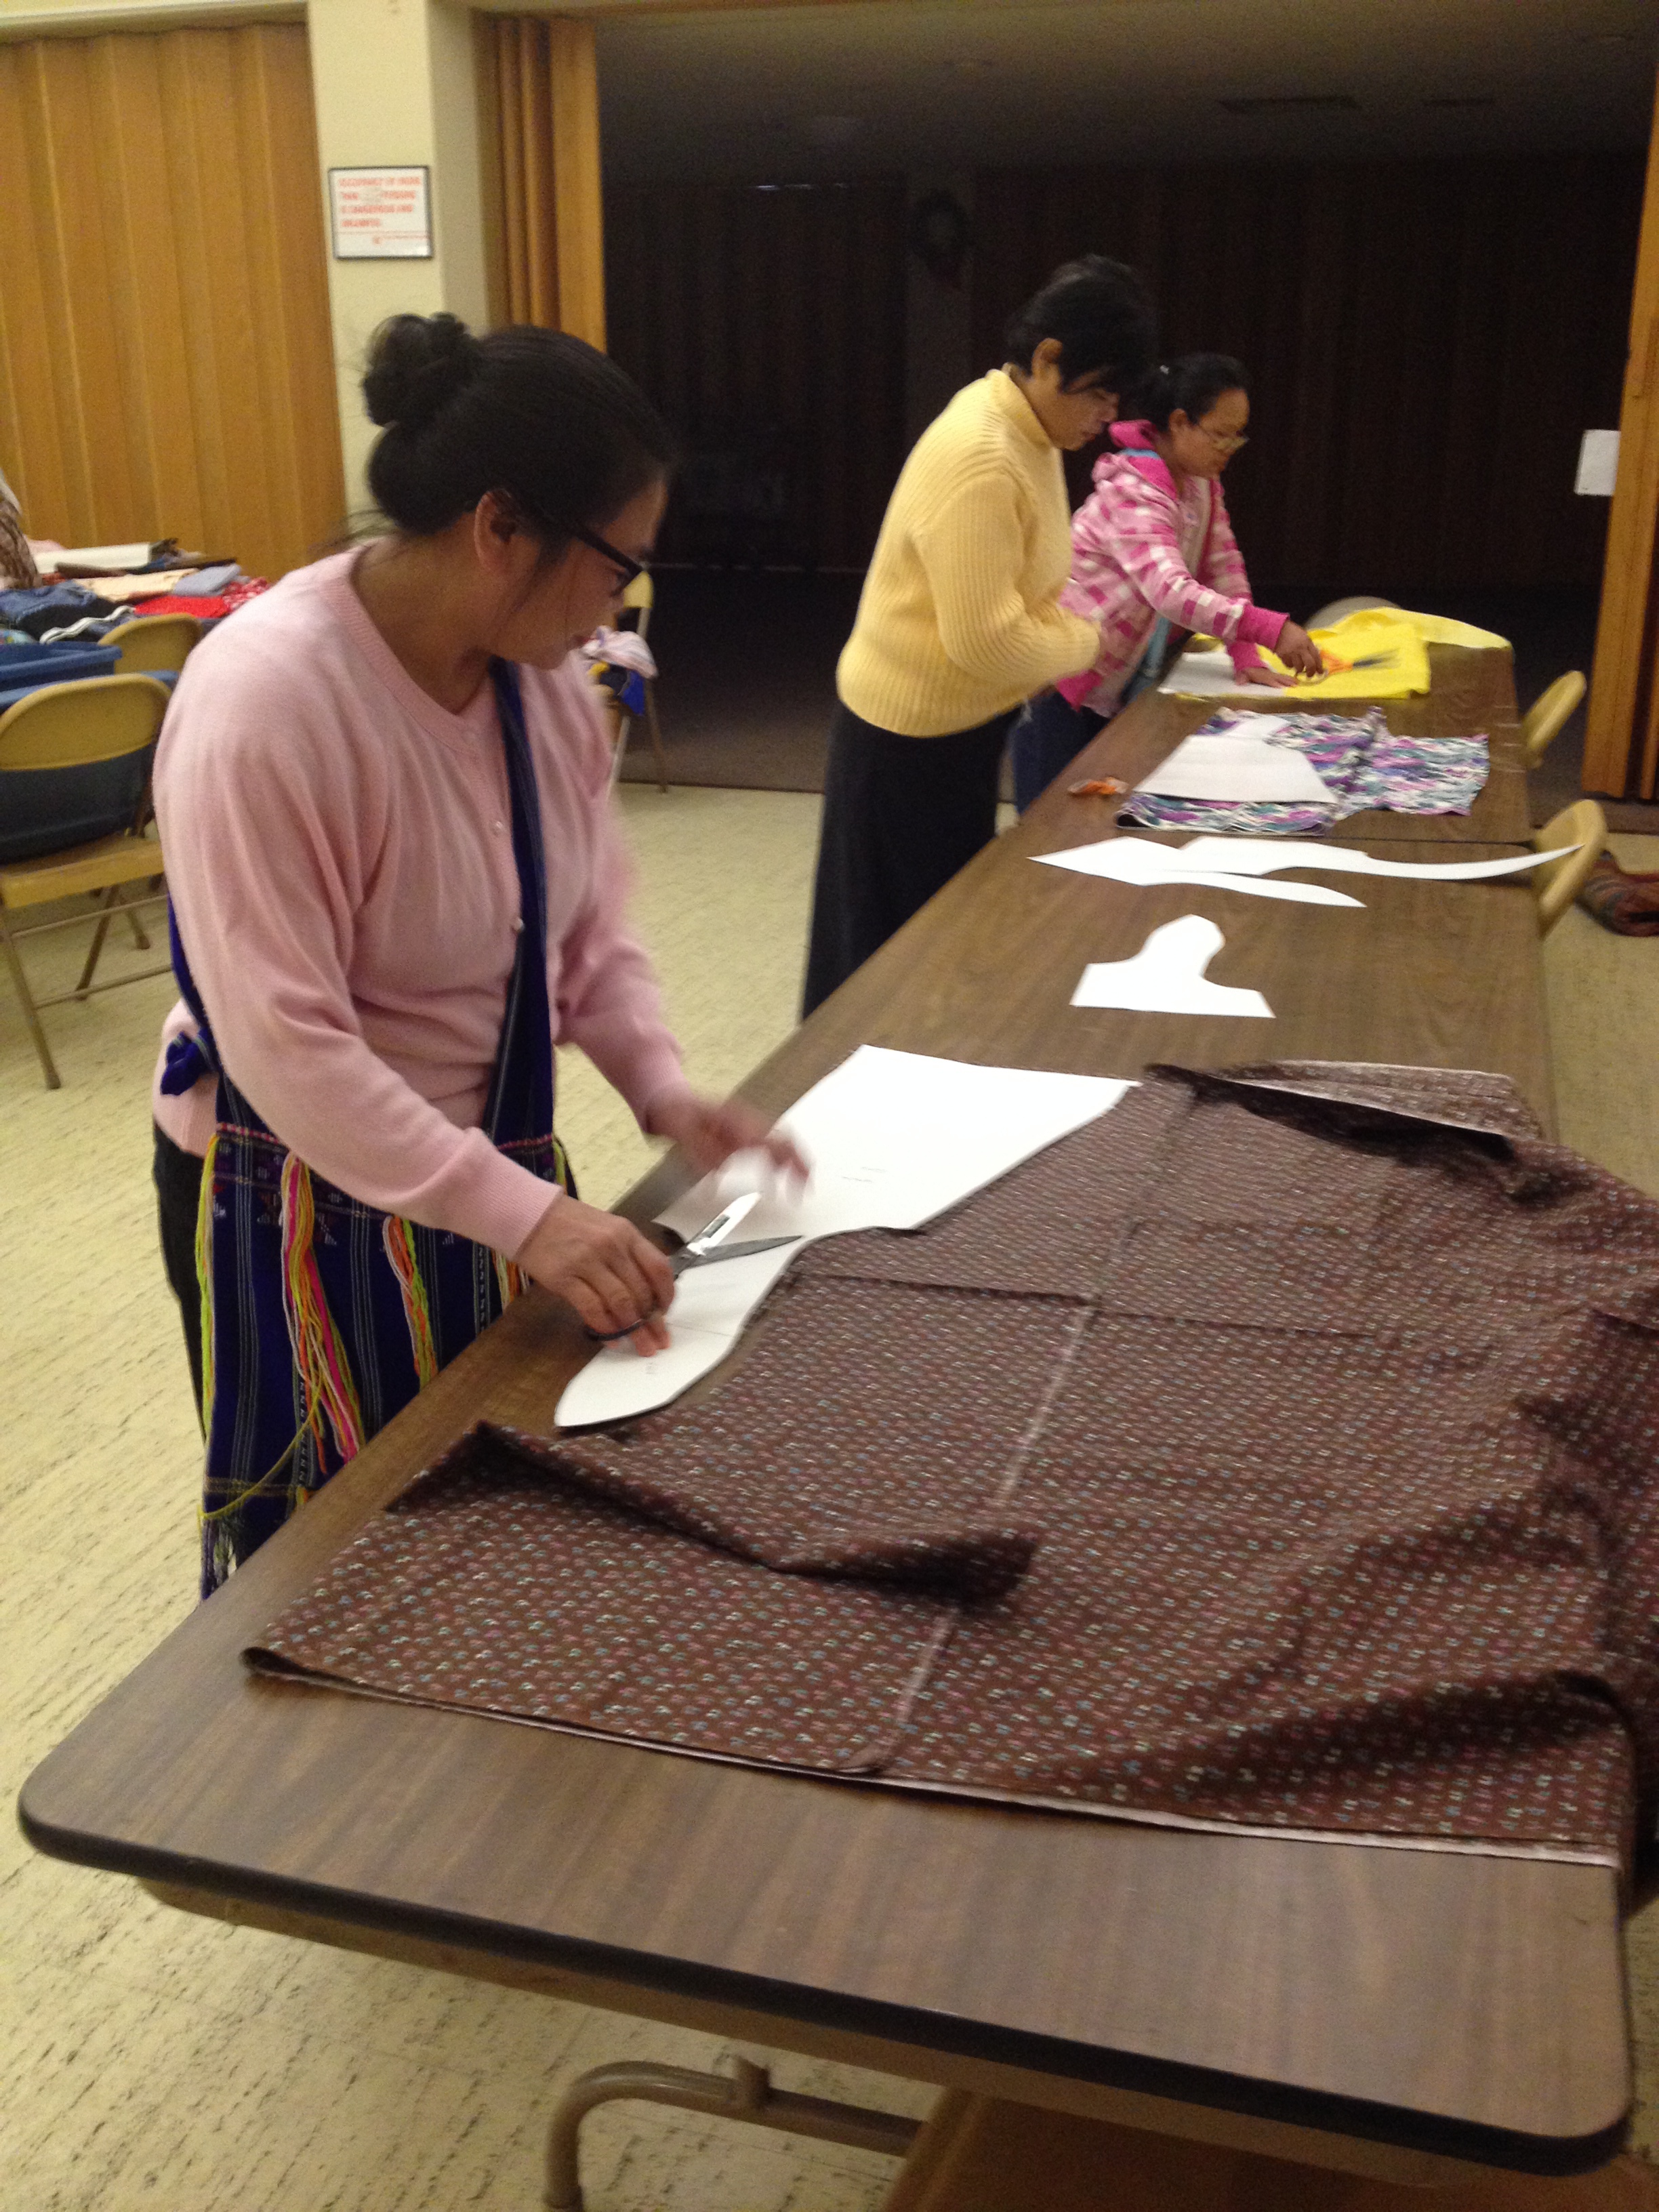
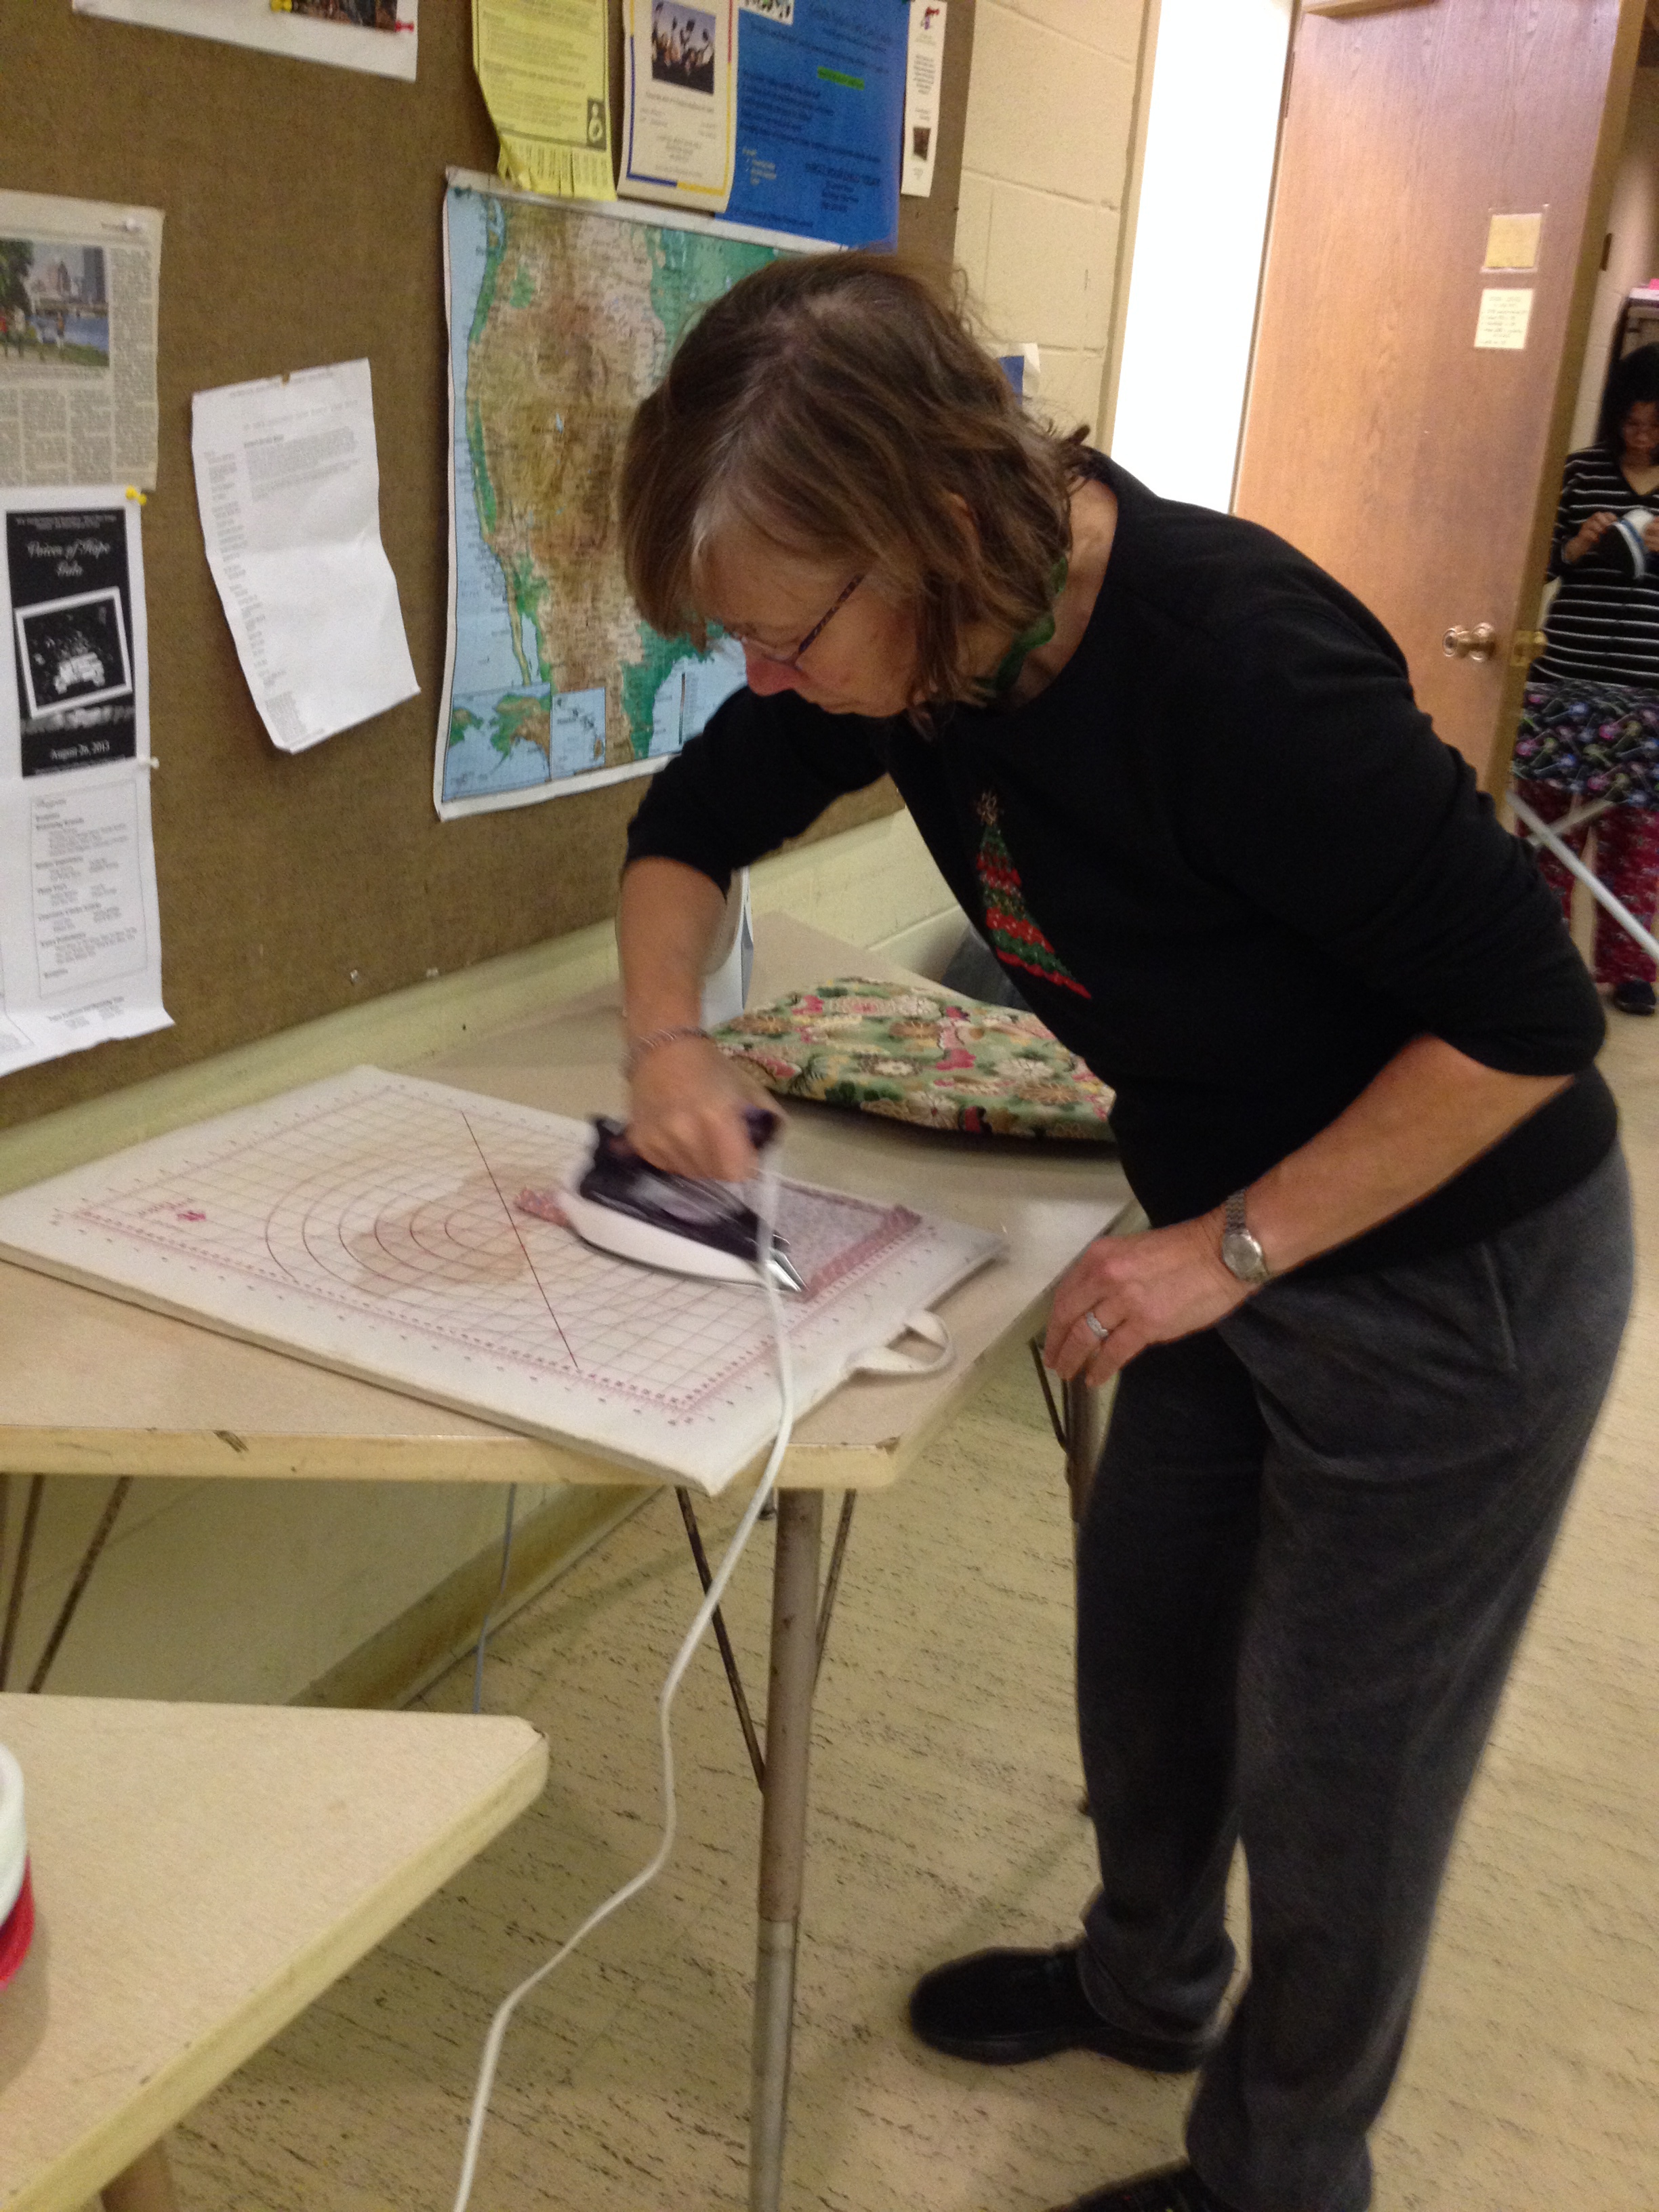
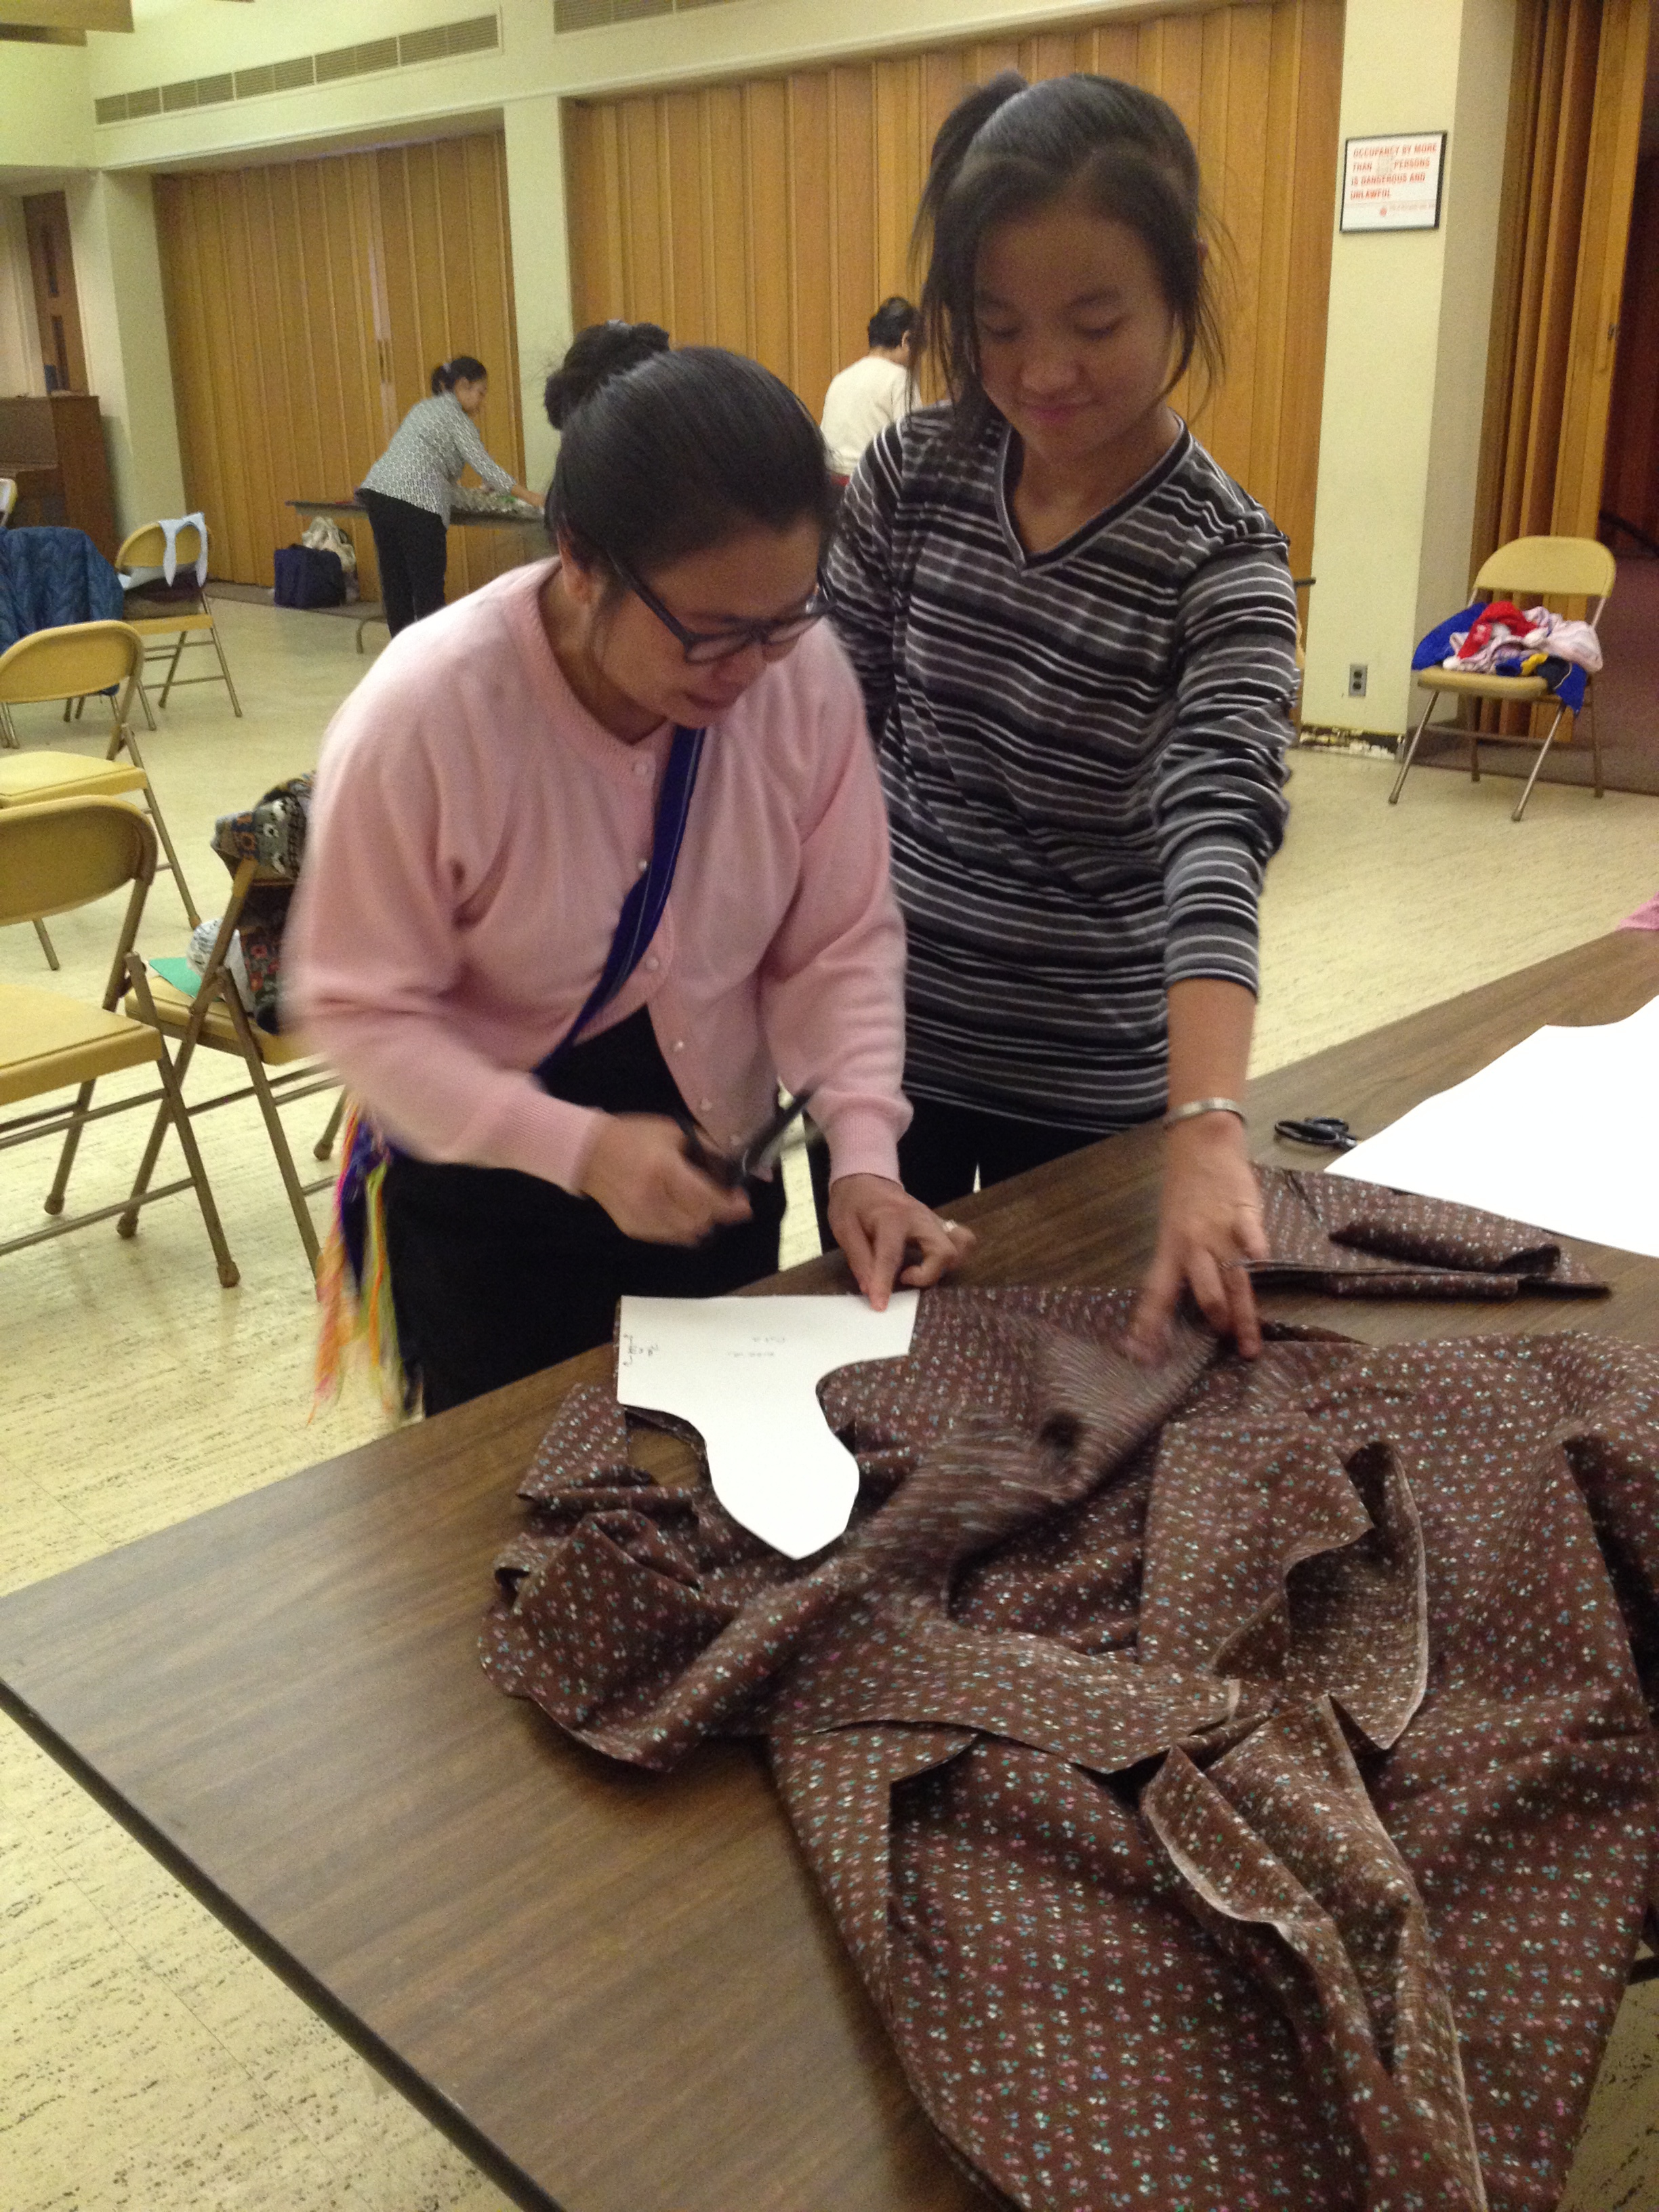
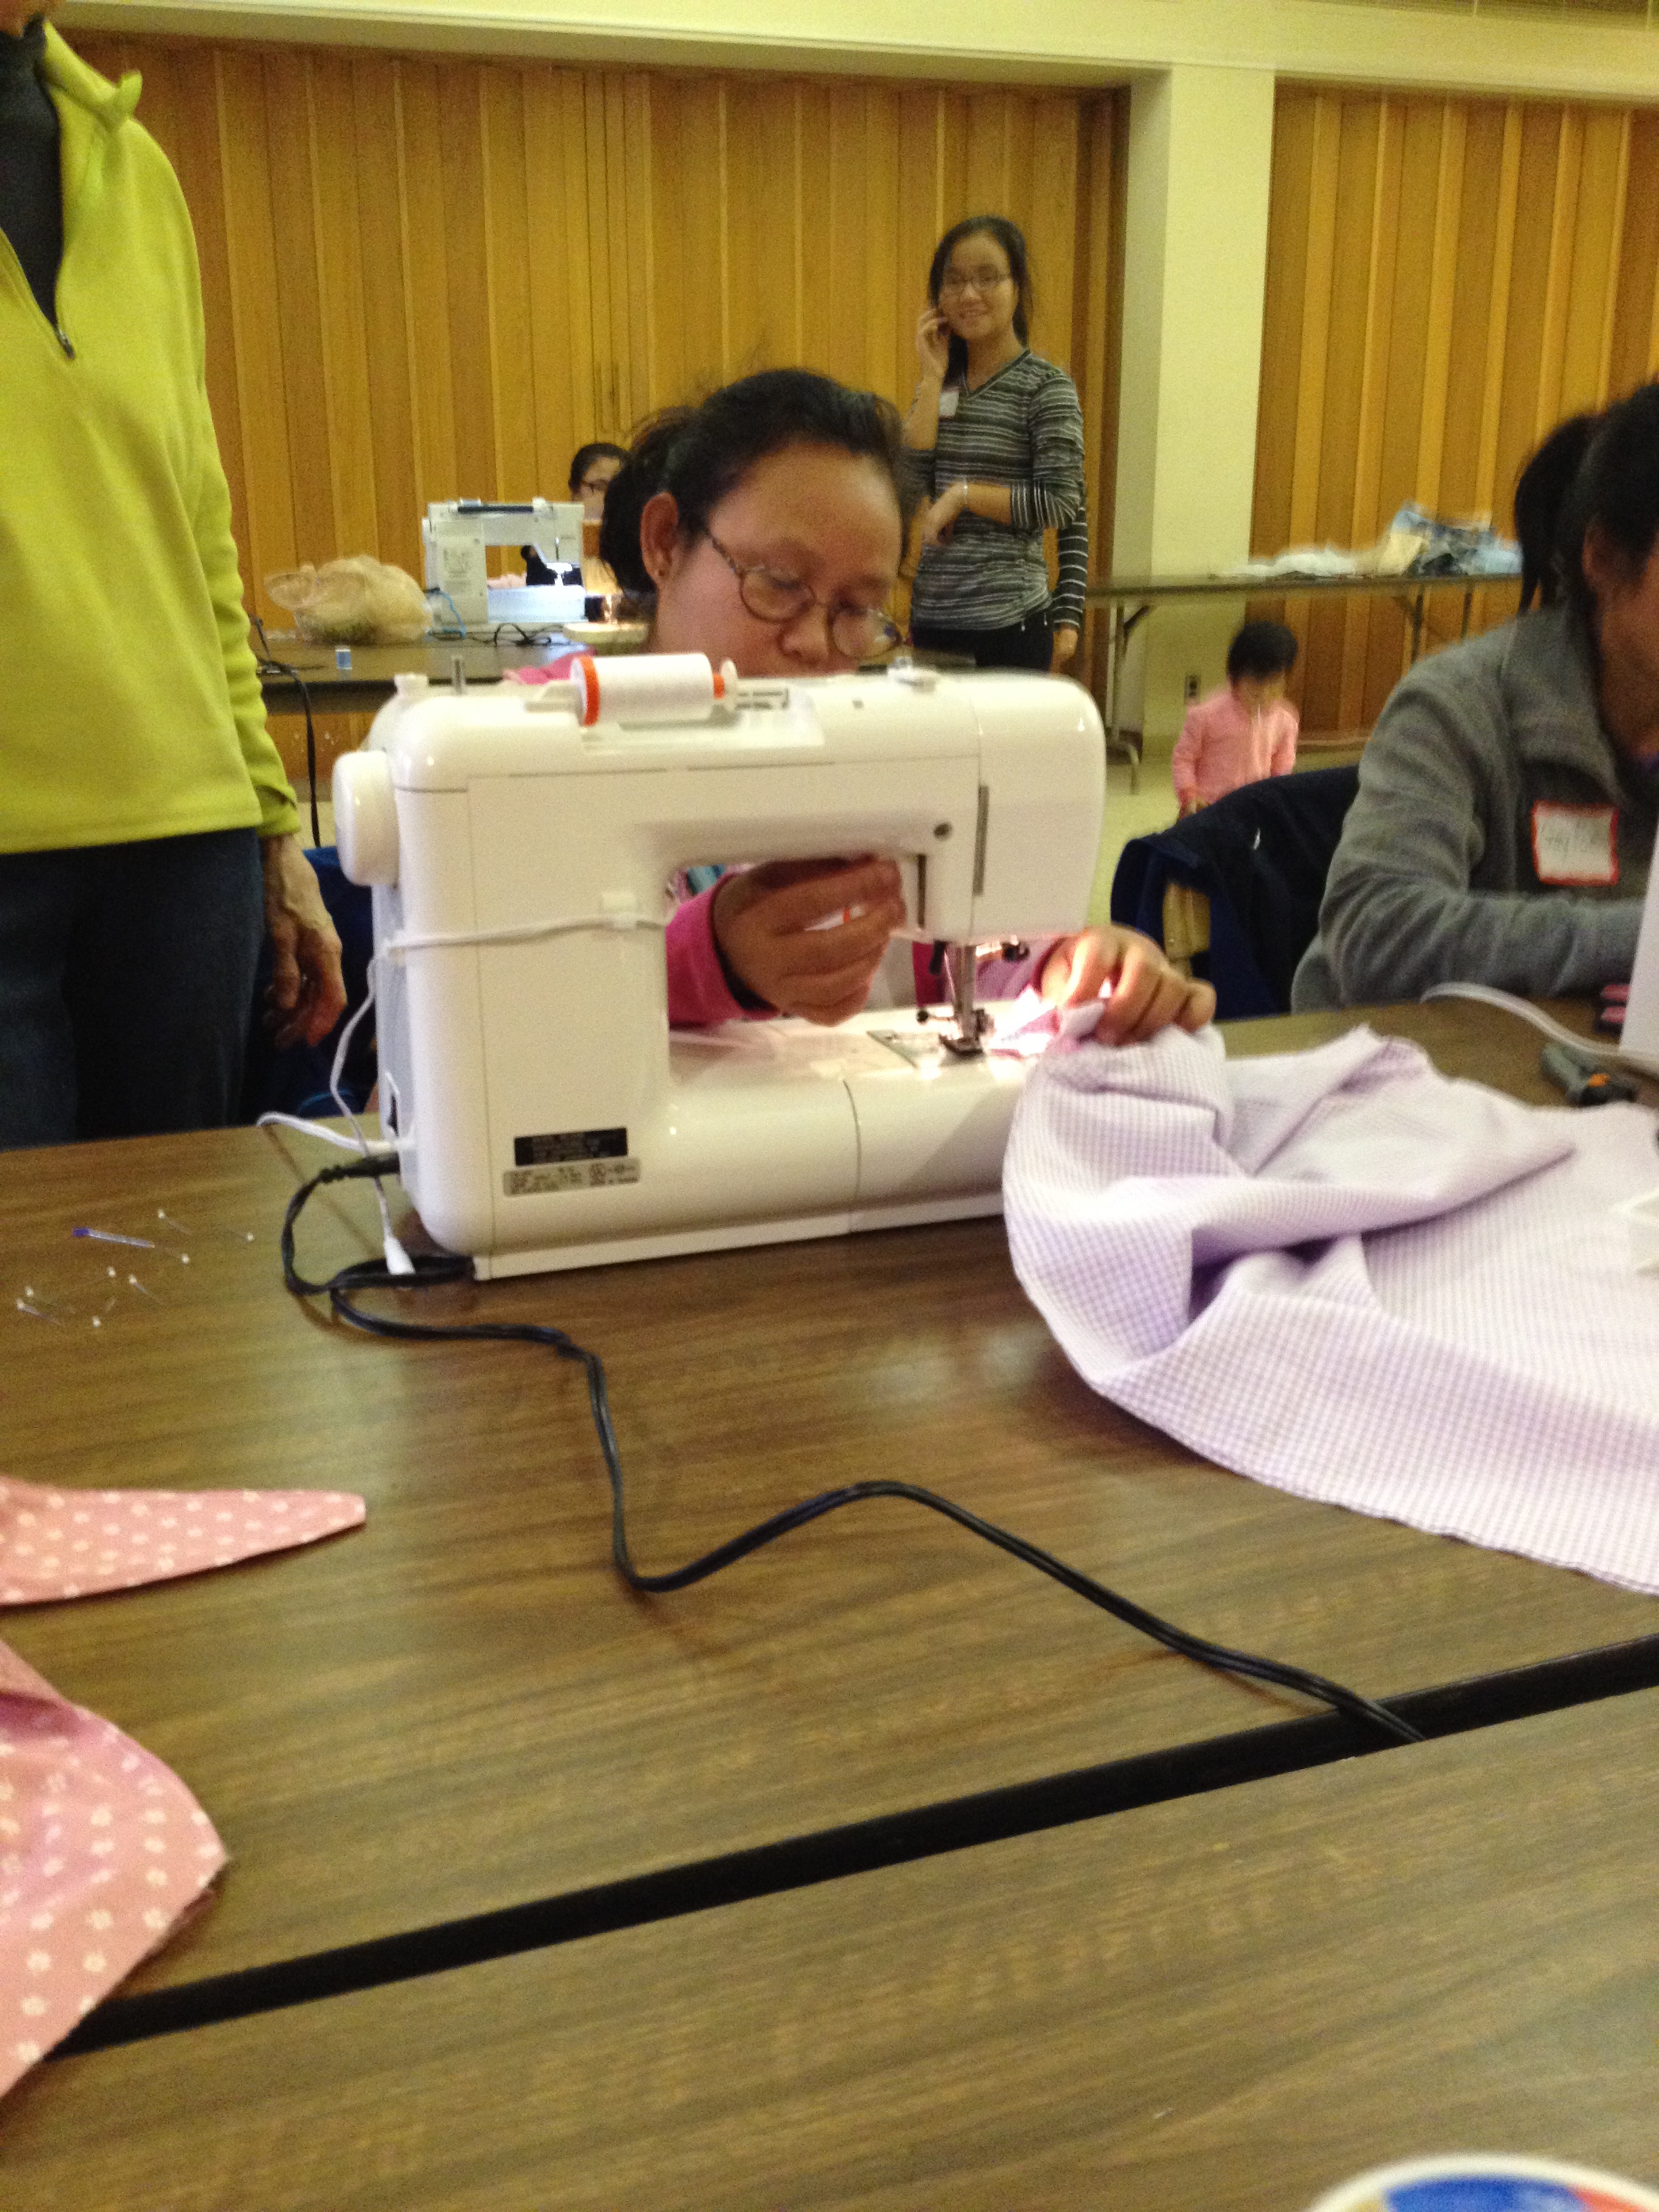
I started off today by joining with some folks from church for a sew day of "Little Dresses for Africa," although I think, given the make-up of our congregation, we're planning on sending ours to Myanmar (Burma). But don't quote me on that--I was just there to sew, I'm not actually responsible for anything, a fact which I thoroughly enjoyed.
I warned the woman coordinating it: I'm a quilter, not a garment sewer. Don't expect much. 8th Grade Home-Ec trauma, doncha know. But the pattern was quite simple, and I have done a pocket or two in my life, so once someone explained the process to me, I was good to go.
Here's the irony--I went to sew but never actually did much sewing. There weren't enough machines to go around and it became apparent another young woman really wanted to learn how to sew. So I let her use my machine and she was in the very capable hands of another woman who is a talented garment sewer. I spent the day cutting fabric into dress pieces.
I mean, people--I was actually cutting fabric with scissors. I haven't used scissors to cut fabric in years! Where was my rotary cutter? Where were my rulers? Where was my cutting mat? I was going old school, baby. (We didn't even have "real" patterns--we were using posterboard templates made from tracing around sample dresses. Way old school.)
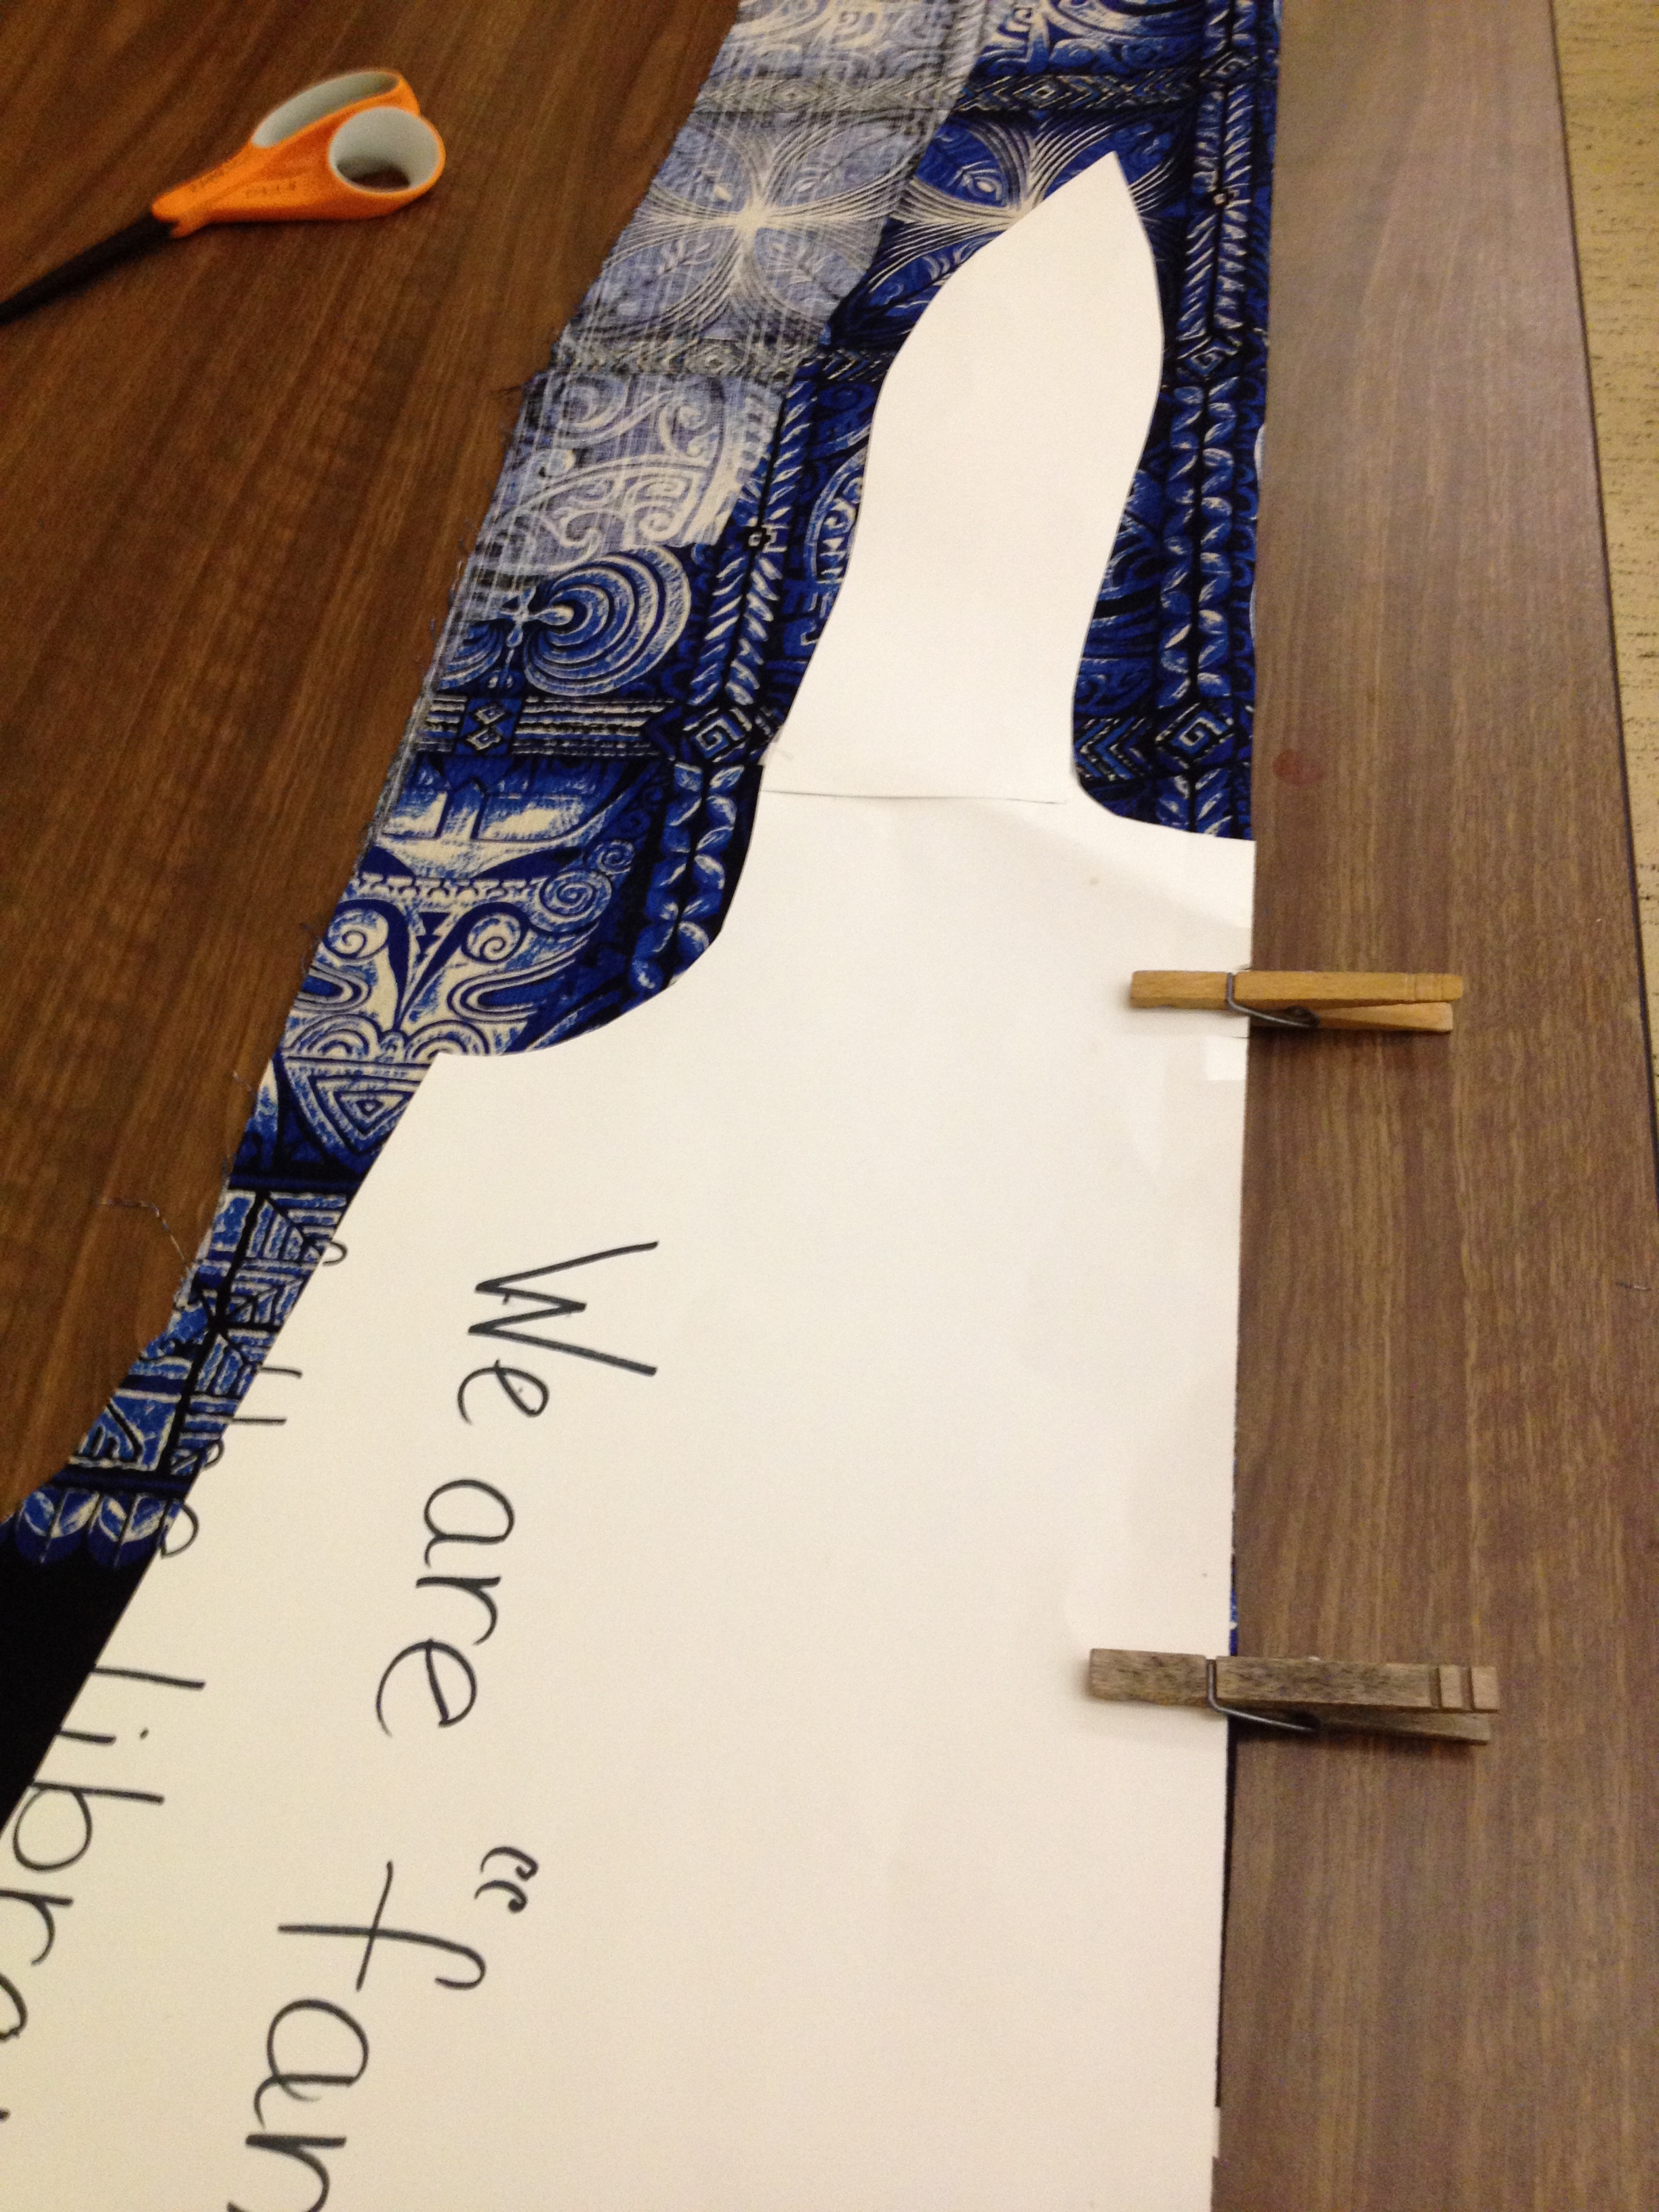
I was thrilled to donate two lengths of fabric I'd bought while in Hawaii a few years back--modern versions of traditional bark cloth. I had a project for them in my head at the time, but the project didn't come off and at this point, was unlikely ever to. On the other hand, the fabric would make great sundresses, so I was very happy to see them used for this. We cut up one of the two pieces (4 yards worth) while I was there. The other piece (also 4 yards) went back in the bin to get used next time.
I believe, if I were using the same rubric as Pam (for the Sunday Stash report), that would make it a total of 16 yards out of my stash because it counts double when it's donated, right? :-)
Although someone counted about 14 dresses sewn, I didn't sew any of them and ended up bringing one of the ones I'd cut out home to finish. But I'm okay with that. I was glad someone learned how to sew, and everyone seemed to have a good time.
Here's a gallery of pictures from the day. My sewing machine makes an appearance in one of them, as well as my Hawaiian fabric with the template on it ready for me to cut. If the gallery doesn't forward for you, just click on the picture--it should work. (If you're getting this by email, you might have to go to the website to see the gallery. Sorry!)
When I get the dress done, I'll post a picture. Right now it's a pile of fabric cut into odd shapes.
2013 Quilty Resolutions Review
Did you participate in my 2013 Quilty Resolutions Challenge? If so, report in on how you did! Here's a link to the spreadsheet to remind y'all of what you said you wanted to do. Fair warning--the first handful don't have names on them, so hopefully you'll be able to identify yourselves! I think I took out any email addresses but there's a lot of copy to wade through on that spreadsheet so give me a quick heads-up if you see something you shouldn't. :-)
Remember, leave a comment to let me know what you accomplished and what you didn't!
I'll be announcing the 2014 Quilty Resolutions Challenge in my next episode--maybe even recording tonight, but more likely tomorrow.
Meanwhile, I'll leave you with something wonderful. We had the opportunity to have the Burmese Fellowship from our church visit our home tonight and sing us some Christmas carols. I'm truly in the Christmas spirit now.
Another postcard...
One of our friends at church was sworn in as a U.S. citizen this week. I had a little bit of a plan in my head of a small quilted wallhanging I would make him to celebrate the occasion, and on Friday, while on the Shirley DeMott Memorial Annual Shop-Hop* with a friend, I picked up some appropriately patriotic-themed fabrics.
When my husband and I were out for dinner that night, I mentioned and briefly described what I thought I might make for our friend. My husband said, "Why don't you make another postcard? I like your postcards."
Well, okay then. As I like to give positive reinforcement for any positive reinforcement my husband gives me for my rather expensive creative endeavors, a postcard it is, tee hee. "Plus," I thought, "a postcard is smaller and may go a little quicker than what I'd planned anyway."

Yeah, well, that never quite works out, does it? I decided to do a design that was quite time-consuming. (Yep, all those red and white stripes are separate little strips of fabric.) Still n' all, it was done in a couple of hours. And of course, I didn't end up using any of the fabrics I'd bought on Friday and just dove into my stash instead.
Sadly, on the very, very last swipe with the iron to make sure all was happily fused down, my iron decided to spit. I hate my iron. And one of the fabrics bled. I hate that fabric.
Here's some irony for you--with all the work I've been doing with my hand-dyes and nothing ever bleeding, this was a commercial fabric. Go figure. My fault--usually when I'm fusing I use a different iron that's never had water in it. But I recently handed that iron over to my son, and didn't bother to take the time to empty the water out of my regular iron before starting to fuse. I hate that water.
I took this picture after I'd gone after the bleed with a dab of Synthrapol, followed by a second attempt with a dampened color catcher. So believe it or not, it does actually look a little better than it did. I'm going to wait to see how it dries, then probably do the ol' paint touch-up. Surely I've got white fabric paint somewhere. I really hate to see all that time--cutting narrow little strips, satin-stitching the hey out of everything--go to waste. But I also hate giving something to someone that's clearly in error. And I don't have time for a Plan B, other than buying him a card at Hallmark. Last I checked, they didn't sell "Happy Citizenship!" cards.
Now, that being said--here's the good news: I've got this whole postcard thing down! I like doing little mini art-quilts. They're fun! (This one is 5x7", btw, rather than the 4x6" I've been doing, as I'm not mailing it so I decided I could go a little larger.)
LATER ADDENDUM:

A little white Tsukeniko ink, judiciously applied. One would never know there was a problem.
*Mom and I used to often go on a shop-hop in an Amish area about an hour away on a Friday in December. I'd take a vacation day, and we'd visit three or four shops, then have lunch at an Amish restaurant that had the best dang corn chowder. After Mom passed away, various of my friends have been happy to keep up the tradition with me, and so the Shirley DeMott Memorial Annual Shop-Hop was born. Sadly, the Amish restaurant closed a couple of years ago, but I think this time around we may finally have found a good little pub to replace it. Not Amish, and no corn chowder, but great burgers!
My mail was particularly beautiful last week
So, if you listened to either Daisy's most recent podcast episode or this one of mine, you know that I won Daisy's Twitter giveaway on Black Friday of a completed quilt top from her stash. I received it in the mail this week...

I'd put my name in for it because I loved the colors and hey, it's a quilt from Daisy! Who wouldn't want one?
It was only later that I began to think...hey, that design looks familiar.
Here's picture of a quilt I made for my son a few years back. Somehow I never got a picture of the finished product but trust me, it did get finished and it's currently on his bed in his apartment. (Or in a rumpled heap on the floor but I choose not to think about that.)
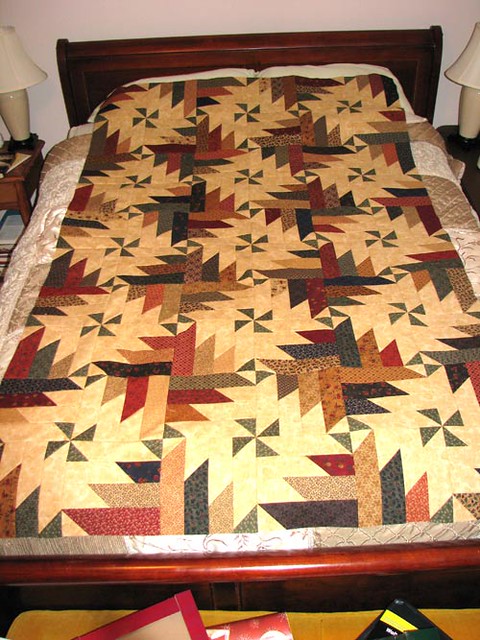
It's a design from one of the Strip Club books, using 2 1/2" strips. (Please note--there are a few books in the series and I have a couple of them, so I grabbed a link to one but can't guarantee it's the book this design is in.) I'd always loved the design and had periodically thought over the years, "Maybe I should make myself another one...." Well, boy howdy. Now I don't have to! Wheee!
I plan to send this out to a longarmer, and I think it'll go on our guest room bed. Unless my daughter lays claim to it next time she's home, which she is wont to do.

I also received this in the mail this week:
This is a lovely little keychain change purse from Jackie of Sew Excited Quilts.
It's so cute! And yes, it's on my keychain, although it doesn't have any change in it at the moment.
Perhaps next time I go on a shop hop or visit vendors at a show, I should put as many bills as I'm planning to spend in this, and leave the credit cards at home! (Of course, it also looks like it might be the right size to hold said credit cards...hmmmm....)
And the third thing I received has a little bit of a story behind it.
Several times over the last couple of years I've had the privilege of visiting one of our denominational mission sites, a residential campus about 90 mins outside of Phoenix for adults with developmental disabilities, named Rainbow Acres. It's an amazing place--I could go on for several blog posts. (If you're in the Phoenix area, I highly recommend you go visit and even volunteer there--you won't regret it!) The adults, referred to as "ranchers," have a variety of jobs they can choose from. One of the things that Rainbow Acres has become well known for is it's weaving. Several of the adults are gifted weavers and love doing it. A couple of the times I visited, the man who is their head weaver quickly took to his loom to show me how to do it, his enthusiasm for the task bouncing out of every word he said. When people purchase the weavings (or paintings, or other items created by ranchers), half the proceeds go back to the rancher him or herself. I'd purchased paintings on an earlier trip, but had admired some shawls they were making. Since I'd just bought the paintings I didn't feel I could also afford the shawl.
However, when I was there in July and we were visiting the weaving room once again, I saw a pile of skeins of yarn they had just received. As we fiber people are known to do, I made a beeline for the pile and dove my hands right into it. Oohing and aahing, I couldn't stop petting the stuff. It was a gorgeous shade of gray with variegated purples and blues, and tremendously soft. The staffperson doing inventory told me that had just arrived and they were deciding what to do with it. She then raised an eyebrow and said, "We do work on commission, you know." Sold. I asked for a shawl done with that yarn, and just received it this week (in perfect time for our ever-dropping temperatures!)

Front
This type of shawl has a name that start with a P--not Pashmina--but I'm blanking. It's joined in the back but open in the front. It'll be perfect for my home office which is right above the garage and ever-so-much-nippier than the rest of the house.
In fact, I'm wearing it right now. Toasty.

Back
Ah, to be surrounded by so much beauty. I can barely stand it!
Postcard Swap Reveal
Whoopee! Let me start with a big thanks to Sandi of Quilt Cabana Corner for hosting a postcard swap this year. Those of us who participated had a great time--and pictures have been flying this week as people started receiving their postcards in the mail. My partner and I have both received our postcards so now we can do the Big Reveal! (Cue theme music...)
Here's the postcard I received from Beth:

I love the way she did the snowflakes, and the different fabrics in the tree. And did you notice that trunk is thread-sketched? Very cool stuff! Love it, Beth!
And here's the postcard I sent to Beth:

The square motif is from an old Laurel Burch Christmas fabric. The background fabrics and fused binding are all my own hand-dyed fabrics.
I talked about how I did this in my most recent (as of this writing) podcast episode, Episode 136 In Which We Make Fabric Postcards. For what it's worth, anyway. My technique definitely needs some polishing, but I have fun with it, and that's the main point!
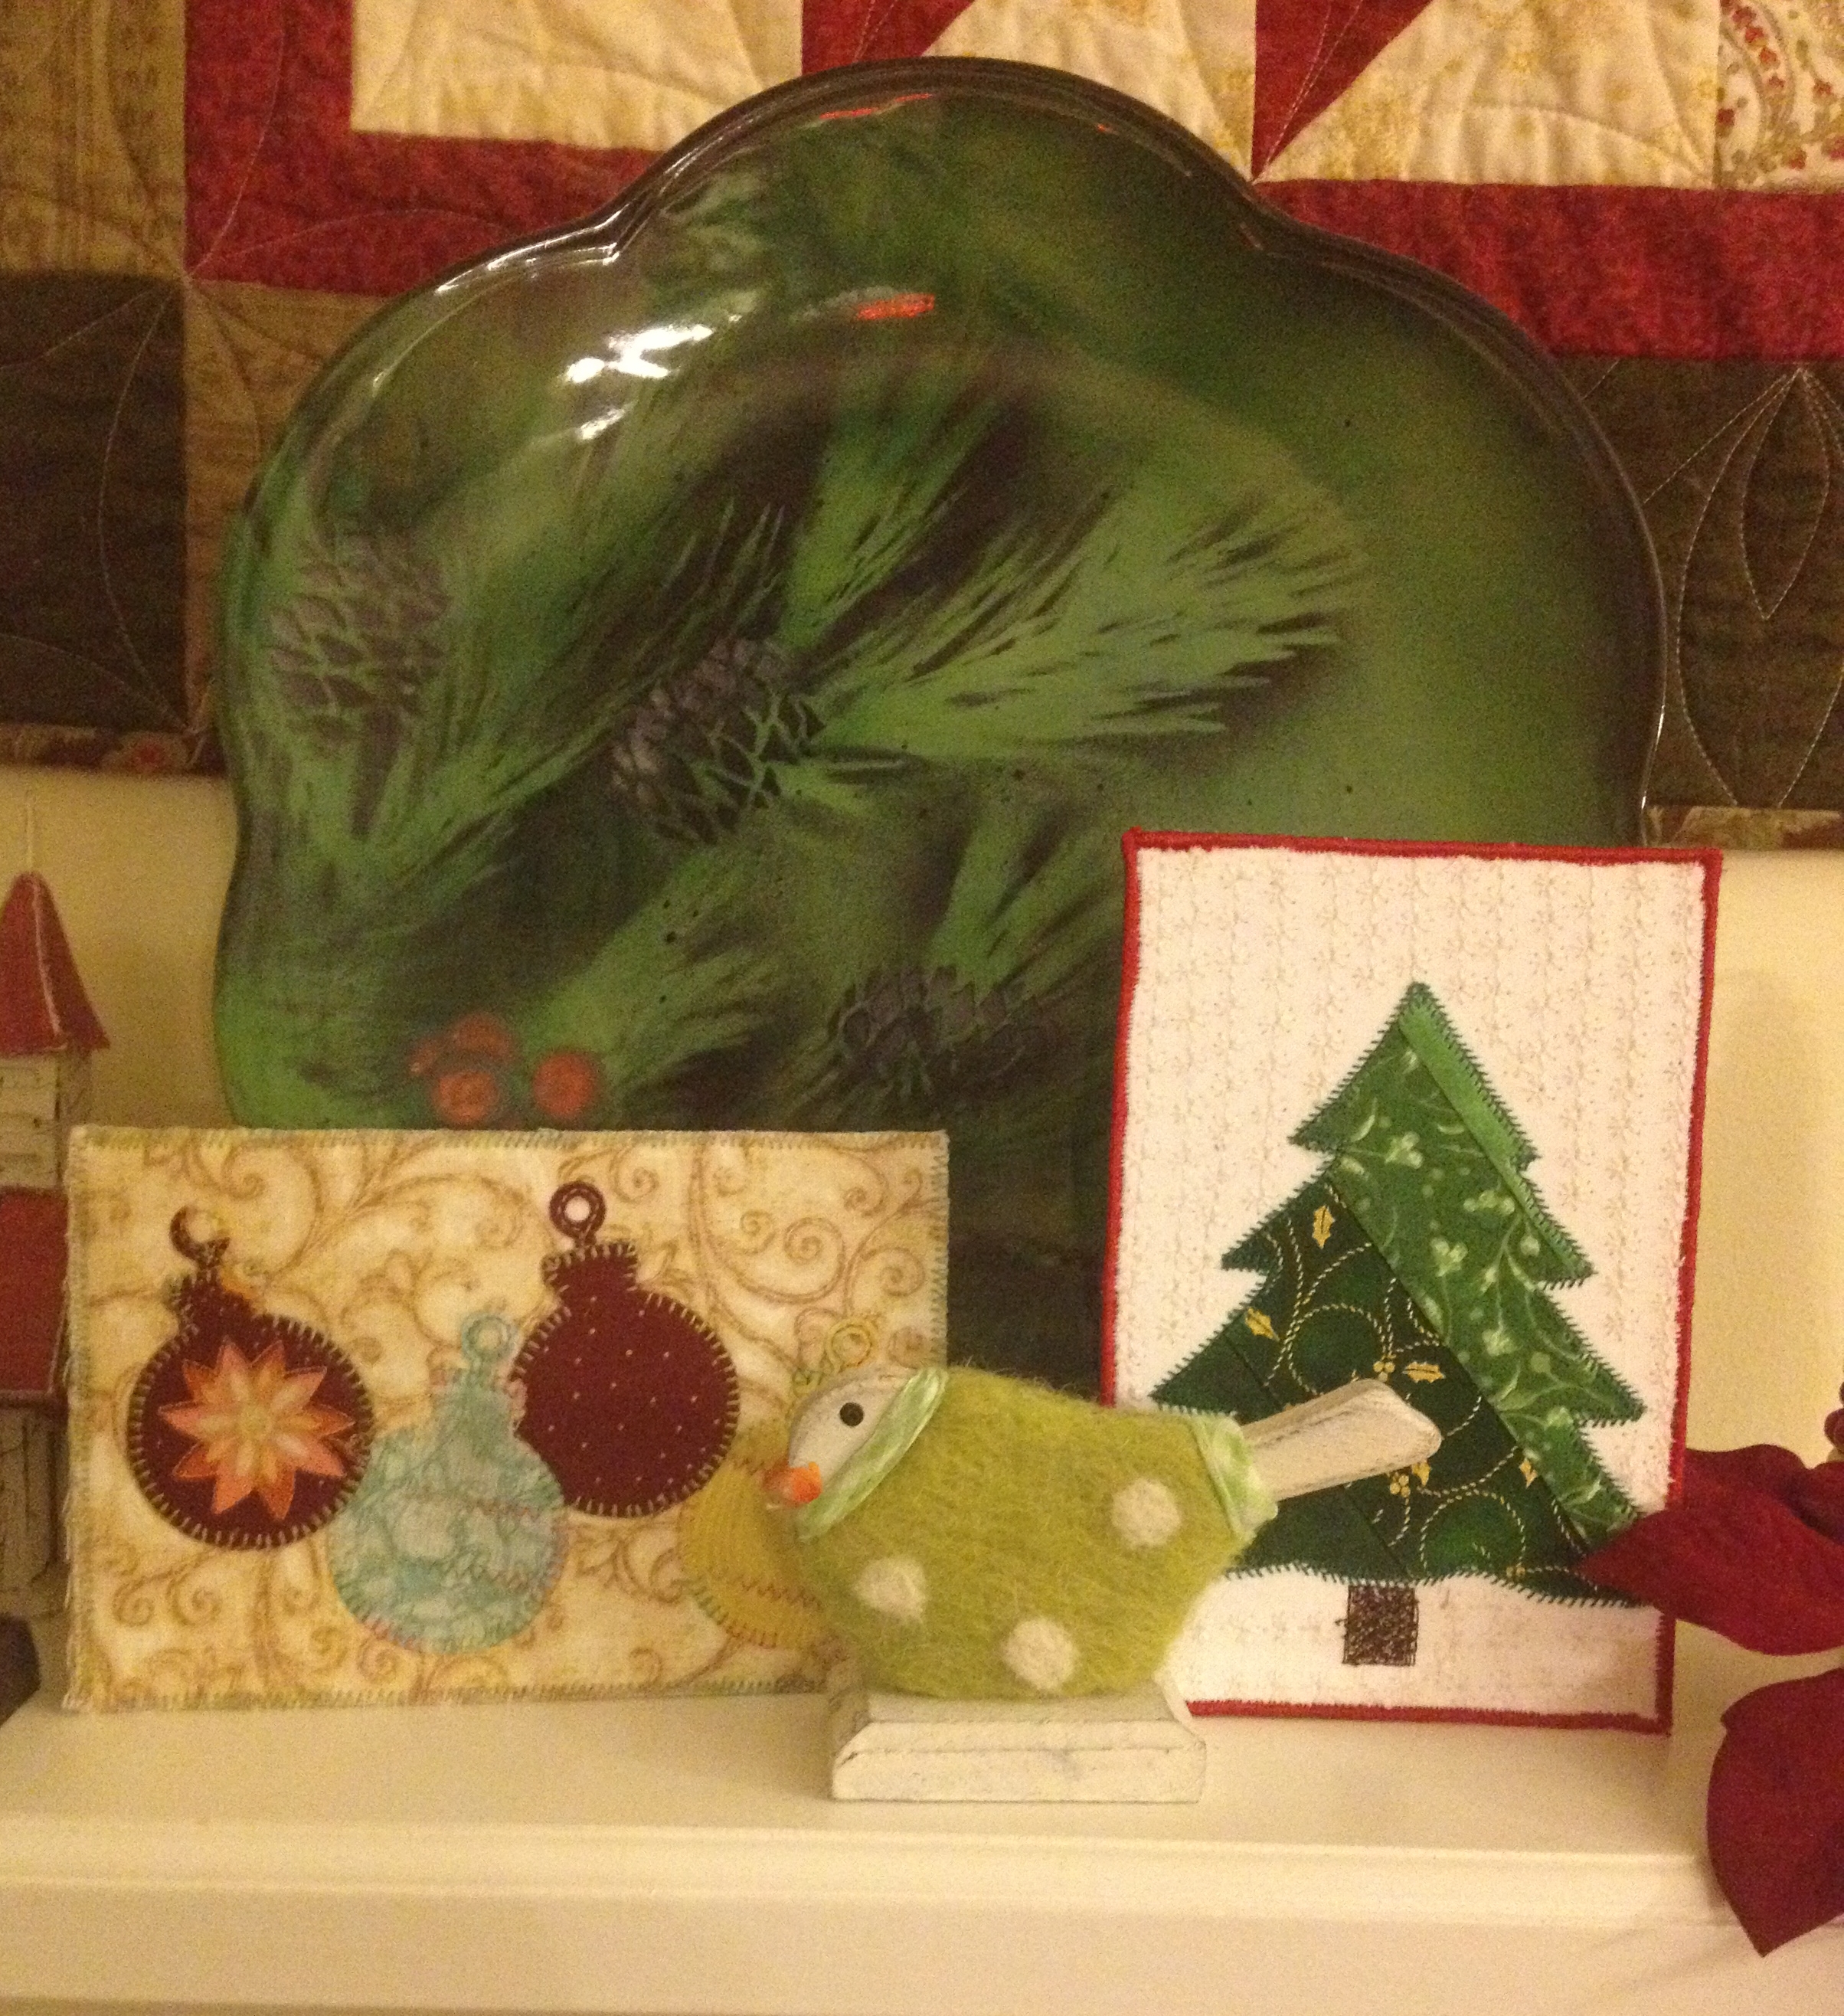
These postcards really do become a permanent part of my Christmas decoration collection. Proof: Sandi's postcard from last year and Beth's postcard from this year have pride of place on my mantel!
#BFSI Report--Baby Quilts Finally Done and Delivered!
The two baby quilts are finally both done and delivered--woot!
Baby Quilt #1 started out as a Jacob's Ladder quilt.

As per episode 133 "In Which I Have a Story of Heartbreak and a Rotary Cutter", it had some issues. (You can't see the issues in this picture. So let's all imagine it was beautiful and now has a happy home being a quilt somewhere.)
Baby Quilt #1 became Baby Quilt Remix. And although (as per episode 134 "In Which It's Just Snakebit") it also had some issues, a little judicious hand-stitching dealt with the problem and it was duly mailed off a couple of days before Thanksgiving.

It's a Disappearing 9-Patch, arranged randomly, made from the scraps of Baby Quilt #1, with a few more added in since I didn't have quite enough of all of BQ1 fabrics left. (If you want to know about the colors, etc., you'll need to listen to the episode--don't want to take up space on that here again.)
I did a very light quilting in the ditch along the block lines and inner/outer border.
Hopefully it will provide many days of warmth and comfort to my little step-great-nephew. Or great-step-nephew. Or great-nephew-step, which is a dance craze soon to cross the nation. (Let's just call him my new little GSN and move on.)
And so I moved on to Baby Quilt #2 for my newly born great-niece. This one started out in my head as a completely different quilt. However, after all the grief of Baby Quilt #1, I seriously scaled down my plans and reminded myself with some vehemence, "It's a baby quilt! It's going to have all sorts of bodily fluids on it within a short period of time! Make it quick, simple, and highly washable!"

Thus, another Disappearing 9-Patch, named "Admit One." I chose to do this one in red, white, and black, which is good for babies as those are reputedly some of the first colors a baby can see. I can't swear to that. My babies couldn't tell me these things at that age.
I quilted straight lines diagonally across the quilt, varying the widths between lines. I don't know that I'd do this again on a baby quilt. 1) It's amazingly hard to quilt in a straight line diagonally across the quilt, and 2) it made for a slightly stiffer quilt. I didn't think I was doing enough quilting to really change the drape of the quilt, but it's definitely not quite as soft as the first baby quilt. I'm not sweating it--it just would've been easier to stick with ditch quilting, so I'll do that next time.
(You might want to pause here for a moment and compare the two quilts. Both Disappearing 9-Patches, looking completely different with different fabrics and a different layout. This design is just too much fun to play with!)

Oh, the "Admit One" thing? Here's the backing fabric. Mom is in theater, so it just had to be done. As my BFF/BQF Kate said when I found this fabric, "And now you can name the quilt, 'Admit One to the Family!'" Perfect! Hadn't even thought of that!

Here's the one who got admitted to the family. Looks like she likes her new quilt.
It may not be Friday, but... Parmesan Crisps and Dipping Sauce
I haven't done a Food Friday in a long time, but was inspired today, despite it being Sunday. If you're a purist and want to read a Food Friday post on a Friday, I'll forgive you if you don't comment for a few days.
We're having our last big family hoo-hah of the Thanksgiving season today at my husband's aunt's house, and I was asked to bring an appetizer. After having cooked (and cleaned up after) Thanksgiving dinner this past week, I was in the mood for something very easy with limited dishes involved. After hearing them referenced on the most recent episode of The Splendid Table, I decided I wanted to try my hand at making Parmesan crisps. I did a little Internet research and ended up combining notes from a few recipes, then putting my own spin on it anyway. So here, for what it's worth, is my (usual kinda-sorta) recipe.
By the way, I used a really good Parmesan for this--none of the inexpensive pre-grated stuff that comes in a tall green jar (that shall remain nameless). That would likely work fine, but I've recently become a Parmesan snob and buy chunks of the good stuff at the grocery store and grate it myself. It's more expensive, but the flavor is so fantastic that a little goes a long way. And since this recipe is all about the Parmesan, I'd recommend ponying up for the good stuff.

Sandy's Italian Parmesan Crisps
Ingredients:
- A great Parmesan, shredded. (I used a Parmiagiano Reggiano available in my local grocery store). I ended up with about 4 cups, but it all depends on how many crisps you want to make.
- 1 tbsp flour
- Onion powder, garlic powder, dried Italian seasoning, dried basil leaves (to taste)
- Salt to taste
1. Preheat oven to 375. Make sure rack is in center of oven. Prepare a baking sheet with a piece of parchment paper.
2. Mix the ingredients together well. The flour will tend to want to head for the bottom of the bowl so I used my hands and kept tossing everything until I felt the cheese was well-coated with the seasonings.
3. Drop cheese mixture in about tablespoon amounts onto parchment paper, spacing it about 3-4" apart. Spread out the cheese mounds until they're relatively flat but still tightly enough together that the cheese will melt into one piece. The more the cheese is mounded, the chewier the result is; a good crispy texture requires a fairly flat, rounded shape. Also, holes among the cheese will remain holes and make finished product more breakable--parmesan doesn't spread too much when it melts. So keep the cheese close together. My first two batches were a little trial-and-error to figure out what worked best
4. Bake for about 4-7 minutes, depending on your oven. They'll bubble first, but don't take them out while bubbling. They need to get a little past that point. You want them nicely browned but not burned.
5. After removing from the oven, let the pan sit for about 5 minutes so they finish setting before sliding them off the parchment with a very thin-edged metal spatula. Move them onto a cooling rack covered with a piece of paper towel to finish cooling and setting. They're extremely delicate, so handle with care!
I believe my yield was something like 3 dozen crisps, but I wasn't really counting. Your yield will depend on how big you make your crisps. I'm carrying them to the party in a tupperware container with a lot of paper towel between each layer mostly to try to keep them from pulverizing themselves on the drive.
I also made a sauce to go with them. I needed something very lightweight so it wouldn't break the crisp when dipped, so I made a sort of marinara thing:

Sort-of Marinara Sauce for Crisps:
In food processor, blend 1 can (28 oz) of diced tomatoes and 1 tbsp tomato paste with onion powder, garlic powder, and italian seasonings. (I used an Italian seasoning blend plus extra dried basil since I'm a fan. We're past season for fresh herbs here, but if I did this in the summer fresh herbs would definitely be the thing. I'd have used a real onion instead of onion powder if I'd had one in the house: This was sort of a make-do recipe.) Add salt to taste, and a pinch of sugar. Process until mostly smooth but with some nice texture to it.
The sauce is just thick enough to cling to the parmesan crisp but not break it. And yes, you could use leftover sauce next time you have pasta. :-)
I confess to having "taste-tested" several. Quality control and all that. I'm taking some risk posting this before actually taking the crisps to the party and finding out what everyone else thinks, but I'm fairly confident!

Waking Up to a Beautiful Morning...
Reminder about Scrapitude Schedule and BFSI
It's Thanksgiving week here in the U.S., so it's time to start looking ahead to our traditional Black Friday Sew-In on Friday. If you've listened to one of my recent episodes you may recall that I'm not entirely sure what my schedule is going to be on Friday due to family being in from out of town, so Pam is going to be doing something for BFSI, as is Daisy. So be sure to check them out! (There are likely others--those are just the two I'm aware of at the moment. If you're also going to be hosting something on BFSI, leave a link to your blog in the comments so people can find you!)
I do know that my schedule will not include any shopping. My hope is that I'll be spending at least some portion of the day having my traditional Jammie Day with my sewing machine. So, mentally, I'm listing the projects I'll be working on.
One of those projects is, of course, Scrapitude. You may remember I get the new clues every month at my guild meetings. I posted November's clue the day after our November guild meeting. Back when Charlotte was setting this all up, our guild asked her to skip giving us a clue in December because everyone felt they'd be too busy with holiday gifts to keep up. So you've now got until January to catch up with Scrapitude! (Or, if you're all caught up, maybe do it in a second colorway! Or, if you're Daisy, a third!)
So, to recap: the next Scrapitude clue will be posted after my guild meeting in January--we meet the second Tuesday, so you can expect it within a day or two of whatever that date is.
If you haven't checked out the Scrapitude Flickr group yet, be sure you do!
Seam Ripper Review Episode (with photos)
The podcast episode I just posted tonight (Episode 135 In Which We Rip It) is all about seam rippers. I do a quick pro-and-con about the three styles of seam rippers I now own. Here are some quick pics to go along with the episode.

First, the three seam rippers side-by-side (left to right): a traditional seam ripper, the Olfa Rotary Point Cutter, and Havel's Ultra Pro Seam Ripper.
All are certainly up to the task, but they each have their benefits and draw-backs. You'll just have to listen to the episode to know (in my opinion, anyway) what those pros and cons are!

A traditional seam ripper at work... (pardon the bad fingernail--it's that time of year when dryness abounds!)
There are actually a couple methods to using this one--sliding it under individual stitches, or sliding it between threads in the seam between fabrics. I just have more problems using it the second way because the pushing motion tends to push the fabric out of whack.

The Olfa Rotary Point Cutter at work. This has been my preferred seam ripper for many years.
It was really hard for me to properly demonstrate this with one hand while holding my phone to take a picture in the other. But you get the basic idea: you simply cut the threads with the blade. When the blade is sharp--and it stays sharp for a very long time (again, listen to the episode to hear how old my blade is!)--all it takes is a little tap on the thread with the blade and it slices cleanly, Very fast and easy, and no stretching of the fabrics. And nope--no cuts! No cuts on fabric or on fingers!

Finally, Havel's Ultra Pro seam ripper at work. This will take a little getting used to but I have high hopes.
Again with the problems of ripping a seam one-handed with a phone-camera in the other hand...and this time, being positive I was going to slice off an appendage in the process.
It's the same basic concept as the Olfa ripper. But with surgical precision. This one could clearly get into tighter corners to rip seams than the Olfa could. I also mention a few other particular types of sewing it would be useful for in the episode.
Hope this is useful information to you! Links to the items are in the show notes to the podcast episode at the link in the first paragraph.
Here's a teaser...
I'm going to be doing a podcast episode this week on this:

...in which I'm AWOL...
This week is one of my work events in which I moderate a conference call every evening of the week; because we're a national organization we have to schedule the calls at Past-Our-Bedtime in Eastern time zones in order to hit Barely-Home-From-Work in Western time zones. And it always takes me a couple of hours to "come down" from the calls when they're over--IOW, stop my brain from spinning with everything we talked about on the call so I can finally (and generally with the help of pharmaceuticals) drop off to sleep. The first day or two I'm filled with energy and excitement. By mid-week, I'm dragging. By the end of the week, I don't trust myself with heavy machinery or sharp objects.
So I'm not able to post a podcast this week. Nor blogging. Nor actually touching my sewing machine.
I have, however, made a priority of getting to the gym for as much time as I'm able between work and the conference call. Yay, me.
Friday night is the last call and I have Monday as a comp day, so you should be hearing from me again soon.
Scrapitude Progress and Linky #2
I consider it a significant benchmark that I finally finished cutting all my Scrapitude pieces.
Woohoo, yay me, happy dance, n' like that.
I got home Tuesday afternoon from my week of back-to-back meetings. Wednesday was a comp day, and I was a bit fried. I didn't feel like going out of the house to get batting for Baby Quilt Remix and was a little worried about trying to do any machine quilting, as tired as I was. I decided, therefore, it was a good day to crank up Netflix on my iPad (Midsomer Murders, my second time through the series) and simply knock out the rest of the cutting I had to do for Scrapitude. I do already have a little sewing done on the four-patches from Step 1, but not much.
I'll be putting out a podcast episode this weekend (already started making my notes!). Meanwhile, I decided it might be time to do another Linky Party. I'm going to leave this one open until next Wednesday so you'll have the weekend to make as much progress as you'd like. That also means you may want to check back periodically to see who has linked up!
Are you doing the Scrapitude Mystery Quilt by Charlotte? If so, link up your blog post about your progress so far here!
Everyone else, check out the linkies below to see how everyone is doing! (You'll need to click on the InLinkz widget below to see the links or add your own.)

Memories of Sue
We have lost a shining light in our world.
This past weekend, one of the members of my quilt guild, Sue, passed away quite unexpectedly. She had been on our guild retreat but began to feel unwell; two of her friends had driven her home on Friday night and advised her husband to take her to the hospital where she was admitted for observation and testing. It was quite a shock to receive word that she had passed away late Saturday night. I'm glad my guild friends at retreat had each other for support and comfort in such a difficult time.
I just returned home from the calling hours at the funeral home (the funeral itself will be private). I went with three of my guild friends; when we arrived, the line was out the door and into the parking lot. There were several hundred people that wound their way through the funeral home and into the chapel to greet the family. I remarked to one of my friends that it went a long way to appease my sadness to see such an outpouring of love and the number of people whose lives Sue had touched in one way or another. Most of my guild were there, as well as members of several other quilt groups that Sue had been a part of. We talked about how none of us had even known how many things Sue had been involved in until people were running into each other at the funeral home and sharing stories of how they knew Sue.
Rather than a casket or urn in the funeral chapel, there was simply a display of a couple of her quilts and other handcrafts that Sue had made, with several professionally-done photos of her with her family. There was a small sign on the photos that said those photos had just been done the weekend before. What a treasure for the family to have.
As I'm writing this, I'm still trying to imagine our next guild meeting without Sue there. My head won't wrap around it. Next month's meeting will be hard in some ways, but in others it will give us the chance to have our own memorial, I suspect.

Sue had a wonderfully dry, often sarcastic sense of humor. She led us in the Hokey Pokey and other stretch breaks during retreats, and then would quietly sit at her machine, periodically cussing it out under her breath if it didn't cooperate. (Okay, sometimes not quite so much under her breath.) If I teased her, I could rely on her looking at me with a twinkle in her eye while she said, with feeling, "Bite me." Sue made me laugh.
She also had a tremendous heart. It was Sue who spearheaded our monthly donations to a local women's shelter and often led other charity projects for other sites. Whenever I made a donation quilt, I'd hand it directly over to Sue with confidence that it would go where most needed.
I will miss Sue's laugh, her caustic wit, her willingness to be silly, and her fervent cussing at her machine. And I will miss her drive to make the world a more soft and comfortable place for people during their time of need.
The next donation quilt I make, Sue, will be in your honor. Thanks for all you did for our guild. I count it a privilege that I had the opportunity to know you.
Hand-Dyeing Results
As you're reading this, I'm driving far, far away...
I'm heading a bit south for a packed week of back-to-back meetings, starting as soon as I get out of my car at my destination on Wednesday afternoon. I get home next Tuesday, so I'm making this quick post to tide us all over until I'm home and might actually be able to accomplish something again. (Well, accomplish something other than getting some sleep.)
You may recall that I did some more dye experiments on Sunday afternoon. The results are in!
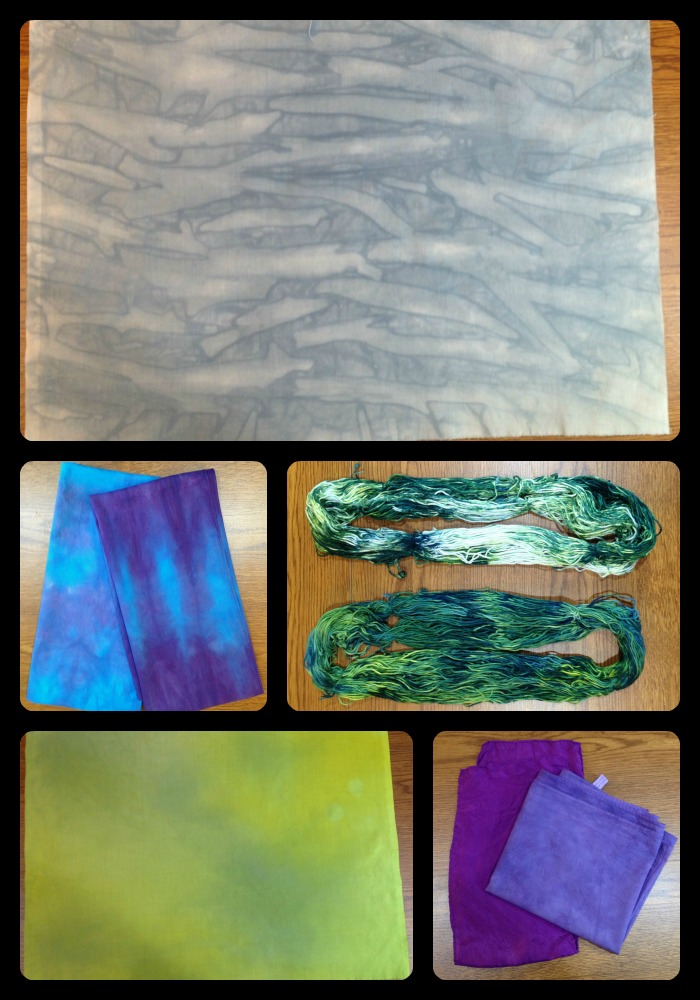
Top and bottom left: I was testing out a new technique picked up from Ann Johnston's DVD. I soaked the fabric in soda ash, then laid it out on a table (one of my newly-recovered-with-vinyl tables!), and then slowly poured a little dye on at a time and rubbed it in with my hands. Top picture is using gray dye and very intentionally creating folds and pleats in such a way to create some directionality. The bottom left looked a lot better wet--it's actually a mix of three colors (gray, yellow, and yellow green). It would make a nice background if one were looking for that particular, slightly odd shade of yellow-green-gray, but it's also a good candidate for over-dyeing or some other surface treatment. It simply wasn't what I was picturing would happen. And that's why I love dyeing so much. I so rarely get what I was thinking I'd get--it keeps me on my toes!
Bottom right: two purple scarves I did as testers for someone to look at during my meetings this weekend. I'm probably going to be dyeing about 50 scarves in all, by next September, for us to give out as gifts at one of our events. The one on the left is silk, the one on the right is cotton, both the same dye and dye strength. Just gives you a sense of how different fabrics react to the same dye.
Center left: Just playing with a couple of other cotton scarves I had on hand. Not overly keen on the way either of these turned out--the colors aren't as vibrant as I'd have expected. I'll have to look up what type/weight of cotton this is because it definitely takes the dye color differently than my usual fabric does.
Center right: 100% cotton yarn, done in an ice dye parfait. Interestingly the one on the bottom is the one that ended up with a lot of white left. I must not have loosened it up as much as I thought when I put it in the container. No biggie--I'm thinking I'll overdye it with yellow. The yarn is slightly thicker than 8 perle cotton, I think. I'll be interested to work with it and see what it feels like.
And now for the really impressive ones. I did another ice dye parfait because I wanted to "break" my black and teal dyes to see what component colors would come out. Ice dyeing is one of the best ways I've found to break a dye. And what a fantastic way to see what colors go into making black and teal!
This one was the bottom layer.

This one was on the top.

All I can say is, wowzer. I'll be breaking a lot more of that teal dye!
Oh, and I did get all my print scraps cut for #Scrapitude, finally, and started plugging away at the background. I plan on doing a marathon session of cutting when I get home next week. And then I'm home for a few weekends so I have hopes of catching up!