The Final MomUFO--Completed

Shirley the Quilter

Shirley the Quilter

If you've followed my blog for awhile, you may recall previous posts about my journey through completing several UFOs that Mom left behind at her passing. (Such as here, and here. And this one talks about the experience a little more deeply--what I learned, how I felt.)

I finished a whole bunch of her UFOs in those first few months after she passed away in April 2009, mostly because I wanted them to go into the general distribution of keepsakes amongst my sibs, and I wanted to finish a few that I knew she had intended as Christmas gifts for that Christmas. (One of the above blog posts talks about those.) A couple took a bit longer, but I finished up the vast majority of them within 18 months. The very last one, however, sat for some time. I kept taking it out, looking at it, puttering a bit, and then putting it back away. It felt somehow overwhelming. It was the only one of her UFOs that I'd kept that was still in pieces, and trying to figure out how to pick up where she'd left off and finish it the way she had planned was beyond my mental capabilities any of those times I pulled it off the shelf to shuffle through it again. 

But last summer, when my daughter and I decided to spend a week together at the cottage (my first full week there in years n' years), I decided it was time to finish Mom's last UFO while I was there, in a place Mom had loved so much and where she'd done a lot of quilting herself.  

Here is what I started with. The project bag contained:

1. A whole ream of print-outs of variants on the design and paper-piecing foundations therein.

2. 24 pieced log-cabin blocks. 

3. 16 paper-pieced flower blocks.

4. One paper-pieced stem/leaf block. 

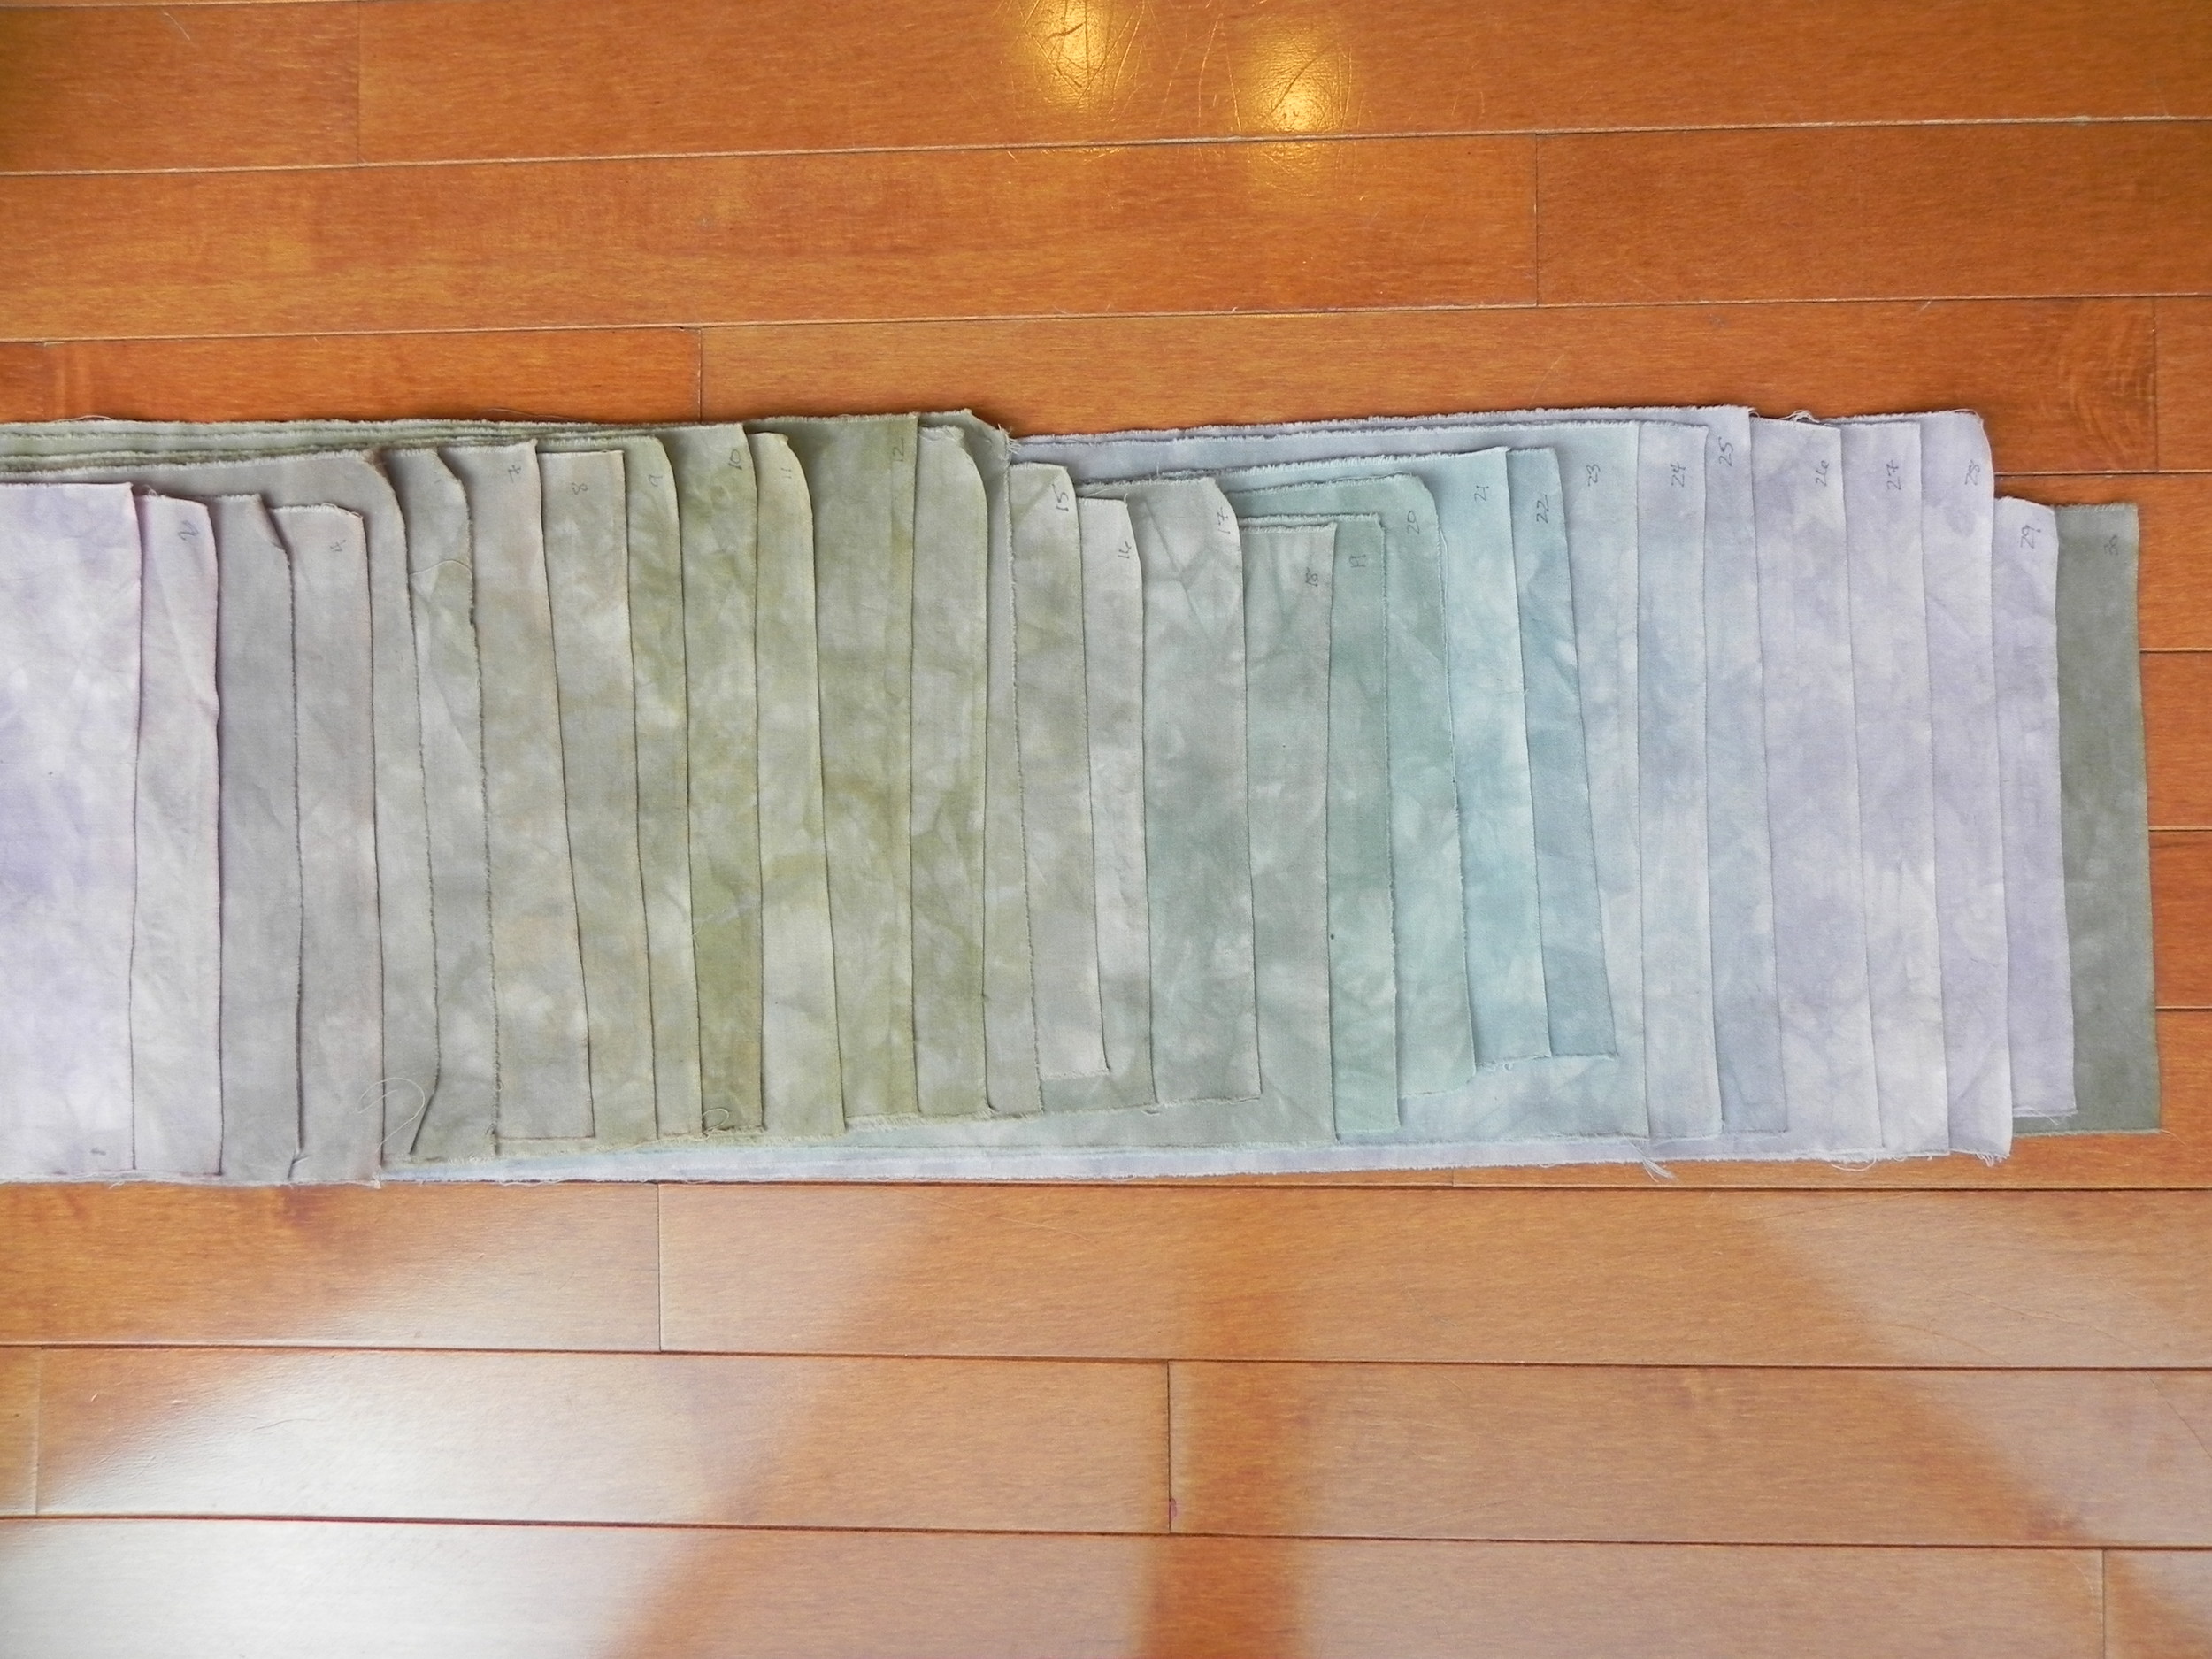
5. A boatload of fabrics--some she'd already used, most still uncut. She clearly hadn't made all her final decisions yet. 

I had distinct memories of her planning this quilt. She had told me she wanted to make a quilt for our family cottage, where we'd spent every summer as kids. After my Dad had passed away in 2001, my oldest sister had spent several summers rehabbing the cottage, including repainting the inside walls a soft yellow. Mom wanted to make a pretty, summery, blue and yellow quilt to go with my sister's new color scheme. In fact, I had given Mom some fabrics out of my own stash in case she needed them--I recognized some of those fabrics in the project bag. Probably, of all Mom's UFOs, this was the one with the most personal connection for me.

It was also the trickiest to finish. I could write a whole long blog post about how I had to figure out which of all the print-outs of designs was likely her final choice; I could write a blog post about having to figure out how to get log cabin blocks (not on foundations)  to play nicely with paper-pieced flower blocks. As for that, I'll just say, don't take a tape measure to this quilt to measure for square. I went for "good enough for horseshoes."

I could write a blog post about trying to figure out how I was going to re-create seven more leaf blocks to match the one she'd done when she didn't have any of THOSE foundations printed in the project bag. (She had every other paper-pieced pattern for leaves and stems known to quilters, I think, but not that particular one. Go figure.) As for that, suffice it to say that it took me three years to have the sudden realization, "She designed it in EQ. What're the chances it's a block in the EQ Library?" Well, of course it was. But the one she'd already made wasn't the right size--and I could imagine her doing that, realizing it was the wrong size, throwing it down on her sewing table in frustration and walking away, intending to return to it when she was in a better mood, and that's why it was still in pieces in a project bag. Been there, done that. In any case, I made 8 new ones, using her fabrics and fabric placement.

I could also write a blog post about laying it out on my design wall, checking it by her design....and then taking the bold step of moving a couple of things around because I liked it a little better. Sorry, Mom. Hope you don't mind. It's still about 95% her original design.

I got the center pieced at the cottage.  But there was no border fabric in the bag, so I had to wait until I got home and could head to my LQS to by border and backing. Found the perfect border. Got talked into another fabric for the backing that looked better in the store than it did when I actually got it on the quilt months later, but that's okay. It's backing. I'm not sweating it.

I had it custom-quilted at my LQS because trying to figure out how to quilt it adequately was beyond me. At this stage, I just wanted it done. I was able to pick it up from them last week, and got the binding on it yesterday, just in time for my guild's show n' tell.

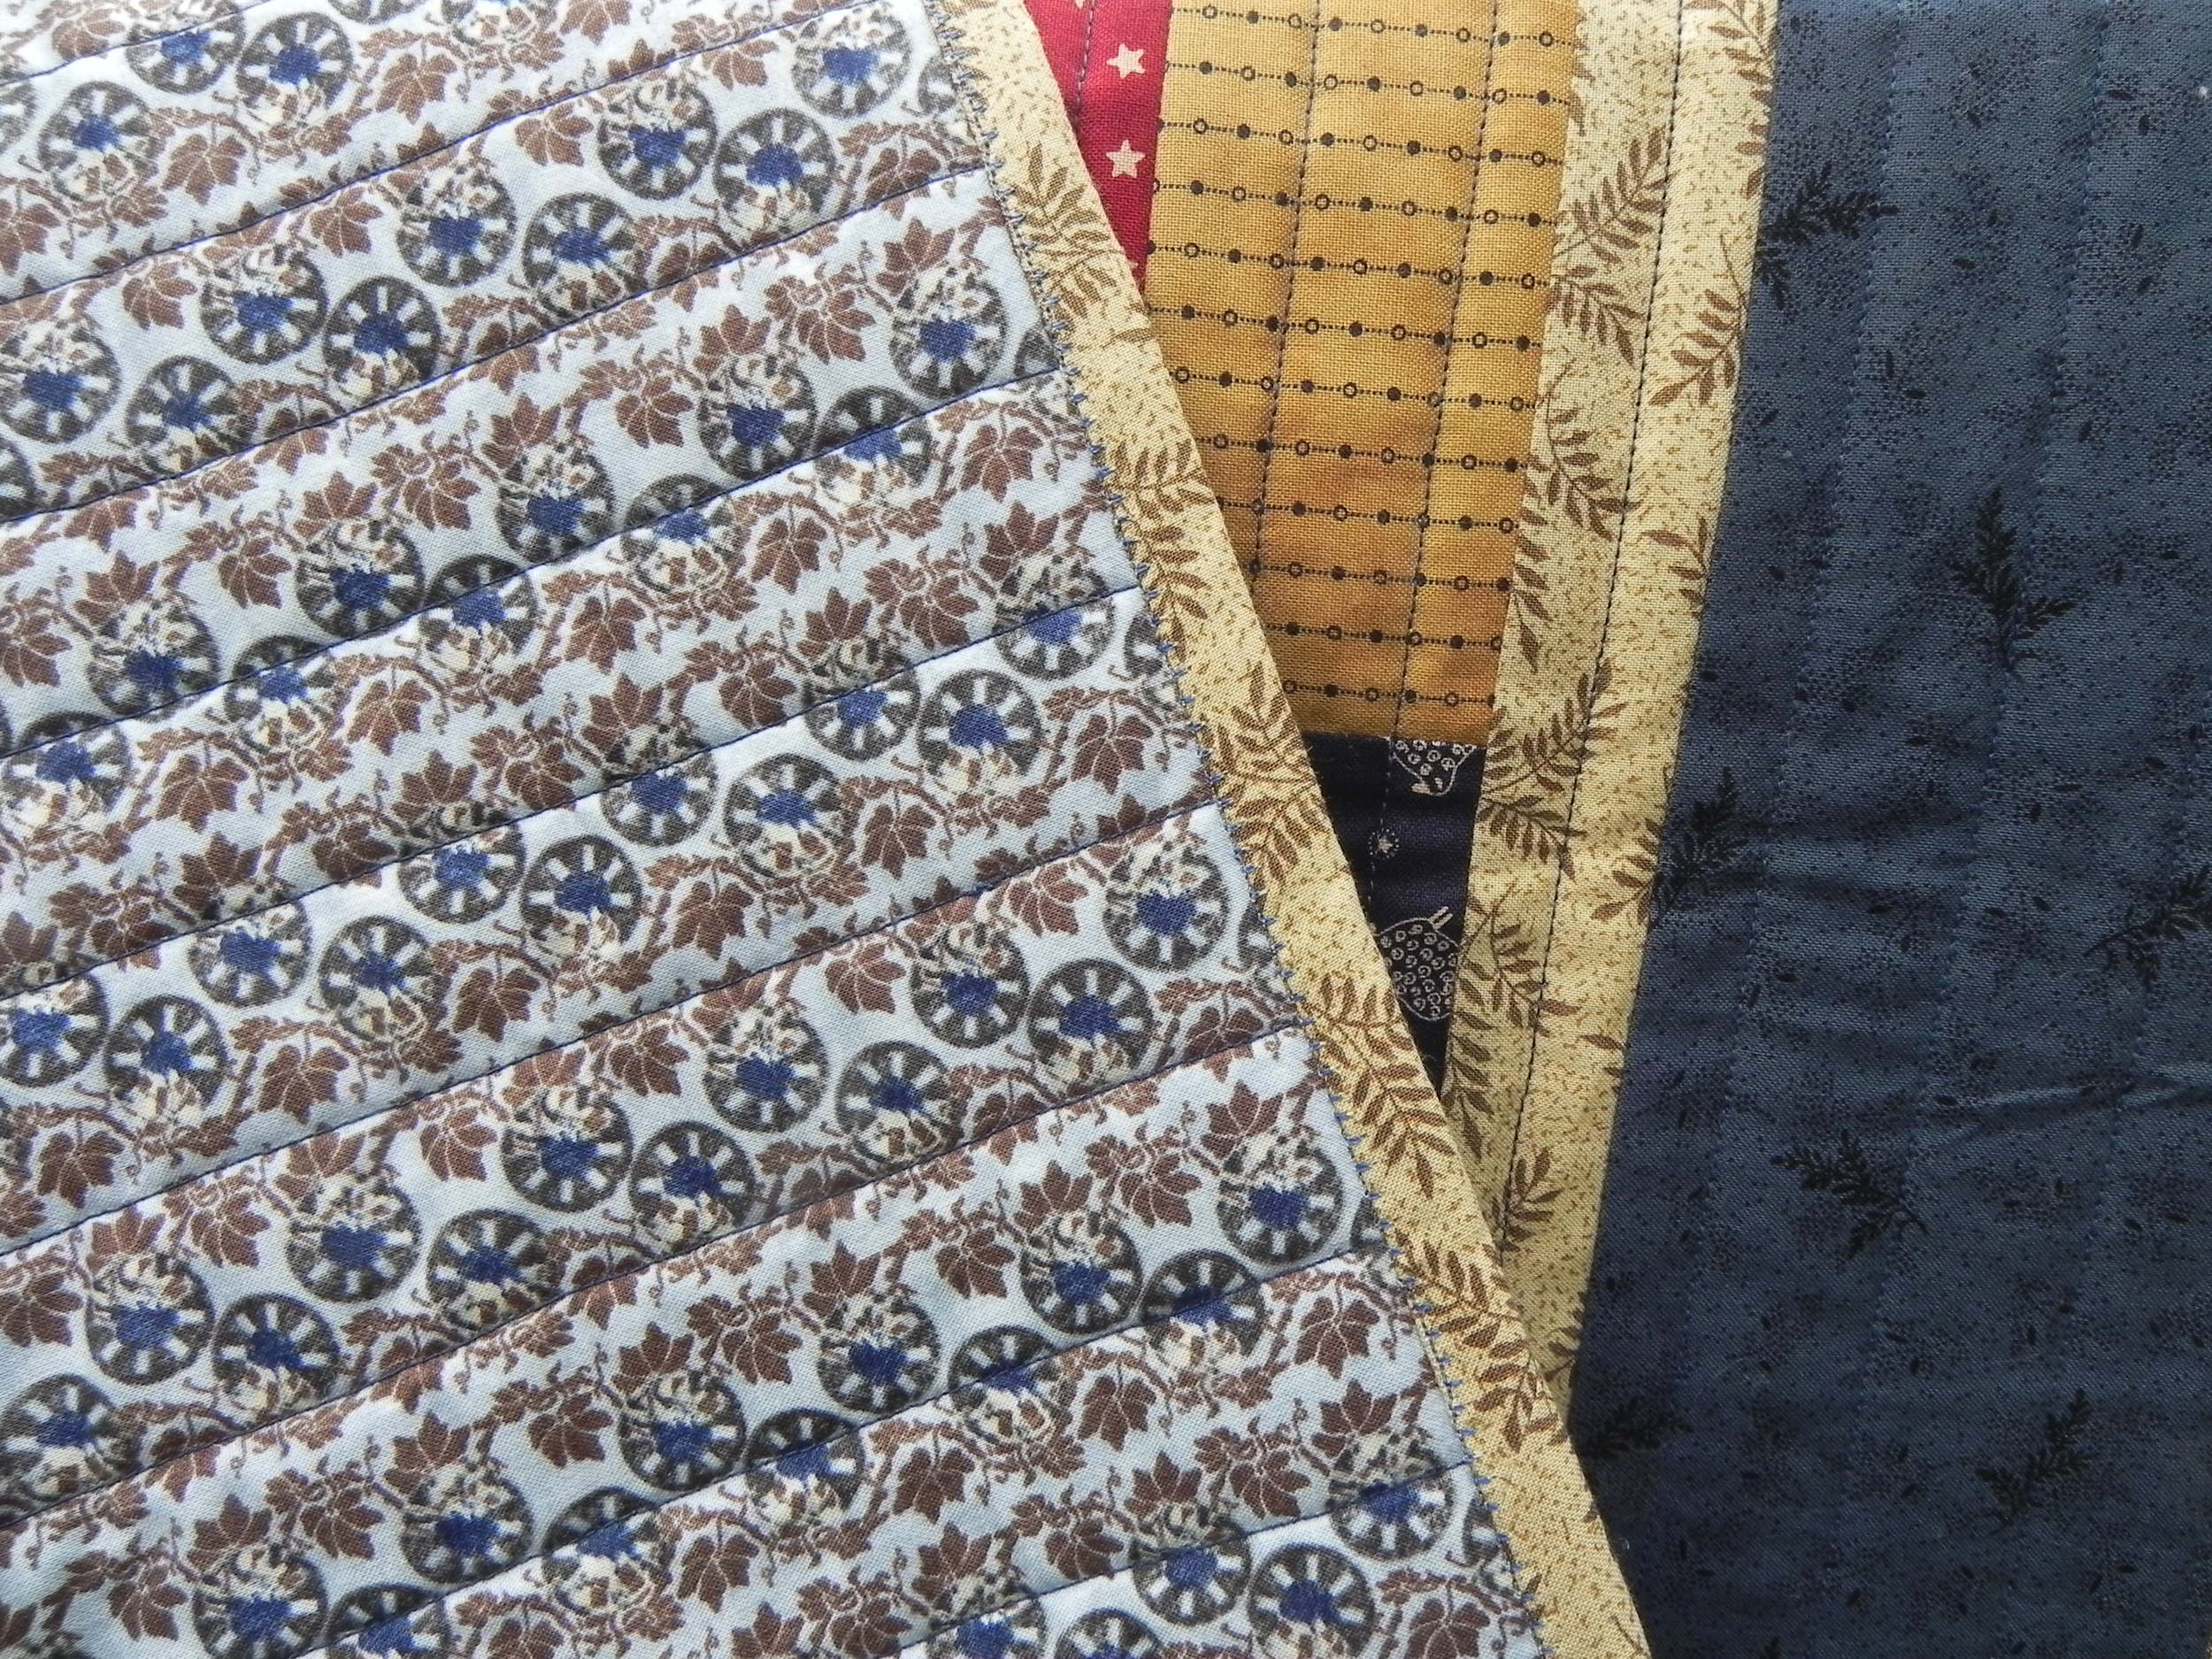
The last of Mom's UFOs, done. It's the end of an era for me. I introduce to you, "Summers by the Lake with Shirley," Designed by Shirley DeMott, pieced by Shirley DeMott and Sandy Hasenauer, quilted by Debby Kenney at Mt. Pleasant Quilt Company.  

Summersbythelakewithshirleyjuly2013.jpg

Doing some catching up...recent hand-dyes

Back in June I finished up a couple more hand-dyeing adventures so it's about time I did some show n' tell. 

You may remember awhile back when I posted about having done the Stones & Shells Gradation sampler kit from Prochemical & Dye. Here it is again, just to remind you...

Stones & Shells Gradation Sampler Kit from Prochemical & Dye

Stones & Shells Gradation Sampler Kit from Prochemical & Dye

Someone asked what three dyes these were--sorry I hadn't posted that before. It's Procion MX Camel (5181), Old Rose (5220), and Stormy Grey (6160)--all names and numbers are the ProChem labels; Dharma would have different names.

I loved what came from the combination of those three dyes so much I now own each of those colors.

I had a second sampler pack kit named "Rainforest" that I finally got done in June.

rainforestgradationjune2013.jpg

By the way--I'm not entirely sure they're in exactly the right order. Here's the problem with dark dye baths: They tend to conceal the notes one made to oneself using a black Sharpie in the corners of the fabric pre-dyeing. Oops.

The three colors used here are Olive (708), Bright Green (7158), and Kilt Green (7218). I haven't bought any of these yet since largely I've been able to produce greens I like from dyes I already have. May well purchase some in the future, though--I especially liked the teal nature of the Kilt Green. I did find one thing very interesting: Note the Bright Green pure sample right in the middle of the bottom row, and notice how much it completely changes when only a half tablespoon of either Olive (to the right of it), or Kilt Green (to the left of it) are added. That has a much more drastic change than any of the other colors.

Finally, what I really wanted to start playing with was creating blacks and grays using value gradations. When I was in Paducah and doing some serious damage at the ProChem booth, I bought two black dyes: 628 and 629. They were described to me as one being a "warm black," and one being a "cool black." I dyed them side by side so I could see what the difference might be.  

Blacks value gradations

Blacks value gradations

628 is on top; 629 is on bottom. One can sort of see a bit of a difference, but not much. I suspect there may be more involvement when I'm mixing black with a color to get a muddier tone--then it may matter quite a bit which I use. Also, the method I used to get gradations didn't work very well in this instance; I'd probably have been better off doing the parfait method. They also lived in the dye baths for several days because I got quite busy suddenly and couldn't get to my rinse-out when I'd originally planned, so they are VERY dyed! 

My next plan with these blacks is to use them as an opportunity to play with some discharges. Wheee! 

Gifts from Kansas

Gifts from Kansas

Then, just because they're pretty and it was a wonderful moment, I must show you this too. I was gifted with some beautiful batiks in thanks for my keynoting at a women's conference in Kansas in early June. They know I'm a quilter, and one of the women on the planning team was also a quilter, so she knew the best thank-you gift they could give me! Apparently Kansas has a big shop-hop every year and Kaufmann Fabrics produces the sunflower batik especially for that shop-hop; I was told it was the only place you can get it. The women then had fun putting together several coordinating fat quarters for me. No idea what I'm going to use these for yet, but I can't keep my hands off them!  (If you're curious, they were from the Material Girls quilt shop in Wichita. I was also given a very nice clear vinyl totebag with zippered top from the same shop that is now my hand-embroidery project bag.)

Okay, I think that finally catches me up with show n' tell! I should have one more finish (new one) before the week is out... 

Wheee! Finally--a Finish!

Yes, at long last, the Disappearing 9-Patch donation quilt is done. Woot! 

dis9patchjuly2013.jpg

I started with a Moda charm pack (don't recall the line, it was fairly old), added some 5" squares from my scrap stash, and then used stash fabrics for the borders and binding. I did have to buy the backing, but found it on a 50% off rack.  

machine binding--front

machine binding--front

I did the binding completely by machine, something I've done a couple of times before and never been happy with the results. I'm somewhat happier with the results on this one, but I still just don't like the look as well as one that's done the traditional way.  

 (Backing and back of binding)

 (Backing and back of binding)

This is wheelchair quilt size (roughly something like 36" x 45" or so, don't recall the measurements exactly now). I hope whatever elder gentleman receives it loves it and finds it cozy!

And then, because it's tradition... 

Dogs n' Quilts

Dogs n' Quilts

A little more patience, please...

nicubunu_Emoticons_Sleeping_face.png

Every two years, the organization I serve hosts two major national events (plus) nearly back to back. This is one of those years. I just got home yesterday from the first event weekend, and now am in the throes of finalizing details for the other which is at the end of July (and is actually three events in one). 

So this is just a bid for a little more patience! I haven't stopped blogging. I'm just using up all my energy for work. I got back in town Tuesday and am now nearly recovered from that trip, so I hope to get some blogs up later this week or over the weekend...not that I've got all that much to blog about...but I think I may have some stuff I got done before the mayhem hit but didn't get posted yet.

Meanwhile, have you listened to my episode with Jane Dunnewold yet? It's a good one! 

Food Friday Begins Again: CSA 2013 Week 1, "Faux Frittata"

It's CSA time again, so I get to kick Food Fridays back into gear! I was thrilled last week to get the email telling me that this week would be our first pick-up for our CSA. (If you are just joining me and are unfamiliar with CSAs, check out my blog post about it from last year.) Up here in Western New York we're just barely getting gardens in the ground at this time of year, so actually getting fresh produce from the farmer feels like a special treat.

iphone-20130529194825-0.jpg

Week 1 is small and extremely manageable. They like to lull us into a false sense of security, only to get that cold dash of reality in August of "OMG What am I going to do with all these vegetables???" For this week, I got:

  1. two bunches of asparagus and
  2. a small bag of spinach.

I'm a big fan of spinach. I remember when I was in second or third grade, suddenly realizing that none of my peers liked spinach and the fact that I did like it might render me permanently uncool. So I hid my love of spinach from the general public for years. I was still rendered permanently uncool just on general principle but at least spinach wasn't the culprit. As an adult, doing my own grocery shopping, I was then hindered by a husband and kids who were none too keen on it. It's only been in recent years that spinach has returned on a permanent basis to my household--I love tossing baby spinach leaves in my salads and occasionally wilting some into scrambled eggs.

Asparagus and I have a much more mixed history together. As much as I loved spinach as a kid, I hated asparagus. I mean, hated it. And we had it regularly because my parents grew it. I thought it was bitter and nasty. Although I tried it once or twice again in my adulthood years only to confirm my hatred of it, I avoided asparagus quite successfully until my husband and I were at dinner at a friend's house and she made steamed asparagus and baby carrots as a side. I steeled myself to choke it down only to be polite and was quite surprised to find I actually liked it. Hers was quite sweet, even though she hadn't put anything on it. A week later I tried cooking it myself by sauteeing it with olive oil and garlic. Not bad. I have sense gotten a little more adventuresome with asparagus (roasting, grilling) and have gotten to the point of saying that, in certain preparations, I can actually like asparagus. Not all preparations--still hate it boiled--and I wouldn't say "love," but now I can deal with it with much more aplomb.

When I picked up my delivery of spinach and asparagus this week, the first thought that popped into my head was "Goat cheese! Woohoo!" Basically I assess most foods on a how-are-they-as-a-goat-cheese-delivery-device scale. Spinach and goat cheese are a particularly good pairing. My next thought was, "frittata." Never mind I've never made one. Never mind I really don't think I've ever even eaten one. But spinach+asparagus+goat cheese just seemed to = frittata. I did a quick check on my cell phone of a couple of recipes to check what ingredients I needed, made a quick run through the grocery store on the way back from the farm, and set about chopping and dicing as soon as I got home. I never consulted a recipe after that quick-pre-shopping-check, so I only had the most vague impression of what was involved and probably made some moves that aren't true frittata territory. Hence...

iphone-20130529194825-1.jpg

​Sandy's Faux Frittata

Ingredients

  • olive oil ​
  • 1 half Vidalia onion, sliced thin
  • 1 bunch asparagus, stems removed, chopped into 1" pieces
  • 1 roasted red bell pepper, diced
  • 2 cloves garlic, minced
  • 1 handful spinach
  • ​bread crumbs (I think I threw in about a half cup, maybe 3/4)
  • 3 eggs
  • 3 egg whites
  • Approximately 1/4 cup of skim milk
  • 3-4 Roma (plum) tomatoes
  • Goat cheese
  • salt and pepper
  • finishing oil (optional)

Heat a medium-sized fry or saute pan on over medium heat until pan is warm; add a tablespoon or two of olive oil and let the oil heat until it shimmers. Add onion, separating the half-rings, and let it begin to cook down and caramelize, stirring occasionally. ​

Meanwhile, prep the asparagus, put in a bowl with a tablespoon or so of water, cover with plastic, and cook for 2-3 minutes in the microwave (otherwise it'll take longer to cook than everything else in the pan). ​While asparagus and onion are cooking respectively, dice the roasted red bell pepper and mince the garlic cloves. When asparagus is done in the microwave and onion has begun to turn slightly brown, add asparagus to pan and saute for a minute or two. Then add red pepper and garlic. Finally, add spinach and let it wilt. Season to taste.

When the spinach is wilted, add the bread crumbs and stir to combine. You may need to add a little more oil and seasoning now as the bread crumbs will soak up all the moisture in the pan. However, you don't want it soggy since you'll be adding the eggs in a minute--the oil will just help the bread crumbs and vegetables hang out together better.

While the bread/vegetable mixture is cooking, whisk the eggs, egg whites, and milk together thoroughly. Feel free to add salt and pepper here too. Pour egg mixture over bread/vegetable mixture in the pan. Stir only enough to make sure the egg has saturated completely and evenly. Then cover the pan, step back and leave it alone.

Mine took about 7 minutes, but the size of your pan, the heat of your flame, and what vegetables you've included will affect the cooking time. You'll know it's done when it acts like a pancake--the edges are a little on the dry side and the middle is set. (My edges crisped up very nicely--I loved that. If you don't want dry edges, you can call it "done" earlier but make sure your egg is cooked through. No salmonella here.)

Frittatas can either be cooked completely on the stovetop or finished in the oven. I let mine cook almost completely on the stove top, then I added my tomatoes and sliced goat cheese over the top and put it covered in a 375 oven for another 5-7 minutes. I took the cover off the pan and let it bake for another 3-4 minutes. Taking it out of the oven, I let it rest for about 5 minutes before slicing and eating.

iphone-20130529194825-2.jpg

Notes:​

  1. For the olive oil, I used a flavored oil, "Sage and Wild Harvest Mushroom." It gives it just another layer of flavor, so I highly recommend using a flavored oil if you've got one. I also drizzled just a little "Tuscan Herb" flavored olive oil over it at the end because the bread crumbs did make it a little more dry.
  2. To be honest, I have no idea where the bread crumb concept came from. I could swear I'd seen it listed in my very brief perusal of a couple of frittata recipes before I went into the grocery store, but I never saw that listed anywhere else so who knows. (Some frittata recipes have potato in them so I'm thinking one starch is much like another in this case!) I had some leftover dinner rolls so I tossed them in my food processor to make crumbs while I was slicing my onion, and I felt all kinds of virtuous about using them up in such a creative way. 

The goat cheese never melted--goat cheese isn't a particularly melty cheese. And the bread crumbs made it more of a strata-like casserole and less of a frittata, I think, but boy was it tasty. And could I have crammed any more vegetables into a single meal?

Been Busy in the Basement

2013-05-29 11.51.57.jpg

I've been hanging out in my basement again, partly because I went from this...​

Photo May 25, 12 47 10 PM.jpg

To this!

I was so excited about my bright, daylight-color florescent fixture I didn't even bother straightening up before I took the picture. But then, the basement doesn't have a lot of ambiance regardless, although my #twilters ("Twitter Quilters," with thanks to @verylazydaisy) all said that the industrial look fits my Mad Quilt Scientist persona. ​However, it's always a lot neater than that before I start a new project.

Back to the story..​

Memorial Day (#MDSI) was fairly warm and clear, so I took advantage of that to use up some old dyes with outdoor dyeing, and having the long weekend also meant I got to play with a new technique (see Sandi's blog at Quilt Cabana Patterns for the backstory to this), and finally use a sampler pack I'd bought from ProChemical & Dye in Paducah.

I don't have time to do a big long blog entry so I'm just going to embed a slideshow from Flickr. This is my first time taking this embed-slideshow-from-Flickr thing for a spin on this new website (which works a little differently than embedding Flickr on other sites) so hopefully this will work. If not, just go to http://www.flickr.com/photos/sandyquiltz/sets/72157633790172177/. The photos are captions with explanations although, again, not sure if those show up on the slideshow or not. Here's hoping for the best...

(LATER Editor's note: If you hold your cursor over the word "notes" just to the lower right of the slide show, it'll pop up the captions to the pictures. This dog has learned a new trick!)

Get the flash player here: http://www.adobe.com/flashplayer

I get my first CSA delivery of the season this afternoon--woot! Maybe I'll be able to kick Food Fridays back into gear....​

Monday Musings

“If you know what a work is going to look like before you begin, why start???” (Steve Sorman)


SPOILER ALERT: Kimberly Einmo Mystery Quilt

If you're doing the Kimberly Einmo Mystery Quilt "Chain of Stars" in Craftsy and do not want to see what the end result is, close this blog post now! Quick! Now! Stop reading!​ Step away from the blog post, ma'am, there's nothing to see here.

​* * * * *

Okay, for everyone else, here we go. ​

​I enjoyed doing this--so much so I did it twice at the same time. She offers instructions for four sizes so I chose the wallhanging size, noting that it's actually a decent size for lap quilts.

Here's the version I did all in batiks. I had most of this in my stash but did add two fabrics to give more contrast.

1.jpg

My daughter has claimed that one for her own. Since she's "fun-sized," (as she describes her diminutive height), this one works well for her to use as a lap quilt.​ The backing and binding are a dark purple batik I had in my stash.

​For the second one, I decided to go a completely different direction and use black, white, and red. I had most of it in my stash, but bought a couple of fabrics to round it out a little bit. This one seemed to be floating off into the distance with all the white around the outside of the design, so I added borders to ground it. (The backing is the red/white/black print from the front, and I used the same as binding).

2.jpg

My nephew claimed this one while it was still on my design wall. I texted him this afternoon to let him know it was ready for him to pick it up. His response was, "Omg!!!!! Yay!!!!" Nice to have such an enthusiastic recipient for my quilts.​

​I had them both quilted by the longarmer at Mt. Pleasant Quilting Company. I asked for pantographs with threads that would blend, but left it up to the quilter's choice from there.

Here's a close-up of the quilting on the batik quilt:​

2013-05-19 17.18.04.jpg

 And a close-up of the quilting on the red, white, and black quilt. It's hard to see in this picture but the thread is variegated black-to-gray.

2013-05-19 17.19.53.jpg

Doofus (Sam) is up at the cottage with my daughter for most of the summer, playing in the lake and generally getting messy and having a great ol' Golden time. Princess Doggie (Spencer) stayed home with us because she, well, let's just say she doesn't like change very much.

In any case, to stay with my Dogs and Quilts theme, here's Princess Doggie doing her best to make me happy, which is her general modus operandi.

2013-05-19 17.18.38.jpg

(She's not smiling so much as pleading with me to please love her please please please love her love her please....)​

2013-05-19 17.20.15.jpg

("I submit! I submit! Please love me...please please please love me love me love me...")​

By the way, depending on when you read this, you still have a couple of days left to enter my Kimberly Einmo Craftsy Class Giveaway on my previous podcast episode! You could win this Chain of Stars class, or her other Magical Jelly Rolls class, for free! Enter using the link on the podcast show notes here.​

Impressive.

Thanks to following links through some art quilters blogs and newsletters (I apologize, but now I really don't recall whose I was on when I found this), I now subscribe to Hand/Eye Magazine and email newsletter. Hand/Eye "tells the stories of artists, artisans, and designers worldwide." Volume 10, available right now, is about "Craft and Compassion," which is right in my wheelhouse. I'm halfway through the magazine and just falling in love more and more.​

Today's email newsletter announced the launch of their new Vimeo channel and the upload of this video about the metalsmiths of Croix des Bouquets, Haiti. . I've seen the artwork in galleries but didn't know how it was done.​ Incredible. Recycling has never been more beautiful.

Monday Musings

Thoughts to ponder, to make Monday just a little more interesting.​ (This is a new incarnation of "Slow Quilt Mondays".)

"If you hear a voice within you say, 'you cannot paint,' then by all means paint, and that voice will be silenced."​ (Vincent Van Gogh)

Kimberly Einmo, the Craftsy Giveaway, and a little progress

I just posted my interview with Kimberly Einmo (episode 124). Woo! I really enjoyed the opportunity to meet and talk with Kimberly--very fun. I just wanted to make sure I posted on my blog as well so all-y'all who subscribe to the blog but may not subscribe to the podcast would know that Craftsy is sponsoring a giveaway on the episode--the winner will get a free Kimberly Einmo Craftsy class of their choice!

Check out the podcast!

D9P5813.jpg

Meanwhile, I got the center done of the Disappearing 9-Patch I'm making as a donation quilt. It's wheelchair size (or will be, once I slap some borders on this puppy), and I chose masculine colors for this one. Do you know how hard it is to find charm packs that aren't girly? Fortunately I had enough scraps to beef up the two charm packs I was able to lay my hands on. ​(Terrible, awful picture--that's what I get for doing it at 10:30 at night on my cell phone. Stinky lighting. I'll do better on the next progress shot.)

flowercloseup.jpg

And I made more progress tonight on my House on a Hill Project for Laura Wasilowsky's class on Craftsy, "Hand-stitched Collage Quilts." ​The grass is done. Woot for grass.

See those two wonderful variegated threads? The pink in the flower (not the French knots) and the green in the grass? Those are both Laura's hand-dyed perle cottons, available through www.artfabrik.com. Tasty.​

I promise, better pictures next time. Pinky swear.​

Final Hand-dyeds post for a bit...

...because I need to focus on getting some other quilty projects done!​

​First, the "parfaits."

Experimental Technique #1: "Value Parfait"

In this method, you use a tall, narrow container. Fabric #1 goes in the bottom with the dye of choice for a few minutes. Then you pour on some soda ash water; wait another few minutes, add fabric #2. You don't add anymore dye but, after a few minutes, you do add some more soda ash. Then you add fabric #3--still no more dye, just the soda ash. Let it sit for some number of hours (I let mine go 24 since I had life to live), remove, rinse, and you get dark, medium, and light.

"Value Parfait" using Mixing Red. Or maybe it was Strongest Red. Sorry--I forget now.

"Value Parfait" using Mixing Red. Or maybe it was Strongest Red. Sorry--I forget now.

It worked like a charm--loved this method! Far simpler than measuring out different concentrations like I did last time, although the previous method is great if you want a bunch of fabric all of the same value.

​Experimental Technique #2: "Color Parfait"

This is basically the same concept as above, but for each fabric you add a different color. Fabric #1 and one color goes in the bottom--wait a few minutes, add soda ash. After a few more minutes, Fabric #2 gets added, then second color poured in--wait a few minutes, add soda ash. ​A few more minutes, Fabric #3, dye number #3, soda ash, hang out for at least four hours (again, I did 24).

Color Parfait #1: Fabric #1 (on bottom): Turquoise. Fabric #2 (middle): Fushia. Fabric #3 (on top): Sunny Yellow

Color Parfait #1: Fabric #1 (on bottom): Turquoise. Fabric #2 (middle): Fushia. Fabric #3 (on top): Sunny Yellow

Color Parfait #2: 1 is Red, 2 is Golden Yellow, 3 is Sunny Yellow.​

Color Parfait #2: 1 is Red, 2 is Golden Yellow, 3 is Sunny Yellow.​

Color Parfait #2: 1 is Intense Blue, 2 is Golden Yellow, 3 is Sunny Yellow.

Color Parfait #2: 1 is Intense Blue, 2 is Golden Yellow, 3 is Sunny Yellow.

And then I did more of what I've come to call, my "tapestries." These are longer lengths that I dye flat in a bin. Well, "flat" being a relative term. I scrunch them up and so forth, but there's more surface area available to work with. For the most part, I see myself leaving these as full, long pieces--not cutting into smaller bits. But we'll see-- a couple of these might lend themselves well to being cut, but mostly I love the size of them.​

All of the newer tapestries. (See my last hand-dyed post for my first two.)​

All of the newer tapestries. (See my last hand-dyed post for my first two.)​

Okay, sure--you wanna see those a little closer? I do!​

Tapestry 1 (Fuschia, Lemon Yellow, Red)​

Tapestry 1 (Fuschia, Lemon Yellow, Red)​

Turquoise, Red, Golden Yellow, dyed sideways instead of top-to-bottom.

Turquoise, Red, Golden Yellow, dyed sideways instead of top-to-bottom.

​Tapestry #2, aka "snake skin"--shared the same dye bin as the previous one, but folded and wrapped with rubber bands.

​Tapestry #2, aka "snake skin"--shared the same dye bin as the previous one, but folded and wrapped with rubber bands.

Tapestry #4, aka "Forest Scene." (LOVE this one. Could just walk right into it!) Intense blue, Golden yellow, Sunny Yellow.​

Tapestry #4, aka "Forest Scene." (LOVE this one. Could just walk right into it!) Intense blue, Golden yellow, Sunny Yellow.​

And, of course, the Doofus.​

And, of course, the Doofus.​

More Hand-Dyes--Playing with Toys from Paducah

I'm now testing out methods in different books to see what method, or combo package thereof, gives me the results I'm looking for at any given time. What I'm finding is that, of course, each has its pros and cons. As in most things quilty, being adept at a variety of techniques allows you to pick and choose what works best in ​a particular situation.

But on to the pictures, because I know that's what you're really waiting for. ​(Captions explain what you're looking at.)

Descending to my basement...I prep some dye concentrates. These have ​kept me company all week.

Descending to my basement...I prep some dye concentrates. These have ​kept me company all week.

​New toy from Pro-Chem booth at Paducah: Color Magnet. Stencil or paint it onto fabric, and let dry for 24 hours, then dye.

​New toy from Pro-Chem booth at Paducah: Color Magnet. Stencil or paint it onto fabric, and let dry for 24 hours, then dye.

And the results. Color Magnet draws more dye to the areas where it's painted. (I know--sloppy job with matching up stencil on the top but I was just trying to get 'er done.) Oh...the possibilities!

And the results. Color Magnet draws more dye to the areas where it's painted. (I know--sloppy job with matching up stencil on the top but I was just trying to get 'er done.) Oh...the possibilities!

Bought two new colors: Intense Blue and Fuschia. I tested proportions of dye concentrate to water ​to get different values. Here's the Intense Blue dyebath (with the color magnet dye bath sitting to the right).

Bought two new colors: Intense Blue and Fuschia. I tested proportions of dye concentrate to water ​to get different values. Here's the Intense Blue dyebath (with the color magnet dye bath sitting to the right).

And here are the Intense Blue values. The two in the middle are a little more different from each other when you see the whole piece, but not much. Notes were taken.​

And here are the Intense Blue values. The two in the middle are a little more different from each other when you see the whole piece, but not much. Notes were taken.​

And here's the same set of dilution proportions done in my other new color, Fuschia. ​(Same thing here with the two in the middle, although these are a little more distinct from each other if you look at the whole piece of each.) The black markings …

And here's the same set of dilution proportions done in my other new color, Fuschia. ​(Same thing here with the two in the middle, although these are a little more distinct from each other if you look at the whole piece of each.) The black markings in the corner is my code for tracking which was which.

Looks like very runny lasagna, doesn't it? This is using a method to get a gradated fabric from the book I'm working through first. ​

Looks like very runny lasagna, doesn't it? This is using a method to get a gradated fabric from the book I'm working through first. ​

Dunno what this one looks like. It may look like a mess here, but oh, just you wait.​

Dunno what this one looks like. It may look like a mess here, but oh, just you wait.​

Gradation #1: Sunny Yellow, Golden Yellow, Mixing Red, Fuschia. Seriously yummy!

Gradation #1: Sunny Yellow, Golden Yellow, Mixing Red, Fuschia. Seriously yummy!

And oh, so-freaking-cool! Gradation #2: Sunny Yellow (I think--forgot to write down which yellow on this one), Fuschia, Turquoise.​ Neither of these gradations are getting cut up into anything. I'm letting my imagination wander for a bit. But every …

And oh, so-freaking-cool! Gradation #2: Sunny Yellow (I think--forgot to write down which yellow on this one), Fuschia, Turquoise.​ Neither of these gradations are getting cut up into anything. I'm letting my imagination wander for a bit. But every time I look at them, I grin and do just a little bit of a hop in place. Must. Do. More.

Stay tuned. As you know, I have a boatload more stuff to play with!​

Photo Album from Paducah

And a wonderful time was had by all. For detail, listen to Episode 123 In Which I Went to Paducah, posted on May 1, 2013.​ As I mentioned in my podcast, we're not allowed to post pictures of the quilts/quilt show (or vendor booths) on social networking or blog sites, so sorry about that. Still, I have a few pictures that will give you a feel for the event.

(For those subscribing by email or reading this through a feed-reader, I hope I've been able to fix the problem with pictures not coming through. I'll be checking that after it posts. If not, just visit it on the web; I subscribe to my own feed so I'll see what happens and, if necessary, I'll keep poking away at the problem!)

42313752p.jpg

The drive down (all 14 hours of it) was lovely--beautiful weather. Then, most of the rest of the time it was fairly rainy, except for one very nice day during which we wandered down to the riverfront and I snapped this picture. Nice scenery!

42413900a.jpg

​The shindig officially opened the first morning with a local high school marching band. It was a hoot. I suspect that Ricky Tims and Alex Anderson were somehow involved; a few women began marching behind the band carrying quilts and I recall something on The Quilt Show website (or was it in Quilt Life Magazine?) inviting attendees to bring pictures for a "flash mob" picture with Ricky and Alex. Katie and I were standing too far away to see what was going on once the band entered the building, but we could hear them. Great marching band--especially the drumline.

42413847a.jpg

After whatever-it-was-that-went-on-in-there, they came back out to the parking lot and played for a bit. The Fancy Dress Majorette must have been freezing--it was under 50 degrees that morning, I think, so I'm hoping she had some long underwear on under there. She was cute, though, so there is that.​

424131058a.jpg

Later that first morning, I attended a lecture on The Tentmakers of Cairo, with Jenny Bowker of Australia. It was a special exhibit at the show--truly wonderful, by the way. And Jenny was a fun speaker to listen to--great stories. ​

42613213p.jpg

Two of the tentmakers were working in the exhibit so you could watch how they do it. They're amazingly fast. No, the applique isn't quilt-show-judging-perfect, but you don't care because the finished products are incredibly beautiful. (You can see a snippet of a few of the "tent screens" behind the men.)

42613225p.jpg

If you're interested in more information about the tentmakers, I l linked the Facebook page above, but google "Tentmakers of Cairo" to see various other sites that include photos, videos, and so forth. Really wonderful stuff!

I don't have any pictures from the Lorraine Torrance lecture that Katie and I attended--but it was also a great lecture!​

42613818p.jpg

Friday evening, Katie and I went to "Behind the Seams with Libby Lehman and Alex Anderson." Entertaining. Unfortunately, as Libby explained in class the next day, that's when she first started experiencing some difficulties that were probably the harbringer of the aneurysm she suffered this week. It's a little more difficult to look at these pictures now. (Libby is on the left, Alex on the right.)​

42613253p.jpg

Speaking of that class, Here's Neicey--the woman who had originally registered for "Sheer Ribbon Illusions" with Libby Lehman but later ended up not being able to attend, so she sold me her seat. Thank you so much, Neicey! (And it was fun meeting you--hope we get to meet again sometime!)​

​I got to be Neicey at the class. I felt like I was walking in very fun shoes.

42713927a.jpg

And here's Libby during class on Saturday. She explained that she was feeling under the weather and was wearing a heat therapy patch on her neck during class. It's a testament to her professionalism and skill, however, that she was still a great teacher, making us immediately at ease and having fun in the class. Thank you, Libby. I'm praying for you! (As of this writing, no further information has been posted on The Quilt Show blog.)

427131200p.jpg

​Here's my class project. She suggested that my highlighting was a little heavy-handed (she said it more nicely than that, of course); I studied her samples more carefully and close-up after doing this and saw that she really only lightly highlights hers. Fun technique, though. (And no, I don't plan on finishing this sample--it was just for the purpose of the class. It's a technique I may play with in future quilts, though. I did get to keep the pretty, pretty thread!)

42513300p.jpg

​A highlight of the week was our visit to The National Quilt Museum. Incredible. They had their permanent exhibition (which gets rotated, of course, through the quilts they have in their collection) in the center, as well as a special exhibit of miniature quilts. On the left side was a special exhibit of quilts using the Jacob's Ladder block. Some were antique quilts with the standard, recognizable block; the rest were contemporary quilts that played with the block in a variety of ways. It turned into sort of a game to see if you could figure out where the block was. Very cool. On the other side was a special exhibit featuring two very different contemporary quilt artists: Emiko Toda Loeb and Regina Alexandra. I can't even begin to explain these exhibits, so check out the link here.

427131000a.jpg

​Another highlight of the week was a meet-up with listener Angela and her mom! Woot! Mom took this picture so you don't get to meet her, but say hi to Angela!

And now for the shopping. ​

purchase5.jpg

Books. Mostly on dying and other surface design treatments, but one is a pattern book that I'm using for a baby quilt. (Not for the one you think, Dianne.)

I also got the book/DVD on the Tentmakers of Cairo exhibit, as well as the DVD of pictures from the quilt show itself. ​

purchase1.jpg

Next, fabric. These are for the baby quilt previously mentioned. I got these on the remnant tables at Hancock's of Paducah--$5.98 a yard. I need a lot of fabrics, but not a lot of each fabric, so I'll likely have enough left over to make other things as well. (I'm not posting pictures of other fabric for another baby quilt due to not wanting to give anything away to certain readers of my blog. So there, nyah.)​

purchase4.jpg

​And, of course, Pro-Chemical and Dye...

...stay posted in days to come for more pictures resulting from this pile of fun.

purchase7.jpg

And Tsukineko inks, stencils, and other toys for surface design.​ Had problems deciding what to play with first after I got home! (Haven't even dug into this bunch yet...but plan to this weekend, if the weekend doesn't get away from me.)

purchase8.jpg

Did you notice this guy wheedling his way into several of my pictures? He's not my purchase--he was Katie's. He's an antique...wait for it...tape measure. Yep--he's got a tape measure coming out of his hindquarters. He's adorable, but you've got to know that I gave her no end of ribbing for having a cat with a tape measure coming out of its butt. ​

And with that image  embedded in your mind, we now leave Paducah and return home--weary, broke, and inspired. Let the games begin!

Project Hope Online Quilt Show (Remix)

Due to some things I'm working on with the email version of this blog, the post announcing the Project Hope Online Quilt Show was not able to be sent out via email. Therefore, I'm posting this link to the original post so that those of you who get this post via email will know what's going on! (And how many more times can I use the word "post" in one sentence?)

http://quiltingfortherestofus.com/blog/launching-an-online-quilt-show-project-hope/4/22/2013

Coming up (as soon as I've gotten just a little more sleep): A report on my adventures in AQS QuiltWeek in Paducah, including fabric, classes, and a conversation with a very nice local police officer. I'll cover some in the blog, some in the podcast. Stay tuned.

Launching an Online Quilt Show: Project Hope

Project Hope.jpg

It's been a very, very hard week. My heart bled for everyone involved as I watched the news about Boston; about West, Texas; about ​the devastating earthquake in China...and continuing into this week with avalanches and shootings in Seattle.

It's all too much, sometimes. We can stop watching TV, we can stop listening to the news, and yet events don't stop. We are still a part of this world community in which something that affects someone else's life in such a deep and tragic way cannot help but have an impact on our own life.

There are a variety of ways to respond. I choose hope. I choose to do what I can to bring peace to my little corner of the world and, maybe, if I get the opportunity, to bring peace to a larger corner of the world.

As a quilter, my healing often comes through fabric and thread. While listening to the news late last week, I recalled reading Sandi Colwell's blog post on thankfulness. I shot her a direct message on Twitter: Can we do something quilty in response to this? As I suspected she would be, she was all over it! And so, the Project Hope Online Quilt Show was born. ​

Express your hope. Express your joy and unity and bridge-building and where you can be peace. Join us for the Project Hope Online Quilt Show. (Thanks to Sandi for putting the rest into words so well--I've borrowed this directly from her blog post on the topic.)

Project Hope Online Quilt Show

In keeping with theme of hope, love and peace, create a 12″ x 12″ art quilt that conveys your thoughts and emotions.

The design rules are simple…there are none. Use whatever creative means on this piece of art that you want to…stamps, paint, couching, transfers, crayons, thread, beads, simple piecing, applique, you name it, you can do it!

We ask that you include an artist statement in your Flickr description about your piece and how you felt while you were creating it.

Upload through June 30th, 2013, to the group on Flickr titled Project Hope Online Quilt Show.

If you are feeling moved to take more action while creating this art quilt, we ask that you make a donation of time or money to an organization of your choice that exemplifies the theme of hope, love and peace. One such organization could be The One Fund. This fund is currently collecting money to go to the many victims of the Boston Marathon bombing. Use the link to find out how to donate and for more information.

​So join us, won't you? Join the Sandi/ys in celebrating hope!