2015 Quilty Resolutions: March Journal Quilt

It's been awhile since I've posted about a journal quilt, so let me recap: My 2015 Quilty Resolution was to do one journal quilt per month. In my definition, a journal quilt is a small project (approximately 8"x10") that allows me to experiment with a technique, a theme, a color scheme, or whatever. My main focus is on experimentation (my 2015 word of the year).

January's journal quilt was Sunset in Bagan, in which I was experimenting with netting. 


I had to cut myself some slack on defining February's journal quilt. That whole month was experimentation! I was playing around with a lot of different design experiments based on having taken the art quilt class as well as some other things that caught my creative eye, as it were. So I decided that, rather than getting all legalistic on my own butt about how I was defining "journal quilt," I'd focus on the "quilt project that involved experimentation" concept, and thus declared Neumes my February journal quilt, despite the fact that it's quite a bit bigger than 8"x10".

March was a very busy month, and I wasn't home much. But I was still experimenting. I did Cindy Walter's fabric painting class on Craftsy in March, and was just having all sorts of fun messing around with all the different types of fabric paints and inks I've amassed over the last couple of years. In her class, she showed a way to do an abstract paint design that brought back to mind my favorite way of coloring when I was in high school--basically just sketching random lines and shapes that connect together and then going to town with the color. I used to do a lot of this when I was a kid!

March Journal Quilt--just named "March Journal Quilt"

March Journal Quilt--just named "March Journal Quilt"

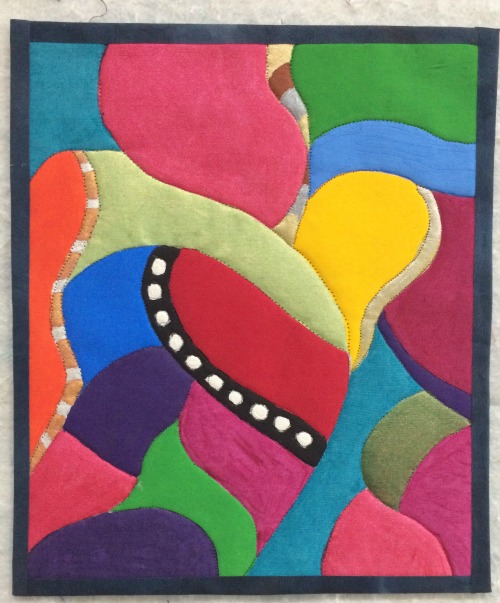
So, my nostalgic painting experiment became March's journal quilt. I'm pleased to announce it's finished! It measures out to 8 1/2" x 10" but that was happenstance--I was just using a spare piece of muslin I had on hand to do the painting and it happened to be almost journal quilt size--phew.

Please note that I did this without any concern for color scheme. My goal was simply to use every paint or ink I had on hand (except my Tsukeniko inks--those remain for another day). Thus: almost every one of the sections in this piece is a different paint. I had a couple of spaces more than I had paints on hand so I did repeat a couple, but probably not as many as look repeated in this photo; some were two different types of paint in basically the same color; another one or two were experimenting with a Pearl-X powder mixed into paint (the Pearl-X isn't showing up well on the photo); I started by mixing one of the purples and, when I was unhappy with the result, I went out and bought a pre-mixed purple that I liked much better so I also painted over the original yuckier one, and so forth. Still working on mixing colors--Joen Wolfrom is very helpful on that!

It took me until the end of April to finish this because (1) you have to let the paint dry and (2) you have to let it cure. All that can take 2-3 weeks, depending on how thick a layer of paint you have. Mine's pretty thick in some places. I sat down this past weekend to add the finishing touches: I used invisible thread to quilt along all the lines to make it look a little more like it was pieced or appliqued. For the most part, I was able to stay in the lines but don't look too closely at the yellow. (Besides, the yellow ended up having the stiffest hand when dried so the needle just poked holes right through it.) I just did a fast fused border using the remainder of my hand-dyed black fabric that I'd used for the backing. This will never go in a show so I didn't want to spend much time on binding.

I learned an absolute ton on this project. I've got a much better feel for what different types of paint are good for, things to consider when approaching a paint project, and so forth. 

April's journal quilt may end up being another "cutting myself some slack" project as I'm still doing a lot of experimenting but not specifically on a journal quilt project. I suppose I could say that my journal quilt resolution has already served its purpose: I wanted to do it to encourage myself to experiment. So far, in 2015 I've been doing very little other than experimenting!

Monday Musings: The 5 Ss--S-3 Set Locations and Visual Cues

How did you do with week two? Personally, I'm pleased to report that I now have bright, shiny, sharp and unbent pins on my magnetic pincushion. Yep, I ponied up for that new pack of pins. As Maureen pointed out in a recent comment on a previous blog post, if I keep this pack of pins for 15 years like the old one, I'm only spending 80 cents a year. I think I can live with that.


S-3 Set Locations and Visual Cues

This week, we're supposed to set locations and visual cues. 

Do you have set locations for things, or do they tend to wander about your sewing room? My biggest issue was my glasses. I don't wear glasses all the time, but the older I get, the more I rely on readers. I have several pairs with the intention of having a pair near anywhere I may need to do anything. The problem is that I tend to wear them to another area and leave them there, with the end result being a pile of 5 pairs of glasses next to one chair and none to be found anywhere else. In my sewing room, it wasn't quite as big a deal because my one pair of actual prescription glasses lives on my office desk--so if I didn't have a pair of readers at my sewing machine or cutting table, I could just walk a few steps and use my "real" glasses. However, then I'd wear them out of the room and the next morning when I started work, well, let's just say I wouldn't be a happy camper.

One day at Target, I noticed a couple of handy-dandy 3M wall storage units. I immediately thought, "Those are great for keeping track of my readers!"

So now one pair lives next to my cutting table. I can honestly say this pair has never wandered out of my sewing room. Other pairs have periodically wandered in to visit for a time, but for the most part, knowing I already have glasses here, I'm less inclined to keep downstairs glasses on my head when going upstairs.


The glasses-holder near my sewing machine also doubles as a place to keep spools of thread when I have to change colors out in mid-project but know I'm going to want to use the one I'm removing again. Another problem solved. 

To be honest, I rarely wear these glasses because I'm usually wearing the other pair from the wall or my desk. But they still come in handy if I decide to grab 10 minutes at my machine on the spur of the moment and don't already have a pair of glasses on.

And then I picked up a third cpntainer to hold my rotary cutters and various other need-to-have-right-at-hand tools at my cutting table. This one sticks to the side of one of the cabinets that makes up my cutting table. Yes, usually my main rotary cutter is just sitting on my cutting mat but if I'm clearing the decks to do something that doesn't involve cutting, my cutter takes a snooze in this container.

I don't like having my rotary cutters, marking pens, and such, in a mug or canister on the surface because those always tip over on me--plus, they become one more thing to have to move out of the way if I'm cutting big pieces of fabric. I really prefer to keep my cutting table surface as clear a possible, although my bluetooth speakers are a must-have for listening to podcasts while I'm sewing. So I do make exceptions. Still, if I can eventually find a 3M shelf the right size to hold those speakers up and out of the way, golden.

I'm pretty good at having set places for things. What about you? Do you have some wanderers that you need to settle down?

For me, visual cues are the answer to "out of sight, out of mind." I know lots of people keep WIPs in grocery bags or boxes or opaque bins. I can't do that. I need to be able to see at a glance what I've got going on. If I stuff something in a bin or a box that I can't see through, it's like it never existed in my life. I suppose, in that regard, I never quite outgrew the infant's perception that if they can't see your face, you've actually disappeared. Poof--it's gone! So for me to remember I've got projects waiting for my attention, they need to be all up in my grill. I've got everything on open shelves and in transparent bins so they catch my eye and remind me they exist.

I also leave myself visual cues when I'm in mid-project. For example, if I finished quilting in the middle of the quilt, I'll leave something unusual (not a tool I was working with at the time, something that would stand out to me) laying on top of the quilt right where I left off--this not only reminds me where I left off, but it reminds me at a glance that hey, I still need to finish quilting that thing! 

Finally, the biggest visual cue I leave myself is my to-do list, or my "next step" list. I talked about this on a recent podcast episode. I've been using a post-it note system for a couple of years now, listing on each post-it one next step for each project I had going on and lining those post-its up on the edge of my cutting table. That way, I could see at a glance what next steps I had to do to move various projects forward, and quickly choose whatever one I was in the mood for or had the time to do. I also had the visual satisfaction of seeing the post-it notes disappear.

Ahem. Yep, there's a lot of post-its languishing on the side of my cutting table these days. I'm slowly taking care of that.

I'm now trying a white board instead, but we'll see if it has that same impact as a visual cue. I'm kind of partial to my post-it system, but see previous comments about trying to lessen the amount of stuff on the surface of my cutting table. 

I feel like I'm already in pretty good shape with S-3, although I'm still trying to find a good home for certain things so I guess I can still use some work on the "set locations" end of things. What about you? What do you feel you do well, and where do you feel you could improve?

Progress and Goals--Week of April 26, 2015

My goals for this week were to:

  • Learn two more stitches for Sue Spargo class project
  • Finish prayer flag
  • Finish Anne Unrein's Everything in Its Place bag from Craftsy class
  • Make a solid list of my UFOs

Progress:

Wing Bling

Wing Bling

  • Stitching: Wheee! Boy, did I have fun this week. I did some woven circles, which (once I got the hang of it) were a beautiful way to showcase some particularly yummy threads. I also got into some wing bling (thanks to @Scooquilt, aka Valerie, for the phraseology). The photo at left is my first beading attempt. Here I was using a fly stitch and attaching the bead to the "leg" of the fly, keeping my stitches pretty small so all you'd see was the bead. I chose that stitch because it also helped hold the edge of the appliqued fabric down, which was showing an alarming tendency to pull away from the machine applique stitches I'd originally used on it. A few extra hand stitches, some beads to distract your eye from the fraying edges of the fabric, and bingo-bango, a finished look. Can you tell I was enjoying myself? I've got more plans for beads--Sue Spargo shows several in the final lesson of the class that I can't wait to try out. 
  • Finish prayer flag: Pret' near done. I've completed the design: I just need to figure out how I'm backing it and such. I'm going to take a few minutes on it as soon as I'm done with this post so my plan is that it'll be done before the end of the afternoon.
Vinyl pockets for bag. 'Nuff said.

Vinyl pockets for bag. 'Nuff said.

  • Anne Unrein class project bag: Well, I did make some progress. So there is that. 
  • Solid list of UFOs: Done. Note that on the top of this blog page (if you're on my website), there's a link for another page that used to be pictures of my WIPs. I never kept it updated so I repurposed the page--it now has a complete list of all my WIPs, UFOs, and projects I've decided to "disappear" in one way or the other. I'll do my best to keep this updated. I know y'all will be far less interested in reading it than I am, but maybe knowing it's out there for all the world to see will keep me on track!

Goals for This Week:

  • Do I even say I want to finish the Annie Unrein bag, or should I be more realistic and just say "Make progress on....?"
  • Complete mug rug for swap. (I'm starting that this afternoon too--not sure how long it'll take me as the design keeps getting more complex in my head every time I think about it, LOL.)
  • Complete three butterflies on Sue Spargo project. I'm actually pretty much done with the class. I've watched all the lessons and if I didn't use every single stitch she demonstrates, I used at least one or two from each "group" of stitches. There's one stitch she shows in one of the last lessons that I want to practice, but after that, it's really just a matter of finishing the project. To do that, I'll be re-using a lot of stitches I've already done in other areas; so instead of focusing on numbers of new stitches, now I'll be setting goals towards completion of the project. I've got 15 butterflies in total, plus background. I've done bits and pieces of several of the butterflies as I was choosing where I wanted to practice each stitch, so now I'm going back and looking at each butterfly as a unit to determine what it needs to be finished. I'd like to finish off at least three butterflies this week.
  • Make block. I'm doing a block for a quilt for a friend, so I need to get my block done this week. 

(I'm not including finishing the prayer flag on this list as in my head, it's really already done.)

Fight the Funk Friday

Fightthefunk.jpg

I'm home! I've had a whole week home! Woo woo!

Don't get me wrong--my trip last weekend was a great one. I just had a string of travel that prevented me from being in any sort of decent exercise routine at all. In fact, the two most recent trips involved hours spent in planes or cars--so they were even more sedentary than usual.

And then, just when we had a beautiful weekend and I was out walking for the first time in weeks, my knee started whining at me again.

But here's the good news: Because I'm home, I finally had time to deal with insurance referrals and back-and-forth with my doctor and...yay...had an appointment with a physical therapist yesterday. She did things. Painful things. I cried a little tear inside.

Actually, it wasn't bad, but my knee was quite ticked off with me by the time I got home so there was more Advil and ice in my life. That being said, it turns out it's not my knee muscles I need to be focusing on, but my hip muscles. Who'd-a thunk it? I'm now armed with a series of hip-focused exercises and a resistance band. I'm planning on trying to get some gym action in again this weekend; basically, she gave me the go-ahead to do anything "unless it hurts." Words to live by.

So, exercise--not so much, unless you count physical therapy. Which it does count, I suppose. But it's not really racking up the FitBit steps. I hope for better this weekend, though I'm going to keep reminding myself to take it slow for a bit. But just you wait until my knee is fully back in working order. The dust will be flying behind me!

A CSA delivery from 2013

A CSA delivery from 2013

On the food front, I'm back to planning and tracking pretty well, and getting lots of fresh produce in the house. I'm counting down the days until my CSA deliveries start--June 9 can't come fast enough! Yep, for those of you in warmer climes, early June is the first we can really expect to start seeing any harvest in these parts, and even that's pretty early--I imagine it'll be mostly greenhouse stuff at that stage. Most of our gardens start producing for real at the end of June or early July. Then we get swamped. But that's a zucchini story for another day.

Oh, and I also got my temporary crown put on this week, in the continuing saga of the broken tooth that started last 4th of July. The final crown is May 7. Can't wait to have it completely done--and I'll be pretty vigilant the rest of my life to make sure I never break a freakin' tooth again. What a pill.

All that means is this week's Fight the Funk post is mostly about preventative medicine and getting myself back into shape for making good progress later. This is a more "reactive funk-fighting" at the moment, but I'll be back to proactive mode shortly!

Thinkin' about It Thursday

This week, I'm thinking...

Doofus with a little spring fever

Doofus with a little spring fever

  • how absolutely, fantastically, great it feels to be home for a prolonged period of time and in a routine again.
    • (The doggies agree.)
  • how, on the other hand, being hither and yon for so long means a backlog of appointments that all landed on this week so I'm not entirely feeling in routine yet.
  • that, however, all that means is I'm finally getting some stuff taken care of that should've been dealt with weeks ago.
    • so it's all good.
  • how new furniture is both fun and stressful at the same time.
  • that the words "oh, we'll just use this for now" should never be spoken.
    • Is 10 years later still "for now?" 
  • that, in the time it's taken us to choose a new coffee table for our family room, other people would have redecorated that same family room twice over.
  • how that should make me remember that every decorating choice doesn't have to be a forever-choice.
    • less stress?
    • faster decisions?
    • no more naked windows or cheap, folding, very unsteady TV-trays as end tables?
  • that our highest priority in choosing new end tables was, "Which one will the Doofus not be able to knock over as he runs by?"
  • how the store clerk was looking a bit askance at us as we leaned on the top of every table and wiggled it to check for sturdiness.
    • but it's a thing.
    • and I'd rather not have it be a thing anymore.
    • Dang Doofus.
  • how nice it is to see green grass.
    • and growing things.
    • and hear birds.
    • and sneeze.
    • because sneezing means spring.
    • Hurray.

WIP Wednesday

I think I've done a WIP Wednesday post maybe twice in my blogging life. But here it is. I have something to say this week!

Vinyl pockets with gussets

Vinyl pockets with gussets

I'm pleased to announce I finally conquered the whole "sewing on vinyl" thing with the Anne Unrein Everything in It's Place bag.

(For those of you who haven't been playing along recently, I'm doing Annie's Craftsy class, "Sew Sturdy Travel Organizers,"* in a last-ditch effort to see if I could ever learn to love doing this kind of sewing.)

In my last podcast episode--I think, or maybe it was a recent blog post, can't recall exactly--I was grousing about the trouble I was having with thread breaking when I was trying to sew gussets in strips of vinyl that will eventually become the pockets.

After reading some blogs on the topic, and then a little trial-and-error myself, I finally hit on the combination that worked for me: Leather sewing machine needles and thinner polyester thread. Using a 90/14 Schmetz leather needle with a Superior Threads Bottom Line (bobbin weight) poly thread in my top and bobbin, I finally got all the vinyl pocket gussets sewn with nary another break. I think the bobbin weight thread will be strong enough, but it all gets sewn again anyway when you install the pockets on the pocket pages, and I'll be using a 50-weight thread for that, so it'll be fine.

Zipper-by-the-yard with pulls installed

Zipper-by-the-yard with pulls installed

And then I had to install umpteen-million zipper pulls on a zipper-by-the-yard. This was a struggle I'd already had to conquer back when I had to do the mesh pocket a couple of weeks ago. Now that I know how to get that stinkin' zipper pull on...I can't say it got a whole lot easier. But at least I got it done without throwing a single one across the room. I measure success a little differently these days.

That being said, I really should've watched the lesson all the way through before I hauled off and got started on the zippers this time around--I only saw after the fact her very helpful tip about putting all the zipper pulls on first and then measuring it out, sewing and cutting the zipper lengths needed with the pulls already installed. Probably would've gone a lot faster, as it's easier to put the zipper pull on using the fabric tail of the zipper rather than on the cut end.

Yes, the jury is still out. Her instructions are great, the class is great, the design is great--but I still think I'd happily pay someone else to make this dang thing for me. Still, I soldier on...

(*Using this Craftsy link helps support this podcast and blog. Thank you!)


Craftsy Class Review: Clever Cuts for Efficient Quilting with Debbie Caffrey

I don't have this ebook from Craftsy yet but it looks interesting, doesn't it? I think I'll grab it as soon as I'm done writing this blog post. 

So, in the name of finding more efficient ways to make progress on quilts as my time grows ever-more-limited, I once again looked to Debbie Caffrey. Well, to be clear, I bought this class primarily because I'd enjoyed her other one so much. Clever Cuts for Efficient Quilting, like her first class (Cut To It: Strategies for Smarter Quilting), is an excellent reference class that you'll want to keep referring back to for years to come!

Like Cut to It, this class doesn't have one specific project for you to do in order to practice techniques, but there are several patterns included in the class materials if you do want to put one of her cutting methods immediately to use. For me, however, I was just watching the lessons to see what was there so I'd know where to go for future reference. Hence, no pretty pictures to go with this review--sorry.

For my general thoughts on Debbie Caffrey as a teacher and the usefulness of the techniques she teaches, see my review of her first class. I can just keep saying "Ditto, ditto, ditto." I can't say it enough--these are both excellent classes to have. 

Do you need to do the other class before doing this one? Not really. However, I do think they build on each other to a degree, and she does reference the other class periodically in this one. However, you could easily do this class as a stand-alone and be just fine, I think.

This class includes a few more tips on organization, accurate cutting and piecing, and general ideas about when these techniques would be useful. She then discusses tube piecing, diamonds and set-in seams, lots of information about working with Tri-Rec rulers, and then some ideas and tips for piecing borders. 

The Basics

  • Seven lessons, ranging from 24 to 38 minutes
  • Lesson 1 is fundamentals of cutting and piecing, including tips for accuracy; lesson 2 focuses on organization, as well as tips for sewing, pressing, and cutting; lesson 3 is strip-tubing (I've done that before and it's fun, fun, fun!); and she demonstrates a fish block that would make a very cute baby or child's quilt; lesson 4 is all about diamonds and set-in seams, as well as a bit of drafting of templates; then lessons 5 and 6 focus on Tri-Recs in a variety of ways. Finally, lesson 7 gives several ideas and demonstrations of different types of borders; I really liked one of those and could see it on one of my UFOs, so I'll be referring back to that lesson again in the next few weeks.
  • She addresses left-handed cutting considerations, too, for all you lefties out there!

Once again, as with her other class, I highly recommend Clever Cuts for Efficient Quilting with Debbie Caffrey. If she does a third one, she'd have a hat trick! For now, it's just an excellent pair.

(Using Craftsy links on this post helps support my podcast and blog. Thank you so much!)

Monday Musings: The 5 Ss--S-2 Shine and Inspect

How did you do this past week on S-1, sorting and removing? The day before I posted the S-1 post, I had already given away to some friends a lot of my scrap stash and some blocks from a project I'd decided I wasn't interested in finishing. They were glad to get them, I was glad to be rid of them. FTW. 

Specialty rulers and accompanying books I'm not quite ready to get rid of.

Specialty rulers and accompanying books I'm not quite ready to get rid of.

On the ruler drawer I said I wanted to sort? Well, it turned out to be harder than I thought. You see, the rulers I've hung onto but not used are pretty much all inherited from Mom. That means they either (1) still have that sentimental "this was Mom's" feeling clinging to them or (2) are no longer readily available so I worry that if my quilting tastes shift again, I may someday think, "Why did I ever get rid of X ruler?" I have used a couple of them and wasn't totally sold, but still am not quite ready to off them, either. So I hedged my bets. I moved them out of my sewing room and put them in a box in the basement, with a note to myself in my ruler drawer that I did that. 

I did, however, get rid of this bendy ruler--virtually impossible to actually use.

I did, however, get rid of this bendy ruler--virtually impossible to actually use.

I know--it's really not taking care of the problem long term. But I'm typically really, really good at getting rid of stuff, so I decided to give myself a little grace on this one. (Someday, when I'm gone, my kids will open up that box in the basement and think, "What the...?" It'll only serve them right for when I gave their bedrooms a good cleaning after they went away to college and thought, "What the...?")

Time for week 2!

S-2 Shine and Inspect

When was the last time you had your sewing machine cleaned? How old is that rotary cutter blade? Have your pins developed rust? 

I realized recently that my beloved pins--so beautifully thin and long--were clearly showing their age. After about 15 years of stabbing them into my design wall and forcing them into thick stacks of fabric, many of them had developed an inconvenient curve and most of them felt like they had lost their sharp, pointy tips. This particular pin isn't cheap, but I really do love them.

And I suppose I really ought to stop stabbing them into my design wall which, by the way, is a felt-backed tablecloth hung face-side down against my wall. No foam. I'm stabbing the pins into the wall. Pin abuse. (And I don't plan on ever letting that wall see the light of day until we move. It's likely not pretty.) Plus, I should stop using this same set of pins for all purposes. I have thicker pins that would put up better with bulkier seams or stabilizer. These are just so easy to grab. Time to change my lazy ways, I suppose.

Got one of these micro vacuum attachment sets? I love mine for using on my sewing machine (carefully!) and my computer vents. Click here to find it on Amazon.

Got one of these micro vacuum attachment sets? I love mine for using on my sewing machine (carefully!) and my computer vents. Click here to find it on Amazon.

In any case, we all know that our lives are made easier by well-functioning tools. So this week, check out your equipment. How's that sole plate on your iron looking? Do you need a few new packs of sewing machine needles? Could your sewing machine use a good wipe-down or tune-up? How are your scissors doing?

Leave a comment and let us know whether you found anything that needed some shining and inspecting!


Progress and Goals--Week of April 19, 2015

My goals for this week were to:

  • Learn two more stitches for Sue Spargo class project
  • Finish prayer flag. (It's quite close to being done.)
  • Finish Anne Unrein's Everything in Its Place bag from Craftsy class--maybe. At least, make significant progress.

Progress:

  • Stitches--ummm...I did watch one lesson. I'll be sitting down with my embroidery tonight for the first time in about 10 days. So tonight I'll have some progress, but nothing to report here.
  • Prayer flag--ummm... see above.
  • Finish EIIP Bag--[insert snort of derision here

Basically, I didn't make much progress this week on quilting projects; I did, however, do a lot to set myself up for better progress in the future. You'll need to listen to tonight's podcast episode to hear why. That being said, while I was listening to my own episode back again prior to posting, I did make some progress on the EIIP bag. Just know (after you listen to that episode) I did finally conquer sewing on vinyl--woot! It took new needles AND a different thread. I finally landed on the right combination that allowed me to get 'er done. It wasn't fast, and it wasn't pretty, but it was done. 

Goals for this week:

  • Second verse, same as the first...
  • Also, develop a really solid list of my UFOs for planning.

Monday Musings: The 5 Ss--Riffing Off Wegmans

2015-02-28 16.58.04.jpg

(Awhile back I was doing Monday Musings. I've decided to reinstitute them, at least for a short series.)

A couple of weeks ago I was doing my usual grocery trip at Wegmans (got one near you?), and noticed this sign hanging next to the employee office near the check-out lines. 

As I read it, I thought, "Hmmm. I could apply that to my quilt studio/sewing room." 

And so, here's my riff on Wegmans' advice for store employees, adapted for us fiber-folk. I'm going to do this in five parts, every Monday, just to keep it--ahem--simple.

S-1 Sort and Remove

You can pretty much guess where I'm going to go with this one, right? 

We may like to think that all those boxes and bins and stacks are the mark of wonderful possibilities. But the reality is, a lot of it may just be getting in the way, keeping us from moving forward in the way we want to move forward.

How much stuff is sitting on the shelves, in the drawers, in the closet, hanging on your wall, that you haven't touched in more than a year? Not only does all this extra stuff tend to get in your way when you're looking for what you need (stealing precious time from your creative endeavors) but it can actually become a burden.

This photo is a few years old. Tellingly, it looks much the same now.

This photo is a few years old. Tellingly, it looks much the same now.

If you've heard my recent episodes, you know I've been struggling a bit with what to do with my stash. Now I'm in a very different place in my quiltmaking than I was six or seven years ago. Yet my stash still largely reflects where I was six years ago, seven years ago, ten years ago.... I've sorted my stash a couple of times and gotten rid of things I wasn't using then, but I hung onto a lot because they're all quite handy fabrics. I kept thinking, "But this could come in handy," or, "but this one's really pretty."

So I kept doing make-work. In other words, I'd find projects to do simply to use up my stash. Those weren't projects I'd have normally done. They may have been somewhat entertaining (although not all of them were), and sometimes I even learned something (although usually I was just going for quick-n-easy). But still, all-in-all, they were a distraction from what I really wanted to be doing. When I realized that I kept putting off my True Love Quiltmaking to try to knock out yet another Stash-User Quiltmaking project, I understood that something was out of whack.

I finally came to the conclusion a couple of months ago that my stash was actually a source of obligation and guilt--not guilt over its size, as it's a reasonable stash. Not guilt over the money--probably half of my current stash was inherited from my mother. Rather, just guilt over all these great fabrics sitting there, not being used. Obligation guilt. I was feeling the burden of needing to use fabric just because it was sitting there--to create projects for myself just to use fabric just because it was sitting there--to not do the projects I wanted to do just to create projects just to use fabric just because it was sitting there....

The lightbulb came on. My stash was actually holding me back. Sure, it was a great stash. I'd actually been very intentional about building a good, usable, stash for those times I wanted to do an impulse project--I could just grab and go pretty easily. But my quiltmaking has changed. Just because something is a "good stash fabric" doesn't mean it's right for my stash. In fact, it might be even better stash fabric for someone else. The only good fabric is fabric that's being used. Everything else is, really, just clutter. No matter how pretty it is.

So I'm giving myself a few more months to use up the fabrics that are still really calling to me, then I'm going to embark on a major clearing out. I'll be sorting and removing. And I'll feel lighter for it.

Rulers. Books. Gadgets. Marking utensils. We all tend to amass collections. If you're using them, even semi-regularly--great! Keep 'em all! But if, instead, you keep seeing a ruler every time you open a drawer and catch yourself thinking, "I really should use that someday," maybe it's just not the right ruler for you. Maybe it reflects things you thought you were interested in a couple of years ago, but you've mentally moved on. Perhaps the ruler would be happier living with another quilter who would love it and use it and make great things with it, than languishing out of loneliness and boredom in your drawer. 

So, this week--my suggestion to you is to practice a little S-1. If you don't want to tackle your whole sewing room, choose one drawer, one shelf, one bin. Sort and remove. (If your sewing collection is just fine, thank you very much, think about the rest of your home or your workplace. Everyone's got a problem drawer somewhere!)

My goal? 

On the left of the two photos below are the rulers I use on a regular basis, although there are even a couple hanging on the ends of that wall that I don't know that I've ever used. (The ones right next to my cutting table are my go-tos just about every time I'm working on something.)

On the right, the drawer of all the specialty rulers I inherited from my Mom a few years back and, for the most part, have never used. It's really time for me to make some decisions. I could use the drawer space.

rulers.jpg

So, go get your S-1 on.

Leave a comment letting us know what you are going to tackle and how it goes!

Progress and Goals--Week of April 12

Did you notice Craftsy is having a flash sale this weekend? Use the banner in the right sidebar of this blog post to check it out! And thanks for supporting this podcast and blog.

My goals for this week were to:

  • Continue progress on the "Everything in It's Place" bag from Anne Unrein's class.
  • Get the binding on the D4P baby quilt.
  • Learn two more stitches on my Sue Spargo class project.
  • Put beads on the prayer flag

Progress:

  • Got the D4P baby quilt done! It has no name, it has no current destination. But it's done!
 
  • Got the beads put on the prayer flag. And a few other things done on it besides. Now I just have to figure out what finishing touches I want to do--it doesn't need much, though, so it won't take long.
 
Cast-on bullion stitch

Cast-on bullion stitch

  • Learn two more embroidery stitches. I learned three, actually--woo! I finally finished lesson four. Took awhile--lesson four stitches are all pretty time-consuming. I only used one on the project; the other two I practiced but decided I didn't want to actually use them yet.

The cast-on bullion stitch (at left) is pretty but very similar to the bullion stitch I did last time; so, since it takes even longer than the bullion stitch, I wasn't in the mood to do it all again. I did one to see how it looked, then cut it back out of the project. I may do one down the road as I still have a heck of a lot of project to embroider, but right now I wanted to do something different.

By the way, being able to slow the video down to 1/4 speed and put it on 30 second repeat helped a lot when I was trying to coordinate my thumbs for that cast-on stitch. Not being a knitter, that  isn't something I've done much and she whipped hers off pretty quickly. After watching her do it very s-l-o-w-l-y several times over I finally got the hang of it.

 
Drizzle stitch

Drizzle stitch

The drizzle stitch is darn cute (at left) but doesn't really work on this current project so I did one for practice and then cut it all off again. Good to know for the future, though. Yep, it's supposed to look like a wad of knots, basically, though generally it would be neater than this. You can't quite tell in this photo that it's 3-D--the stitches hang off like hair or fibers or some such. Cute in the right place--not right for my project. I cut these off when I was done practicing.

 
Double cast-on stitch

Double cast-on stitch

Finally, the third stitch was a keeper on the project this week. The double cast-on stitch is also very, very time-consuming, but pretty cool, and I was able to use it in a very limited space so I wouldn't be working on it for the next three years. I didn't get mine touching each other the way I'd have liked to--it was a little hard to see where my needle was coming out in comparison to the completed stitch before it. And I still need to work on evenness, but that all comes with practice. It's also a matter of learning how your thread will behave. This one was variegated in such a way that it divided in half color-wise, which was kind of neat, but now I know how to picture that ahead of time as I'm choosing threads in the future. 

She has several examples of how she's used this in various ways (as she does with all her stitches) and this one has great possibilities for other places on my project. You may see more of this one later.

  • As for the Anne Unrein purse project? Well, not so much. I looked at it the evening I finished up the baby quilt but decided the next step is not one I can leave half-done easily, and since I'm about the head out of town, it's better to be left until I'm home. So it's on next week's goals--but this time I hope to get it finished!

And yes, it did help listing my goals like this. Mostly, it got finishing that baby quilt stuck in my head until I finally just sat down to knock it out! 

I'm actually on the road as this posts (waving at you as I drive by). I don't get home until Thursday, but I have Friday as a comp day. Friday evening my husband and I need to clear out of the house for a couple of days as my daughter is turning it into a weekend boarding house for her and some of her buddies attending a Comic-Con in the area. We're just staying in town because we've got some things to do locally, so it's not a terribly exciting weekend away, although we'll make the best of it! In any case, I won't have access to my sewing room for the weekend. For all those reasons, my goals are small, and largely involving embroidery that I can bring with me on the weekend jaunt. 

Goals for the week of April 12

  • Learn two more stitches for Sue Spargo class project
  • Finish prayer flag. (It's quite close to being done.)
  • Finish Anne Unrein's Everything in Its Place bag from Craftsy class--maybe. At least, make significant progress.


A Finish! Disappearing 4-Patch Done

It's finally done. It's a little ridiculous it took me this long to get around to getting the binding on, but there it is. I had the blocks done before I went to Burma in December ; got the center pieced together in January, got the quilting done in early March and had the binding strips cut about two weeks ago. And it just sat, n' sat, n' sat...

image.jpg

The center is a charm pack by Moda--I've had it for awhile, but I think it's the "Good Morning" line or something like that. I had two of the same charm pack and used one for a lap quilt for a friend of mine last summer who was going through cancer treatments. I like the fabrics--it's nice and cheery. It's supposed to be a non-gender-specific baby quilt but, frankly, it's definitely more girly according to our societal definitions of color assignment (!) so I went with quilting feathers in the border and free-form flowers in the center. I used this to practice some of my developing FMQ skills.  They're a little whonky but better than I used to do. The inner yellow border is a ribbon candy design--gol dang, but that's hard to keep even! 

Still n' all--it's done, and it ain't half bad. And best of all, it's done. Did I mention, it's done?

No intended recipient. It'll hang out on my shelves until some sort of appropriate occasion presents itself. 

Thinkin' about It Thursday

This week, I'm thinkin' ...

  • about stubborn snow.
  • that I really need to do laundry tomorrow.
  • how I have very few clean clothes left in the "professional" category.
  • that I need to have enough to pack on Saturday.
  • how good it feels to have finally finished a project.
  • that it's best not to think too hard about the rest I still have left to finish.
  • about stubborn snow.

(No Thinkin' about It Thursday post next week as I'll be traveling.)

A Nifty Little Tool

I keep forgetting to talk about these, and they're the best new quilting-notion-y thing I've gotten in awhile!

There are any number of "bobbin buddies" out there (and the vast majority of them are named "Bobbin Buddies" which makes it difficult when searching for a particular type). The problem is, most of them don't work with Aurifil thread spools. I've tried golf tees, I've tried clampy things, I've tried blue stopper-type things, and rubber bands just annoy me.

So when I saw a picture of this new type in a magazine, my heart sang. This Aurifil Girl may have finally found the solution!

It took me a few minutes of Googling to find the right ones because the magazine didn't list the supplier. Go figure. But I tracked them down at Erica's Craft and Sewing Center. I got the 20-pack and absolutely love them. They're perfect for my Aurifil but, of course, also work in all the other spools I use too. 

I'm a happy camper. Sometimes it's the little things...

Follow-up on Comments Testing

Hey, y'all. While I was running giveaways and the like, SquareSpace tech support was checking out any comments people were leaving that gave information about whether or not the comment had worked, how they'd accessed the blog, and so forth. Here's what they've found out:

1. Most people who comment directly on the site itself, or through the email version of my blog posts, have no problems. (And, actually, the vast majority of people reported in that they didn't have a problem commenting.)

2. When you want to comment, you're getting redirected to a screen in which you can choose or not choose to actually register on the site. You do not have to register, but you do have to leave a name. This is a spam-protection feature. So if you've been asked to sign in and don't want to, know that it's not necessary to actually register--but it is necessary to leave a name.

3. Commenting by logging in with your Google and Facebook accounts seems to be working fine.

4. To sign in to leave a comment, you have to have enabled pop-up windows for the site. If not, you'll either get a failure message or your screen will just sit there and look at you blankly, in confusion. I can't tell you how to enable pop-up windows--it all depends on your own set-up; you'll need to do a little Internet browsing if you don't know how to do it on your computer.

5. There are particular issues with BlogLovin'. The BlogLovin' feed for the blog doesn't actually reference to my SquareSpace site somehow--BlogLovin' changes the feed. So if you try to comment through BlogLovin', your computer (or whatever device) won't actually know where it's supposed to go to comment. I actually have this same problem when I'm trying to comment on some other people's blogs through Feedly (which I use because I prefer it to BlogLovin'). There are certain blogs I just can't ever comment on through Feedly, but other ones work fine. So if I want to leave a comment on certain blogs, I know I have to go to the blog directly from the web in order to comment. 

6. Under the category of "other": This same issue as #5 may occur in other RSS feed readers. I can also personally attest to occasional issues I have commenting on other blogs when I'm on my iPad--but I don't have those same problems on my iPhone or PC. So there is something just a little funky about the way iPads talk to the Internet or something. 

So, basically, what we found out is that most of you have no problems leaving comments. So I hope you'll continue to do so!

For those of you who have experienced issues, please check the information above to see if any of it may fit your situation. If you've had a completely different experience, then (again) give me very specific information about what you're seeing when you try to comment, how you're trying to access the blog to comment on it, and so forth, and I'll go back to tech support again. Thanks!

Progress and Goals for Week of April 5, 2015

Yeah, I know--I'm entitling this blog post for April 5, which was yesterday, even though I'm writing it today (April 6, Monday). But for some weeks now I've been thinking I should take a page from the books of Jackie at SewExecitedQuilts.com and Philippa from Ozzypipquilts.com and do a post every weekend in which I recap what I've gotten done and set goals for the coming week. That just seems so nicely organized. And I've just become so...well...disorganized. I've been all over the place is my quiltmaking lately and it's time to settle down and move some projects through finishing stages to get them off my cutting table, design wall, or shelves where UFOs go into hibernation. I'm thinking Jackie and Philippa have a good idea--doing a weekly report on my blog may keep me on target. Or, here's hoping, anyway.

I guess I should start with the master list. Oi--this is going to hurt. I won't include this full list every week, though I should probably put it in the sidebar or on it's own page or something; I just always forget to update that kind of thing. Anyway...engines started, here we go:

Things I need to get done in April but haven't started yet:

#JBBOM kit

#JBBOM kit

  • Mug Rug for Sandi at Quilt Cabana Corner's Mug Rug/Potholder Swap--I know what fabric I'm using, and have mentally toyed with several designs. I need to settle on one and execute.
  • April Journal Quilt--no definite thoughts about this one yet, although see art quilt design class-related list of projects below--one will likely become the April journal quilt.
  • April Jinny Beyer Block of the Month (Craftsy)--aka #JBBOM
  • One Feb JBBOM block
  • March JBBOM block--the fact I'm a couple of months behind on this is really stressing me out. I need to devote a couple of days to catching up again.

Works in Progress (things I'm poking away at on an on-going basis)

20150327194201.jpg
  • March Journal Quilt--it's partly done; I probably have another couple of hours of work to do on it.
  • Two bags for Anne Unrein's Craftsy class--first bag is in progress. It's taking a long time. And I had my first temper tantrum over it earlier today. But I'm not giving up!
  • King-sized Jacob's Ladder quilt--first stage of cutting done
  • Sue Spargo Embroidery project
  • Prayer flag--needle-felting and embroidery project that I haven't talked about yet because it was purely spur-of-the-moment; it should only take about an hour of embroidery/finishing.

UFOs (projects that have sat for at least one month or more with no progress being made)

D4P Baby Quilt

D4P Baby Quilt

  • D4P baby quilt--just needs binding. Really? And it's sat for this long?
  • Duffle bag--probably only has about an hour or so left of work to be done. 
  • Color and Curves class project--working on border, then needs quilting/finishing. Probably would only take a few hours to finish, all in.
  • African Star Quilt--the one I did in Ami Simms class in Lancaster last spring. Needs quilting/binding. I want to quilt this one myself.
  • Scrap-in-a-Box--I did most of mine last spring/summer when I was pattern-testing, but didn't finish it once everything moved to Charlotte's blog and I was no longer responsible for the reveal, LOL. I've had breathing room while everyone caught up, but I think next month y'all will be caught up to me, so then the pressure will be on to actually finish it in my lifetime.
  • Color Circles art quilt design class project--needs quilting and finishing
  • "Flames" hand-dyed tapestry project--needs quilting and finishing
  • Art Quilt Map--stalled, went after it with a rotary cutter and completely changed direction, then ended up sort of backing myself into a corner. Need to make a decision about the future of this one.
  • Jelly Roll Sampler--I think all my blocks are made. I just need to decide sashing/no sashing, then get the top pieced and send it out for quilting. This is something that will be a gift for someone who is likely to redecorate before I ever get it done. Need to just get it done!
  • Fibonacci Sequence Quilt--my own very simple design using Fibonacci Sequence. Strips all cut, one block done, another block completely messed up. Need to decide if I'm finishing this or not and if so, figure out what I did wrong.
  • 2008 Guild BOM--blocks all done. Have to decide sashing/no sashing, then get top pieced and send it out for quilting.
  • Katerina Project--this one is an ancient UFO, probably over 10 years old. My own EQ design to use a fabric collection my Mom gave to me for Christmas that year. Some of the finished block sizes were way off, though, so it got set aside. Now I'm no longer in love with the fabric but there's still a lot of sentimental attachment to the project due to its connection with memories of my Mom. Need to decide what I want to do about this one.
  • This one's a little embarrassing, but do y'all remember the Hexie Challenge I did with Pam and Jaye, and I only ever got my Hexies cut out? They're still sitting in that bin. Hmmm.

Projects in Planning Stages but First Cut Hasn't Been Made (so, technically not a UFO in my mind!)

Burma Fabrics

Burma Fabrics

  • Laurel Burch wallhanging--have had fabrics for-freakin-ever; keeping it simple in design. Need to just get 'er done.
  • Art Quilt Design Class project Feather
  • Art Quilt Design Class project Hope out of Darkness
  • Art Quilt Design Class project Monochromatic Trees
  • Art Quilt Design Class project Sunset on the Irawaddy colors
  • Art Quilt Design Class project Finger Lakes Wine Country (FMQ)
  • Art Quilt Design Class project Monochromatic Cave
  • Zipper pouches with fabrics from Burma
  • Hand-dyeing colorways--I want to start working my way through the Ives color wheel and dye sets of fat quarters in every color, several shades/tones/tints of each. That's a long term project but there will be immediate benefit since I'll immediately have new fabrics to put into projects as soon as I get rolling on it!

I'm not yet including in this list the recent UFO I inherited from Vicki (I talked about this an episode or two ago), nor a set of blocks I inherited from Mom years ago that still haven't landed in a project. Those just need to brew for awhile before I worry about getting them on any official list.

UFOs I think I'll be releasing to the wild

Some UFOs just don't jazz me anymore, and I'd be finishing them just to finish them. And there's not enough time in the day for that kind of nonsense. I'm not big into obligation quilting--if I'm going to spend what little, precious time I have in my sewing room on a project, it's one that's really going to jazz me. So there are certain UFOs I think I'm ready to just send on to someone else. I'll ask around at my guild to see if someone wants these.

  • Bow tie blocks--I was playing with a technique I'd learned when I was out on a speaking engagement. I thought it would be a great way to use up 5" squares, which it is. I've got something like 12 or 13 blocks done--just enough for a wheelchair quilt for a guy. It probably wouldn't take all that long to finish, I just have zero interest in putting any more time into it. Someone may love these blocks and enjoy putting it together.
  • Snail-trail top--I believe this one dates back a couple of years to when I was doing creativity challenges on my podcast. I vaguely recall this was my start on the warm color challenge--I did a background with snail trail blocks in black and sort of a taupe-y fabric. The intent was to do applique flowers on the top in oranges/yellows. The background is nice enough but I have no interest in finishing it at this stage.

There may be others I decide to send away to new, loving homes, or ditch altogether if I've learned what I need to learn. These are just the ones I've run across recently that I immediately thought, "Nope, not interested."

Oh, I'm so sure I'm missing something on this master list. But it's enough to make me feel overwhelmed so here's to starting to chunk away at it.

Goals for This Week

I'm home most of the week, though after today I'm back to work. I'm out Tuesday night but I think that's it. I'm gone next week, though, so I'm keeping my goals very limited until after I get back from this next work trip. Then I've got a few weeks of a fairly low-key schedule so I hope to make significant progress then.

This week I plan to:

  • Continue progress on the "Everything in It's Place" bag from Anne Unrein's class. Unlikely to get it finished, but would like to at least feel good about where I'm at.
  • Get the binding on the D4P baby quilt. I mean, really. Can't believe that's still sitting there.
  • Learn two more stitches on my Sue Spargo class project.
  • Put beads on the prayer flag so it's easier to travel with--I'll bring this with me on next week's trip because it's very, very small and easily portable.

Winners of My 5th Podcastaversary Giveaway

Thanks so much to all y'all for being part of my celebration!

I've had a lot of fun reading your comments and will probably do a summary on an upcoming podcast episode.

The winners were:

  • $25 Fat Quarter Gift Certficate: Carole Ann W.
  • Aurifil Thread: Jeanie C.
  • Scrapitude pattern: Jeanne B.
  • PRO Chemical and Dye gift certificate: Carole D.
  • Craftsy class: Helle S.

(I've already emailed all five winners so if your name/last initial matches one of the above, check your email. If you don't have an email from me, that means your Doppelgänger is the winner--sorry!)

I wish I could give all my listeners out there gifts to say "Thank you!" Thanks so much for making these past five years fun, creative, and interesting. Part of the benefit for us podcasters to doing a podcast is that we try to stay on top of our projects knowing we need to have something to talk about! I know I've been much more productive these last few years because I knew I had people waiting to hear about my progress. Accountability, donchaknow.

Also, for me, knowing that I have listeners who enjoy learning new things pushes me to learn new things myself. I likely would have ended up doing art quilting and hand-dyeing and working with fibers eventually one way or the other, but I strongly suspect that having you all sending me encouraging comments, asking questions, and sharing your own experience with me has propelled me forward more effectively than I'd have done on my own. And I know my family is very happy that I have other people to talk about all this with, so I'm not constantly bending their ears about color schemes, accurate 1/4" seams, and struggles with fiddly bits! (They're none too sure about the Mad Quilt Scientist, either, but the less said about her, the better.)

So, thank you, thank you, thank you. And thank you again. 

Now, back to our regularly scheduled programming...

While I've Been Away...Playing with a New App

I left you in the good hands of my 5th Podcastaversary Giveaway and Rafflecopter, while I was off and traveling about. Meanwhile, I entertained myself with playing around with a few new apps on my phone. So far, the big winner--in terms of coolness and actual usability--is Steller. (And no, I'm not an affiliate, so this is just a straight-up review and introduction!)

Steller is a really super-cool storytelling app for smartphones. Steller allows you to create online photo books, of a sort, called stories. You can create pages with photos, videos, or text, or a combo package. It has several very nice templates and several layout options for pages within those templates, so it's pretty simple to learn. It also has a social-networking aspect in that you can follow and be followed by other Steller users, "like" a story, and leave comments. A lot of Steller users are professional photographers so just scrolling through all the Steller stories available is wonderful eye-candy. I'm a particular fan of the travel-related stories. Gorgeous. There are also a lot of stories that are recipes with step-by-steps included that may be useful, although I haven't tried any yet to know how well that works in the kitchen. 

When I first found it, I thought (of course), "This will be GREAT for documenting the process on quilts!" I've thereby got a Steller WIP on one of my quilty WIPs going on. Meanwhile, to learn the app and to entertain myself on my second trip that involved a ton of time sitting around in airports, here are the three Steller stories I've created to date.

Story #1:  I had pictures from our vacation to Washington D.C. handy on my phone still, so it was pretty fast to throw together. I was just learning the basics so I didn't get fancy with anything--it's pretty straightforward.

In Story #2, I had other photos on my phone from fibers I'd recently acquired. I messed around a little more with Steller layout options on this one.

For Story #3, I had to wait until I could get on WiFi and download a few photos from one part of my trip to Burma. I only did a little photo editing and for some reason I couldn't download a couple of the videos I have related to this, so this one is still fairly straightforward at this point. I might edit it later to make it a little more whiz-bang.

Finally, Story #4 is the one that kept me entertained in airports. I decided I may as well kill time messing around with all the various photo and video apps I have on my phone--and I have a lot. So you'll see at the end I listed which ones I used in this particular Steller story.

Super-cool, right? Love this app. It's probably my favorite new app find of the year. I even got @carolewool hooked. Here's a link to one of her Steller stories. (She beat me to the punch on getting one done on a quilt process--mine's not finished yet! The project is taking me a lot of time to work through so it may be awhile...) I've found several people to follow--including one young man who is documenting his study-abroad semester in India, which is fascinating!

You can follow Steller on Twitter if you're not sure you want to actually sign up for the app yet--they tweet links to newly posted Steller stories (although only featured ones), so you can see what they're like. You can also set up a Steller account even if you never intend to create a story, and only want to be part of the network. It really is a beautiful app.

I use it on my iPhone (it's not available for iPad but I'm checking out similar iPad apps to decide if I like them as well); it's also available as an Android app. I really do suggest you check it out!

Keep an eye out for an upcoming post on my favorite photo editing apps. Like I said, I have a lot, but a few are standouts! 

March 2015 Craftsy Class Update

If you're looking for my 5th Podcastaversary Giveaway, click here.

Hey, did you know that Craftsy now also has some downloadable ebooks? Check out this one on hand embroidery--it's free! Just click on the image to the left to find it.

This month wasn't stellar for me in terms of progress because I was gone for pretty much the last two weeks of the month--one week on vacation, the next week for work.  I did manage to get a couple of classes done, though--woo for me! Plus, while traveling, I did make some progress here and there on other classes. I'm so glad I now have embroidery to take with me on trips. I don't often get time to just sit and relax with a hand project (even on vacation!) but it was nice to have it with me for those spare moments that I did have that opportunity. That being said, the beginning of April is a little hairy as well, but by mid-month things settle down again and I should be happily ensconced back in my sewing room on a more regular basis.

New Completions

(+2)

Classes in Progress

(7--I know, it seems like a lot all at once, but it all depends on if I'm on the road or at home, doing class projects or just watching, etc. Note that they're "in progress," not "being finished as we speak.")

Classes added this month

(+4)

  • Clever Cuts for Efficient Quilting with Debbie Caffrey--got so much out of the first one of hers (see review here) that when this one went on sale, I went ahead and got it. It's technique more than project so I'm just watching the lessons for now and will apply techniques to future projects.
  • Stitch it with Wool: Crewel Embroidery with Kristin Nicholas--this has been on my wish list for a long time; I'd just decided to do Sue Spargo's class first. Again, when it went on sale, I figured I may as well pick it up to have it at the ready when I'm done with the other.
  • Love Your Vegetables with Anna Bullet--I'd just signed up for another CSA (Community Supported Agriculture--a delivery of fresh produce weekly from a local farm) for this summer earlier on the day I got the Craftsy sale announcement and decided this might help me find new ways to use some of the heaps of greens I tend to get. I didn't do a CSA last summer, but you can see posts from previous years here. (I was recently re-reading my posts to refresh my memory about recipes I'd developed and decided my favorite line from all of my CSA posts was this: "Basically I assess most foods on a how-are-they-as-a-goat-cheese-delivery-device scale." True dat.)
  • The Essential Guide to Photoshop with Skott Chandler--I use Photoshop all the time for work and play but have never really learned more than the basics and a couple of nifty tricks. So when I saw this new shop posted on Craftsy, I grabbed it. 

Classes To Be Completed

Current count: (16, +2 from last month since I'd finished a few as well)  

Completed Classes

Current count: 53 (+2)