Craftsy Class Review and some reveals! Fun Techniques with Fabric Paints with Cindy Walter

Online Quilting Class

Dyes are great. I love dyes. But using fabric paints as well just gives me more ways I can create really, really cool original fabrics.

So the #madquiltscientist has expanded her repertoire.

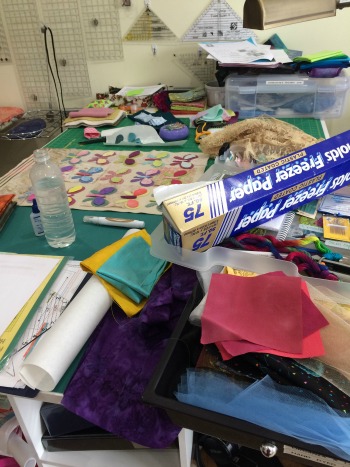
Now, here's a true confession moment: I've owned a lot of different types of fabric paints for awhile. I kept collecting them, swearing to myself that I'd immediately spend time figuring them out. And they were all neatly organized and sitting in labeled bins in my dye studio in the basement. Collecting dust.

Finally, last weekend, I got the fire lit under me to pull them out and start playing. I honestly can't remember what the catalyst was, but whatever it was, the bug hit fast and hard. I spent a couple hours on Saturday messing around with my PROfab opaque textile paints. They come with instructions but not much in the way of guidance beyond that and, as usual, I didn't bother to first go on YouTube or sit down with one of the many art quilt books I now own. I just pulled out the paints, grabbed a piece of the PFD fabric that's always sitting at the ready in my dye studio, and went to town. It wasn't bad, but I wasn't getting quite the results I was going for. Then I remembered--Doh! I owned a Craftsy class on this, didn't I?

Yep, several weeks ago I'd bought Fun Techniques with Fabric Paints with Cindy Walter. Woot woot! I spent several hours on Sunday just blasting my way through watching all the lessons, then descended back into my dye studio freshly armed with knowledge and a few new techniques to try. I had an absolute ball.

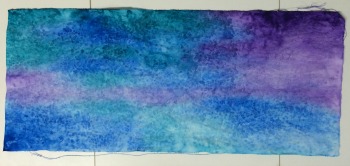
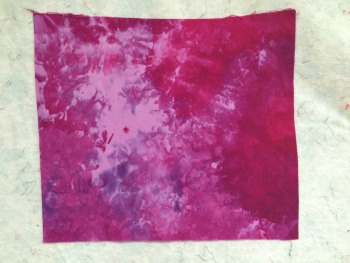
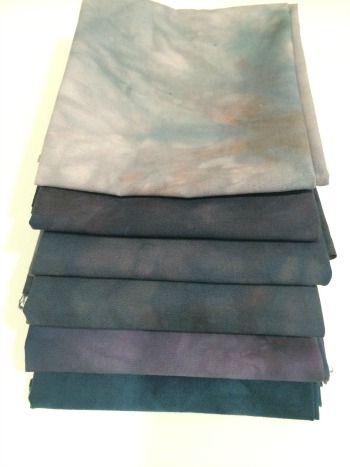
I switched to the Dye-na-Flow paints I also owned (ahem) and tried the same effects I'd been going for on Saturday, but to much better end results this time after watching Cindy Walter's techniques. 

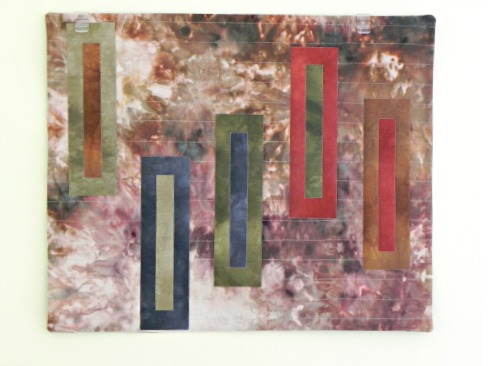
I did a colorwash on a cotton PFD piece I had left over from a previous project, and then (again, testing out something she teaches in the class) salted it with Kosher salt, the largest salt crystal I had in my house, my husband having used up the last of our rock salt on the driveway in the most recent snowstorm. 

I also had a leftover piece of what I think is silk--although I bought it at a sewing guild's rummage sale and it was unmarked, and once you get me out of the world of cotton and wool, I'm a bit lost in the fabric-identification department. But it's shiny. And it feels like silk. So that makes it silk in my world. 

I also salted this one.

Part of what I love about paints versus dyes is they're not fiber-specific. I can use my dyes on silk but the colors come out a little different than they do when used on cotton. With paints? It makes nary a never-mind what you're painting. I could paint my dogs and it would still work just as well. (Whether the dogs enjoyed it would be another story.)

Then I did some colorwashes and, instead of salting, did some scrunching and folding to test out some other things that Walter teaches in the class. Being my first time out of the gate on this one, I learned a lot about how much I need to scrunch or fold to get the volume of lines I want. But still, as a test, it's all good. And these can still be overdyed or painted again or whatever, so it's just a start.

I've heat-set all of these, but they have to cure for a bit before I can run them through the wash and really finish the process, so you can still see some leftover salt-crunchy that's embedded in the fabric until I can give them a good wash, and lots of wrinkles that didn't want to come out with just using a dry iron. 

A little tired of being in the basement, I moved my operations to the kitchen table to do some more work with the thicker PROfab paints. I'll post pictures of that one later on when it's finished. I also (sigh) couldn't resist running out Monday evening to an art supply store in the city that carries a decent selection of fabric paints. I picked up a couple more Dye-na-flow colors, plus some Jacquard Textile Colors, Jacquard Neopaque, a handful of Jacquard Lumiere (and I already have a specific project in mind for those), and one Jacquard Pearl-Ex Pigment so I can add it to my other paints to turn anything I want into a Lumiere-style paint.

So much like Jane Dunnewold did to me a couple of years ago with hand-dyeing, Cindy Walters has now done to me with fabric paints. It's a logical addition to my arsenal of textile art and surface design. And I'm just having a blast. 

Ah, you want to hear about the class now, is that it? 

It's just boatloads of fun. If you need more detail than that: She does an excellent job giving tips about setting up a work space, the difference between the types of paints, how to dilute thicker paints for different effects, and a variety of techniques for using several types of paints. She also shows examples of how to use the painted fabrics (and garments too!), so there's a lot of visual inspiration alongside the practical information. 

I think this class most likely marks another turning point for me in my development with art quilting. I've owned Painted Pictorial Quilts with Annette Kennedy for a couple of years now--it's one of the first Craftsy classes I ever bought, but I always found it a bit intimidating to think about diving into that one. Now I feel so much more prepared--it's just gotten bumped up to the top of my "next class" list! I've also pulled out my art quilt books and am going over anything related to fabric paints, and spent a pleasant hour or so reviewing Mickey Lawler's SkyDyes, which my BFF/BQF gave me a few months ago. I enjoyed it then, but I'm enjoying it even more now!

The Basics

  • 7 classes, ranging from 14-45 minutes--most are around 25-30 minutes.
  • Lesson 1 gives an overview of fabric paints in general, and she talks about the difference between dyes and paints, and color theory as it relates to fabric paints. 
  • Lesson 2 goes into more detail about types of fabric paints, how to buy paints, and how to set up your work space.
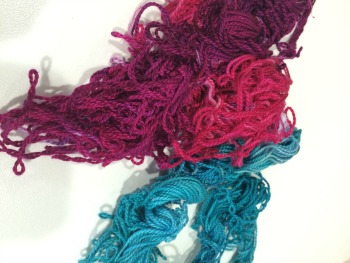
  • Lesson 3 and 4 are about doing color-washes and variations; lesson 5 is about using thick paints (stamping, stenciling, and painting); lesson 6 gives direction for painting a miniature quilt in a couple of different ways (this is the project I'm currently working on, to be revealed later); and lesson 7 goes into mixed media--including 3D paints, ink pens and pencils, oil sticks, and using yarns and embroidery for embellishments. 

Do you even need to ask? Two thumbs up for Fun Techniques with Fabric Paints with Cindy Walter.  Way, way, way up with a bit of dancing around involved to boot. 

(Using Craftsy links in this post helps support this podcast and blog. Thank you so much!)

Craftsy Class Review: Secrets to Cooking Fish: Eight Essential Techniques with Joel Gamoran

As I've referenced in other posts, my husband and I periodically talk about how we really should eat more fish. I'm a bit iffy on fish in general; I have a few types of fish and a few ways it can be prepared that I can almost say I enjoy. He likes fish better than I do, but it's still not something he really looks forward to. I have been wanting to learn more about different ways to prepare fish (in the ever-diminishing hope I'd ever find something I really, truly loved), so I was thrilled when I saw that Craftsy now has a second class on fish. I had already done Fire up the Fish with David Bonom and enjoyed it (here's my review of that one). So, here's my review of Secrets to Cooking Fish: Eight Essential Techniques with Chef Joel Gamoran.

Joel Gamoran is executive chef at Sur La Table. You can tell he's used to teaching classes--he's very easy to watch: he's dynamic without being over the top, and makes you feel immediately comfortable. One very nice twist to this class is that he brings in a student for each lesson; the student serves as a visual "stand-in" for you as the viewer, of course. It's nice to see someone slicing and chopping as slowly as I might, and giving him the occasional uncertain look. I enjoyed how that made this class feel a bit different from other cooking classes I've done on Craftsy. 

Because he's associated with Sur La Table, there is a certain amount of product placement in this class. And I did almost "bite," so to speak, because my fish spatula is a very cheap one that's not at all flexible when I try to get fish out of the pan, so I tend to end up with crumbly bits on the plate rather than a pretty filet. Still, I decided I'd wait to treat myself to a decent fish spatula for if I ever start cooking fish on a more regular schedule than Once in a Blue Moon.

Each lesson introduces different ways of cooking fish by going through a recipe for that technique. There were only a couple of the recipes that I thought my husband and I would be able to agree on, so I ended up making the Sole with Browned Butter, Lemon and Almonds recipe, although I substituted tilapia for sole. In the grand scheme of fish, I will say I enjoyed this fish more than most, and it was certainly a very easy recipe to throw together on a weeknight. Next time I make it, though, I think I'm going to throw a little Panko crumb on that fish as my husband and I both like our fish to have a bit of a crispier outside. 

On the other hand, by the time it's soaking in that very tasty butter/lemon sauce, you've probably negated the vast majority of the health factor to eating fish in the first place. But that's beside the point.

I did really enjoy the class, despite my half-hearted feelings about the main course. I feel like I understand a little more about fish and what types of fish work best with what kinds of preparations, and I really appreciated his discussion of sustainability in the second lesson; great information there. There was a decent amount of information in regards to blending flavors and what kinds of sauces, salsas, or side dishes work well, although I always wish for more along those lines.

Still n' all, I do really recommend this class. For this non-fish-aficionado (see what I did there?), it was a good class. For someone who actually likes fish, it would be a great class!

The Basics

  • 8 classes; absent the 2 1/2 minute introduction of lesson 1, the other 7 range from 14 minutes to 26 minutes.
  • Lesson 2 is an excellent overview of types of fish, what to look for when buying fish, and sustainability; it also has a no-cook recipe included.
  • Lessons 3-8 go through grilling, roasting, poaching, sauteing and pan-frying, steaming, and curing and smoking. The recipes range in complexity but none are very difficult--they're all quite achievable by the average home cook. Some excellent tips for testing for doneness and how to slice and serve certain fish dishes are also useful.

I can't allow my two-thumbs-sideways attitude about fish to color my review of Secrets to Cooking Fish: Eight Essential Techniques with Chef Joel Gamoran, so I'm giving the class two thumbs up. And if you act fast, it's on sale right now!

(Using Craftsy links in this post helps support this podcast and blog. Thank you so much!)

Fight the Funk Friday

I'm determined to keep doing these weekly posts even if I've been a slug all week without any progress to report. Because at least typing is moving my fingers and therefore burning a few calories, right?

This was not a good week in general, although there's a happy ending to the story. My very, very intense week last week extended into a very busy weekend which culminated with yet another presentation followed by an evening conference call on Monday and my guild meeting Tuesday night... Introvert Sandy was racing pell-mell towards full melt-down by then. 

I wasn't sleeping much at all during most of that time, and what sleep I was getting was due to sleeping pills which, after a few days of taking them in succession, significantly affect my mood and not to the better. So I've not been sleeping, which means I've not been exercising and I've not been eating well. And because of my mood, I couldn't even bring myself to care.

Basically, everything went to pot this week and I finally had a full-on (mostly introvert) crash Tuesday night/Wed morning. 

In terms of the "fighting the funk" category, however, I did try to take care of myself in some ways through all that by using various relaxation techniques just to get me through. Addressing symptoms only goes so far, however, until you can sort out the causal factors. 

Three days of gorgeous sun and over-freezing temperatures--woo! But there's still a lot of snow left to melt...

Three days of gorgeous sun and over-freezing temperatures--woo! But there's still a lot of snow left to melt...

That being said, I feel like things finally took a big turn for the better midweek, after my crash. Wednesday really seemed to be a turning point for me. First of all, WE HAVE SUN!!!!! So that's a big boost. I haven't been using my light box this week because I'm actually getting real live sun from the windows and when I go outdoors. Wow. That feels good. Plus Wednesday was the first day, after 12 days in a row of stuff going on, in which I had no conference calls, no presentations, no in-person meetings, no one other than my husband and dogs I needed to interact with. Blissful quietness. I didn't talk much to my husband or dogs that night, either.

Therefore, no surprise here, I got my first really solid night's sleep Wednesday night without the help of any pills at all! Thursday my mood was vastly improved but I still had some residual tired going on so I allowed myself to take it a little easy. Because I knew I'd be spending part of my day off today (Friday) with a bunch of people for my guild sew days, I let Introvert Sandy stay in hiding for one more night and didn't attend my WW meetings or go to the gym. I will start doing Daily Burn and/or the gym again this week--I know I have some lost ground to make up for.

Meanwhile, I did have a little fun with the current Craftsy sale and picked up three new classes. (One was nearly 60% off! Woo!) In my defense, however, one is a cooking class about vegetables that I have had on my wishlist for awhile. Since I just signed up with a new CSA for the summer (another woo!), I figured it was a timely purchase.

So although I have little to report this week, I am happy to say that all signs point to vast improvement for this coming week. We're supposed to keep getting sun and mostly-decent temperatures, even though we're also due for a little more snow sometime in the next few days. DD came home last night for her spring break this week; DH will be gone on business for some portion of next week so DD (a vegetarian and very good cook) and I will be playing in the kitchen with some healthier, adventuresome recipes that DH would never eat--he's generally a meat-and-potatah-kind of guy. So I'm really looking forward to getting back on track.

By the way, here's a very entertaining view of what an impending Introvert Melt-Down looks like. All I can say is, yep.

(As per yesterday's post but with new information: I'm testing out some problems I've been having with this site for a long time. If you haven't already done so on yesterday's post, it would really help if you'd leave comments so tech support can see what's going on. If you leave a comment, just mention in parentheses how you've accessed the site--phone, tablet, PC/Mac, iOS or Windows, directly or through a feed reader, etc. If you try to leave a comment and are unsuccessful, use this link provided by SquareSpace tech support: http://supportdetails.com/. This will give technical details that you can then forward to me to send to tech support. It will allow them to test the problem further. All information is confidential. Do, however, remember that you can sign in as "guest" if you don't have one of the other accounts that the comment feature mentions. Also, be sure to check that your browser is the most recent version--something you should be doing on a regular basis anyway for security purposes. Here's a helpful link for the most updated versions of your browsers: http://outdatedbrowser.com/enThank you!)

Thinkin' about It Thursday

This week, I'm thinking... 

  • How absolutely, fantastically, overwhelmingly good it is to see sun again. 
  • That a little sun makes a huge difference to my overall mood. 
  • That even after three days of 40s (and dabbling toes briefly in the 50s) I can still only see a little patch of green on our front slope. 
  • How it's still good weather for driving around with the sunroof and windows open. 
  • How sore my fingertips are from embroidery.
  • That I'm going to have to keep practicing that darn rosette chain stitch.  
    • Waterloo. 
    • Dang, that one's tricky.  
2015-03-05 14.39.33.jpg
  • That my favorite stitch so far has been the fly stitch. 
  • How fun it is to do the same stitch in different lengths, widths, tensions, and with different threads, to see how completely different it can look. 
  • Because that means I can use my favorite stitch a few different times and most people wouldn't even notice it's the same stitch.


  • That I've once again put a quilt in a show--my second time ever. 
  • How I noticed something I should've fixed even as I was putting the quilt into a bag for drop-off at the quilt shop hosting the show.
  • That hopefully it'll be hung a bit above eye level. 
    • So no one can look too closely. 
    • But it's not too noticeable, really.
    • And is just due to using old fusible.
    • So that makes it the fusible's fault and not mine, right?
  • That I'm looking forward to my day off on Friday and will be going to my guild's sew days, even if just for a few hours. 
  • How I need to figure out tonight how many strips and squares a certain honkin' big quilt will take so I can cut them while surrounded by buddies to keep me from thinking about how mind-numblingly boring all that cutting is.
  • That, other than DD coming home for spring break, I have nothing scheduled for this weekend and that feels great! 
    • Other than an eye appointment
    • And they'll dilate my pupils
    • So I won't be able to see really well for awhile
    • And going to the quilt show to see my and my friends' quilts hanging will be poorly timed if I'm still wearing sunglasses. 

(Shameless plug for comments, but for a good reason: I'm testing out some problems I've been having with this site for a long time. It would really help if you'd leave comments so tech support can see what's going on. If you leave a comment, just mention in parentheses how you've accessed the site--phone, tablet, PC/Mac, iOS or Windows, directly or through a feed reader, etc. If you try to leave a comment and are unsuccessful, email me that same information. Do, however, remember that you can sign in as "guest" if you don't have one of the other accounts that the comment feature mentions. Thank you!)

Oops. I lost a few days in there somewhere.

I just now realized it's (Sleepy) Saturday. Which means I missed Thinkin' about It Thursday and Fight the Funk Friday. ​

That's okay--I wasn't thinkin' about much and didn't fight the funk really at all this week. Busy week, although a great week, with a week-long online event for work that meant late nights and not a lot of good sleep​. Plus, when I wasn't on my computer for work, I was very conspicuously staying off my computer to give myself a little break time. 

image.jpg

But just to show that I was still in the game otherwise: I have made good progress with my Sue Spargo embroidery class this week. Embroidery is a nice antidote to computers, I found. And I got myself organized for my next Craftsy class--stay tuned for more on that. And I finished quilting the Disappearing 4-Patch baby quilt. That puppy just needs binding now.  

And I read lots of quilty blogs, even if I couldn't quite get up the mental energy to be leaving a lot of comments. (Sorry, Friend Bloggers, but I enjoyed what I read! ) Always a nice thing to do over coffee. And more coffee. And some more after that.

Today I'm off to another art quilt design class with a bunch of my quilty peeps. It'll be a seriously fun day...that is, if I don't do a faceplant on my sewing machine.  

Craftsy Class Review: Machine Quilting Negative Space with Angela Walters

Yep, another Angela Walters class! This one is Machine Quilting Negative Space.

I have to start by saying: This was the first time I felt like I'd seen a lot of this before. If you've read my other reviews of Angela Walters' classes, I've always been impressed that I didn't feel like there was a lot of repetition. I suppose at some point, given how many of her classes I've taken before this one, I would start feeling like I'd seen a lot of it already. The designs are, by and large, the same ones she addresses in her other Craftsy classes, as well as conversations about how to vary those designs. That being said, if you haven't taken as many of her classes as I have, you won't have that same impression.

Practicing some FMQ flowers

Practicing some FMQ flowers

What this class brings to the table is looking at expansive space as opposed to thinking in blocks. In other words, if we're accustomed to quilting block-based quilts, we have defined smallish areas that we're working with--places where we know we can put X design in one area and Y design in another area. Negative space, in the definition for this class, is one big wide-open space to fill in (think Modern Quilting). Angela offers a lot of good suggestions for how to break things up and create a lot more visual interest, as well as how to use that negative space to really highlight the overall design of the quilt

It is true that although I was already familiar with the designs and variations demonstrated in this class, I did still manage to pick up a couple of interesting new ideas (such as transitions) that she hadn't presented in other classes. Despite how familiar much of it was for me, there were still enough great tips and suggestions that I very much still feel that this was time and money well-spent.

Also, as a very important note here: In this class, she only uses her longarm to demonstrate the designs. But that does not make this only a longarm class. All of the designs are equally usable on either a longarm or domestic machine. She addresses briefly how you might need to vary your approach depending on which machine you're using. I only have a domestic machine and didn't feel like I was missing out on anything at all taking this class; I was playing with some of the designs on practice sandwiches here and there as I was watching--all very easily done on a DSM.

FMQ flowers for real

FMQ flowers for real

As always,don't forget to read the discussion questions posted from other students in the class. Sometimes you pick up great tips and additional information there!

Strangely, I also decided that there is something very meditative about watching someone quilt on a longarm with that close-up view of the needle and thread--especially when I sped it up a bit. Almost hypnotic, watching that design just appear as if by magic. Ohmmmmm....

The photos I've included in this post are not really directly related to this class because it's not technically negative space. That being said, watching Machine Quilting Negative Space got me in the mental zone I needed in order to sit down at my sewing machine and finally knock out the quilting on the Disappearing 4-Patch baby quilt I started months ago. Plus, I was using a flower design that's a simplified version of one she demonstrates in this class--which has been in other classes as well. In any case...

The first picture is of my one-and-only practice session to see if I could pull it off and what scale I wanted to use. It went so well, I immediately put the quilt under the needle and took off. The second photo is the design on the quilt, for realsies. It went swimmingly! I used tips from this class and others about changing scale, thinking about filling space more than about symmetry of design, and so forth. In other words, who cares if part of a flower has two echoes of petals and another part has three because I had to move off in another direction before rounding out the whole flower? You don't see that at all when you look at the quilt; it's the overall impact that matters. Plus I had fun throwing in little flowers here and there as connectors or to fill in awkward spots and such. This was probably the first time in awhile I can actually say that FMQ felt fun. 

Next step, ribbon candy in the inner border, and feathers in the outer. I'm feeling brave now!

The Basics

  • 10 lessons, ranging from 5 to 27 minutes--most are in the 15-20 minute range.
  • The first lesson is an overview and introduction.
  • In lessons 2-4, Angela doesn't turn on a sewing machine--it's all sketching and showing examples in her own work of the designs she discussing. 
  • In lessons 5-9, she demonstrates quilting all of the designs she sketched out in the first few lessons, as well as showing how to most effectively work with the space available to you. She also demonstrates getting out of corners (which did help me at one point on the baby quilt!) and a lot of other helpful little tips that would be applicable regardless of what design you're using. 
  • Lesson 10 is a design gallery to, again, show you the techniques in action.

 So, although there wasn't quite as much new for me Machine Quilting Negative Space with Angela Walters as in previous classes, there was enough to keep me watching and still make me feel like I had benefited from the class. So you should definitely check it out!

(Using Craftsy links in this post helps support this podcast and blog. Thank you!)

Craftsy Class Review: Cut to It: Strategies for Smarter Quilting with Debbie Caffrey

Craftsy

I got talked into this class. Really--they really had to twist my arm. (Stop that laughing. I can hear you.) I love Twitter, but sometimes those #Twilters, they can be real enablers. Still n' all, in this case, it was a tremendously useful enable!

I was reading tweets about Debbie Caffrey's Cut to It: Strategies for Smarter Quilting at a weak moment: I'd just decided I should make a gift for someone that will involve a ton (a TON) of cutting of the same units, over and over. I wasn't looking forward to it, so anything that sounded like it might help me be faster and more accurate at the same time seemed like it would be worth a try. 

I loved this class. It's not the kind of class that I can post pictures of projects I made because of it, nor have I really been able to put into use most of the techniques taught in the class...yet. I've not been doing that kind of quilting recently. However, watching her did convince me to finally pony up for something I've thought about for awhile--I used a Joann's coupon to buy a second large cutting mat for my cutting table. I keep one mat upside down so it's just a plain surface to make it easier to see ruler lines without the competing lines from the cutting mat beneath, just like she suggests in the class. And it really is nice to have both surfaces available to me. I can still flip either over as I need, but it's nice to have one of each to go back and forth.

I used a double-sided poster-hanging tape to hold both cutting mats steady in place. It just made me fall in love with my cutting table all over again. 

I have also started holding my ruler differently based on this class. I've always done the, well, let's call it the Spider Grip--that I was taught early on: fingertips splayed on the ruler (palm lifted up) with the pinky on the mat next to the ruler to hold it in place while cutting. It works well enough, but my hand gets tired after awhile. Debbie has a slightly different hold that works as well in terms of steadiness--if not better--and is more comfortable for long sessions of cutting.

Some of the techniques she's teaching made me almost want to do the "Doh!" forehead slap: Why didn't I think of that before? Such a simple, seemingly small change to how I approach my cutting, but how much more quick and potentially much more accurate it could be. Her charts and graphs in the downloadable materials, which she goes over in good detail in the lessons, may seem confusing at first but once you get the concept, they will make things go much more quickly in the future. 

I particularly liked the lessons on jelly rolls and fat quarters because I have a lot of them and she offers a lot of helpful tips for dealing with issues they can sometimes bring with them. I tweeted after watching some of those lessons that I wanted to run right into my sewing studio and start slicing away! I may not be much of a traditional quilter these days, but I loved the blocks from Lesson 4, especially when she laid three of them out side-by-side. I immediately thought, "Boy, I wouldn't mind using that for a holiday table runner." 

There aren't really projects related to the tips she teaches per se, but she does include a quilt pattern that does use the tips if you want to do it. However, it's not emphasized in the lessons--she references it here and there, but there's not really a step-by-step instructional piece just on that project. This is truly a technique class. 

She also shows both right-handed and left-handed positions for different techniques,how to use rulers in lieu of templates (something I'm going to start trying on my Jinny Beyer Block of the Month which is Template Central), working on the bias, trapezoids, and so forth. Lesson 6 is a really interesting look at how to figure out how many pieces you can slice one unit into for very different results. Fun stuff!

So, in other words, this was an incredibly useful class. It's one that, even though I watched it all the way through, I'm sure I'm going to keep going back and watching individual lessons or parts of lessons to refresh my memory before I start certain types of projects. Including that gift I mentioned. Yikes. 

The Basics

  • 7 lessons, ranging from 20 minutes to 34 minutes, mostly in the 30 minute range. (She doesn't mess around!)
  • Lesson 1 gets through the basic introduction stuff pretty quickly; she then dives right into some foundational guidelines for holding different types of rulers and the most efficient way to approach some standard cutting tasks--strips, cross-cutting, diamonds, chevrons, and so forth.
  • Lesson 2 is all about strips; lesson 3 is half-square triangles (HSTs), quarter-square triangles, and trapezoids; lesson 4 is fat quarters and templates; lesson 5 is squares into Delectable Mountain blocks of various types;  lesson 6 also addresses squaring up, and slicing simple blocks up to form more complex units; and lesson 7 is doing bias HSTs. 
  • Class materials include a 15-page reference for everything she talks about in class, plus another PDF with the quilt pattern. Even if you don't want to make the quilt, it's worth downloading this PDF as she does address the pattern specifically at one point to demonstrate how to calculate for cutting and you may want to be looking at it for reference as she does.

Debbie Caffrey's Cut to It: Strategies for Smarter Quilting was a great purchase. This is definitely reference material for some time to come. She has a second class available that I'm now eyeing: Clever Cuts for Efficient Quilting. I'll probably be picking that one up once I knock out another class or two that I already own.

(Using Craftsy links in this post helps support my podcast and blog. Thanks so much!)

February 2015 Craftsy Class update

Craftsy

Time for my monthly update! My son gave my husband AppleTV for Christmas. I use it more than my husband does. What do I use it for most, you ask? Why, streaming Craftsy class videos so I can watch while eating breakfast, of course!

New Completions

(+5)

*Normally I don't count it as completed until I've gotten that review posted on the blog, but it's been a pretty busy couple of weeks so I'm cutting myself a little slack. I will be getting those reviews out next week, though!

    Classes in Progress

    (3)

    Classes added this month

    (+5) With all the frigid cold and lack of sun, I was weak. However, I already knocked out two of them so it's not quite as bad as it seems.

    • Learn to Sew: Simple Bags with Nicole Vasbinder. Already done, already reviewed (link above).
    • Fun Techniques with Fabric Paints with Cindy Walter. Because, well, you know.
    • Cut to It: Strategies for Smarter Quilting with Debbie Caffrey. Kati of @katisquilting is the enabler on this one. However, I bought it and had watched it all the way through within a few days. She was right!
    • Secrets to Cooking Fish: Eight Essential Techniques with Joel Gamoran. I've been wanting to do another class on fish and have looked at both in-person and Craftsy for awhile. I did a different fish class on Craftsy, but I needed one for the rest of the year when my grill is buried under three feet of snow. Ahem. In any case, I was thrilled to see this one pop up in the new classes listing and, since it was on sale, I grabbed it immediately.
    • Sew Sturdy Travel Organizers with Annie Unrein. I blame listener Jamie for this one. She commented on my review of Nicole Vasbinder's class that I may want to check out Annie Unrein. As I liked the look of those travel organizers, and since this class was also on sale for a good price, I decided to go ahead and buy it. Let it be on Jamie's head...

    Classes To Be Completed

    Current count:  14 (broke even with last month)

    I've been a busy bee!

    I've been a busy bee!

    Completed Classes

    Current count: 51 (+5--woot woot!)

    Fight the Funk Friday

    I had a pretty stellar weekend last weekend, especially considering I spent hours n' hours in the car on a quick overnight trip to see my daughter at college for her birthday. 

    I am proud of myself that I got to the gym before we left on Saturday.

    I am proud of myself that I got to the gym as soon as we got home on Sunday.

    Maybe not so proud about the pancake breakfast at the diner near her school Sunday morning. But that's become a bit of a tradition, and we only have a couple of trips up there left before she graduates. So it needed to be done. (Hence getting to the gym as soon as I got home.)

    Exercise: Other than the two gym sessions over the weekend, I did my Daily Burn program pretty much every day except one; the video classes are definitely progressing in challenge level. I can still do everything, but one or two of the upper body exercises are giving me something to work towards as I have to take a couple of breaks in the middle of the routine, shake it out, and then go back to finish it up. My goal is to get all the way through each routine without a break. Still, not much cardio to speak of in the program I'm doing, so I really want to work towards getting some elliptical time at the gym back into my schedule. It felt so good this weekend! It didn't work out this past work-week as I had stuff going on every evening and couldn't get out of work early enough for the time I'd need for a gym trip. But that's why I like having Daily Burn at hand--I can generally fit that in every day regardless of what I've got going on.

    And by the way, those Daily Burn videos garner me little in the way of steps, so my step count is pretty low even though I've been diligently exercising. I also got stuck on my computer for hours on end with a remote-service tech support call for two days in a row--I couldn't walk away because they kept needing me to do stuff, so I couldn't even do my walk-around-the-house routine.

    Schedule/Priorities: My schedule/priority focus hasn't been great. Whenever I have evening stuff going on it seriously messes with my ability to get to sleep at a decent hour. (It's an introvert thing and it seems to get worse as I get older.) So I've been going to bed well past midnight and only then because I've drugged myself which makes me draggy the next day. Next week will be a repeat--I have a 9p conference call every night. But I'm going to really stay focused on getting in cardio or Daily Burn every day because that does help counterbalance the sleep issues a bit. 

    Goals for next week: 

    • Get in a really solid grocery shopping trip so I have healthy food back in the house again (a major issue this week as we were gone last weekend)
    • Three cardio sessions at the gym; Daily Burn the rest of the days (and maybe doubling up if I have the time on a given day)
    • Planning all my meals ahead of time, which I really fell flat on this week--see first bullet point.


    Thinkin' about It Thursday

    This week, I'm thinking...

    • That I really, truly, am a machine girl.
    • That hand-piecing and hand applique are just not really my cup of tea.
    • That, however, I do like doing felted wool with a blanket stitch by hand.
      • Just not in several layers with a honkin' big chenille needle that hurts my fingers trying to get it through everything.
    • How I'm finally narrowing in on being able to start my embroidery for the Sue Spargo embroidery class (not the "Sue Spargo Take 6 Weeks to Finish Your Background" class).
    • That I'll find out then whether I'm an embroidery girl.
    • How I have a few too many projects clamoring for my attention at the moment.
    • That, regardless, I'm having too much fun to stop myself. ("Ooh, shiny!")
    • How much I'm looking forward to going to a class on Saturday with a bunch of my peeps.
    • How it's been way, way too long since I've gotten to spend time with my Guildy-Girls. 
    • That, on the other hand, I've gotten to spend time with a few of them in our Design Study Group this week.
    • How much fun Design Study Group is. 
      • Especially when someone brings in a project for a consult.
      • And we can all gather around and discuss design principles and voice opinions.
    • That it'll be fun to see what they do with the art quilt design classes we're all taking the next couple of Saturdays.
    • How that brings me back to looking forward to going to a class with my quilty peeps.
    • How that almost makes it better that there's still piles of snow outside that haven't melted enough yet for us to even see pavement.
    • How the forecast doesn't look good for the next several days.
    • That at least "March 1st" means "Getting closer to spring," so I'll be celebrating that day even if it is supposed to snow.
    • That even the Doofus has an opinion about the weather.

    Fight the Funk Friday

    I did well in terms of doing my Daily Burn exercise program this week. I think I only missed one day. The series I'm working on did get more challenging this week, so that's good, but it's still largely strength-training without much cardio. I really do need to start getting back to the gym for the cardio--I miss it physically, plus the strength-training emphasis is doing nothing towards weight loss.

    In fact, I think the weather is working in the opposite direction. I've been planning and tracking meals this week and did fine in terms of what I was eating (calories in vs calories out), but when I got on my home scales today they hadn't budged. I suspect with the negative wind chills outside, my body is very reluctant to release any of its protective layer at the moment. Still, I will once again step it up a notch. 

    Mood-wise, though, I've been solid. I'm doing all my usual habits (sun lamp, aromatherapy, trying to make sure I sit in sunlight coming in through the window even if I can't get outside much), and I do feel more energetic than I usually do this time of year. In fact, normally this is when I get no exercise at all because I just can't bring myself to do it. It's always a vicious circle: I know getting regular exercise really helps with the seasonal depression, but when I'm in the throes of the seasonal depression, I could care less about getting exercise.  This year, I'm keeping up my exercise program in February. Woo! In that regard, having Daily Burn really does help--it's in my house and it's a manageable amount of time so it removes several layers of excuses.

    I missed my Weight Watchers meeting yesterday because my husband had taken my car to drive out of town for work--his car stinks in the snow, so I far preferred he be driving mine. But that left me at home with his stinky-in-snow car. That wasn't an issue earlier in the week as I had nowhere to go anyway. But he was supposed to get home in time for me to grab my car keys and shoot out the door for my meeting yesterday...which didn't happen. He did his best, but winter driving just slowed things down. I'll try to get to a meeting Saturday morning instead.

    Goals for this week:

    • plan and track, plan and track, plan and track
    • Make it to 5000 steps a day. This may not sound like much but being as house-bound as I've been lately, even with the bits of cardio in my Daily Burn program I've been only barely pushing 4000 steps. I'm starting small. (It's hard to get my head wrapped around doing enough laps in my house to get to 10k...yikes. How boring would that be?)
    • Hit 15 flights of stairs a day. This I can do. I've got stairs in my house, for sure!

    Oops...Some Snow Dyes I Never Posted...

    I got so caught up in my sewing room I forgot that there was a set of snow-dyes I never revealed here. Plus, I got some regular hand-dyeing done too. These are all from a week or two ago. They're not terribly exciting and I had some issues with a couple of them. But still n' all...

    Fuchsia and grape scrunched

    Fuchsia and grape scrunched

    Fuchsia and grape folded

    Fuchsia and grape folded

    Fuchsia and grape spiraled

    Fuchsia and grape spiraled

    Strong orange, mixing red, fuchsia spiraled

    Strong orange, mixing red, fuchsia spiraled

    Same mix as above, but folded. And clearly there was a little drop of a former dye bath still left on the grate that I hadn't seen when I washed it. Oops. This just shows what havoc one tiny little drop of the wrong color can wreak! Oh well, not one…

    Same mix as above, but folded. And clearly there was a little drop of a former dye bath still left on the grate that I hadn't seen when I washed it. Oops. This just shows what havoc one tiny little drop of the wrong color can wreak! Oh well, not one of my faves anyway. Ripe for overdyeing.

    A v-neck shirt done in the same color combo as the above. This didn't have nearly as much going on with it as I thought it might, but it's fine as a knock-about summer shirt.

    A v-neck shirt done in the same color combo as the above. This didn't have nearly as much going on with it as I thought it might, but it's fine as a knock-about summer shirt.

    Lounge pants--woo! These are pretty oversized on me; PFD clothes from Dharma are often on the small size, plus they're 100% cotton so they shrink when washed. These didn't shrink as much as I thought they would, so they're very comfortable but not p…

    Lounge pants--woo! These are pretty oversized on me; PFD clothes from Dharma are often on the small size, plus they're 100% cotton so they shrink when washed. These didn't shrink as much as I thought they would, so they're very comfortable but not particularly flattering! Fine for quilt retreats, though! This is teal, intense blue, and turquoise.

    Here's a closer-look at the embroidery thread I dyed along with these lounge pants. A little tangled, but I think I could sort it out to use. 

    Here's a closer-look at the embroidery thread I dyed along with these lounge pants. A little tangled, but I think I could sort it out to use. 

    Some of these other embroidery threads are going to take a little more untangling, though....

    Some of these other embroidery threads are going to take a little more untangling, though....

    This set is a more prosaic gradation of blacks. The two on the bottom are a blue-black and a purple-black--I wanted different tones. There was something going on, though, as many of these ended up with sort of an orange-y tinge to them. I'm thinking…

    This set is a more prosaic gradation of blacks. The two on the bottom are a blue-black and a purple-black--I wanted different tones. There was something going on, though, as many of these ended up with sort of an orange-y tinge to them. I'm thinking I may have left them too long without soda ash (I forgot to put it on until several hours later), so it's possible the belated addition reacted differently with the dyed fabric. Anyone...?

    And, just for kicks n' giggles, I dyed some scraps of cotton batting, inspired by some things that @madquiltlady (aka Charlotte) did awhile back. You can see one of the batting scraps was pieced--apparently it had scrim on one side and not on t…

    And, just for kicks n' giggles, I dyed some scraps of cotton batting, inspired by some things that @madquiltlady (aka Charlotte) did awhile back. You can see one of the batting scraps was pieced--apparently it had scrim on one side and not on the other. When you flip the piece over, it's the reverse of this side (one half lighter than the other). No idea what I'll do with these but it's fun to know what it looks like!

    Snow-dye Challenge Reveal

    Sandi of Quilt Cabana Corner and I have both completed our snow-dye challenges early--or, at least, we're both close enough to do reveals this week. Mine's completely done--hers is pretty dang close by all accounts. 

    Abundant natural resources...

    Abundant natural resources...

    If you've listened to either of our more recent podcast episodes you'll know the backstory--we're both happy snow-dyers, but often have difficulty deciding how to use the resulting fabric. So we challenged one another to do something that used at least one snow-dye, if not more. 

    When I took the Designing Art Quilts class with Tina Somerset on Feb 7th (which I talked about in this episode), I came home with a notebook full of sketches and stacks of hand-dyes picked out for several of them. It was so much fun, I knew I just had to stay on that roll!

    For one of the exercises in the class, Tina had us listen to a few different songs she'd selected, and we sketched as we listened, making notes of what images came to mind. This is actually something I do periodically in my head when my husband and I go to the Philharmonic, but I can't tote a sketchbook into the theater with me and certainly wouldn't be able to see what I was sketching once those theater lights dim. So images dance in my head and disappear as soon as the piece is over. It was fun to do the same thing when I actually had pencil and paper in hand! 

    artquilt notebooks.jpg

    The sketch that ultimately became my snow-dye challenge project is at the left. The song it's based on is "Grace," by Michael Jones on his album Touch (1996--scroll down to find a sample of the song). If you listen to the sample, you'll hear that it's a pretty spare arrangement--lots of air. I kept seeing long rectangles, muted colors, space. 

    And so, that sketch became "Neume."

    The background is one of my recent snow-dyes done with Camel, Old Rose, and Smokey Grey. The rectangles are all my own hand-dyes. This project just kept building--I started with the base rectangles as in my sketch, but then decided they needed more dimension so I did a second layer. I fused the rectangles and did a very simple outline quilting around them. After consulting with my daughter, we decided the best quilting design would be straight horizontal lines, which really sealed the image it had come to represent as it developed--notes on a music staff. The rectangles float over the top of the horizontal lines. I did a faced edge so there wouldn't be any visual barriers on the piece.

    "Neumes" is the name given to musical notation that developed in the Middle Ages, the precursor to today's written music. (You can still find them today in some chant music.) Neumes were square and mostly represented ascending or descending pitch, but not necessarily specific notes or rhythm until later in their development. The word "neume" comes from the Greek word for breath, "pneuma." I knew about the square notation but I didn't know what it was named until I looked it up after I had the piece done--the fact that it is related to the word for breath really sealed for me what this piece came to represent--a quiet peace. And so, it became the name of the quilt. 

    The quilt shop where I took Tina's class is having a quilt show coming up in March--I think I'll be putting this in the show. Now it's time to get to work on some of those other sketches!


    Craftsy Class Review: Learn to Sew: Simple Bags with Nicole Vasbinder

    Craftsy

    So, if you've been listening to my podcast or following my blog for awhile, you'll know my intense dislike for fiddly bits and anything that even vaguely smacks of garment sewing. 

    I love seeing other people's completed fabric purses, totebags, and duffle bags. But let's just say that my own brief forays into the field haven't been stellar. I made one totebag years ago that I still use frequently but I can still see the places where seams didn't match up and I didn't quite box the bottom correctly. Still, it's pretty functional and nice fabric so I live with it. I had another attempt at a purse that ended up in the trash. My biggest issue? I'm not a garment-sewer, and a lot of purse/tote/duffle patterns are written with the assumption you are.

    Foldover tote completed

    Foldover tote completed

    While toodling through Craftsy classes a week or so ago to see what was new, I saw Learn to Sew: Simple Bags with Nicole Vasbinder. I thought, maybe that's the ticket. Maybe if I take a step back and put myself in garment-sewing school (just the basics, ma'am), I'd grow more comfortable and wouldn't find these kinds of projects as frustrating. 

    I completed the class in one weekend. It wasn't too painful, and I completed both projects in a reasonable length of time and with only a few curse words here and there (all while working on the dang boxed bottom of that pouch when my machine decided to throw a hissy). Enough background. Here's the review:

    Demonstrating the pockets on the front (1 pocked subdivided into 3 parts)

    Demonstrating the pockets on the front (1 pocked subdivided into 3 parts)

    This class would be great for someone who's never touched a machine before. It really does start out with how to sew, as per the name of the class, "Learn to Sew." The first lesson walks through parts of a sewing machine (in brief), how to thread machine and bobbin, and so forth. There are some neat graphics in the first lesson about how the sewing machine works. The second lesson is sewing seams--of course, this class is doing it "garment-style" so seams are generally wider than this quilter is used to. I was proud of myself that I only went to default-mode of 1/4" seams twice--for the most part, I remembered to do those gargantuan 1/2" seams she uses. 

    The third lesson had a little information about fabric in general, as well as some suggestions for picking fabric for the totebag. From there, it goes directly into the projects with some "teachable moments" interspersed. 

    Showing the interior pocket and lining

    Showing the interior pocket and lining

    True confessions: I watched most of the lessons on 2x speed, until I got to parts I felt I needed to watch more carefully. I did get frustrated a few times because the video doesn't always completely match the written instructions in the downloadable materials, and the instructions sometimes leave out key information about placement and so forth. I had to keep referencing the video over again to make sure I was doing things correctly. It's not a huge issue in this case, but I would have wished for more accuracy in having the written and verbal instructions match. I made notes on the written instructions just in case I ever go back to use them again and don't want to have to watch the whole lesson over.

    Zipper pouch completed

    Zipper pouch completed

    My suggestion is, if you're new to sewing or new to this kind of sewing, watch each whole lesson first, and then back up and start doing the steps with her. In some things it's confusing until she gets to later steps and finally explains how she's got things laid out or why she's doing something the way she's doing it. 

    I can't say this class has made me all gung-ho to run out and start churning out purses and bags. But I think it did increase my comfort level with the differences between garment-sewing and quilting to a degree. The totebag and zippered pouch are cute, but if I were to make either of them again there are several adjustments I'd make to them to have them work better for me. I'm just not committed enough to either design to poke at them like that. I already own a lot of patterns for totes and purses; I guess this is something I can just keep plugging away at when I get in the mood...once in a blue moon.

    Interior

    Interior

    The Basics

    • 7 lessons, ranging from 11 minutes to nearly 30 minutes
    • The first two lessons are introductions to the basics of your sewing machine and sewing in general. Lesson 3 includes some more of that introductory information, but then goes into the cutting of pieces for the tote.
    • Lessons 4 and 5 are the foldover tote, and lessons 6 and 7 are the zippered clutch. 
    • The class materials give some troubleshooting information about sewing on your machine, and then supply lists, instructions, and templates for the two projects. As noted above, I was disappointed that there were some discrepancies between the materials and the video lessons. Just have the materials in front of you while you're watching the lessons so you can make notes to yourself as you go.

    This is a tough one for me to rank because it's a topic that I come to having a bit of an attitude already. In the grand scheme of learning how to do garment/accessory sewing rather than quilting, I guess I can give Learn to Sew: Simple Bags with Nicole Vasbinder my usual thumbs up. But I'm still not an enthusiastic garment/accessory sewist. 

    Don't forget, Craftsy is having a Valentine's weekend sale--lots of great classes to check out. I'm working on another one I just picked up this weekend that's just chock-full of great information and much more in my wheelhouse...but more on that one in a later post!

    (Using Craftsy links in this post helps support my podcast and blog. Thanks so much!)


    Craftsy Class Review: Small Changes, Big Variety with Angela Walters

    Craftsy

    I'm celebrating Valentine's Day weekend by writing up another Craftsy class review!

    Yep, another free motion quilting class. At this point I'm just looking for inspiration for designs. And this class was chock-full of that! So, here's my review for Machine Quilting: Small Changes, Big Variety, with Angela Walters.

    Do I have to say again that Angela Walters is an enjoyable teacher to watch? I've lost track of how many of her classes I've reviewed on this blog now. And although I've done several of her classes and own several of her books, I have to give her props for not noticeably repeating herself. This class really felt like all new material. Sure, I'd already done spirals before, for example, but getting a few ideas for how to change it up to look like an entirely different design was very helpful.

    As always happens with every FMQ class I take, just watching the teacher do the design helps me grasp more easily how to travel from one section to another, how to work my way back out of the corners I almost inevitably end up in, and how to ignore the couple of bobbles here and there and simply drive on. After all, as Angela Walters continually points out, for the most part I'd be using a thread that blends and those little bobbles would be completely unnoticeable. 

    I decided to practice some of the designs on a practice quilt sandwich, but to make it interesting for myself I used one of my [less favored] hand-dyes to make the sandwich and then played with a lot of my funkier threads while I was quilting. I intentionally used contrasting thread so I could see what I was doing, so it's clear where my brain and hands periodically refused to play nicely together. But still n' all, I can definitely see the improvement in my FMQ skills after a full year of so many classes and practice. And that's nice. 

    In any case, this class is just jam-packed with designs. Packed. I think I counted up something like 32 total designs, and that's just to get you started. Once you see her suggestions for variations it gets your mind running with "What ifs". 

    Detail of practice 

    Detail of practice 

    If you've never free-motion quilted before, you'll need to start somewhere else because she really doesn't spend any time teaching about how to set up your machine, basting, tensions, threads, or any of that. But if you at least know the basics, you'll have no problem doing this class. Each lesson goes from a fairly simple version of the design to increasingly more complex variations. 

    The Basics

    • 7 lessons. The 1st is a short introduction; the rest range from 19-27 minutes long.
    • The main designs include pebbles, swirls, ribbon candy, feathers, squares, and clamshells. For each design, she gives between four and six variations, plus ideas for additional variations you can try. 
    • The downloadable class materials are set up like her Free-Motion Quilting Workbook, with a drawing of all of the designs, each with a blank box next to it for you to do your own practice drawing before trying to stitch it on the machine. Although part of me struggled a bit with printing off so much blank space, I have to admit it was useful having the reference drawing directly next to the space I was drawing in rather than on a computer screen or something where I'm bouncing my eyes back and forth.

    So, all in all, two thumbs way up for Machine Quilting: Small Changes, Big Variety, with Angela Walters.. I got a lot out of it, I'm still practicing some of the designs, and I'm brewing ideas for some of them on current projects.

    By the way, it's on sale this weekend, too! Just click any of the Craftsy links on this blog and it'll take you to the sale.

    (Using Craftsy and Amazon links on this post helps support this podcast and blog. Thanks so much!)


    Fight the Funk Friday

    Have I said recently that I'm cold? 

    No, really. It's just a bit nippy up in here.

    As a result, I think my body has gone into "store up the fat to make it through winter" mode. Sigh.

    I had a gain at my weigh-in this week. I was expecting to be about the same, as I'd been about the same the couple of times I'd gotten on my scales between weigh-ins. However, I did go out on Wednesday evening with the family, and I didn't sleep well Wednesday night so I had a few salty crackers with lunch in my overtired-carbo-load reaction. But I didn't overeat this week and I did get more exercise in than usual, so I'm thinking it may have been a temporary gain due to excess sodium or something. If I'd been just a hair up, I would've bought it. But to be up as much as I was? Completely unexpected.

    So that happened.

    Still n' all, I'm pleased that I did more exercise and more tracking than I'd done in recent weeks, so the gain just means making some adjustments this week and doubling-down on exercise. 

    Some little critter got out walking in this snow--sure wasn't me!

    Some little critter got out walking in this snow--sure wasn't me!

    Exercise and Steps: My steps haven't been that high but I have been doing my Daily Burn exercise programs just about every day. They're primarily strength and floor work, so they're not adding up to tons of cardio or steps--which I think is also part of the gain. I miss my cardio. I've checked in with my Daily Burn coach (might as well use her as much as possible while I'm still on the free trial) and she says that (1) my current program will get more challenging in the third week--which I start in another couple of days, and (2) she suggested a couple of other programs I might want to add in if I want to up my cardio. So those are both in the plans for this coming week. If the weather lets up at all, I may also try to get to the gym. 

    Eating: I'm really focusing on planning out my meals for the day the night before--I always do better when I don't leave meals up to the whim of the moment--and tracking them afterwards as well if I changed anything mid-stride. I've also told my husband I really don't want to ever go out on a Wednesday night again, urgh. It's happened several times that we end up out on a Wednesday and I have that Thursday weigh-in. No matter how healthy a choice I make off the menu, I know it's always higher in salt than what I'd eat at home.

    Schedule and Priorities: I did use my sunlight alarm clock a couple of times this week. I do like it! Well, notwithstanding the one time I was trying to turn the light off again to snooze a bit and managed to throw the whole lamp down the back of my nightstand. The whole "snooze" thing doesn't work as easily as the manual says it should. At least I couldn't see the light anymore. I've also used my sunlight lamp and desk humidifier daily. I can feel it when I skip one or the other!

    Goals for this week: 

    • Stay warm
    • Plan and track, plan and track, plan and track
    • Do 30 mins exercise daily
    • Get good sleep every night (I've been staying up too late again)

    Thinking about It Thursday

    This week, I'm thinking...

    • That, for once, I'd just like to be warm.
    • How I don't even need to see negative-double-digits show up on the "RealFeel" temperature listing on my Accuweather app. 
      • Because I can feel it.
      • Even inside.
      • With two space heaters on me.
      • And wearing fuzzy socks, slippers, a hoodie, and fingerless-gloves.
    • That Craftsy classes are apparently like dark chocolate truffles for me (which is a very apt metaphor as we come up on Valentine's Day): I just can't resist them when they're on sale.*
    • That, on the other hand, it's a good way to get over my heebie jeebies about something that smacks of garment sewing. And fiddly bits. 
    • How nice it is to have my daughter home from college for a few days.
    • That I keep forgetting I have Monday off, so woohoo long weekend!
      • Even if it is going to be negative-double-digits on Monday.
      • All the more reason to stay inside and cuddle with my sewing machine.


    *Craftsy affiliate link--by using this link you help support my podcast and blog. Thanks so much!

    Fight the Funk Friday

    Not really an amazing week, but I'm still working on small goals that will eventually all work together for good--one hopes.

    Eating: Although I've not been stellar about planning ahead or tracking, I did make it back to my Weight Watchers meeting last night for the first time in three weeks or so, and I was down half a pound. I was expecting to be up, given that I hadn't been paying that much attention. Which means some healthy habits have truly become just that: habits. Yay for me. Goal for this week: plan and track, plan and track, plan and track. Did I say, plan and track?

    Schedule/Priorities: I didn't end up using my sunlight alarm all week because my husband complained about the fact that it woke him up too early the couple of mornings I used it last week. Go figure: He's normally up and out of bed well before me. Apparently we need to communicate better as to what mornings he might want to sleep in. I do really like using that alarm--it's a much more gentle way to wake up. So goal for this week: Try to ascertain ahead of time what days my husband will be up early enough for me to use my alarm. I do still need to work on getting up earlier in the morning.

    Exercise: Ahem. But there's hope.

    After a few more days of "It's way too cold and snowy to make me want to leave the house to get to the gym," I finally subscribed to a 30-day free trial of Daily Burn on Wednesday. I also decided to subscribe to the month's free trial of their personal coaching system. February is really my most critical time in terms of keeping me motivated, so 30 days works for me. By March things are starting to break up around here--although March is our big ice month, but at least we start seeing some sun here and there it makes me think, "spring is almost here!", and I'm much more likely to find the motivation to get to the gym. But until then...

    Daily Burn is a collection of exercise videos of a variety of types (strength, cardio, pilates, yoga, etc), rated for fitness level and exercise experience. You can use your mobile devices or stream them to your TV, so they're very portable--good for those of us who travel. When you sign up on Daily Burn, you fill out a short assessment questionnaire and then it gives you a suggested program of which exercise programs to do on each day. If you follow the program exactly, it'll slowly work you through to increased levels of difficulty which, of course, you can also control yourself. If you're not ready to move on, stay where you are. If you think you can skip ahead, skip ahead. I've only been doing it for a couple of days so I can't fully assess it yet, but I can tell you I'm feeling it! 

    It has a nutritional component which I'm ignoring as I'm doing Weight Watchers and perfectly comfortable with my knowledge of nutrition; I'm also completely ignoring the supplements section which, in my opinion, is really just them trying to sell stuff. But I do like the way the fitness programs are done so it's okay with me to skip the rest of it.

    I've already had a couple of introductory email exchanges with the personal coach I was assigned--Meg. I was impressed in that the second email I got from Meg (after I answered all her general assessment questions in the first email) was relatively personal. I could tell some was copy and paste, but hey, we're just getting started. I'm more skeptical about how useful an email coach will be. It's an extra fee over the top of the monthly cost for Daily Burn so I'd have to be really convinced it was helping to go beyond the free trial. I've had a real-live personal trainer in the past but it's hard to keep up regular meetings with my schedule, so I suppose the one thing an email coach would have going for her is she'd be able to poke at me even when I was traveling. Hmm. We'll see how it goes, anyway.

    As a follow-up to last week's reference to desktop and portable humidifiers:

    The portable humidifier attached to the top of my water bottle, steaming away.

    The portable humidifier attached to the top of my water bottle, steaming away.

    The good news is, the water bottle humidifier works. The bad news is, it only runs as long as the filter tip that hangs down from the unit can still reach the water level in the bottle, and the water goes down pretty quickly. So I'd say it maybe has 3-4 hours in it, which is only half a night. I suppose half a night is better than none. And I do often (ahem) get up in the middle of the night so I could refill if needed.

    The other humidifier, on the other hand, goes all day! I turn it on around 9a and it's still kicking out the steam when I turn it off at 5:30 or 6. Sometimes I'll keep it running longer if I'm working on blogs or whatever. I believe it has an auto shut-off if it runs out of water but I haven't run it long enough yet to find out. And it's fun to decide what mood lighting I might want for any given day--blues and purples have been popular, so far--although I usually just keep the light part turned off. I love that thing!

    Thinking about It Thursday

    This week, I'm thinking... 

    Yet another snowfall...

    Yet another snowfall...

    • How good it is to have friends. 
    • That cold and snow is okay, but I could do without the cold.
    • That people really should know to be quiet in study areas in a university library. 
    • That my dogs turned out to be less a distraction than those chatty-cathies and chatty-chucks in the library. 
    • That my dogs were certainly glad to see me come home again to work when I gave up on the library. 
    • How badly I really need to kick my motivation back into gear and get some exercise.
      • No matter how cold and snowy it is outside.