Yes, it's Black Friday, and once again I'm refusing to shop. However, I'm also not really hosting my usual #BFSI (Black Friday Sew-in) because I dropped my machines off for cleaning/tune-ups already--since I'll be gone three weeks, I figured this was the best time to do without. Unfortunately, I ended up with more time on my hands today than I thought I would and I'm really missing those machines!
However, it did give me time to finish up a Craftsy class, and I figured I'd quick post the review today since Craftsy is having a big Black Friday sale with all classes $19.99 or less. So grab the ones you've been looking at now!
This morning, sans machine, I took the time to finish A Modern Take on the Mother Sauces with James Peterson. To a certain degree I've been working on this class for awhile, watching lessons here and there, waiting until I had the time to try out one of the techniques. This one was a little trickier to decide what to try than the other sauce class I took awhile back, Homestyle Pan Sauces with Martha Holmberg (see my review here). Homestyle Pan Sauces is geared more at simple and relatively quick sauces you can make even on a weeknight when time is short. Mother Sauces take more investment of time, and willingness to wash a few more pots and pans afterwards. To tell the truth, some of what I learned from this class is, "Unlikely to make that one at home!" But that's part of the learning process--discovering what your limits are. None of the sauces are difficult, really; it's just a matter of time and, again, being willing to wash a bunch of pans.
Holding steady...
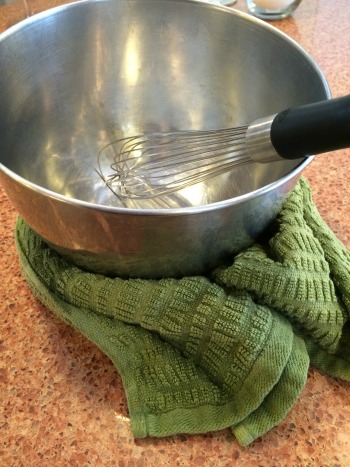
However--one of his lessons that I was willing to take on: I made myself a cranberry rosemary mayonnaise this morning to use on my leftover turkey sandwich for lunch, it being the day after Thanksgiving and all. I've made homemade mayo before, but I wanted to try his technique. I've used my food processor for this before; this time, I did it by hand. I picked up a nifty technique from him for keeping the bowl in one place on the counter while you're whisking--wrap a damp cloth around the base. My bowl was so lightweight it still bounced around a little unless I held onto it but it did make it wander a lot less than usual. He made some great suggestions for mayonnaise variations and how he serves them at barbecues that I may need to call on sometime over the summer when we've got a crowd over--they sound tasty!
I may do his aioli technique at some point--it's in the same lesson, and takes the same time and number of bowls (one) that the mayo takes. I could see myself doing a Hollandaise sometime, on a weekend or for a brunch. I thought all of the other sauces looked quite wonderful, really, but they're mostly going to have to wait until I have a stay-cation or retire.
I enjoyed James Peterson's teaching style quite a bit. He's very laid-back and can come out with some very funny expressions here and there--he referenced stealing the soul of a particular ingredient, for example, which tickled me. I did find that some of the lessons I was able to watch on 1.5x speed because he speaks relatively slowly, so if I was just wanting an overview of the technique to determine if it was something I'd do again, speeding it up a little was great. Besides, it's fun to watch someone whisk that quickly. Once I decided I wanted to use a technique, I went back and watched it again at regular speed to make sure I hadn't missed anything. Plus, of course, I took lots of notes--one of my favorite parts of the Craftsy platform.
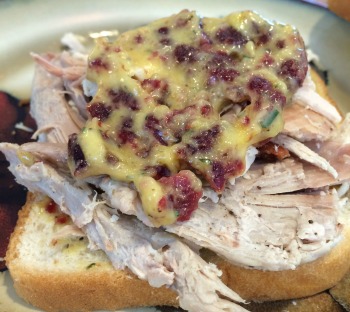
Cranberry Rosemary mayo--tasted far better than it looks.
The lessons are very comprehensive--in addition to teaching how to make the basic sauce, he gives several variations (sometimes demonstrating them, sometimes simply talking about them), and in most of them he also gives one quick recipe or demonstration of how you'd use the sauce--a cauliflower gratin, for example, or poached fish, and so forth.
If you're a foodie and are willing to invest some time in getting great results, this would be an excellent class for you. Even if you're not into cooking, I actually found it very interesting to learn what goes into sauces I like to order at restaurants--now I finally know what they're made from and what makes them special, even if I don't ever tackle making them at home.
The Basics
- 8 lessons; the intro is 3 minutes, but the remaining 7 lessons range from 20-30 minutes long.
- Lesson 1, the introduction, does the usual teacher introduction, but then explains what a "Mother Sauce" is and why they're good to learn how to make.
- Lesson 2 is Béchamel Sauce; Lesson 3 is Beurre Blanc (another one I'm likely to try at some point); Lesson 4 is tomato sauces, although not necessarily "your grandma's Italian pasta sauce cooking on the stove all day," but other types of sauces using tomatoes; Lesson 5 is Brown Sauce, Demi-Glace, Glace de Viande, and Bordelaise; Lesson 6 is Velouté (this was a new one on me!); Lesson 7 is Mayonnaise and Aioli--inclduing a brief discussion of why much of what you see called aioli in restaurants isn't actually aioli; and Lesson 8 is Hollandaise and Béarnaise sauces.
- The class materials are also very comprehensive. Not only do they include the recipes he demonstrates in class but a ton of variants on a lot of the sauces, and a glossary of terms at the end.
Even though, the day after Thanksgiving, I'm watching this class and saying, "Nope, not gonna wash that many pots again," the likelihood is that once I'm a few weeks removed from kitchen chaos I'll decide on some relaxed weekend that spending a few hours making a really wonderful, fancy French sauce for dinner sounds like a lot of fun. I would definitely take other classes from James Peterson. Two thumbs up.
Again, that's A Modern Take on the Mother Sauces with James Peterson. And yes, it's on sale today!